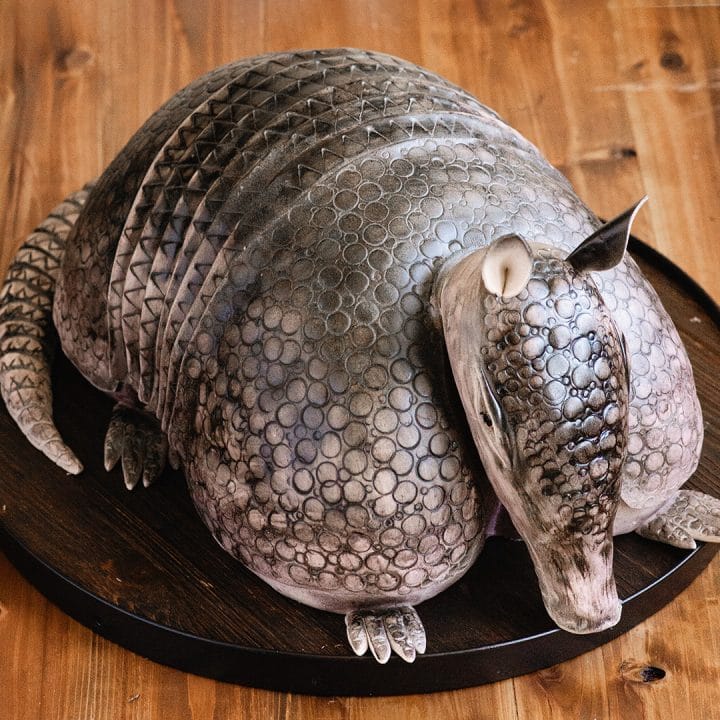
Everyone loves the iconic armadillo cake from the play and film “Steel Magnolias”. Here are instructions and a video tutorial for how I recreated this memorable cake.
Why an Armadillo cake?
In the play and then the movie they explain that the grooms cake is being made by the grooms aunt. Her specialty is an armadillo shaped cake made out of red velvet cake.
What should be hideous is of course hilarious and some of the best lines revolve around this cake. At one point one of the main characters, Ouiser, says “that looks like an autopsy”.
And the best banter in the movie is between the father of the bride and the same neighbor, Ouiser. They had been fighting already when he asks her for a slice of cake – she cuts off the backside and tail and hands him the slice to which he responds “nothing like a good piece of ass!”
While the rest of the movie brings out the tears the wedding and cake scenes always make me laugh so hard!
Anyway – the armadillo cake has become an icon and has been remade many many times. So when I got asked to do one for a neighbor’s wedding I was thrilled!
Just take me to the Armadillo cake carving already!
If you’d rather skip my tips and tricks for recreating the Steel Magnolia cake, along with links to other cake carving instructions and get straight to this quirky Armadillo cake – simply scroll to the bottom of the page where you can find the printable recipe card.
How do you make an Armadillo Cake
The Cake and Frosting
Start with red velvet cake. Traditional red velvet cake is light and fluffy and doesn’t carve well. You need a denser – more pound cake like texture.
You want thicker layers with less frosting vs thinner cake and more frosting for the best results when carving cake. It’s much more stable with the thicker cake layers.
For baking with deeper cake pans, like 3 and 4 inch pans, you’ll need to bake at a lower temperature for longer. 325 for 3 inch and 300 for 4 inch cakes.
I baked 3 half sheet cakes (13x18x3) at 325 for 2 hours 15 mins. I also used bake even strips and 2 heating core nails to keep the cake as even as possible. And of course I made high altitude adjustments to the recipe.
Cream cheese frosting is traditional for red velvet but a little soft for cake carving and underneath fondant – so I made a white chocolate cream cheese frosting – it is firmer and still delicious.
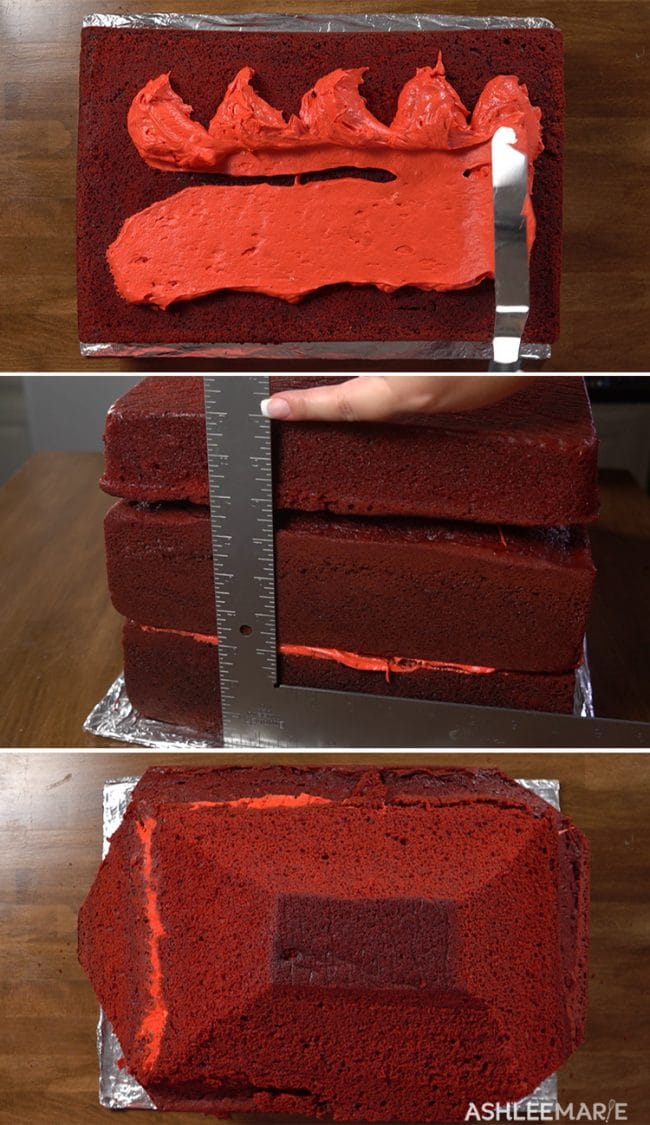
I made two batches of frosting, one red for the filling and the other batch I went with a pinkish ivory for the outside frosting. Stack the cake layers with the red frosting and chill until the frosting is firm.
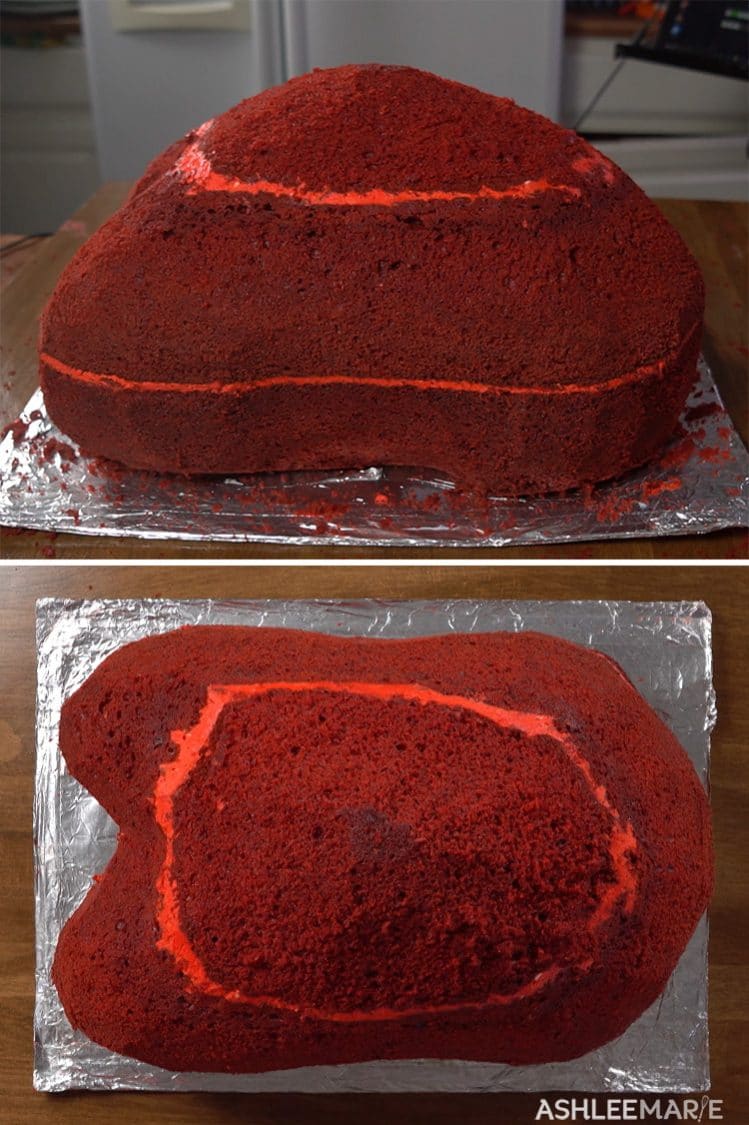
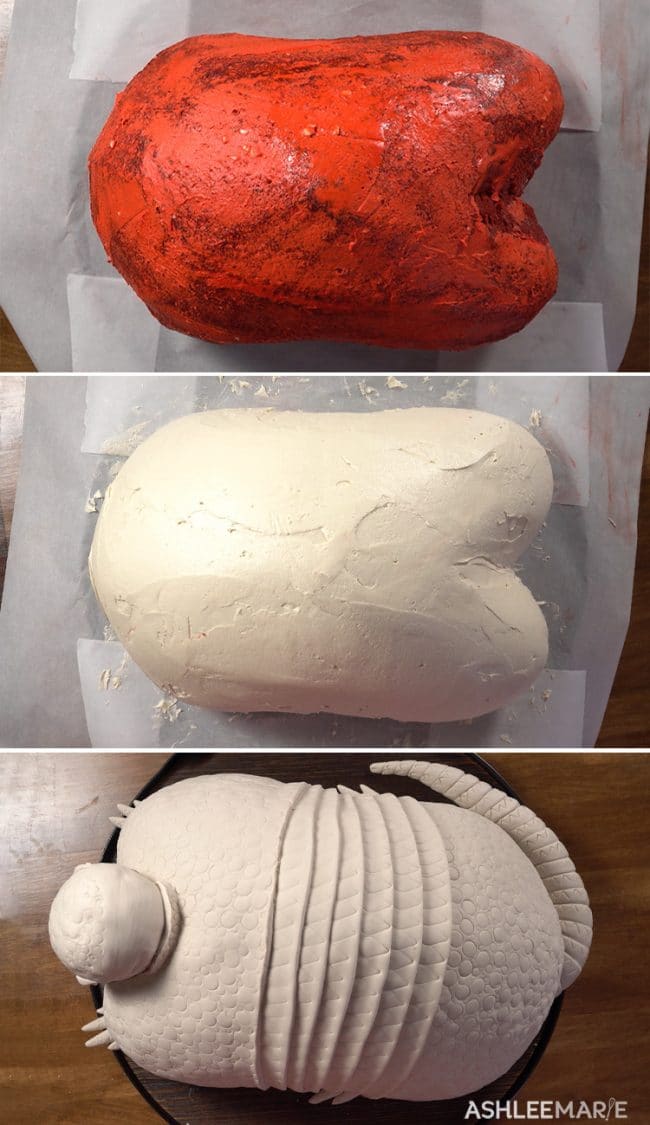
Now start carving! I cut the corners first to create a more oval start. Then carve from the top center of the cake down all the sides to round the cake. Carve a spot of the tail, and head on each of the narrow sides.
Carve a little at a time, you can always carve more, it’s hard to add cake back if you carve too much. Once your happy with the overall shape go through once more and smooth everything out.
To make the right shade of pink/ivory/grey I added a small drop of red, a small drop of black and a large squeeze of ivory. (I used this same mixture for the fondant coloring too.
Frost a very thin crumb coat and chill the cake again. Then do a thicker all over layer of the frosting and chill one more time.
The Appendages
I made the head, tail and paws while the cake was chilling. You can also do it before even starting the cake – you just want to do it early enough that they have time to dry.
For the head I started with a small batch of rice krispie treats – I use less cereal to keep it gooier so it sticks better. Shape it into the armadillo head shape – a large oval with a thin long nose in front.
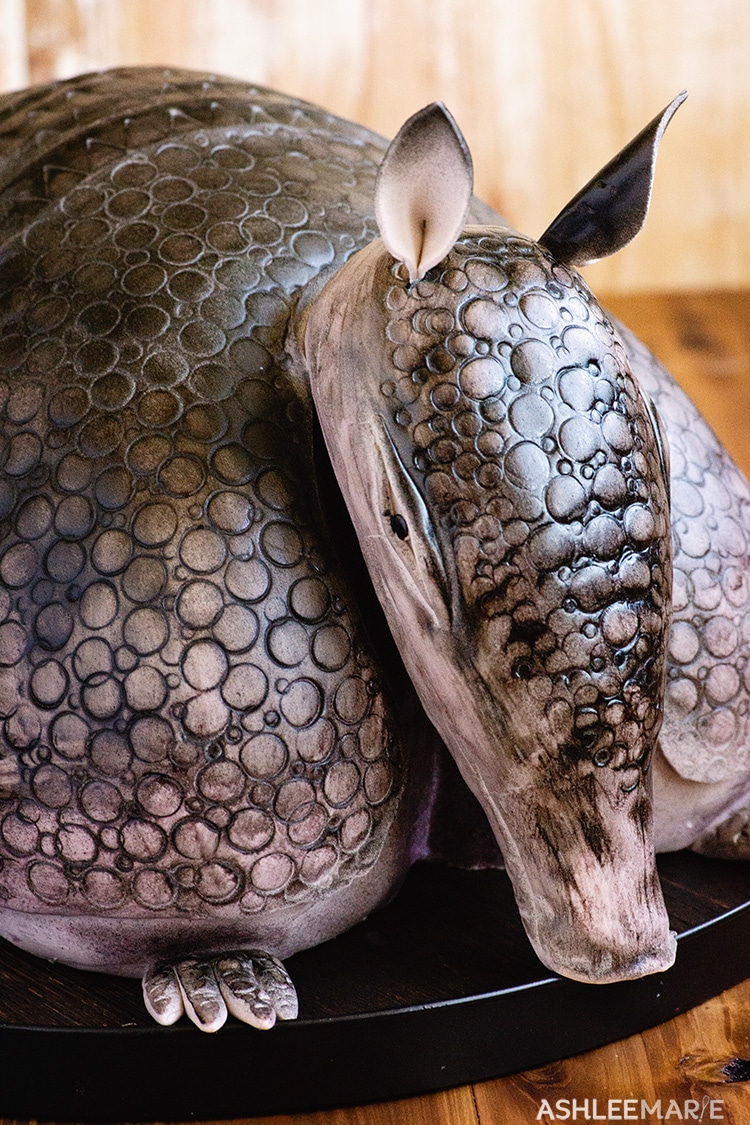
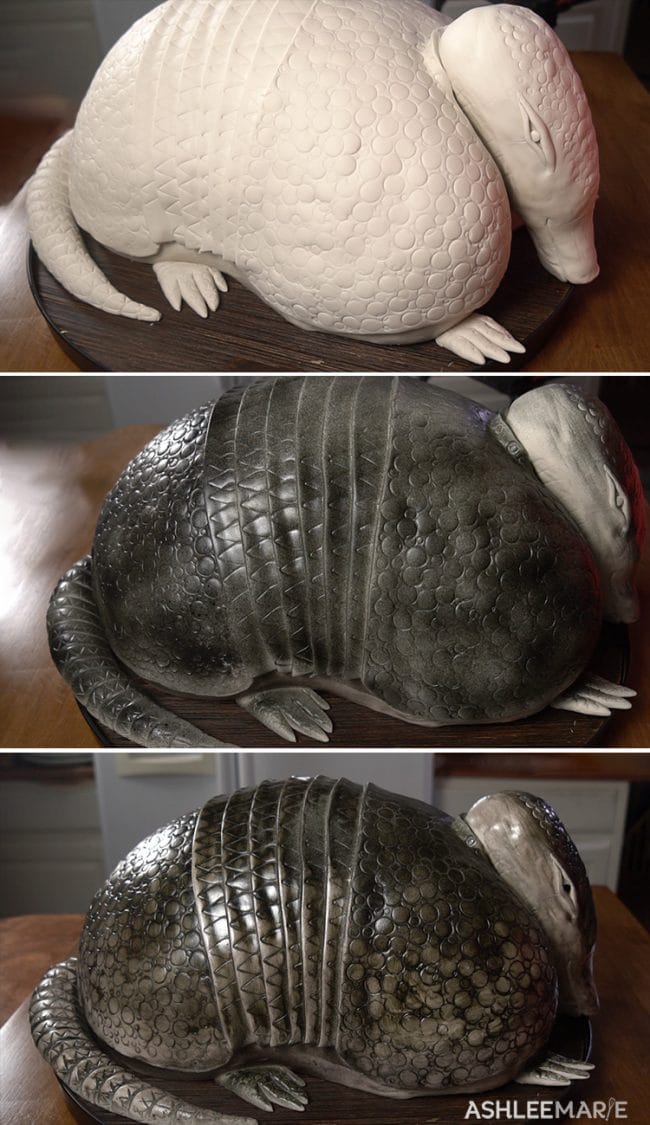
Cover it with frosting and chill it so the frosting becomes firm. Then cover the head with fondant and smooth. I use three round tips to create various sizes for the round scale markings down the top of the head.
If you press the circles right into the fondant it tends to leave sharper marks. I like to place a layer of plastic wrap down first to keep the markings softer, but it’s a personal choice.
Finally add round circles of fondant for eyes, and add ropes of fondant around the top and bottom of the eye for the rest of the eye shape. I also add a mouth and rough scrap marks around the rest of the head.
For the paws – the center toes are longer than the outside toes. I created an oval shape then made three cuts to create the 4 toes. Roll them between your fingers to shape them. Add markings.
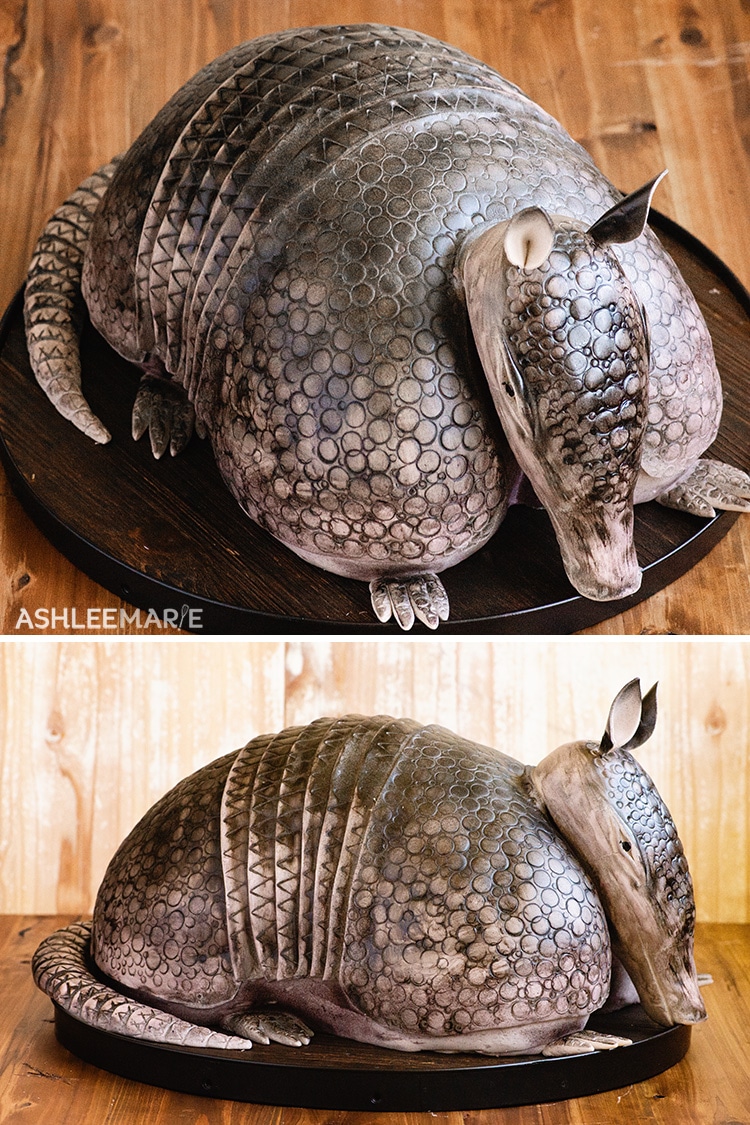
Roll out a thin layer and use some large rose petal cutters to cut 2 ears. Pinch the fat end around some toothpicks and let them dry. I use parchment paper to help them hold their shape.
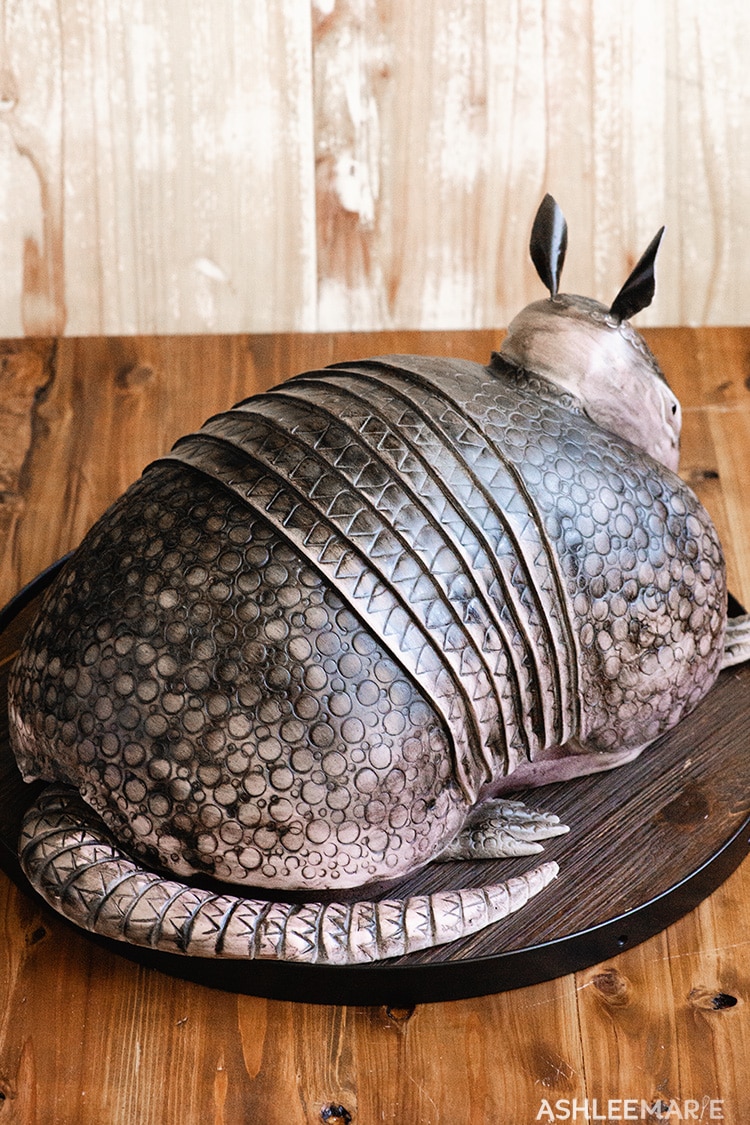
Finally the tail – roll out some fondant fat on one and and thin on the other. For the tail add diagonal markings all down the tail, then using a small rose petal cutter add triangle markings between the diagonal swirls.
Fondant body details
Because the over shell won’t go all the way to the base of the cake the first thing I do is add a thin layer of fondant anywhere the shells won’t cover. Around the base, neck and tail area.
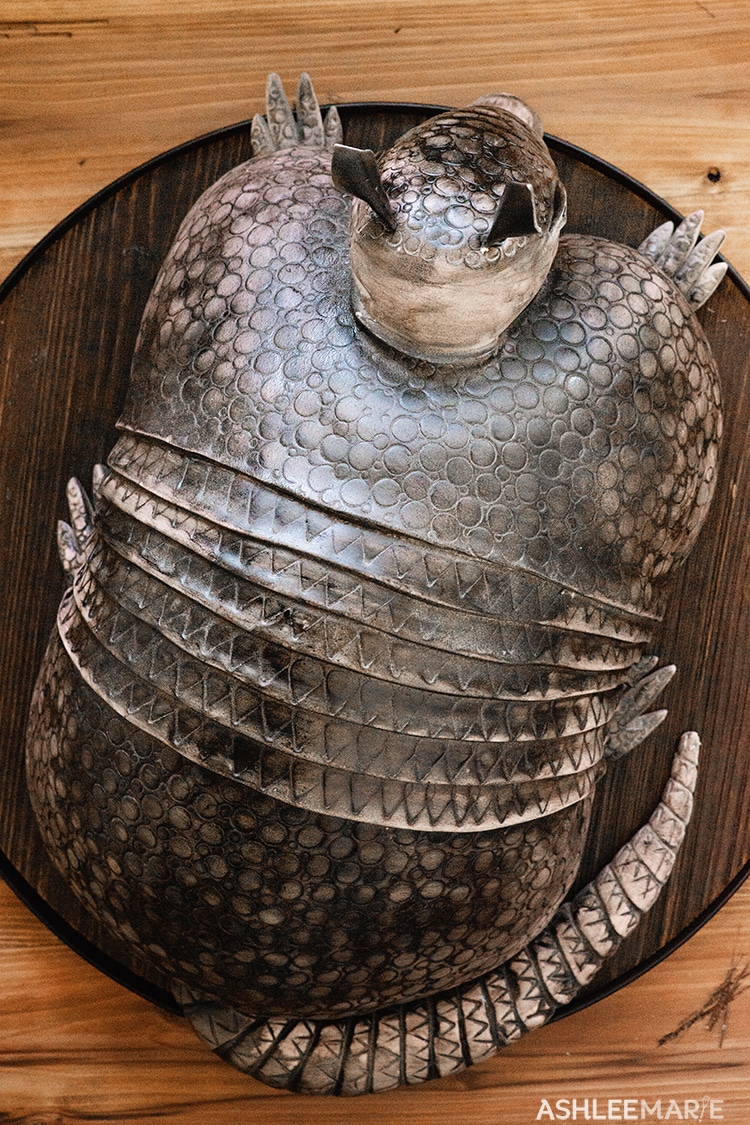
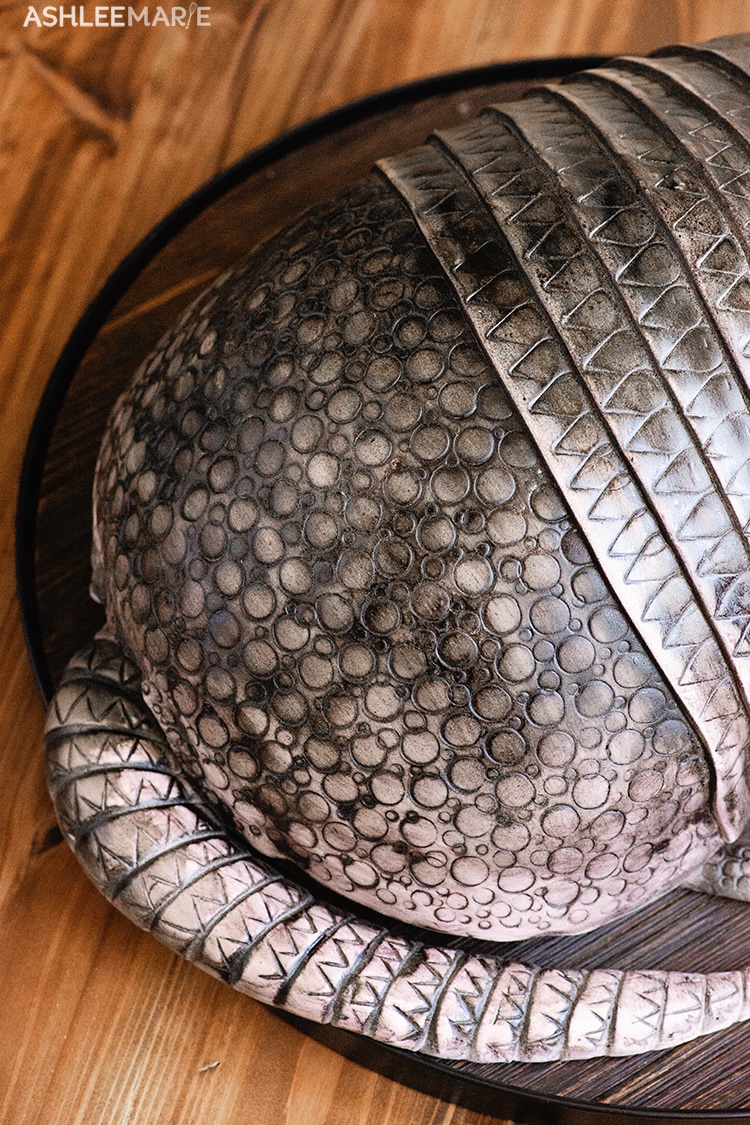
For the outer shell you can roll out a large sheet and cover the whole cake or what I did was add the fondant separately. I started with the back end shell.
Trim the fondant to the shape you want for the shell then adding the circle markings. Make sure to smooth the side that will be getting more layers of fondant over it so there isn’t a bump.
Then I roll out and cut 1 1/2 inch strips and layer them across the center of the armadillo. Add the triangle markings on these strips as you go. Make sure to continue to press the side that will be layered over smooth.
After a few strips add the final large fondant sheet. Trim around the back, legs an neck. And add the round circle markings again.
Assembling and Painting
To add the head I use toothpicks to attach and hold the head into place – quite a few. Then add the feet/paws and finally the tail. For these I just press the into place.
Now I grabbed some black airbrush paint and sprayed the body, top of the head, tail and paws. I went darker along the top than I did around the base, leaving the bottom inch almost non painted.
Take a damp paper towel and rub the paint off, starting at the base and working your way up to the top of the back. As the towel gets more and more paint on it it will rub off less and less paint. I like the bottom and sides more rubbed off and the top left more black.
I went through many towels until I got the look I liked. Add more paint if you feel your rubbed off too much in any place.
Finally paint the back of the ears and using needle nose pliers press the ears into the head!
FINISHED!
To make and carve this Red Velvet cake you’ll need these tools.
- Three half sheet (12x18x4) dense red velvet cake
- Bake even strips
- Heating cores
- large serrated knife for carving (I use a 10″ serrated cutco knife)
- 2 batches white chocolate cream cheese frosting
- small batch rice krispie treats
- White Fondant
- Gel food dye – red, black and ivory
- Round piping tips – various sizes
- Rose petal tips – large and small
- Flexible Fondant tools
- Sharpe small knife for trimming fondant
- Fondant mat and rolling pin
- Airbrush
- Black airbrush paint
Steel Magnolias’ Armadillo Cake
If you love this armadillo cake as much as I do, I’d love a 5 star review. Be sure to share on social media and tag me if you make it @ashleemariecakes! If you want to stay updated on new recipes sign up for my newsletter and join my Facebook Group!
If you love making movie-based cakes you’ll love these other cake carving tutorials!
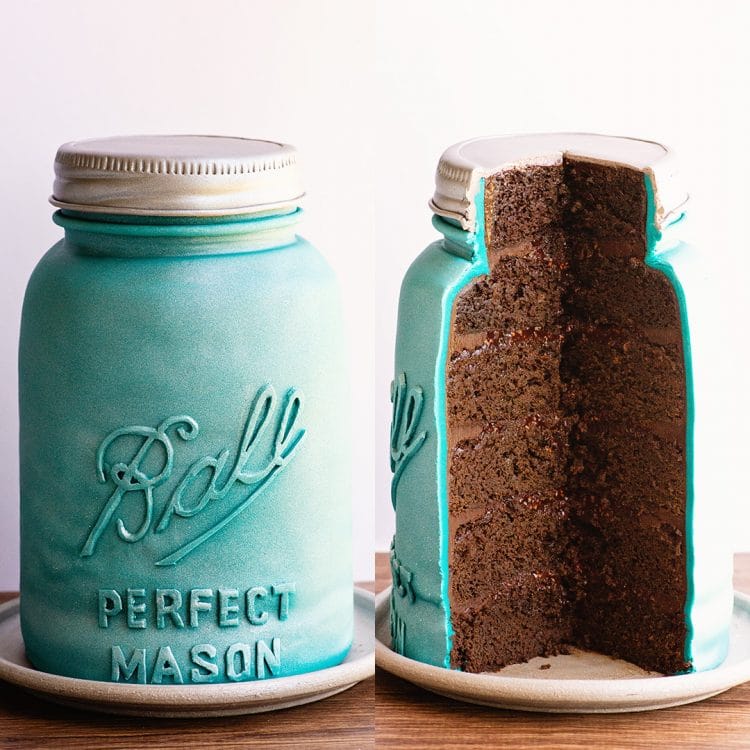
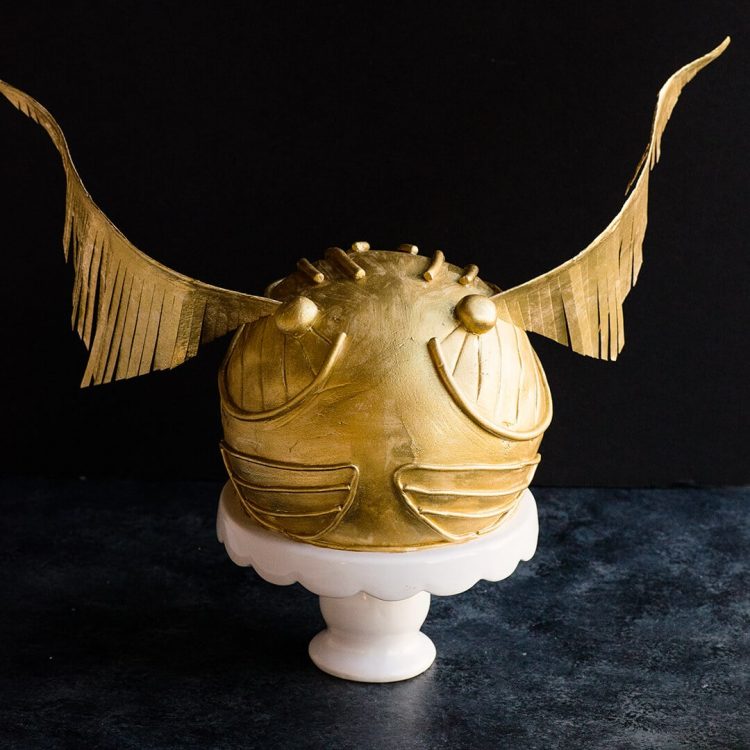
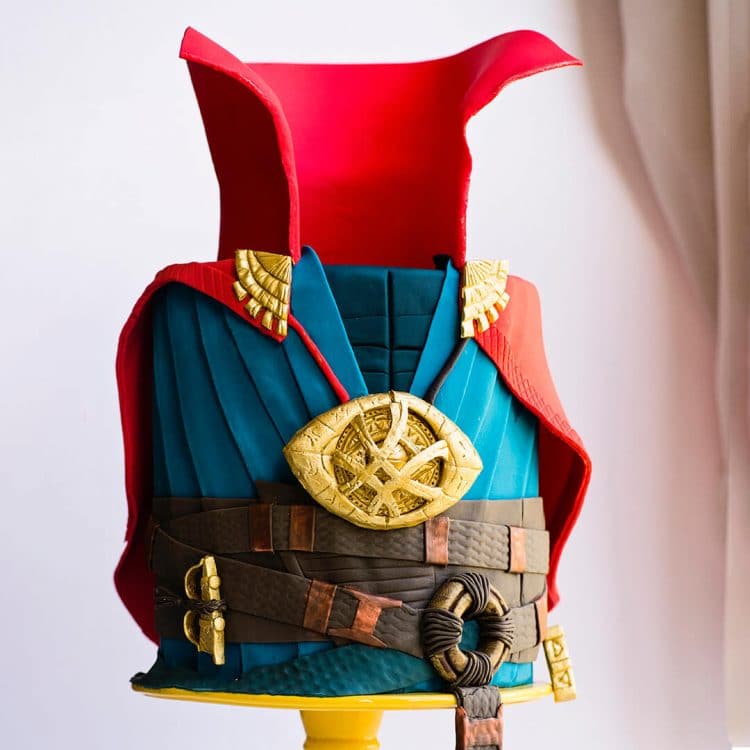
Mason Jar Cake | Snitch Cake | Doctor Strange Cake
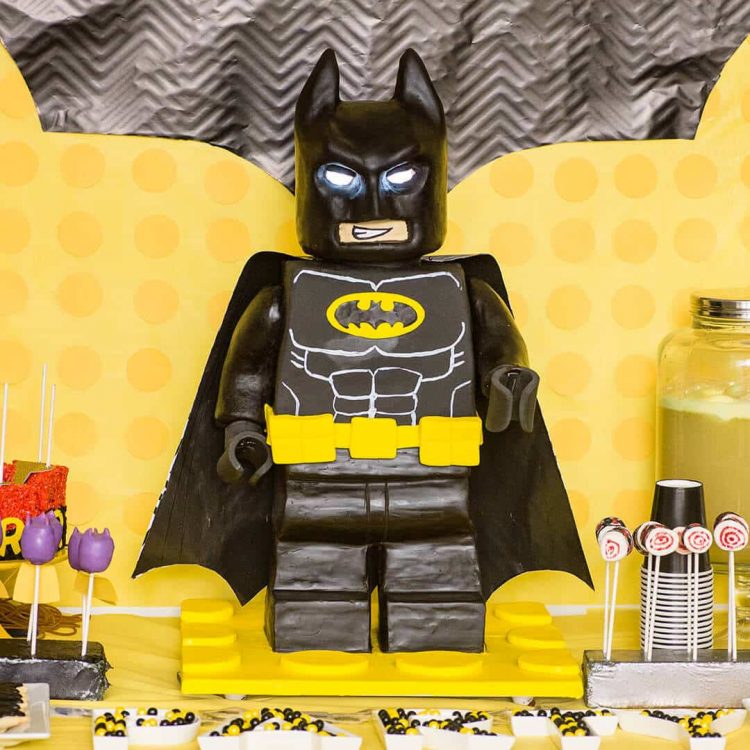
Standing LEGO Batman Cake | Santa Cake | Moana’s Tamatoa Cake
Connect with Ashlee Marie Online!
To watch me make this Steel Magnolias’ Armadillo red velvet cake play the video in the recipe card (if you’re on desktop, it should be auto playing for you).
You can find all my cooking show style recipe videos on YouTube, or my short recipe videos on Facebook Watch, or my Facebook Page, or right here on our website with their corresponding recipes.
Steel Magnolias' Armadillo Cake
Everyone loves the iconic armadillo cake from the play and film "Steel Magnolias". Here are instructions and a video tutorial for how I recreated this memorable cake.
Materials
- Dense red velvet cake recipe
- 2 batches white chocolate cream cheese frosting
- small batch rice krispie treats
- White Fondant
Tools
- 12x18x4 half sheet cake pans
- Bake even strips
- Heating cores
- large serrated knife for carving (I use a 10" serrated cutco knife)
- Gel food dye - red, black and ivory
- Round piping tips - various sizes
- Rose petal tips - large and small
- Flexible Fondant tools
- Sharpe small knife for trimming fondant
- Fondant mat and rolling pin
- Airbrush
- Black airbrush paint
Instructions
THE CAKE AND FROSTING
- I baked 3 half sheet cakes (13x18x3) (at 325 for 2 hours 15 mins). I also used bake even strips and 2 heating core nails to keep the cake as even as possible. And of course I made high altitude adjustments to the recipe.
- I made a white chocolate cream cheese frosting, dye red
- Stack the cake layers with the red frosting and chill until the frosting is firm.
- Now start carving! I cut the corners first to create a more oval start. Then carve from the top center of the cake down all the sides to round the cake. Carve a spot of the tail, and head on each of the narrow sides.
- Once your happy with the overall shape go through once more and smooth everything out.
- Frost a thin crumb coat layer and chill.
- Make another batch of frosting - I added a small drop of red, a small drop of black and a large squeeze of ivory.
- Frost a thicker all over layer of the frosting and chill one more time.
THE APPENDAGES
- Head - For the head I started with a small batch of rice krispie treats. Shape it into the armadillo head shape – a large oval with a thin long nose in front.
- Cover it with frosting and chill it so the frosting becomes firm.
- Mix the fondant with some ivory, a drop of red and a drop of black to get the pinkish/greyish/ivory color.
- Cover the head with fondant and smooth. I use three round tips to create various sizes for the round scale markings down the top of the head.
- Finally add round circles of fondant for eyes, and add ropes of fondant around the top and bottom of the eye for the rest of the eye shape. I also add a mouth and rough scrap marks around the rest of the head.
- Paws – the center toes are longer than the outside toes. I created an oval shape then made three cuts to create the 4 toes. Roll them between your fingers to shape them. Add circle markings.
- Ears - Roll out a thin layer and use some large rose petal cutters to cut 2 ears. Pinch the fat end around some toothpicks and let them dry. I use parchment paper to help them hold their shape.
- Tail – roll out some fondant fat on one and and thin on the other. For the tail add diagonal markings all down the tail, then using a small rose petal cutter add triangle markings between the diagonal swirls.
FONDANT BODY DETAILS
- Roll a thin layer of fondant anywhere the shells won’t be covering later (see video for details). Around the base, neck and tail area.
- For the outer shell roll out a large sheet and cover the back end shell.
- Trim the fondant to the shape you want for the shell then adding the circle markings. Make sure to smooth the edge that will be getting more layers of fondant over it so there isn’t a bump.
- Then I roll out and cut 1 1/2 inch strips and layer them across the center of the armadillo. Add the triangle markings on these strips as you go.
- Add the final large fondant sheet. Trim around the back, legs an neck. And add the round circle markings again.
ASSEMBLING AND PAINTING
- Use toothpicks to attach the head to the body. Then add the feet/paws and finally the tail.
- Now I grabbed some black airbrush paint and sprayed the body.
- Take a damp paper towel and rub the paint off, starting at the base and working your way up to the top of the back. As the towel gets more and more paint on it it will rub off less and less - which you want. I like the bottom and sides more rubbed off and the top left more black.
- Finally paint the back of the ears and using needle nose pliers press the ears into the head!
")


Ines
This is. truly an amazing cake!! Where will I find the recipes for the cake and the frosting?
Ashlee Marie
Working on getting the recipe into a post!!! With all the crazy from the holiday it might be a a few weeks!