A cake decorating video tutorial making this detailed Elsa princess cake from Frozen 2 with free custom stencils.
How I created Elsa Frozen 2 Princess Cake
Six years ago when Frozen first came out I threw my daughter a Frozen birthday party (like everyone with a daughter did that year). I love doing themed parties, representing all the characters with various recipes and of course the CAKE!
I have always wanted to redo those cakes filming video tutorials for them so when Frozen 2 was announce I thought this is the perfect time! Then I saw the trailers for the new movies and decided I needed to make NEW cakes, with the new dresses.
SO I decided to do a video with both, Anna and Elsa from the first movie AND Anna and Elsa from the second movie! I spent 16 hours making and filming these cakes and I love how they turned out.
Just take me to the how-to card and video already!
If you’d rather skip my tips and tricks for making princess cakes, along with links to other frozen cakes and recipes and get straight to this video tutorial– simply scroll to the bottom of the page where you can find the printable how-to card.
Tips for making detailed princess cakes
– First off pick your princess doll – This will hep you determine the height you need your cake. I tend to go with the 13 inch barbie style.
– Design your cake! I like to sketch mine out. Decide what the shape of you want to carve the skirt (leave it full or carve an A-line). Then will you be adding slits, or ripples to the skirt…
– Decide what aspects of the skirt/dress will be fondant and what colors you’ll need as well as what other techniques will you be using? Airbrush, hand painting, stencils and royal icing, fondant (clay) extruder…
– To prepare your doll get it undressed and use plastic wrap to hold the legs together – this keeps the cake food safe, and makes it easier to slide into the cake.
– Wrap up her hair so it’s out of the way. You can use a rubber band or I just use more plastic wrap, it also protects her hair and face from the airbrush.
– Bake your cakes – I use this wonder mold pan to get the beginning of a dress shape but you can always stack round cakes and carve from there. The wonder mold is too short on it’s own so I also bake and stack a 2 -3 inch round 8 inch cake to the bottom.
– I recommend a nice dense cake for carving. If the cake is to fluffy and light it just crumbles as you carve. I use my Chocolate cake recipe (just the cake, not the frosting) One full recipe makes one wonder mold and one 8 inch cake.
– Cut a hole in the center of the cake, down to the bottom and slide the princess down inside. Then start carving your skirt
– For the frosting use a straight ganache (2 to 1 ratio), not the ganache buttercream. It goes on like frosting but as it cools and sets it gets firm and will hold the details of the cake as you add the fondant and other details later.
– Next determine the order of your decorating. Are you starting with the sleeves or the skirt. How thick or thin do you want each layer (super thin for sleeves, thicker for areas like the skirt).
– Mix any fondant colors or paint colors you need to make. Start by making small amounts of the color to test what mixture it takes to get the color you want. Then make enough for the whole cake – You don’t want to have to try to match a second batch after you’ve already started.
– Cut any stencils you want to use. I tried stencil material (that you use a wood burner to cut) it was too thick and stiff. Then I used my circut to cut some martha stewart sticky stencil material but it was also too stiff and wasn’t sticky enough. Finally I tried normal vinyl and it worked the best.
– Make and color your royal icing. You don’t want it to be thick. More on the color flow side of things so when you pull the stencil away it leaves it more smooth less rough. I always do a test run on some rolled out fondant to test it vs doing it right on the cake.
– When using an airbrush gun multiple light layers is always better than going to dark to begin with. Hold the gun further away for a wider spray, and super close for a distinct line.
– Also the airbrush over sprays a TON – like you’ll have a thin layer of paint mist over everything, I’d recommend covering everything with plastic wrap you can just ball up and toss, otherwise you’ll be wiping the counter a week later and still be getting up blue paint!
– If you are going to be doing any piping with the royal icing I recommend using parchment paper triangles to make the piping bag, you can get it very small and I find it easier to pipe details vs a large plastic bag.
– I use wafer paper for additions like capes – things that need to stand away from the body, or things that only partially attach to cakes. It’s still edible so I don’t mind using it!Paragraph
– To color the wafer paper to match I use an airbrush gun. Now liquid effects wafer paper, so do a light layer to start with – it will curl the paper. Just flip the paper over and paint another light layer on the other side and the paper will curl the other way. Repeat until you are happy with the color and let dry – the paper will flatten out!

To make this Elsa Princess cake you’ll need
- Cake recipe
- Wonder mold cake pan
- Ganache recipe
- Fondant – I used satin ice purple, an little blue and lots of white to create the periwinkle color for this dress
- Fondant mat
- Fondant rolling pin
- Electric pasta roller
- Fondant tools
- small shape knife
- Pizza cutter
- Airbrush gun
- Airbrush colors – I used purple with a little bit of blue for the periwinkle, also a silver and soft pink
- Paper towels
- Royal icing recipe
- Piping bag – I use parchment triangles for royal icing
- Stencil SVG files (below), with a cricut cutter and vinyl
- Fondant glue or clear alcohol
- Silver sanding sugar
- Wafer Paper
- Small angled frosting spatula
- Paint brushes (ones I only use for cakes)
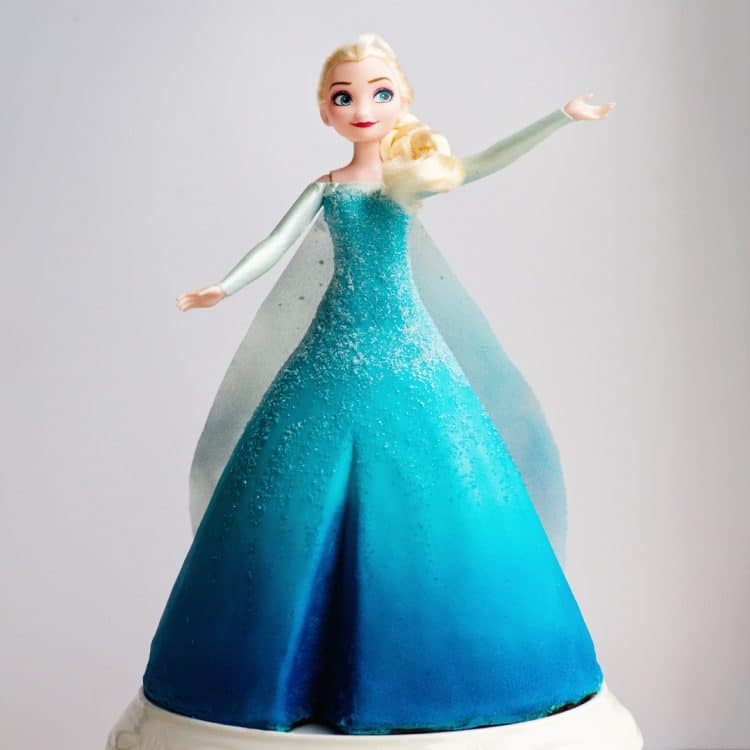
Frozen 2 Elsa Princess Cake
If you love these princess cake decorating tutorials, I’d love a 5 star review. Be sure to share on social media and tag me if you make it @ashleemariecakes! If you want to stay updated on new recipes sign up for my newsletter and join my Facebook Group!
If you love This Elsa Cake you’ll love these other Frozen recipes!
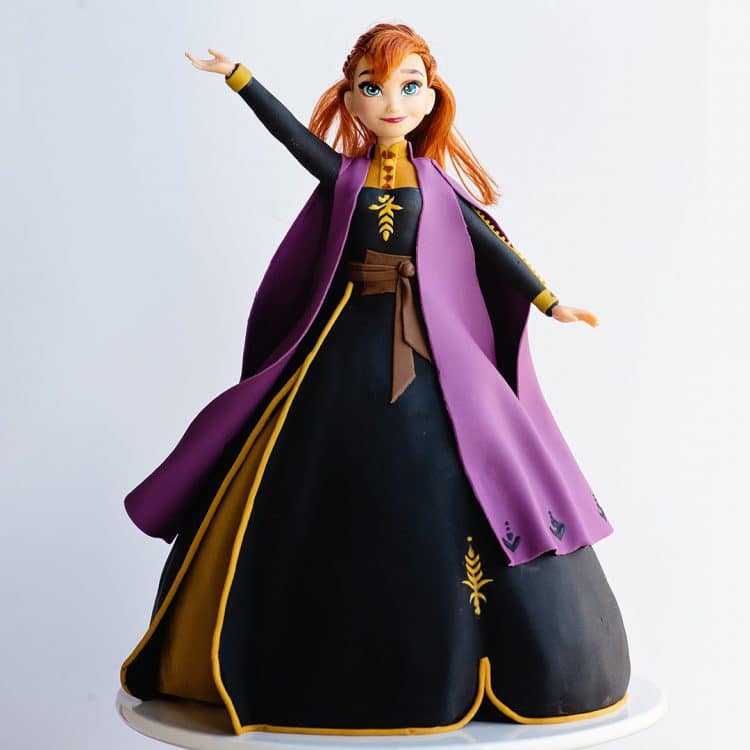
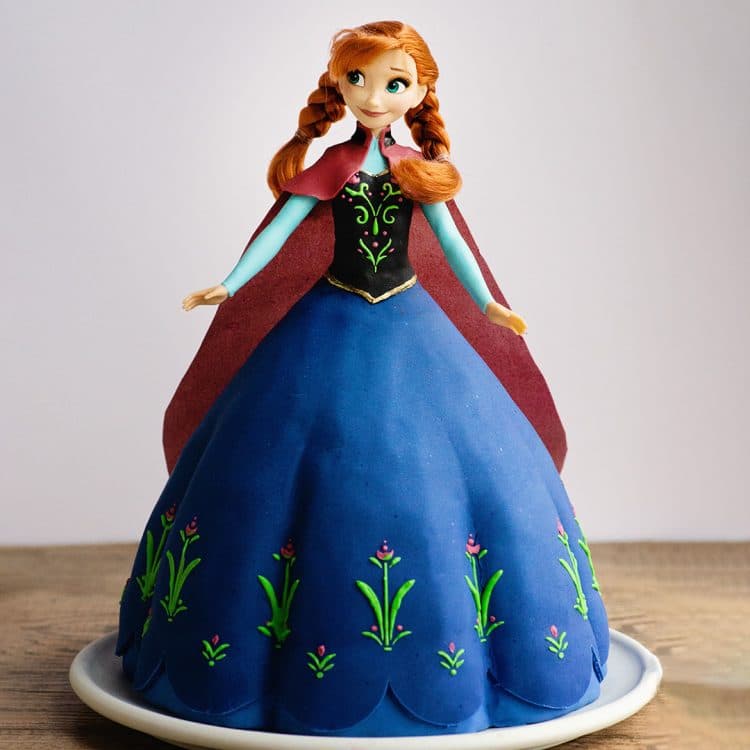
Frozen 1 Elsa Princess Cake | Frozen 2 Anna Princess Cake | Frozen 1 Anna Princess Cake
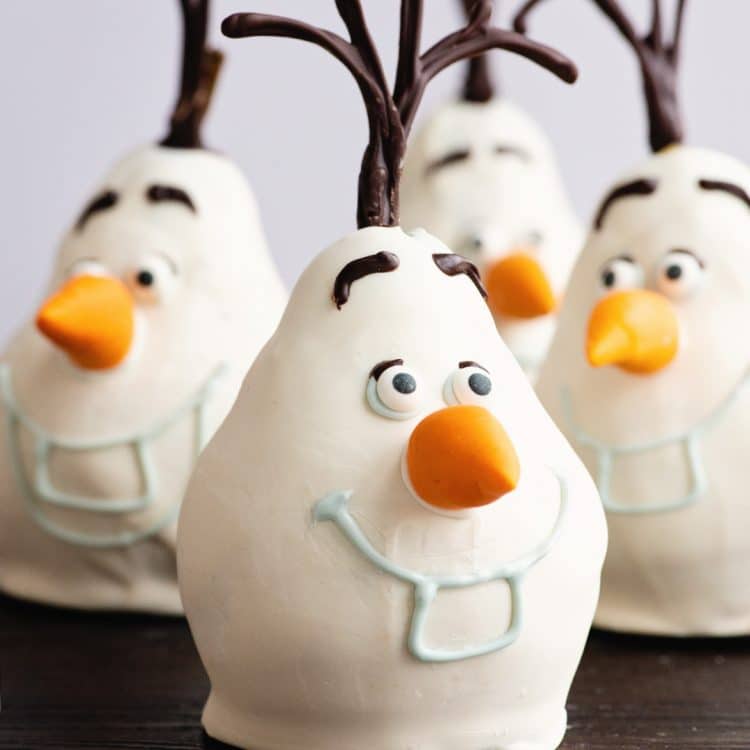
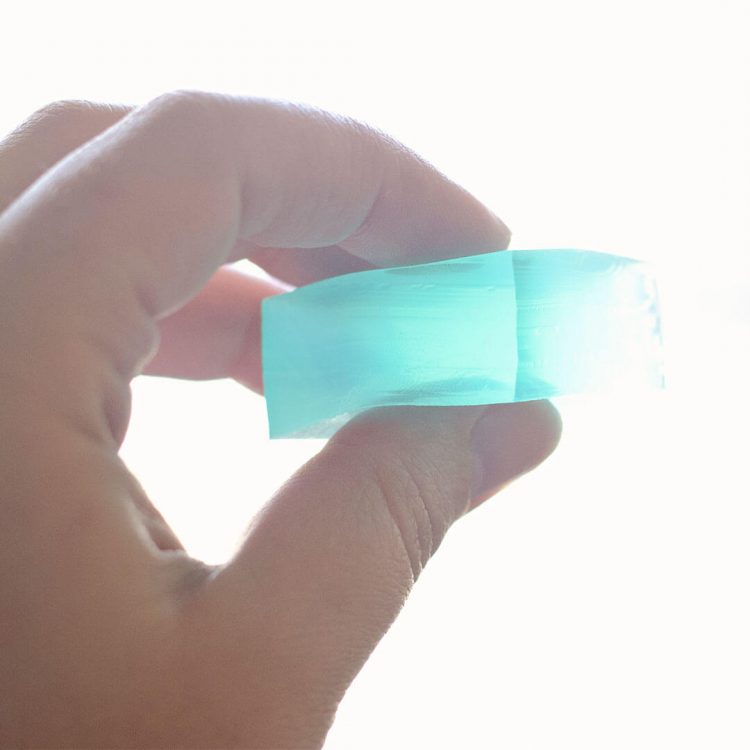

Olaf Caramel Pears | Kristoff’s Jello Ice Blocks | Snow Globe Ring
Connect with Ashlee Marie Online!

To watch me make this Elsa cake as well as the other three frozen princess cakes play the video in the how-to card.
You can find all my cake decorating videos on YouTube, or my short teaser videos on Facebook Watch, or my Facebook Page, or right here on our website with their corresponding recipes.
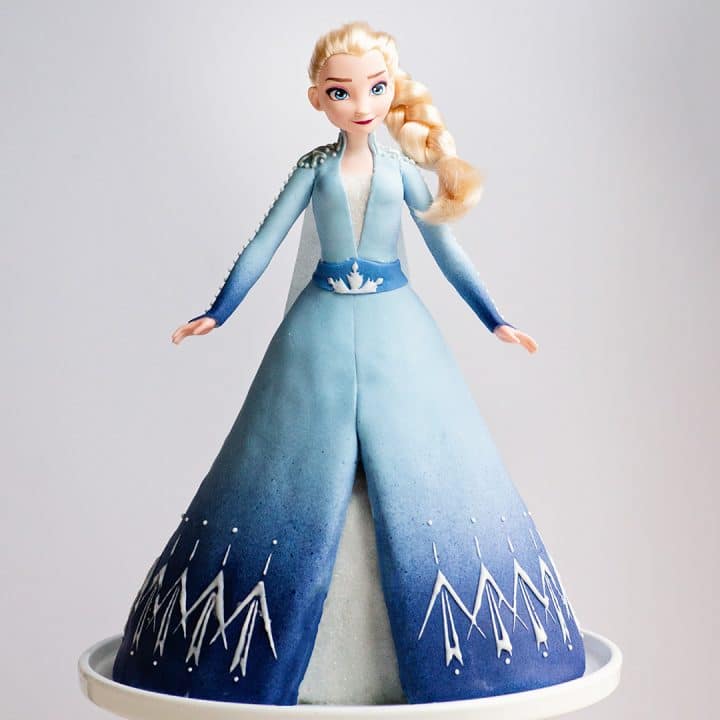
Frozen 2 Queen Elsa princess Cake
A cake decorating video tutorial making this detailed Elsa princess cake from Frozen 2
Materials
- Cake recipe
- Ganache recipe
- Fondant - I used satin ice purple, an little blue and lots of white to create the periwinkle color for this dress
- Airbrush colors - I used purple with a little bit of blue for the periwinkle, also a silver and soft pink
- Royal icing recipe
- Fondant glue or clear alcohol
- Silver sanding sugar
- Wafer Paper
Tools
- Wonder mold cake pan
- Fondant mat
- Fondant rolling pin
- Electric pasta roller
- Fondant tools
- small shape knife
- Pizza cutter
- Airbrush gun
- Paper towels
- Piping bag - I use parchment triangles for royal icing
- Stencil SVG files (below), with a cricut cutter and vinyl
- Small angled frosting spatula
- Paint brushes (ones I only use for cakes)
Instructions
- Level the cake and stick together with the ganache - freeze the cake for carving
- Cut out the center hole, about 1 1/2 inches through both cakes
- Wrap the doll's legs to easily insert into the cake
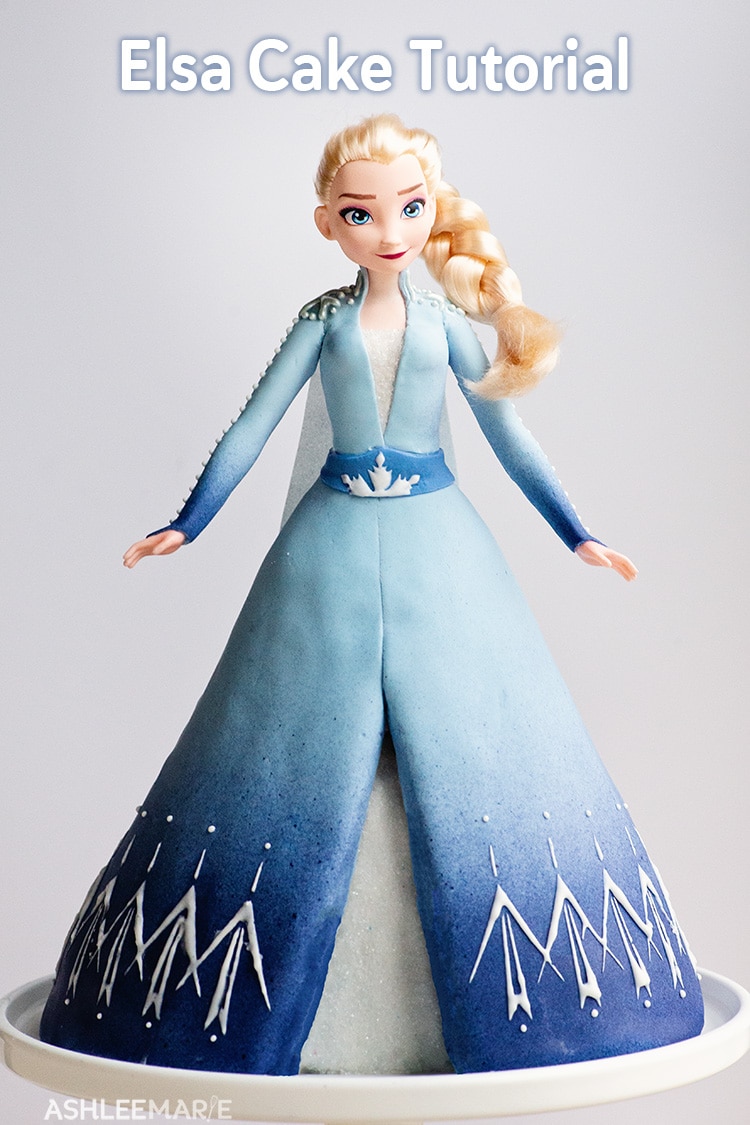
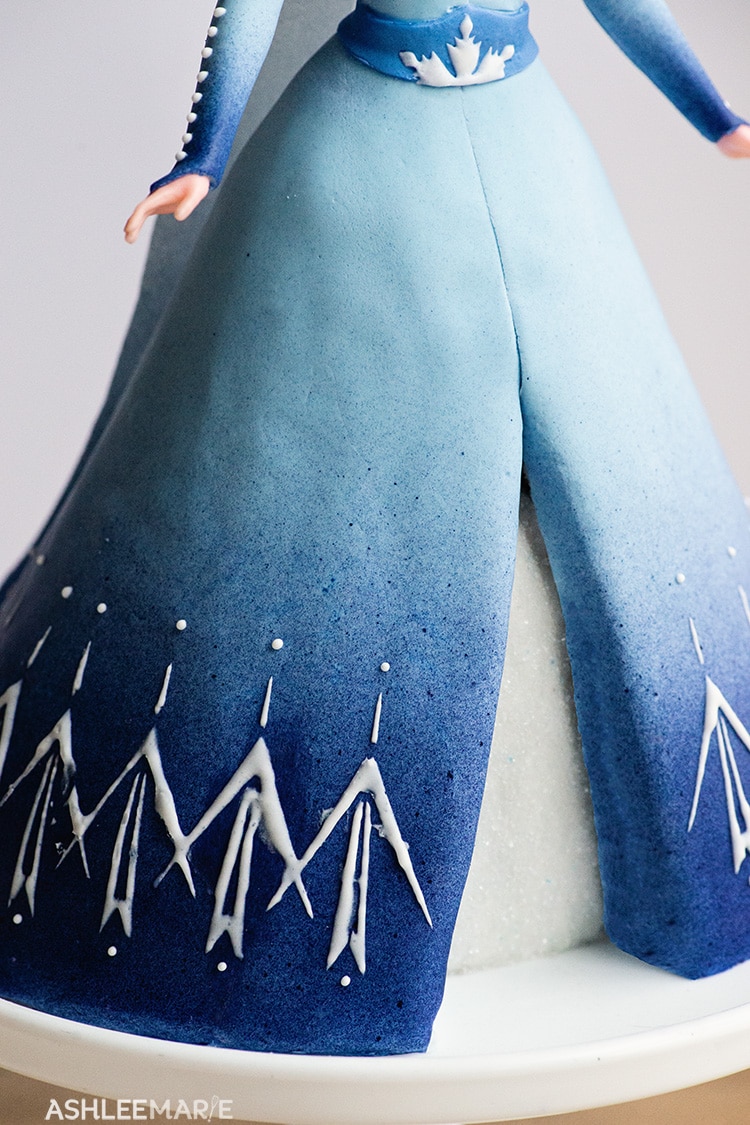
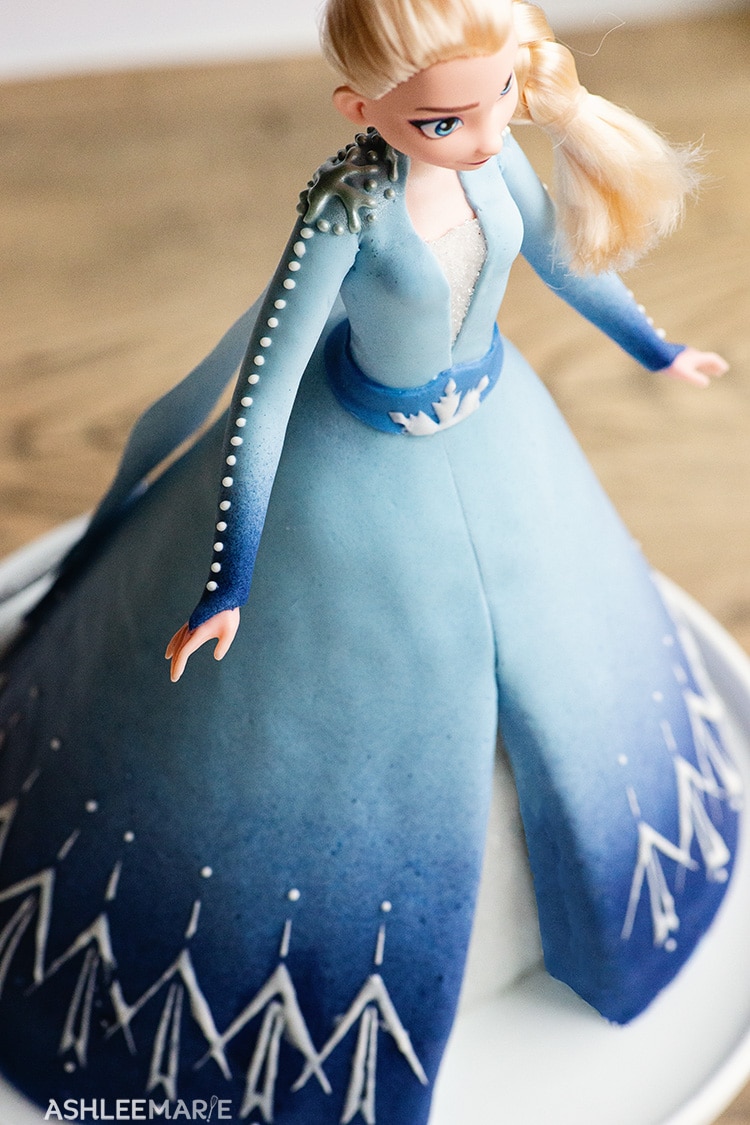
- Carve the skirt from the waist to the bottom edge creating an A-line shape to the skirt
- Carve the front of the skirt a little flatter than the rest.
- Mark a triangle (for the coat opening) in the front of the skit and then carve into the cake - about 1/2 inch deep on the bottom, almost meeting the outside of the skirt at the top of the triangle.
- Cover the cake with ganache and let it set completely.
- Roll out some white fondant and fill in the triangle, using a fondant tool to press it into the edges and get it as smooth as possible. Trim the outer edge about 1/2 inch away from the triangle and smooth the fondant into the ganache. Finally trim the bottom edge.
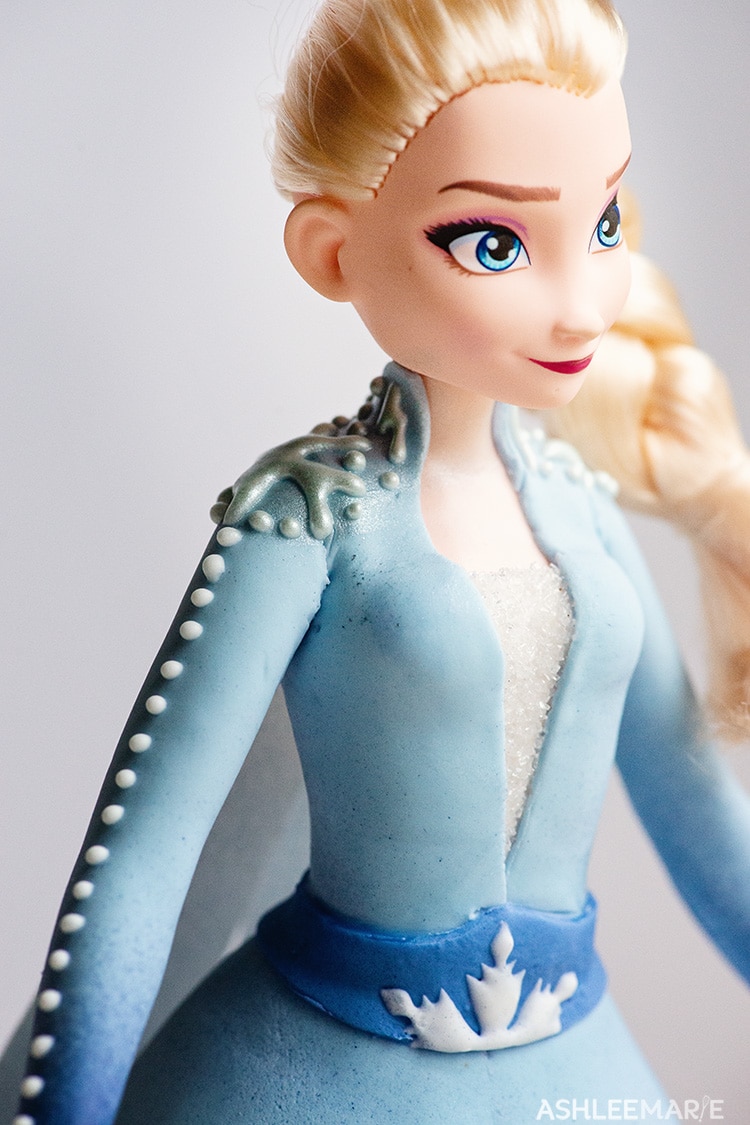
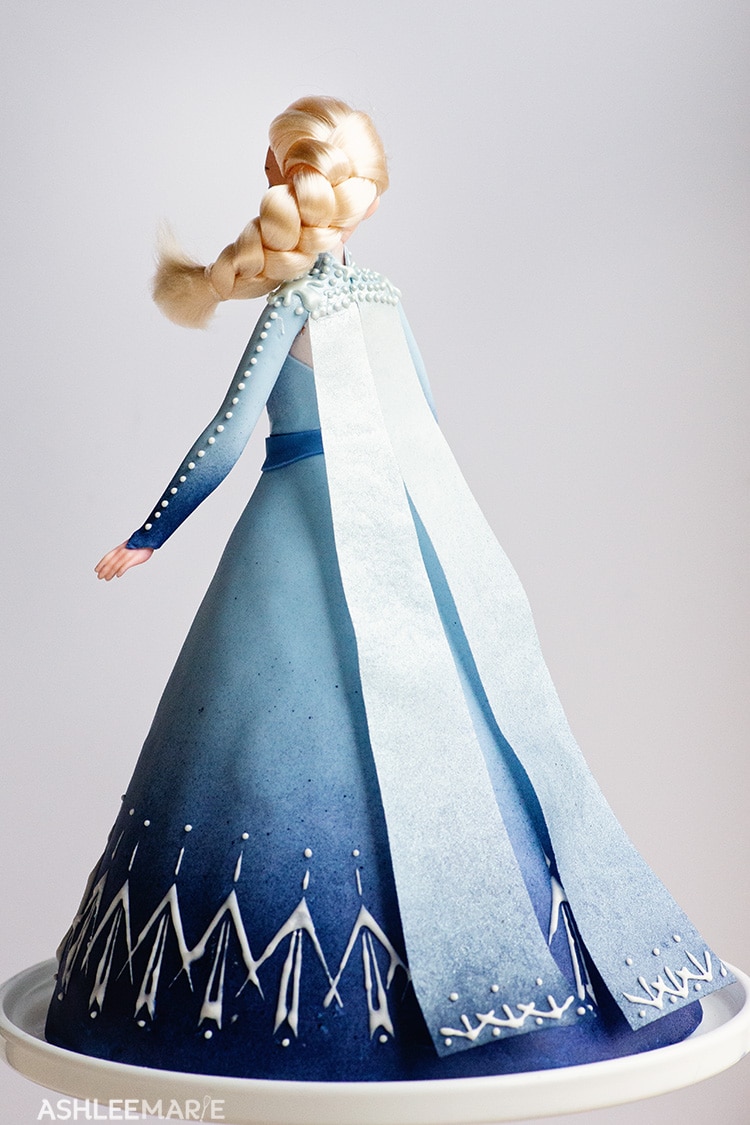
- Roll out some white fondant super thin and paint the back with some fondant glue or clear alcohol and attach it to her back, trim the top, sides and bottom
- Roll out some white fondant and attach it to her front. Trim around all sides.
- Paint the inside of the triangle in the skirt and a thin inverted triangle on her top with the fondant glue. Sprinkle with the silver sanding sugar.
- With a dry brush brush off the excess sanding sugar.
- Roll out a large light periwinkle fondant and wrap around her skirt - with the opening in the front. Smooth out the fondant around her skirt and trim a straight line down. Lightly press into the skit opening and trim.
- Roll out more light periwinkle and add the bodice of the jacket, I did it in two parts left the right side. Leave a v neck opening and an opening in the back as well.
- Roll out more and add the sleeves, remember they end in a v over her hand.
- Mix some violet and blue airbrush colors together and airbrush the bottom of the skirt and sleeves, using paper towels to protect the areas you don't want painted.
- Add some dark periwinkle for her belt.
- Make some white royal icing
- Gently stick the stencils onto the cake (belt and skirt) - fill out the form above to get the svg files sent to you
- Add a thin layer of royal icing over the stencil and pull away leaving the design on the cake
- Add more white royal icing to a piping bag (I prefer parchment bags for royal icing) and pipe on the shoulder designs and the small dots down the sleeves
- Airbrush the shoulders with silver.
- Airbrush a sheet of wafer paper both sides, the bottom periwinkle and the top silver.
- Cut two thin "cape" pieces and add them to the back of the cake with a little bit of water.
- Finally as a last detail you can "water down" some of the periwinkle paint and some soft pink airbrush paint with clear alcohol and paint a very light shade onto the skirt stencil.
- Take down her hair and your done!
")


Julia Nunn
I can’t find the EGG files, where are they please?
Ashlee Marie
there is a place to imput your email and name and the files will be auto sent to you.
Ivis
Beautiful cakes!
Ashlee Marie
Thank you so much!