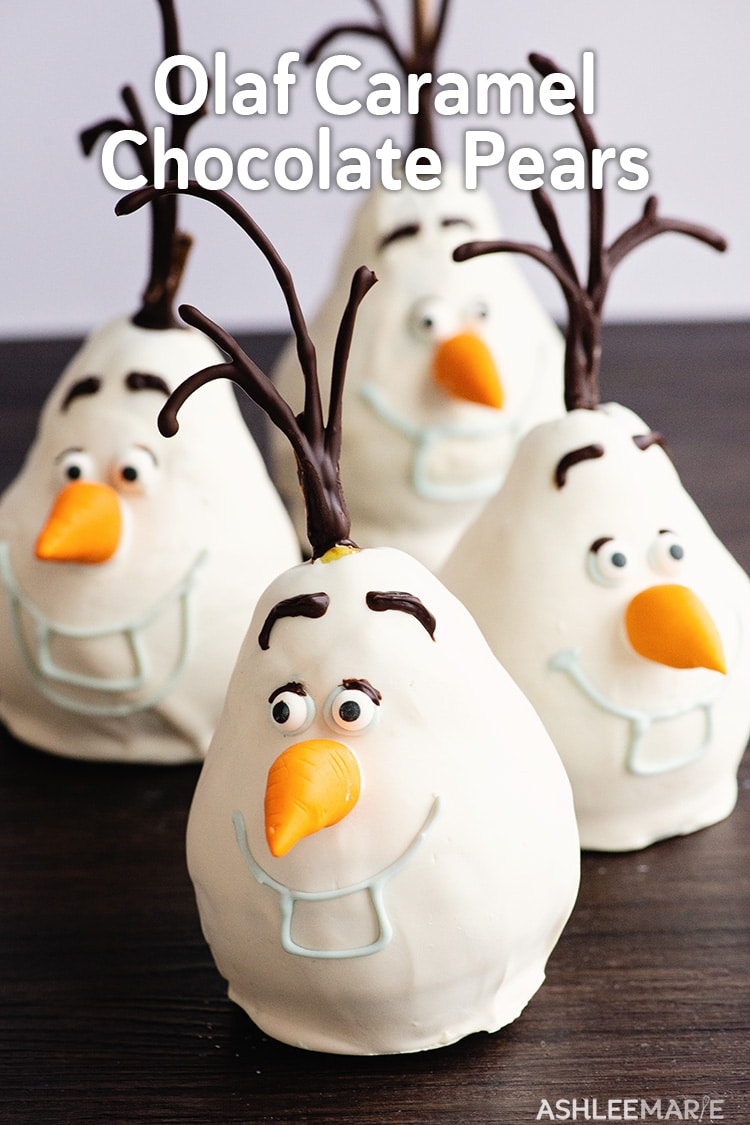
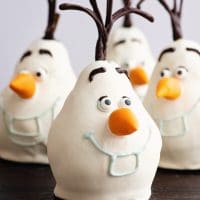
Make your own edible Olafs for your Frozen Party. Chocolate and caramel covered pears are delicious and just the right shape. Full video tutorial of these popular treats
How I created these Olaf Chocolate Caramel Pears
I’m excited to start sharing some of the food from the Frozen birthday party with you guys! My favorite???
These caramel and chocolate covered pears, or Olaf Pears! When I was at Walt Disney World for a conference in March I got to see these cute chocolate and caramel covered apples decorated to look like Olaf… They were adorable.
BUT the round shape wasn’t really olaf like more traditional snowman. So when I was at the grocery store one week doing my grocery shopping and I walked past the pears was inspired!
And I will tell you, caramel covered pears are SOOOOOO much better than caramel covered apples. But pears are more sensitive, so don’t make them super far in advanced.
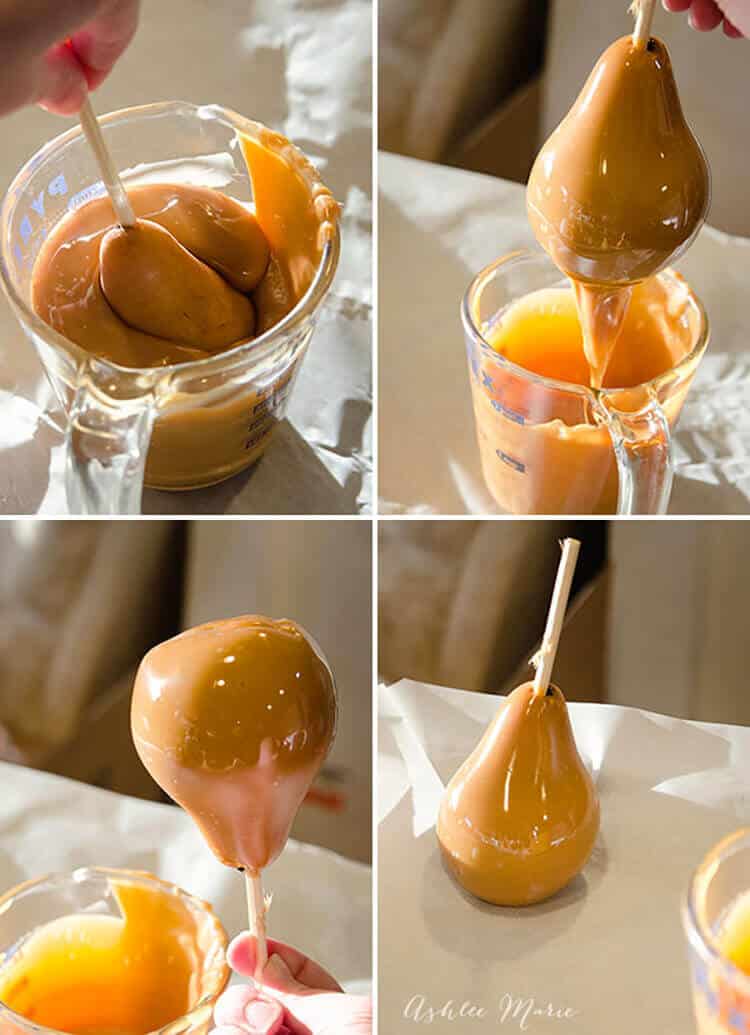
So I started by washing all the pears, then sticking them with caramel apples sticks. (A lot of them ended up splitting, so the next time I made them I didn’t use the sticks, I held the top, I also didn’t have the caramel and chocolate go all the way to the top)
Then melt about 8-10 oz of caramel and dip your clean and dry pear into the caramel. Give it a good swirl, making sure it’s all covered, then let it drip a bit. once the largest drips are gone scrap the bottom off…
Hold it upside down to let it set a bit, then place it on parchment paper. Do this with all your pears and refrigerate until cool – this will also help cold the caramel in place.
Just take me to the Olaf Caramel Pears Recipe already!
If you’d rather skip my tips and tricks for chocolate caramel pears, along with links to other Frozen themed recipes and get straight to this fun tutorial – simply scroll to the bottom of the page where you can find the printable recipe card.
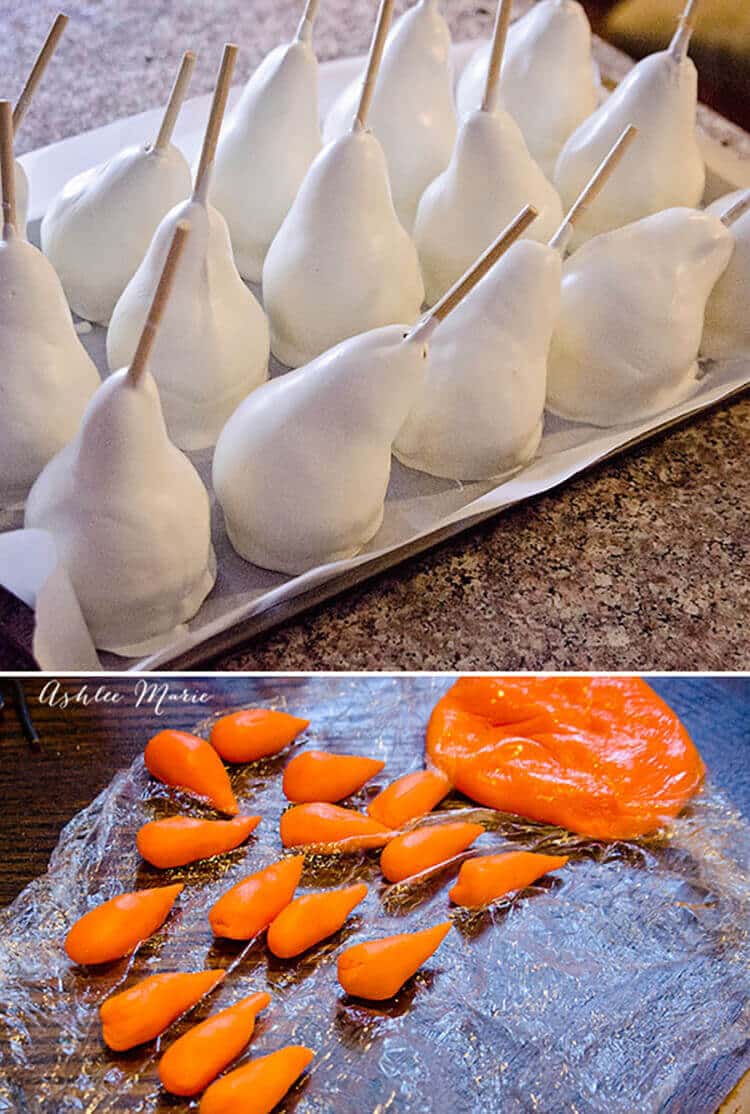
Once the caramel is cool melt some white chocolate and dip all the pears. Do the same thing with letting the excess drip off, scrapping the bottom and refrigerating.
I let the pears rest however they wanted, since trying to get them all upright was a bit of a struggle. When your buying your pears check to make sure they stay upright so this won’t happen.
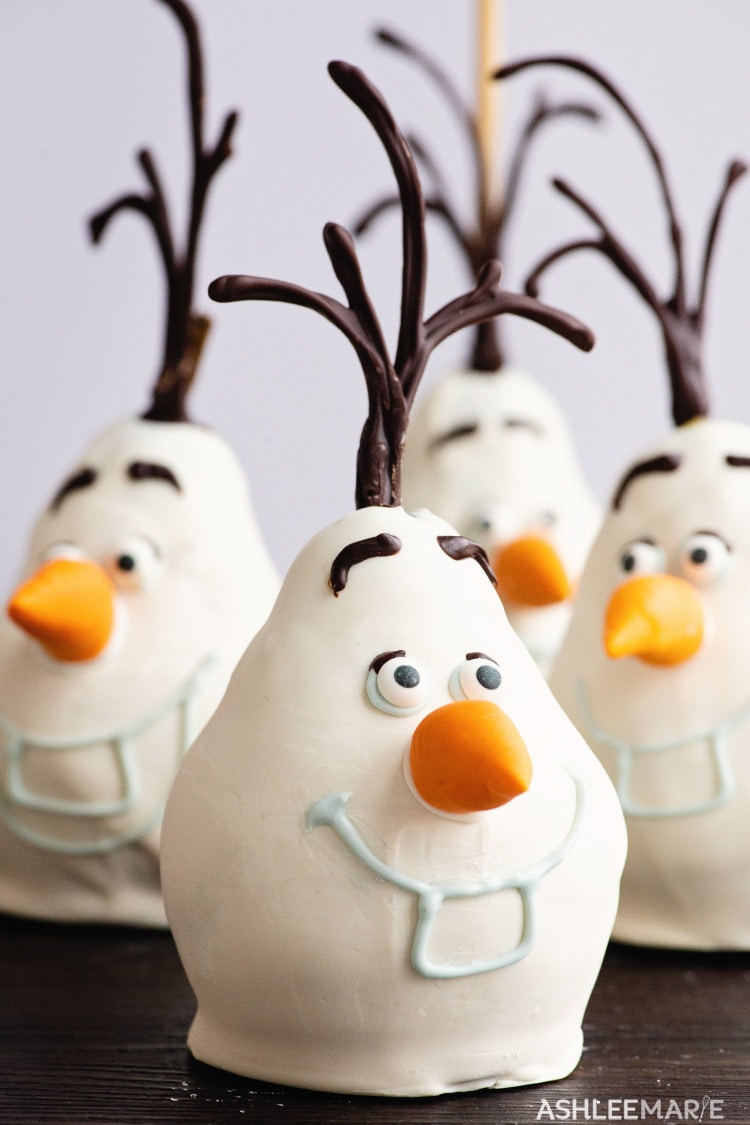
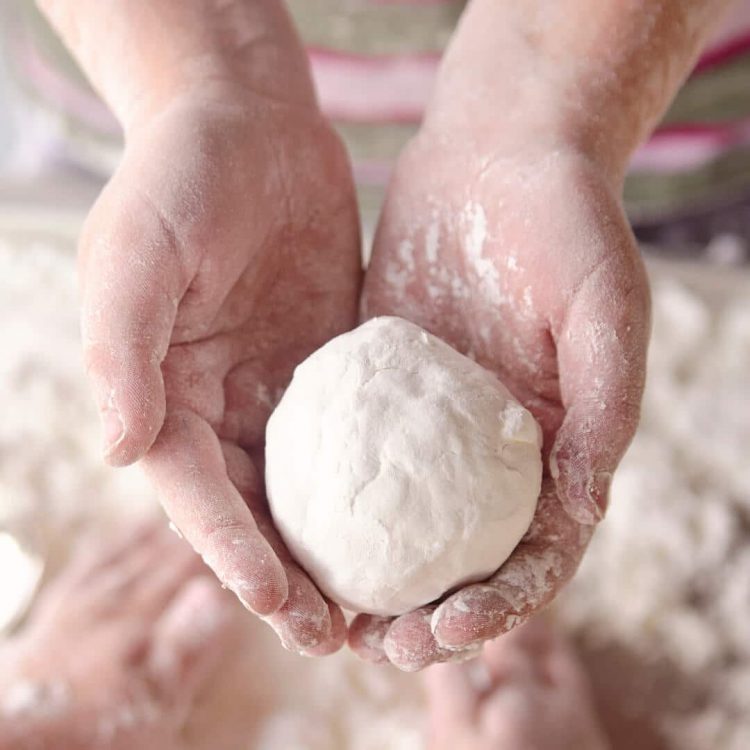
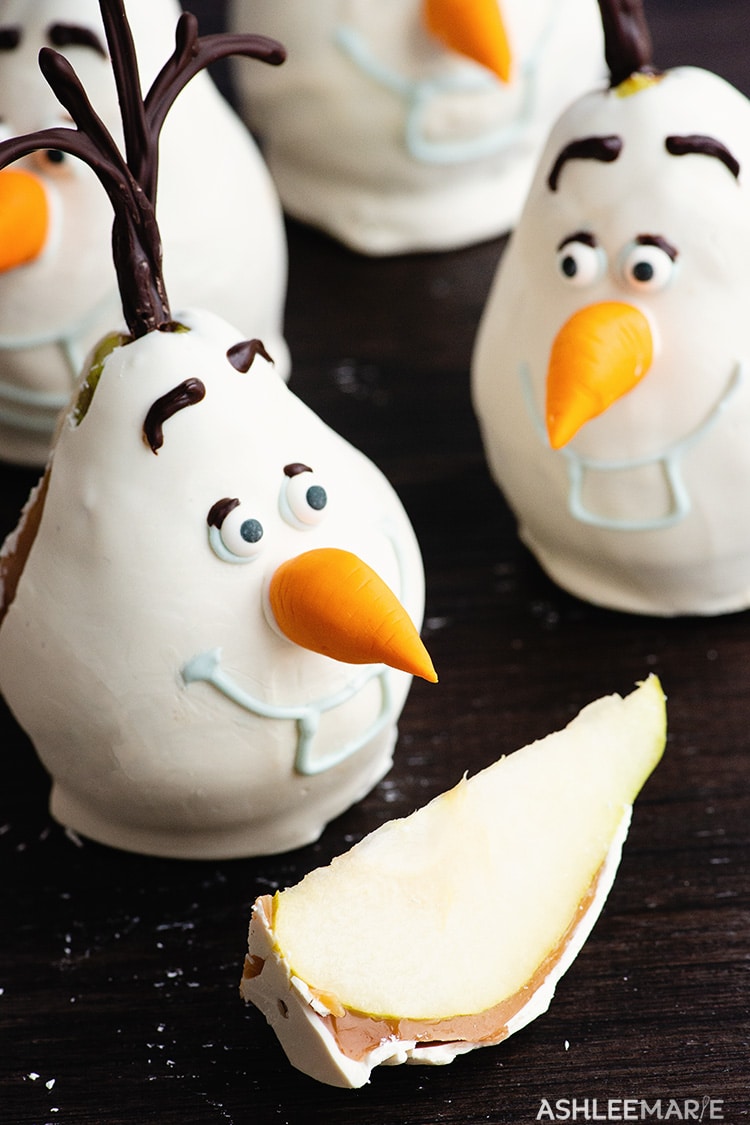
I had Lego Boy roll out a bunch of fondant noses for me. They aren’t all the same and they aren’t all perfect, but that’s what makes them so great!!! I think they all made great “carrots” this way. I considered adding some orange sugar to give it a sparkle, but opted against it.
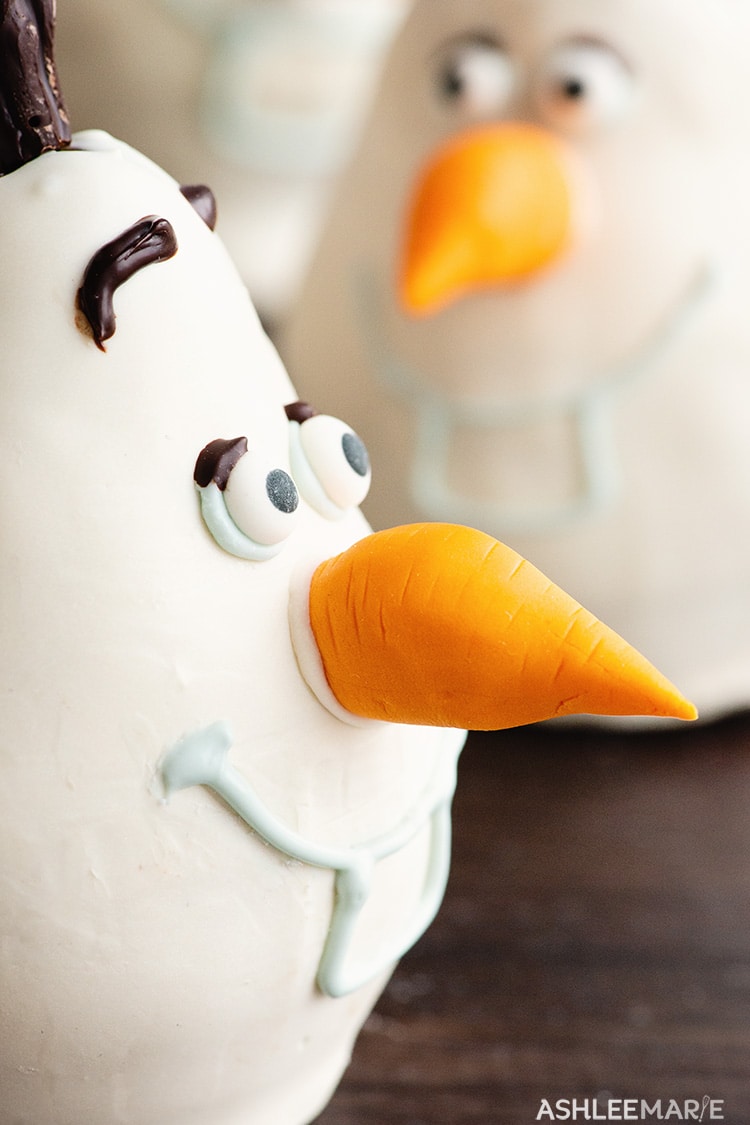
I used some of the melted white chocolate to connect the noses to the pears. Then I added some black gel food dye to turn the chocolate grey the first time.
The second time I used light blue – I think it turned out way better, and looks more like the movie olaf. I attached the candy eye’s with the grey chocolate. And use the same blue to pipe on the mouth.
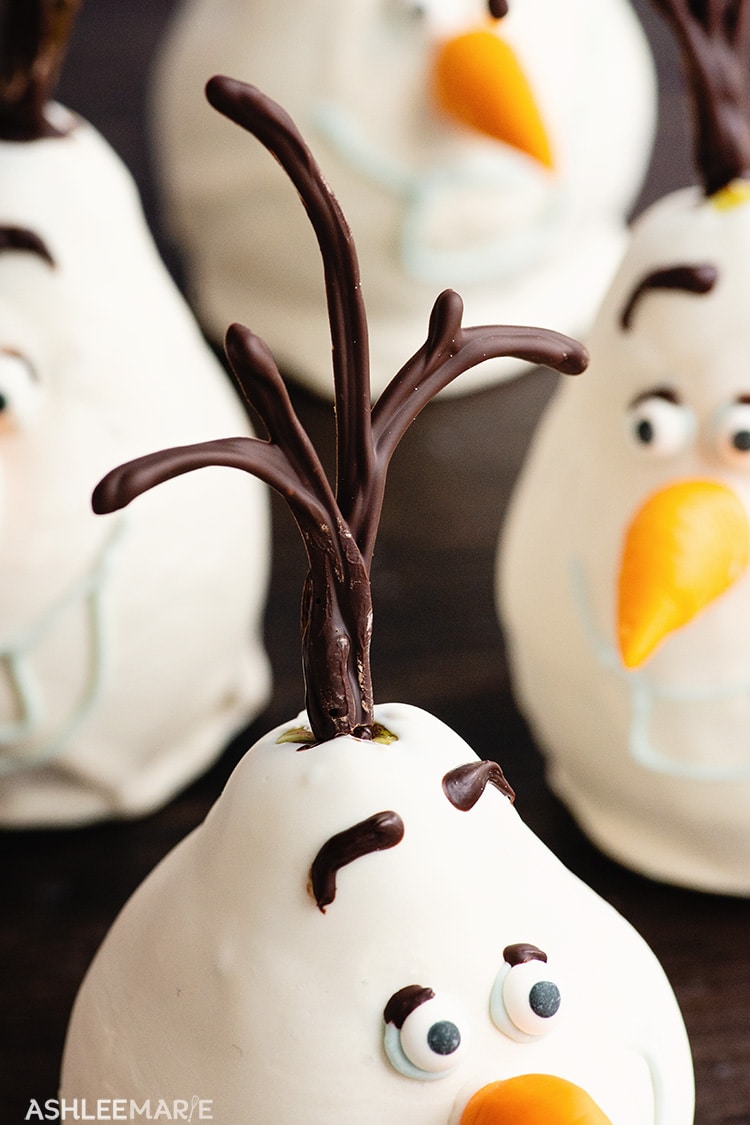
Then melt some normal brown chocolate to use for piping on the eyebrows. Even better? pipe some “branches” with the chocolate, let it set and attach to the top of his head!
The kids LOVED them and they tasted AMAZING! I will warn you, make sure you buy your pears the day before and use them right away they ripen FAST and start to get gooey/mushy quickly. These are not something you can make way ahead of time, they do NOT keep.
Olaf Caramel Apples (or pears)
If you love these Frozen Olaf Caramel Pears as much as I do, I’d love a 5 star review. Be sure to share on social media and tag me if you make it @ashleemariecakes or #makesomeawesome! If you want to stay updated on new recipes sign up for my newsletter and join my Facebook Group!
Tips for Melting Caramel
– I recommend peters caramel – it melts beautifully and tastes amazing. AND it’s the brand Disney uses to create their caramel apples!
– You want to melt the caramel to 150 degrees. You can go as high as 170 but don’t go over as the caramel will then cook and as it cools will harden and crack instead of staying soft.
- I recommend melting the caramel in the oven when possible. Add the caramel to a oven safe pot, turn the oven temp to 200 and melt the caramel for 1-2 hours until it hits 150-170.
- You can also use the stove top – just watch the temperature, and don’t over stir.
- You can also microwave the caramel – use 50% power and stir often to keep the hot spots evenly spread out, and to avoid scorching.
– Don’t over stir the caramel, it will add air bubbles that will effect your smooth coverage.
– use a spoon to help coat the pears while you turn them vs trying to evenly dip the whole thing. This way you won’t have to melt as much caramel (although you can let it cool and reuse it)
– You can pour the extra caramel into a freezer bag and let cool and remelt and use again another time.
– Keep air tight and leave in a cool dry place for up to a year. Dont refrigerate or freeze.
Tips for dipping Caramel Apples or pears
You can use apple skewers – but they tend to split the pear so be careful.
Make sure you clean the skin of the pears carefully – don’t be rough, but get any coating off – and let them dry.
Hold the pears over the caramel and use a spoon to help coat them – this will be easier than trying to dip the whole thing and then pulling it out of the thick caramel.
once you have the pear covered hold upright over the caramel letting the excess drip off, then scrap the bottom.
hold the pear upside down for a moment and let the caramel start to cool.
If adding toppings straight to the caramel do it now (not counting a chocolate coating).
Place on parchment paper and directly into the fridge – this will help the caramel set and avoid a lot of dripping issues.
Wait until the caramel is cool and set before dipping in Chocolate – then add whatever extra toppings or decorations you want.
To make this Chocolate-covered Caramel Pears you’ll need
- Peters Caramel
- Apple Skewers
- White Chocolate
- Blue candy dye (or Blue chocolate wafers)
- Chocolate wafers
- Orange fondant
- Candy Eyeballs
If you love my take on Disney’s Olaf Caramel Apples you’ll love these other Frozen recipes!
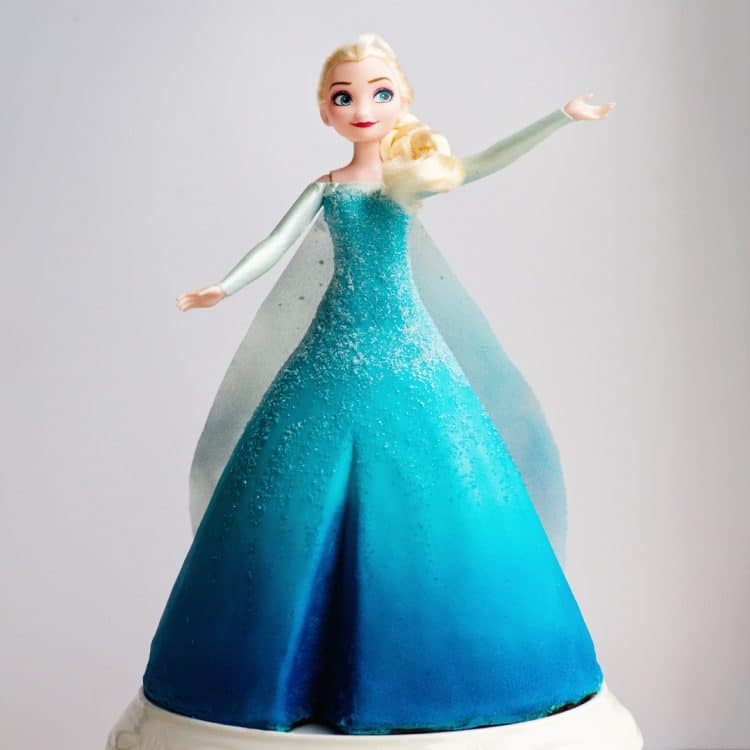
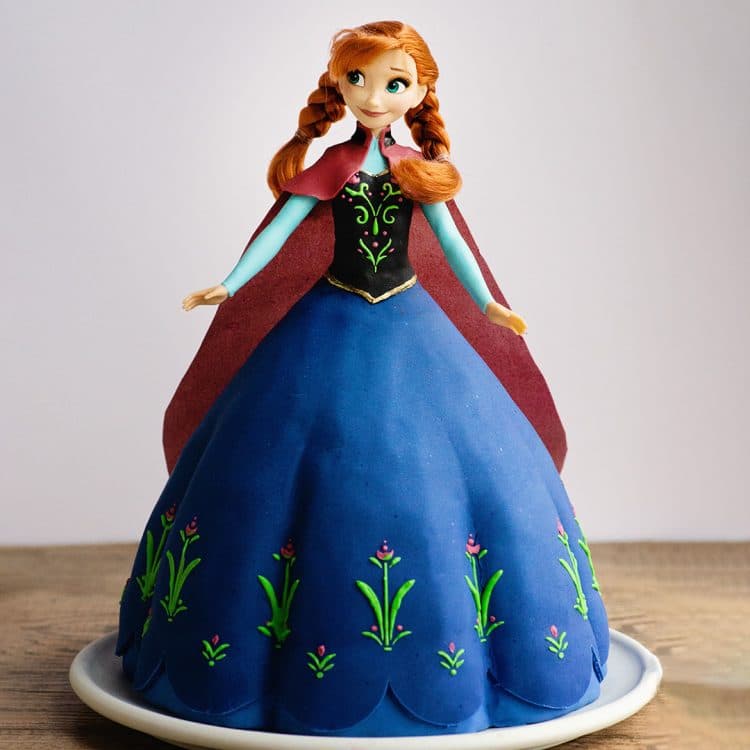
Elsa Princess Cake | Kristoff Jello Jiggler “Ice blocks” | Anna Princess Cake

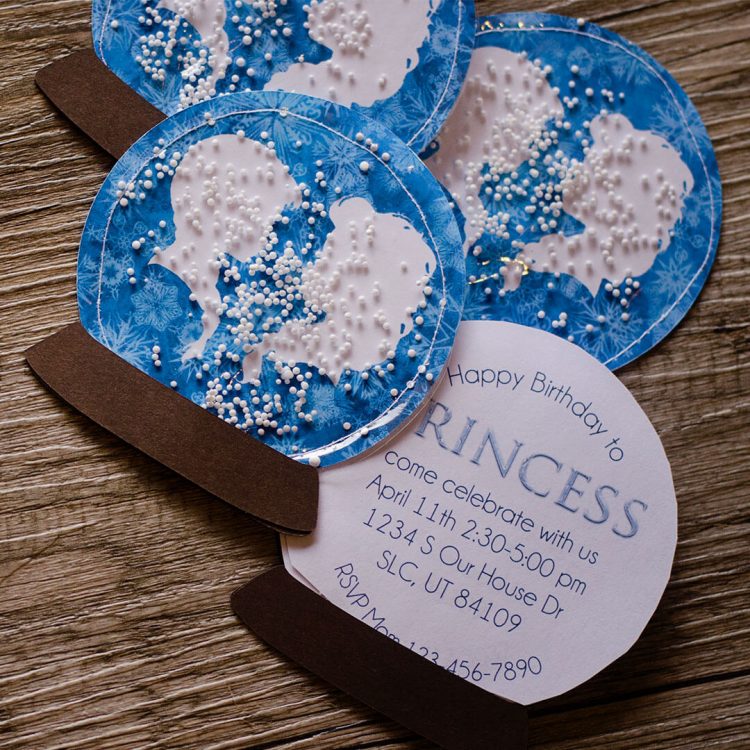
Snow Globe Rings | Frozen Party Printables | Homemade Fake Snow
Connect with Ashlee Marie Online!
To watch me make these Olaf Pears play the video in the recipe card. A short teaser video will be auto playing.
You can find all my cooking show style recipe videos on YouTube, or my short recipe videos on Facebook Watch, or my Facebook Page, or right here on our website with their corresponding recipes.
Frozen Olaf Chocolate covered Caramel Pears
Ingredients
- 8 pears
- 8 sticks
- 1 lbs caramel
- 10 oz white chocolate
- blue candy (oil based) food dye or a few blue chocolate wafers
- 4 oz chocolate
- 2 oz orange fondant
- 16 candy eyes
- piping bag
Instructions
- So I started by washing all the pears, then sticking them with caramel apples sticks. (Try not to let them split, if they do the caramel won't stick well, in fact it will keep oozing under the caramel and chocolate and cause problems later)
- Then melt about 8-10 oz of caramel and dip your clean and dry pear into the caramel.
- Give it a good swirl, making sure it’s all covered, then let it drip a bit.
- Once the largest drips are gone scrap the bottom off.
- Hold it upside down to let it set a bit, then place it on parchment paper.
- Do this with all your pears and let cool (I refrigerated mine for a little bit to hold their shape better).
- Do the same thing with the melted white chocolate and you can see the head already taking shape!
- I let the pears rest however they wanted, since trying to get them all upright was a bit of a struggle.
- Roll out a bunch of fondant noses in your palm to create the carrot shape.
- I use some of the melted white chocolate to connect the noses to the pears.
- Then add some blue food dye to turn the chocolate very light blue – or you could ad a few blue chocolate wafers melted to achieve the same effect.
- Then I attached the candy eye's with the light blue chocolate. Then pipe on his mouth.
- melt the normal chocolate and pipe on eyebrows. You can also pipe chocolate branches onto parchment paper and once they set add them to the top of the pears (maybe make them first if you want to go that route)
Video
Nutrition
")


Kathy@mishmashmom
So cute! What a fun idea!
Ashlee
Didn’t he turn out SO adorable! I am still in love with him!
Michelle
Are you kidding me?! How did you come up with this idea? It’s ADORABLE and looks DELICIOUS!!
Ashlee
Awww thanks!!! Seriously I saw the apple Olafs at Disneyworld and then remembered hearing that caramel pears taste even more amazing and it went from there!
Sara @ Mom Endeavors
These are insanely cute! What a great idea! We did a whole Frozen party too! 🙂 So fun!
Ashlee
SOOO many frozen parties this year and so many fun ideas out there!!! They all have something so cute about them!
Carrie @ Kenarry: Ideas for the Home
Ashlee, these are SO incredibly cute and clever. I’ll definitely be pinning and tweeting about them.
Ashlee
Thank you so much!!! I’m so glad you like them and want to share, nothing bloggers appreciate more, right???
Emily
oh wow!!! Amazing!! I’m pinning this.. so fun!
Ashlee
awwww thanks! I love how he turned out, seriously one my my favorite part of the party!
Sarah @ Miss CandiQuik
Omg – these are adorable! And I bet they taste AMAZING!
Ashlee
awww thank you so much! and they taste even BETTER than they look!
Cindy
These are so cute in the pictures! However, I tried making them and they didn’t turn out like the pictures—harder than it seems. 🙁
Ashlee
what part did you have a problem with? You have to make sure that your pears are BRAND new, they are so much softer than apples that they are easy to be too just pop off the sticks, and get too goopy. Try only doing it halfway in the caramel (so you can keep your hand on the pear). Make sure the caramel is high quality and warm enough that it is a nice thin layer, if it’s too thick it will keep running off the pear over night and cause more problems later. Anyway, I’m just guessing that the caramel was the tricky part (cause it was def the tricky part for me)
Karen @ The Food Charlatan
This is such a fun idea! I’m totally saving this for my daughter’s next birthday party!
Ashlee
you are so welcome! I’d suggest doing a practice run (like one or two) but do the party ones as close to the party as you can!
diony martinez mata
Me encanto lo de las peras ylas realizare pasr la fiesta de mi niete que sera el q15 de sep. Tratare de entender ya que no se ingles saludos
Porfis marcar las instrucciones en español gracias
Ashlee
I’m so sorry that I don’t speak Spanish and can’t translate, I hope that the pictures are helpful and maybe google translate for the page (I know you can get it with a chrome browser)
Holly
These are gorgeous! I’m sure they are delicious but I’d have to stop and admire them for a while first! 😉 Pinned them for later!
Ashlee
They are cute, for sure, but seriously they taste SO good!
Judy
Yum. Looks fabulous. I know 2 little girls who are big fans of Frozen who’d go wild over these. I am sure I could help them eat them. I’ll leave the work to their Mum though. I’ll be the one who encourages and helps get things needed and I might be nice and help clean up. The girls will have birthdays in a few months but think Mum will be a bit tired out with no 3 on the way
Ashlee
I totally understand that, since I have 5, although I was more tired at the beginning of my pregnancies than at the end. Hopefully you and the girls can have a BALL making some.
Karyn
CUTEST thing ever!!! My kids are now begging me to make them! 🙂
Ashlee
isn’t he a cutie!