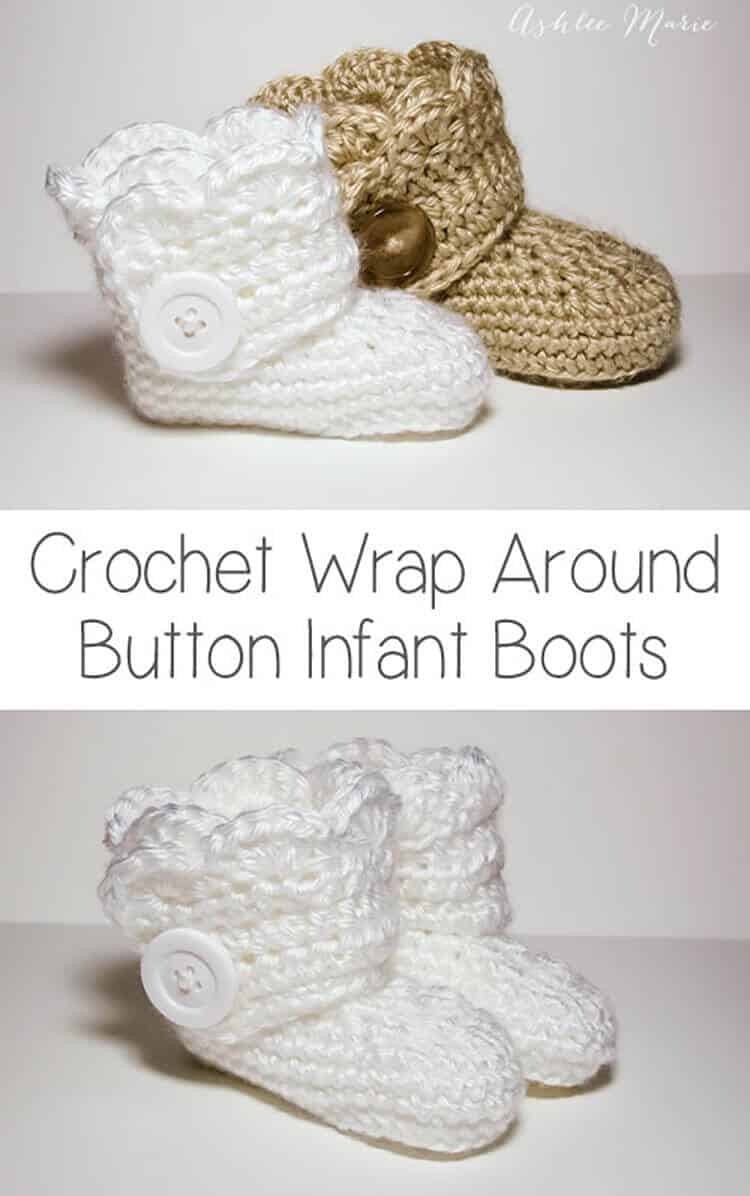
This is an easy to follow pattern to make wrap around infant booties – both for boys and girls.
Okay, after some confusion I’m separating out the patterns. Here is the one for the INFANT size! I realized after making a second set of these that I have two G hooks and they are different sizes???
So for the larger Baby sized shoes I used a G6 – 4mm for these infant shoes I used G6 – 4.25! So if your looking for an infant size 1 (or 0-3 month) boot your in the right place! For a larger (closer to size 4) shoe go to the crochet wrap around button baby boots!
Buy BOTH the Ad-Free pattern pdf’s for both the Baby AND Infant sized discounted here!
The pictures are still the same as before, for the larger size, I’ll try to substitute out smaller pictures when I make another pair!
Buy the Ad-Free pattern pdf for just the infant size here!
Infant wrap around boots
Crochet materials:
caron simply soft yarn
large buttons
G6- 4.25 mm hook (To go up a size use a larger hook, or a larger pattern, to go down a size use an G-4mm hook)
abbreviation:
ch (chain)
sl st (slip stitch)
sc (single crochet)
hdc (half double crochet)
dc (double crochet)
sc2tog (single crochet 2 together)
dc2tog (double crochet 2 together)
dc3tog (double crochet 3 together)

sole:
ch 11
row 1- sc in 2nd ch, sc 5 times, hdc 3 times, 7hdc in last ch, finish the rest of the round working along the back of the chain, hdc 3 times, sc 5 times, 4sc in the last/first ch, sl st to the first sc (28)
row 2- ch1, sc in same sc, sc 7 times, hdc, 2hdc 3 times, 3hdc (in one stitch), 2 hdc 3 times, hdc, sc 8 times, 2sc 3times, sl st to first sc (39)
shoe:
row 3- ch1, working in back loops, sc in same sc, sc around, sl st to first sc (39)
rows 4-5- ch1, sc in same sc,sc around, sl st to first sc (39)
row 6- ch 1, sc in same sc, sc 9 times, sc2tog, dc2tog, dc, dc3tog, dc, dc2tog, sc2tog, sc around, sl st to first sc (33)
row 7- ch 1, sc in same sc, sc 7 times, sc2tog, dc2tog, dc3tog, dc2tog, sc2tog, sc around, sl st to first sc (27)
row 8- ch 1, sc in same sc, sc 5 times, sc2tog, dc, dc3tog, dc, sc2tog, sc around, sl st to first sc, cut yarn weave in ends. (23)

Boot cuff:
for the right boot sl st in the 7th stitch from the seam, for the left boot sl st in the 11th stitch from the seam
ch 12
row 1- hdc in 3rd ch from hook- ch2 counts as hdc, hdc in next 9 ch, hdc in first sc (the same one you sl st in), hdc 19 times (there will be 3 spaces left), skip 2 spaces, sc in last space. (32) **note – some people had a problem with getting two right or two left feet. remember to not cross over the front, work down the inside, around the back and back up the outside, so you’ll work in opposite directions for each bootie, counterclock wise – looking top down, or “wrong” side out for the right booties and clockwise, or “right” side out for the left bootie**
row 2- ch2 (counts as hdc), turn, hdc in first hdc and around 28 times, ch 1 skip one hdc, hdc in last 2 (31- with a ch1 space)
row 3- ch2 (counts as hdc), turn, hdc, hdc in ch1 space, hdc around (32)
row 4 scallops (girls)- turn, 5dc in second hdc, *skip 1hdc, sc in next hdc, skip 1hdc, 5dc in next hdc*, repeat around (8 shells), sc down the side (I fit 5), continuing around sc across the bottom along the original chain (11), sl st, cut yarn and weave in ends

row 4 simple (boys)- ch1, turn, sc across top (32), down the side (5) and across the bottom chain (11), sl st, cut yarn and weave in ends
And both the boys and girl versions (again these are the larger size)
Don’t forget to add a button where ever you like and your done! I placed mine at the bottom of the 5th hdc over from the front- I might go lower next time… or maybe two smaller buttons?
And one final picture, I thought you might want an inside shot so you can see how it wraps a bit… I’m still so very much in love with these boots.


Wendy
Hello 🙂 i love your pattern! Only wondering if i have to use the front, back, or both loops when making the sole???
Ashlee
ever row is totally normal except the ONE that says work in back loops. when it doesn’t say it means normal.
Amelia
I have never made booties before, but I tried your pattern and it worked GREAT for me! I thought it was incredibly easy, especially after I finished the first and went on to the second. Will be making lots of these for my little girl due in November!
Ashlee
awww thanks! I’m so glad, I’m glad you like them.
Diane
Thank you! Thank you! Thank you!! I have been looking for a pair of high tops with buttons and everything is buy it and the instructions I got were translated to English so didn’t make much sense. Your pattern is clear and concise and JUST what I’ve been looking for! Love it!!!!
Ashlee
thank you so much! I’m so glad it was clear for you. I hope it goes really smooth for you!
Melissa S
Help! I’ve made the base of a boot (everything except the wrap), and it’s so crooked!
I followed the pattern, and I’ve tried stretching the right side, but it still won’t straighten up. I think there *is* something wrong with the pattern …
(link has photo)
Ashlee
after you finished the sole did you keep going from where you ended up (the correct way – off to the side) or did you finish off and restart in the center of the heel (wrong way)? the only other thing I can think of is that maybe your sole is off, does it look like the diagram with the 3hdc in the CENTER of the 7hdc of the first row? that would mean it’s getting off on that first stitch somehow. Do either of those suggestions make sense or help?
Melissa S
I. followed. the. pattern = I did not restart or deviate from the directions.
Ashlee
Whoa, no need to get upset! I was simply starting by asking about the two most common mistakes people make, people who think they are following the pattern perfectly. I start asking about the common issues and if that’s not it work from there. you didn’t answer my other question: is the 3hdc in the CENTER of the 7hdc of the first row? because it looks like it might be off one stitch each row. everyone writes patters a bit different so the way each row ends and begins is sometimes the place where people get off. and if that continues around you end up with your top way off. and finally it could simply be that you crochet tighter than I do. If your stitches are all in the right place (the center increase and center decrease all on top of each other then it might just need to be blocked.
Tammy
These are awesome!!!!
Thank you so much for sharing the pattern.
They look great and everyone who sees them thinks I’m amazing and are in awe of them. None of them crochet so they think I’m magical or something lol
Ashlee
your are so welcome! I’m so glad you like them and that you are getting so many compliments! Always a super fun thing!
Barbara Kessler
Just found this pattern and I really like it for my GB 2 B. What is your gauge on these booties? I’m using a worsted wool alpaca blend that are leftovers from the sweater I just knitted. When I make one it came out HUGE. I couldn’t find where the gauge is mentioned.
Thanks
Ashlee
Sorry, I am not a professional pattern writer by any stretch of the imagination, these are just what I made for my baby and I shared for anyone interested. I didn’t create a gauge, I wouldn’t know how to begin to make one for this pattern. I used baby soft, so it’s prob MUCH thinner than the alpaca your using, all I can say is try a thinner yarn and smaller hook. Try doing just the sole and see if it’s the size you want before going on to the whole shoe.
Nina
Hi! So happy I found this pattern as I’ve been searching extensively. I’m making my first bootie and am at row 6 and I’m doing something wrong. I have the 39 stiches on row 5 as explained; however, with the stiches given, I don’t see the decrease of 6 stitches. My together stitches don’t end up exactly at the toe and I’m still at 39 plus the extra together stiches. What am I doing wrong?
Ashlee
the sc2tog, dc2tog and dc3tog are all decreases. does that help?
Miriam
Thank you for a simple yet very effective pattern, i have tried 3 baby bootie patterns this evening and been very disappointed with them all, this was a pleasant find, and free too, double bonus. Thank you once again.
Ashlee
you are so welcome! and thank you for taking the time to comment! It makes my day to get positive comments on these patterns!
MLJ
I’ve already made two pairs of these for our babe due in 9 days, but I’m wanting to make one more size and now having trouble with my stitch counts. Wondering if you are counting the chains or sl sts in your stitch count in parentheses for each round. Thanks much. They are adorable!
Ashlee
no I’m not. I’ve never heard of a pattern counting sl st’s and unless a pattern says “count this chain as a stitch” they don’t ever count. so since i don’t say that it’s not counted in my pattern.
Megan
ok. thanks. that’s always confused me and this helps. I was able to match the pattern better and our little girl is home wearing the booties! thanks again.
Ashlee
I hope it helped a little. I’ve had trouble when translating patterens from other languages too, since they have their own “rules” that the rest of us don’t always know! Glad you figured it out
Kendra Julian
I am new to crochet. I have learned so much from your pattern. I have also learned lots from the questions and answers. I do have one question about rows 4,5 and six. In row 4, I did the following: ch1, sc around, sl st to first sc sc. Does this mean in row 5 (after the sl st) I should sc in the first sc and then ch 1? Then for row 6, do I (after the sl st) sc sc and also ch 1, AND sc in same sc?
Thank you very much for the pattern AND your help!
Ashlee
nope that was a typo, just sl st to the first sc, then move onto the next row.
Jessica
Hey just a quick question I’m new to this and I’m sorry if you said it beforeI didn’t read all the comments, so manybut when you posted the pictures of the duties with the pictures from the bigger size or the infant size?mine just don’t look the same size no matter how many times I’ve made them.
Ashlee
the pictures are of the larger size, but the principles of each row are the same so i used the same images.
Catrinel
Thank you so much!!!! You are grate! Hugs from Romania.
Ashlee
You are so welcome! I’m so glad you enjoyed the pattern and took the time to comment, totally makes me feel so great when I hear such sweet words!
Laura
I went online to find booties to buy and the image in my mind were these booties. I do not know how to crochet and wish I did because these are absolutely amazing!!! You have inspired me to lean a new craft. I just hope I can get it down before her feet get too big 🙂 Thank you for the inspiration and the generosity you have to share this with everyone.
Ashlee
you are so welcome! i sure hope you figure it out before she get’s too big! their is also a larger size pattern for the same booties just in case. Also a few of my readers use my pattern to make and sell on etsy if you decide you can’t wait!
Lauren
Hi. I am soo in love with these boots! I have attempted to make them numerous times and have had them all twisty. I think I have figured out the problem as I have seen a few comments to the same effect. In row one, you start with 6(8) side stitches. We curve the toe w a come back with 5(7) side stitches. The diagram you made shows both sides with 6(8) stitches.I have not finished my newest boot, but I think that may be the problem with the twisted sole? Because you start with sc in same sc, then 5(7) stitches. And then before the toe you end with 5(7) stitches leaving one side shorter.Please advis ewhich is right.
Ashlee
nope, its written right
row 1- sc in 2nd ch, (first sc, and part of the heel, not part of “6”)
sc 5 times, (5 sc)
hdc 3 times,
7hdc in last ch, finish the rest of the round working along the back of the chain,
hdc 3 times,
sc 5 times, (5 on the other side)
4sc in the last/first ch, (i think the 4 in the first ch are messing you up, I think your counting the first of these 4 as part of the side 6 when it’s actually part of the 5 stitches in the first chain)
sl st to the first sc (28)
the sides are perfectly even, it twists because of people crocheting tight or loose, those 7 in the toe tend to push the one side over more, but as you keep working, and as the baby wears them they work themselves out just fine.
natasha
Hi, I just wanted to say thanks for this free pattern! I’v just made my first pair (for twins so have one more set to go) and they have turned out well! Easy to follow pattern too which was good because I’m only a beginner! Thanks again! Tasha (England)
Ashlee
I’m so glad that you found them easy! I start to get worried as the negative comments start coming in, so I treasure the nice ones like yours. thank you thank you!
Emma
Hi! I love these boots! Thank you for posting!!! I’m having a problem though. For rows 4 & 5, it says “sl st to first sc sc”. After I sc around & sl st to the first sc, am I supposed to sc into the same sc or is it a typo? Thank you so much!
Ashlee
typo, fixed now, thanks!
Andie Cavanaugh
I am just starting to work on trying this pattern starting with row 3 you state to work with the back loops my question is at row 6 are you still working in just the back loops?
Ashlee
it only says to work in the back looks on row three, so it’s the ONLY row you do it for, it’s just to give a sharp edge to the bottom of the booties. It would say “from now on” if it was an every time thing, or “work in back loops” for each row you are supposed to use it.
Pam
Absolutely beautiful and so easy to make! Thank you so much for sharing.
Ashlee
thank you so much! I’m so glad you like the pattern.
Dell Bodden
How do you do sc2tog? two in the same chain?
Ashlee
it’s a decrease stitch, your decreasing two stitches into one using a sc, thus sc 2 together (sc2tog)
cindy salas
Hello,
Thank you for sharing this pattern. Didn’t run into problems with it. Almost done with the first boot, just need a little help with row 4 of the cuff. The very last part (sc down the side (1 fit 5), continue around the bottom along the original chain 11. Question how should I dc down the side and around and what does (1fit 5) mean?
I was hoping someone else asked this question so I wouldn’t have to bother you. Again thank you for the free pattern God bless.
Ashlee
It’s not 1 fit 5, it’s I (as in me), I fit 5 sc down the side. When doing sc’s down the sides sometimes it’s hard to know how many you can fit down, some people only do 4, some do 6, I fit 5!