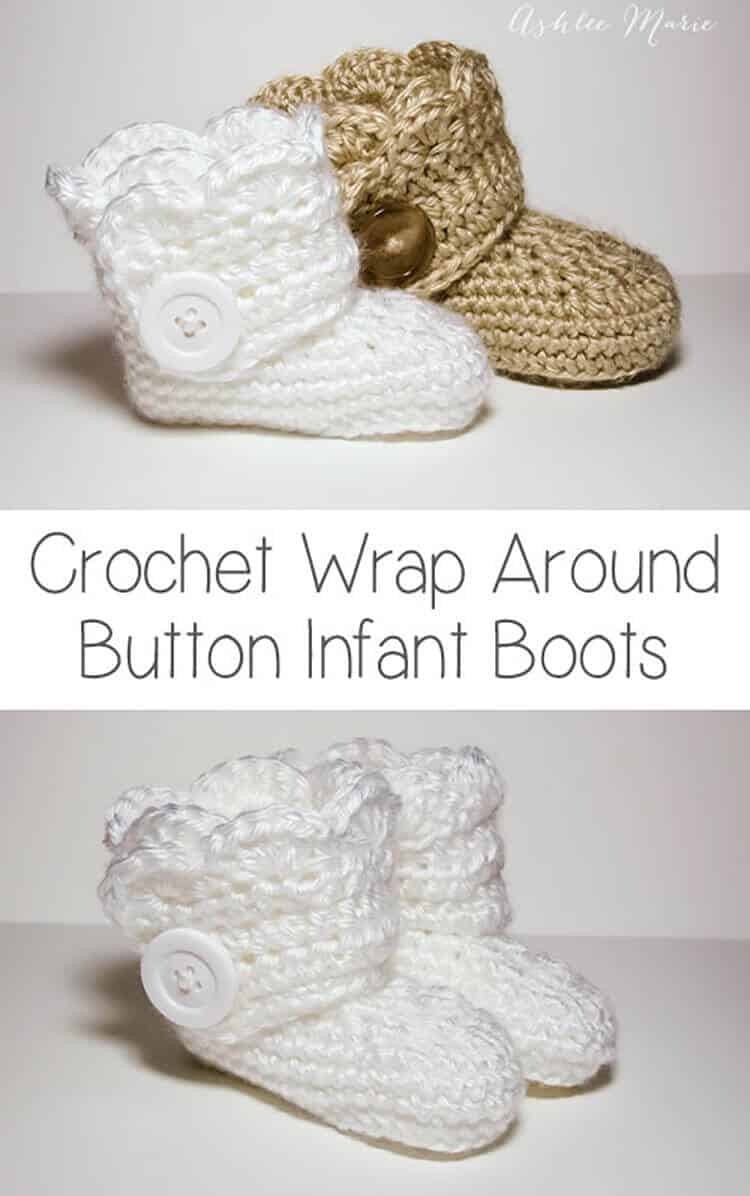
This is an easy to follow pattern to make wrap around infant booties – both for boys and girls.
Okay, after some confusion I’m separating out the patterns. Here is the one for the INFANT size! I realized after making a second set of these that I have two G hooks and they are different sizes???
So for the larger Baby sized shoes I used a G6 – 4mm for these infant shoes I used G6 – 4.25! So if your looking for an infant size 1 (or 0-3 month) boot your in the right place! For a larger (closer to size 4) shoe go to the crochet wrap around button baby boots!
Buy BOTH the Ad-Free pattern pdf’s for both the Baby AND Infant sized discounted here!
The pictures are still the same as before, for the larger size, I’ll try to substitute out smaller pictures when I make another pair!
Buy the Ad-Free pattern pdf for just the infant size here!
Infant wrap around boots
Crochet materials:
caron simply soft yarn
large buttons
G6- 4.25 mm hook (To go up a size use a larger hook, or a larger pattern, to go down a size use an G-4mm hook)
abbreviation:
ch (chain)
sl st (slip stitch)
sc (single crochet)
hdc (half double crochet)
dc (double crochet)
sc2tog (single crochet 2 together)
dc2tog (double crochet 2 together)
dc3tog (double crochet 3 together)

sole:
ch 11
row 1- sc in 2nd ch, sc 5 times, hdc 3 times, 7hdc in last ch, finish the rest of the round working along the back of the chain, hdc 3 times, sc 5 times, 4sc in the last/first ch, sl st to the first sc (28)
row 2- ch1, sc in same sc, sc 7 times, hdc, 2hdc 3 times, 3hdc (in one stitch), 2 hdc 3 times, hdc, sc 8 times, 2sc 3times, sl st to first sc (39)
shoe:
row 3- ch1, working in back loops, sc in same sc, sc around, sl st to first sc (39)
rows 4-5- ch1, sc in same sc,sc around, sl st to first sc (39)
row 6- ch 1, sc in same sc, sc 9 times, sc2tog, dc2tog, dc, dc3tog, dc, dc2tog, sc2tog, sc around, sl st to first sc (33)
row 7- ch 1, sc in same sc, sc 7 times, sc2tog, dc2tog, dc3tog, dc2tog, sc2tog, sc around, sl st to first sc (27)
row 8- ch 1, sc in same sc, sc 5 times, sc2tog, dc, dc3tog, dc, sc2tog, sc around, sl st to first sc, cut yarn weave in ends. (23)

Boot cuff:
for the right boot sl st in the 7th stitch from the seam, for the left boot sl st in the 11th stitch from the seam
ch 12
row 1- hdc in 3rd ch from hook- ch2 counts as hdc, hdc in next 9 ch, hdc in first sc (the same one you sl st in), hdc 19 times (there will be 3 spaces left), skip 2 spaces, sc in last space. (32) **note – some people had a problem with getting two right or two left feet. remember to not cross over the front, work down the inside, around the back and back up the outside, so you’ll work in opposite directions for each bootie, counterclock wise – looking top down, or “wrong” side out for the right booties and clockwise, or “right” side out for the left bootie**
row 2- ch2 (counts as hdc), turn, hdc in first hdc and around 28 times, ch 1 skip one hdc, hdc in last 2 (31- with a ch1 space)
row 3- ch2 (counts as hdc), turn, hdc, hdc in ch1 space, hdc around (32)
row 4 scallops (girls)- turn, 5dc in second hdc, *skip 1hdc, sc in next hdc, skip 1hdc, 5dc in next hdc*, repeat around (8 shells), sc down the side (I fit 5), continuing around sc across the bottom along the original chain (11), sl st, cut yarn and weave in ends

row 4 simple (boys)- ch1, turn, sc across top (32), down the side (5) and across the bottom chain (11), sl st, cut yarn and weave in ends
And both the boys and girl versions (again these are the larger size)
Don’t forget to add a button where ever you like and your done! I placed mine at the bottom of the 5th hdc over from the front- I might go lower next time… or maybe two smaller buttons?
And one final picture, I thought you might want an inside shot so you can see how it wraps a bit… I’m still so very much in love with these boots.


Sammy
This pattern is so great! Question…on row 3,4 and 5, do you use the slip stitch from the previous row as your last space to single crochet in for the row you are working on? I normally don’t crochet in the slip stitch when I’m doing the next row but I have taught myself a lot of crocheting so I’m not sure if I do it right 🙂 thanks!
Ashlee
no, I don’t count the sl st as a stitch. In all the years I’ve been doing crochet you never use the sl st, it’s not a stitch, it’s just to connect stitches. you also don’t count the ch at the beginning of the row.
Jessi
Super cute boots! Great pattern! Didn’t have trouble outside of my own mistakes. Thanks so much for sharing — much appreciated!
Ashlee
I’m so glad! Thank you so much for taking the time to comment and tell me that you were able to make it! I get so many questions that sometimes I wonder if i just should take them all down! So I live for sweet comments like yours! Thank you!
Jessi
Love these booties and I appreciate you posting the pattern! Thank you so much!
I made the infant size and unfortunately determined they’d be too small for my niece, but the size 4 pattern is definitely too large. She is in between a size 2 and 3 for the winter… can anyone suggest which would be better, using a smaller hook on the size 4 pattern or using a larger hook on the size 1pattern? I would greatly appreciate some input!
Ashlee
I’d try both, just making the soles, and decide from there. The sole doesn’t take too much time but you’ll be able to tell which one will fit better!
Erika
Hi. These booties are adorable. Just curious if anyone else got two left boots too…it’s not too noticeable, but I noticed.
Ashlee
The boots are the same, only the cuffs are different. you can make it with the seam on the other side, but it’s much more complicated and trying to teach it in a free pattern is a bit challenging. You can attempt to do it yourself, you just do the end of each row (the heel) at the begining, so you do heel, side toe side instead of side, tow side heel. Does that make any sense?
Stephanie s
Can someone send me a free pattern for these girl boot slippers, Thank you.
Ashlee
I’m not sure why your asking this, the full pattern is right in this post, there isn’t anything more. And you can print or email the pattern yourself from this page, the green “print email” button (just click on the images and paragraphs you don’t want before printing)
Megan
Wish i was good at crocheting so i can make these, but I’m clueless to this stuff. You should make them and sell them.
Ashlee
Thanks so much, I have no interest in making and selling items, I tried it for awhile, it just wasn’t for me. But because I don’t I allow other people to make and sell from my pattern, I’ve given permission to prob a dozen sellers, so if you check out Etsy I’m sure there are a few sellers that are using this pattern to make some.
Jennifer
I am in awe of the strong and giving woman you are…5 children, special needs and you share your amazing talents with us…During this xmas season I want to wish you and your family a wonderful holiday and thank you for sharing a little bit of yourself with me.
….Oh yeah…..I love this pattern….You have explained and written it beautifully….
Ashlee
thank you SO much! Tis the time of year when I get a lot of activities on these patterns, it’s so nice to have such a sweet comment to wake up to!
Lauren
Thanks so much for the amazing free pattern. I just learned to crochet yesterday and was able to make these following your tutorial. The photos were very helpful! I used a 5.00 mm hook with worsted weight yarn and it produced a size 2 bootie, if anyone is looking for a size between the two you’ve made. I did have to add an extra row at the top of the foot to make it look right though; I think it was sc 5, sc2tog, dc3tog, sc2tog, sc around. Thanks again!
Ashlee
you are so welcome! Thanks so much for the sweet comment.
Shelly
I’m having difficulty with rows 6-8, am I suppose to skip some stitches. If row 5 is 39 stitched and I’m increasing won’t I get more than 33 stitched in row 6?
Ashlee
rows 6-8 are DECREASE rows, not sure why you would want to increase, we’re trying to close the shoe up in those rows.
Ashley
This is the part I’m stuck on as well. I keep getting more stitches than 33 and the end of row 6 and I can’t figure it out. Don’t have a clue where I’m going wrong.
Ashlee
So you end row 5 with 39 stitches
row 6- ch 1, sc in same sc, sc 9 times,
sc2tog, (this is a decrease so you go down by 1)
dc2tog, (this is a decrease so you go down by 1)
dc,
dc3tog, (this is a double decrease so you go down by 2)
dc,
dc2tog, (this is a decrease so you go down by 1)
sc2tog, (this is a decrease so you go down by 1)
sc around, sl st to first sc (33- so there are your 6 stitches of decreases)
Ashley
Thank you for the fast response! I am doing them as decreases which is why I’m so confused! Lol I will double check the stitches I have in row 5 again. Then just keep trying until I get it right! Lol love this pattern though!
Ashlee
So did you ever figure it out???
Teresa
I’m confused also. I can see that you are terribly patient and I am a beginner. If you are putting 2 or 3 stitches together in one stitch, then it seems that you are adding, not decreasing. You will end up with more on the next row. Please help me understand this. My thinking is obviously backwards ): Thanks
Ashlee
your turning what WAS 2 stitches into just one stitch, so taking away a stitch. It is a DECREASE not increase stitch. An increase stitch would be, 2hdc, putting 2 stitches in ONE, not taking 2 and making one. Does that help at all?
Dawn
This is my go – to baby boot pattern! I’ve made them several times and I LOVE them!
To make the tops of my boots the same I follow the pattern as written for the left boot. For the right boot, I cut off after row 3 of the cuff. I attach the yarn at the base of the strap and then work row 4 in reverse. Easy peasy!
Thanks so much for this great pattern!
I kind of hate to saythis, but it appears that someone is selling your pattern on etsy at https://www.etsy.com/shop/EmmeCole
Ashlee
thank you so much, and that is totally a way to get the cuff the other direction. And thank you so much for looking out for me. that’s actually the booties that my cousin sent me asking me to make (her pattern is older than mine) BUT I don’t pay for patterns, EVER, so I sat down and created my own based on her picture. I’m sure our patterns are different, but i’ve never actually bought and tried hers, just inspired by the image.
Dawn
I’m really glad that they are 2 different patterns! I never ever pay for patterns either, so I, too, have created my own pattern from a picture!
Thanks again for this pattern! I’m getting ready to make a pair with the simple cuff for the first time!
Ashlee
your so welcome, I hope you enjoy the pattern!
Lizzie
thanks for that idea! Was trying to figure out how to make it the same since I might be a little bit of a perfectionist when it comes to my crafts 🙂
Sheri
This may have already been answered in the comments, but I didn’t read through all of them to find out. How long are these booties made as written? My granddaughter’s feet are 3″ long and I’d like to know if they’re going to fit before making them. Thanks!
Ashlee
I don’t include measurements like that because then I get a ton of complaints when they aren’t exact (because different yarns, and tight or loose crocheting will change it). I suggest making just one sole, it whips up really fast, and measuring your own stitching, that way you can tell if it’s going to fit the way you work or not. If you need it just a tad big bigger move up a hook size or yarn size. and if it needs to be much bigger try the larger pattern.
Suzanne
Thank you for the pattern on the booties! I just made my first pair for my 1 yr. old Grand daughter and will make more different sizes. They are so cute! And Free!
I want a pair for myself!
Thank you again and keep up the good work!
Ashlee
Thank you so much! and I’m so glad you like the pattern!
Brittany Boozer
I absolutely loved this pattern! I am working on some gifts for my godson that is due next month including a blanket, hat, bib, and booties, and I tried a bootie pattern that was really similar to yours a few days ago. After trying it three or four times without success, I finally looked for a new pattern to try and ran across yours! I loved it!!! So easy to follow. Thanks so much for your free patterns.
Ashlee
YAY! you just made my day, that makes me so happy that you found my pattern easy to use! Congrats on the upcoming godson!
Teresa
Row 3 says “do in back stitches”. Are Rows 4 & 5 also done in the back stitches??? I’m new to crochet also. LOVE these but get confused easily. Thanks!
Ashlee
nope, just the row that says too. It would say it every row or say “do this every row” if you are supposed to repeat things like that. It’s just to create a sharp edge between the soles and sides. does that help?
Lauren Wright
Hi! I’m trying to make these and I don’t think it’s looking like it should. Reading patterns is new for me so that’s probably why I’m having problems. I do have some questions though. What are the numbers in parentheses for? On row 3, for example, does it mean I need to sc 39 sc’s? I can’t figure out where my rows need to end and begin. Any help you can give would be very much appreciated!! 🙂
Jackie
That is correct. The numbers in parentheses are the total number of stitches you need in that round. On the cuff, when she includes the chain 2 as one of the hdc, you would count that as one stitch in the round. If the patrern doesn’t say that a chain stitch counts as anything, don’t include it in your count. Hope that helps and good luck!
Ashlee
the parentheses at the end are the number of stitches you should have in that row, it helps you stay on track!
Jackie
I love this pattern! I have made one pair according to the pattern and several others with variations, doing a full cuff instead of the wrap around style. They are so quick to whip up! While the inside and outside of crochet look different, for the people that are having issues getting the directions for how to make a left and right, they could just turn the booties inside out. 🙂
Ashlee
actually you can’t. because in row three, your working in the back stitches to create a sharp edge of the sole, if you flip it inside out you’ll end up with a really weird edge, that would look way more pronounced and awkward than the “wrong” side edge of the cuff. ALSO if you do that the the entire shoe portion of the bootie would be inside out, which I think would be way more obvious. Personally I don’t get it, no one has ever thought my booties looked right side wrong side before, who gets that close? BUT I also believe people should feel free to make patterns work for THEM!
Hope
This is a GREAT pattern I love it THANK YOU SO MUCH I will defintly be making these for my little sister Faith who is due in may, THANK YOU THANK YOU THANK YOU 🙂
Ashlee
Awww thank you! and I hope you enjoy making them! I bet your sister will love it so much.
Lizzie
Firstly, thank you for this pattern! fell in love with it as soon as I saw it. Had a few struggles getting the first one done but I think that was mostly due to being left handed and trying to figure it out (I had to use the front loops instead of back to get it to stand up :)) but now I have lovely booties for a gift.
My only question is, since it sounds like you have made these for a baby, does the button really need to be functional? found adorable ones that match perfectly but are too big for the size of the buttonhole that is in the cuff. Any guidance/opinion would be helpful!
Thanks again for cute pattern!
Ashlee
I’m glad you figured it out! I’d definitely make the cuff button functional for a baby, the reason for that is that you want to open it up to easily get their feet in, then button it TIGHT so they can’t kick them off. If they can slip on then they can slip off easily… then get lost. Does that make sense?
Ayesha
Dear Ashlee!
Thanks for posting all these wonderful patterns for free! Its great encouragement for all us novice crocheters out there. Recently I was asked to make a pair of Wrap-around booties.
I tried to, but the pattern didnt seem to be put together properly. I then did some troubleshooting, and came across your ORIGINAL pattern! I was shocked at the prospect of someone copying your pattern and doing so while making glaring errors (row 2-3 of the cuffs are missing), and you are not given any credit! I hope you are able to sort out matters with this blogger who has stolen your work.
I also hope it does not deter you, or all those other kindly and helpful crocheters who share their hard work with the world.
Hope this post was helpful!
Ayesha.
Ashlee
Thank you so much for letting me know, I reached out to the blogger and she took the pattern down. I appreciate you letting me know! Glad it worked out for you!
Marny CA
These are sooooo adorable! My question is: do the soles look alike or do they have the left/right look??
I’d love to try these for charity – and get the rest of the group to make these, too. Everything our group makes, whether knit, crochet, or loom is for different charities.
Katja Sch.
They have a left look! That’s why I’m asking for the right one…
Ashlee
because your working in the round it will twist and look left and turned as you work, just keep going, it’s normal I promise, once your done you can block it and straighten them out! (or just put them on the baby and it will work itself out, I’m too lazy to block when I’m making for my own baby, I do block when I’m giving them as gifts though.)
Katja Sch.
Thank you so much for the great tutorial!!
I finished boot #1 – the left one. No other option because the sole said so. ;)) My question: How can I make the right one, that the sole turnes to the other side? Do you know what I mean? My English is not that good…
Best regards from cold Germany…
Ashlee
the sole is symmetrical, I promise, there is no left or right. It looks that way because you are working in the round and working like that twists the sole, when you finish the bootie it will still look twisted, just wait until you finish the booties and block them to straighten them out. mine did the same thing, all booties worked this way do, they all work themselves out!