This is an easy to follow pattern to make wrap around infant booties – both for boys and girls.
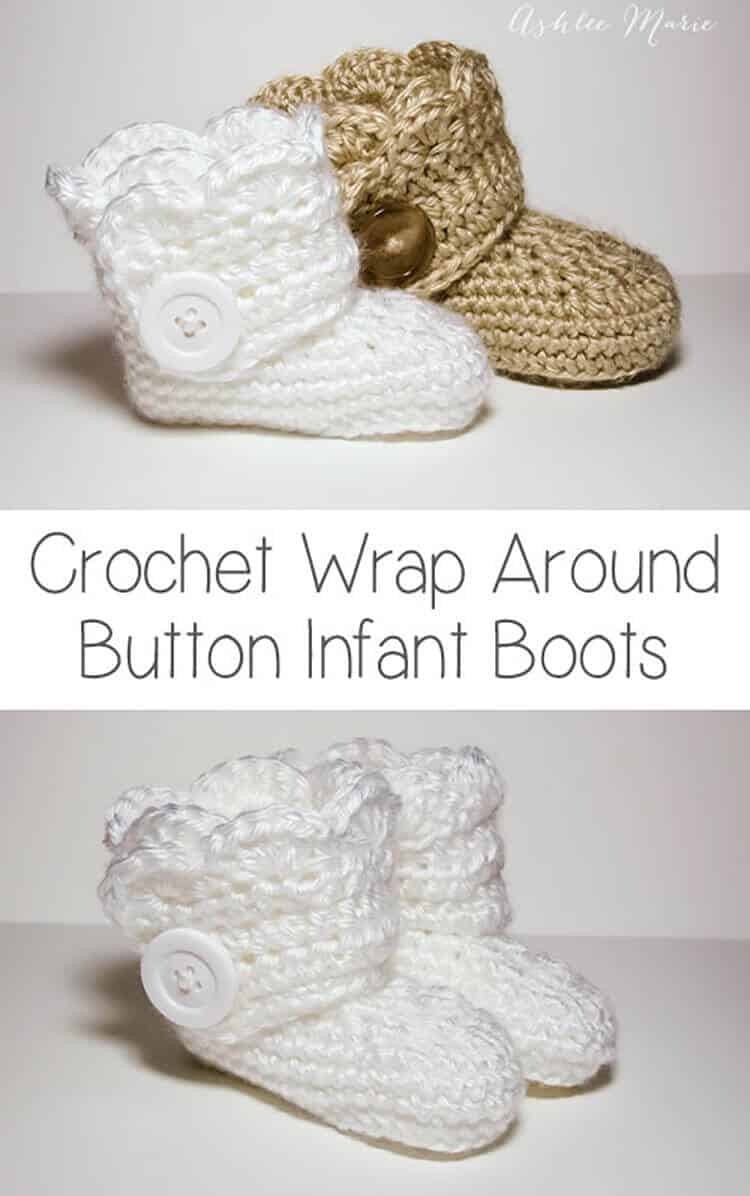
Okay, after some confusion I’m separating out the patterns. Here is the one for the INFANT size! I realized after making a second set of these that I have two G hooks and they are different sizes???
So for the larger Baby sized shoes I used a G6 – 4mm for these infant shoes I used G6 – 4.25! So if your looking for an infant size 1 (or 0-3 month) boot your in the right place! For a larger (closer to size 4) shoe go to the crochet wrap around button baby boots!
Buy BOTH the Ad-Free pattern pdf’s for both the Baby AND Infant sized discounted here!
The pictures are still the same as before, for the larger size, I’ll try to substitute out smaller pictures when I make another pair!
Buy the Ad-Free pattern pdf for just the infant size here!
Infant wrap around boots
Crochet materials:
caron simply soft yarn
large buttons
G6- 4.25 mm hook (To go up a size use a larger hook, or a larger pattern, to go down a size use an G-4mm hook)
abbreviation:
ch (chain)
sl st (slip stitch)
sc (single crochet)
hdc (half double crochet)
dc (double crochet)
sc2tog (single crochet 2 together)
dc2tog (double crochet 2 together)
dc3tog (double crochet 3 together)

sole:
ch 11
row 1- sc in 2nd ch, sc 5 times, hdc 3 times, 7hdc in last ch, finish the rest of the round working along the back of the chain, hdc 3 times, sc 5 times, 4sc in the last/first ch, sl st to the first sc (28)
row 2- ch1, sc in same sc, sc 7 times, hdc, 2hdc 3 times, 3hdc (in one stitch), 2 hdc 3 times, hdc, sc 8 times, 2sc 3times, sl st to first sc (39)
shoe:
row 3- ch1, working in back loops, sc in same sc, sc around, sl st to first sc (39)
rows 4-5- ch1, sc in same sc,sc around, sl st to first sc (39)
row 6- ch 1, sc in same sc, sc 9 times, sc2tog, dc2tog, dc, dc3tog, dc, dc2tog, sc2tog, sc around, sl st to first sc (33)
row 7- ch 1, sc in same sc, sc 7 times, sc2tog, dc2tog, dc3tog, dc2tog, sc2tog, sc around, sl st to first sc (27)
row 8- ch 1, sc in same sc, sc 5 times, sc2tog, dc, dc3tog, dc, sc2tog, sc around, sl st to first sc, cut yarn weave in ends. (23)

Boot cuff:
for the right boot sl st in the 7th stitch from the seam, for the left boot sl st in the 11th stitch from the seam
ch 12
row 1- hdc in 3rd ch from hook- ch2 counts as hdc, hdc in next 9 ch, hdc in first sc (the same one you sl st in), hdc 19 times (there will be 3 spaces left), skip 2 spaces, sc in last space. (32) **note – some people had a problem with getting two right or two left feet. remember to not cross over the front, work down the inside, around the back and back up the outside, so you’ll work in opposite directions for each bootie, counterclock wise – looking top down, or “wrong” side out for the right booties and clockwise, or “right” side out for the left bootie**
row 2- ch2 (counts as hdc), turn, hdc in first hdc and around 28 times, ch 1 skip one hdc, hdc in last 2 (31- with a ch1 space)
row 3- ch2 (counts as hdc), turn, hdc, hdc in ch1 space, hdc around (32)
row 4 scallops (girls)- turn, 5dc in second hdc, *skip 1hdc, sc in next hdc, skip 1hdc, 5dc in next hdc*, repeat around (8 shells), sc down the side (I fit 5), continuing around sc across the bottom along the original chain (11), sl st, cut yarn and weave in ends

row 4 simple (boys)- ch1, turn, sc across top (32), down the side (5) and across the bottom chain (11), sl st, cut yarn and weave in ends
And both the boys and girl versions (again these are the larger size)
Don’t forget to add a button where ever you like and your done! I placed mine at the bottom of the 5th hdc over from the front- I might go lower next time… or maybe two smaller buttons?
And one final picture, I thought you might want an inside shot so you can see how it wraps a bit… I’m still so very much in love with these boots.


Toni
OMG! Love this pattern! I had to go up to a H hook bc I crochet tightly… but it still looks AMAZING! I love it! now off to make the matching one! lol. I only got one finished but had to tell you THANKS and I <3 this pattern! This will be my new go to boot/bootie pattern!
Ashlee
I totally do that when I crochet, change the hook size to fit my crocheting style! I’m so glad you like them! And kudos that you know so much about your own gauge! not everyone does!
Veronica
For Rows 4-5 are we still suppose to be working in the back loops?
Ashlee
Just the row that says work in back loops, row 3.
Divya
Hi Ashlee,
Just loved the booties you made :). I am a begineer and I am following your pattern. I am stuck at one point and need your help. I am not sure what you mean by this “Boot cuff: for the right boot sl st in the 7 stitches from the seam, for the left boot sl st in the 11 stitches from the seam”
Which is the seam??
Can you guide me here, that will help me proceed with my booties :).
Your pattern is very easy to follow 🙂 thanks for the sharing.
Divya
Ashlee
the seam is where your row ends and you sl st then ch up to the next row.
Divya
Thank you Ashlee 🙂
Ashlee
your so welcome! Glad to help!
Divya
I have made 3 booties using your pattern and they look sooooo cute 🙂 love your pattern. Simple and easy to understand 🙂
Ashlee
Thank you! I love hearing that. I’m so glad you like them!
Kristen
I hope this makes sense; should i be workig from the inside of my boot or the outside? I love this pattern, thank you!
Ashlee
for the sole and foot your working on the inside, the cuff changes every row, with one foot’s cuff being inside outside inside, and the other cuff being outisde inside outside.
Elizabeth M
Thank you so much for the awesome pattern! I can’t wait to try it out! I’m going to to be making these for a 6 month old little boy. Your directions show the hook size and says to go up or down depending on size. What size does the G6 hook make to start with so I know what size hook to use to get to the right size? Thanks so much!
Ashlee
your so welcome! it all depends on how tight or loose you crochet, so my advice is to make the sole and see what size your getting. just one sole, it’s pretty easy to gofrom there, up or down. Mine made a size 4, but other readers have gotten totally different results
Kathleen
Cute! I am the same way. I won’t buy a pattern either unless it’s a adult sweater for knitting. I think I got the furrylicious booties figured out. 🙂 will be posting the pattern for free when it’s done.
Ashlee
AWESOME! my sister wants a pair of those for her little girl!
Dawn
Love the pattern. It is very well written. I cheat and sl st over to the beginning of the cuff. I’m doing some for my friends little girl to be and its hard to believe her little feet will be that big in a year. Having fun though!
Keep up the good work… but is it really work when its so fun to create?! 😉
Ashlee
I “cheated” and sl st over the left bootie, but it made it a bit too stiff right there so I didn’t do it for the right. I don’t like finishing off and restarting if I don’t have to! and thank you so much!
Brigitte
Hi there..i just love these booties..but for some reason im struggling to make it like in your pictures..dont know what im doing wrong..would realy be great if you could put a video up on how to make them..coz ive tried a few times and failed.feel so silly reading how some people tried making it for the first time and did it perfectly..please please please reconsider putting up a video of this… love these booties
Ashlee
It’s on the “someday” list, but honestly it’s a VERY long list and without help videoing would be hard to do.
astitchintwine
I’m loving this pattern. Adorable boot! I have a couple of questions. 1. Do you know if my Hero G hook is 4 or 4.25? I can’t find that info online anywhere! I’m having a little trouble when starting the cuffs, lol I keep coming up with two of the same boots. Reading through the comments I know its my error…Im going to try again before I try to explain what Im doing and see if you can help me!
Ashlee
I have no idea, My hooks not only have the letters, but also the MM so they both say 4.0 or 4.25. as for the cuff, your just working it down the wrong side, for booties you work down the chain then when you get to the shoe part work down the inside around the back then the outside of each shoe, one show will be right side out/wrong side out/right side out… the other will be wrong side out/right side out/wrong side out… does that help?
Nicki
http://www.crochethooksyou.com/crochet-hook-conversion-chart/ try this for hook comparisons. I tend to crochet tightly so I used a 4.5mm hook which turns out perfect for 0-3 months size!
Ashlee
thank you so much! when I first started writing patterns I just did it for fun (still do) I’m totally not a professional and I feel bad when something I wrote isn’t clear!
Liz W
I love this pattern so much, and am working on my 3rd set! So far they have all measured differently, and I was wondering if you have measurements for them? lol Just so I know I’m not making them too big and unusable with a matching 0-3m hat. Thank you!!!
Ashlee
it totally depends on if you crochet tight or loose, the yarn and if you go up or down a hook size. The only time I made the exact same size I used the same yarn, just in a different color, even a slight change changed the sizes for me!
Nicki
Great pattern, thank you so much. It was very easy to follow and very fast to work up! I will post them on my facebook page for all to see hopefully tomorrow, of course linking back to your blog 🙂
Ashlee
thank you so much! I appreciate the link back love!
Keri
Hey, Just wanted to say thank you for the fabulous pattern!! As a crochet newby, I thought your pattern was really easy to understand. I did the right foot incredibly fast, so I was super excited. The left boot took me 3 tries, but it was my issue, not the pattern. The first one, I didn’t get my decreases right, but thought it would fix itself when I started the cuff, so I fastened off. I was wrong. (I have tension issues, since I am still pretty new at this)The right side/wrong side was bugging me, so on my second try, I ripped out the cuff twice. I tried to reverse sc the 4th row, but the stitches were too loose, so I ended up fastening off and tying on, to make the last row match the first boot. I LOVE your pattern and will definitely do these again. This pair is for my grandson who will be here in August, I will make him some more in different colors for winter.
Thank you again for sharing the pattern with all of us. You are a blessing.
Ashlee
thank you for your kind comment! I really appreciate it! I’m glad you like the pattern. I’m not a professional, but I do enjoy sharing hoping others can enjoy them as much as I do.
Kimie
Hi. Your boots are too cute. I’m having trouble with mine, it just don’t look like yours. I must be doing something very wrong, but I will keep on trying. I am confused on “working on the back loops” . I’m not familiar with this term. Can you describe what that means? Thank you for posting the instructions.
Ashlee
when your doing normal crocheting your working in two loops, a front loop and a back loop. When your working in back loops only your going to end with a crisper edge. I like how that works out for shoes best. does this help http://www.stitchdiva.com/tutorials/crochet/crochet-in-the-front-or-back-loops-of-a-stitch
Heather
Hi! Thank you for posting this pattern! It’s adorable! I have found your size 1 and size 4 pattern…do u by chance have a pattern for a size in between?
Ashlee
to get the in between sizes just change your hook size! It’s pretty easy! using a different weight yarn will also change it a bit. start by doing a sole, measure it up and go from there.
Kristin
The finished product looks very cute and I’m looking forward to trying a pair of these for my newest addition (#9, expected mid-November). Can’t wait to see how they turn out! 🙂
I thought you’d like to know that the “print this” button is not working. I’ll just copy and paste to a pages document so I can have a printout so no worries, but if it were my page I’d like to know it wasn’t working. 😉
Looking forward to checking out the rest of your blog…
~k
Ashlee
#9!!! i love you! I always wanted 8-10 kids, but I barely got 5 out of my husband… Yay you! I know the print this isn’t working, I’ve been hopging they would fix the plug in before I take the time to re do every single recipe and patters post. I guess it’s time to give in and fix it.
Micki
First off, I have to say thank you SO much for posting this pattern! I’m in love with these booties and determined to make them. Also, I have to say thank you for donating your time and effort and posting the pattern free of charge as well as taking the time to read and answer all these comments!
I have a couple of suggestions (sorta):
(1) everyone seems to be hung up on what you’re saying when you’re trying to say to do the same stitch x number of times in one stitch. Well, my two cents is that in a lot of the patterns I’ve read, they put into parentheses or brackets what they want performed in a single stitch. For example, row 2 would read: ch1, sc in same st, 7sc, hdc, (2hdc) 3 times, (3hdc), (2hdc) 3 times, hdc, 8sc, (2sc) 3 times, sl st to first sc. This may or may not help cut down on the questions/complaints. I understood what you meant just fine, so I don’t care. It was just something that I thought might make your life a little easier.
(2) in regards to the cuff, (I could be totally off base as I haven’t even gotten that far) some seem to be sensitive to one of them being “inside out” and I thought a solution might be to chain x number of stitches then attach to the boot, thus working around from the opposite direction and making the two match. If this sounds feasible to you, I’ll give it a try when I get to that point.
Now, I have a question. I’ve seen several others post with this same issue and I can’t tell what I’m doing wrong. I get my soles done just fine and work r3 alright, too. But, that’s when it all goes kinda wonky. Starting with r4, I sc around, counting to 39 (not counting the first ch1) and still finish 2 or three stitches short of the first sc. I’ve tried to keep plugging along, but by the time I finish r6, the toe seems to be off to one side of center (still requiring more sts than indicated to complete the row). I’ve even used stitch markers in the first stitch in hopes of finding where I’ve gone wrong. Can you or anyone else help me with this? I’m so tired of frogging for 2 days but not willing to throw in the towel. Thank you so much in advance. 🙂
Ashlee
feel free to change the pattern for your own use however you want! I didn’t do the cuff that way because joining pieces on such a small project make it too bulky or stiff in my opinion.
as for row 3 and 4 your just working in the stitches already there, so if row 2 and row 3 have 39 stitches then row 4 should too. as long as your stitch count is right just keep going, then when your done you can either just let the baby wear it, or you can block it.
ashley
I love your pattern. It’s amazing and super simple to follow. I’ve followed several of your other patterns and I love how you write!
I am having a problem with the first two rows of the cuff though. I know I’m missing something but I’m not quite sure.
row 1- hdc in 3rd ch from hook- ch2 counts as hdc, hdc in next 9 ch, hdc in first sc (the same one you sl st in), hdc 19 times (there will be 3 spaces left), skip 2 spaces, sc in last space. (32)
row 2- ch2 (counts as hdc), turn, hdc in first hdc and around 28 times, ch 1 skip one hdc, hdc in last 2 (31- with a ch1 space)
The ch2 is supposed to be stitched into during round two correct? So what is this ch1 skip? Is it supposed to be on the other side of the boot? I looked at the picture and my hole is at the bottom of the strap, not the top.
Ashlee
when I say “ch 2 counts as hdc” in row one I’m talking about the 2 chains at the end. when you hdc in the 3rd ch from the hook, those 2 chains you skiped to do the hdc are the ch 2 i’m talking about. don’t chain two more, or your you’ll get a huge hole. and then when you come back around you want to make sure you do an hdc in that ch 2 (on the other side of the first hdc) does that help? the ch1 and skipped stitch is the button hole.
Ellen M
Hello everyone,
So, was going along swimmingly (I thought!); I, too, have a pair of booties where both wrap to the left. Been trying to piece together comments to correct this.
So…after creating the strap (chain … hdc back down to the slip); do I need to go in one direction (back) for the left bootie and forward (right?) for the right bootie? Or???
Luckily I did practice cuffs and they are not attached! Shower is coming up soon!
Appreciate anyone’s instruction.
Thanks.
Ashlee
yep, one direction for one, one direction for the other, go down the chain, down the inside, around the back up the outside and then back the other way.
Sarah Godden
I absolutely love these boots! I made them about a year ago when I was new to crocheting and they were the second pattern id followed. you made it so easy to follow, they turned out perfect and ive now come back to your pattern to make them for a friend who’s expecting. Thank you so much 🙂
Ashlee
Thank you SO much! you have no idea how much I love hearing that! I sometimes wonder if I’m the worst pattern maker of all time with some of the complaints I get. so thank you thank you thank you!
Krissy Houston
I am having some trouble with round 2 where it says in one stitch is that the 7 sc and hdc all in one stitch of do i do 7 sc in one stitch?
Ashlee
if the number is after the stitch, like sc 7 times, you do that stitch that many times around. You can see in the diagram. If the number is BEFORE the stitch, like 3hdc that that many stitches in ONE. when it has both, like 2 hdc 3 times your doing to do two hdc in each of the next three stitches.