I am SO excited to share this tutorial with you. My cousin just had twins last week so I made a boy and girl version! Of course I made them to fit my model so they won’t fit the twins for SOME time. But they are precious!
Yes, I made my sweet little boy wear the girls boots for this picture. Better than a skirt or something, right?
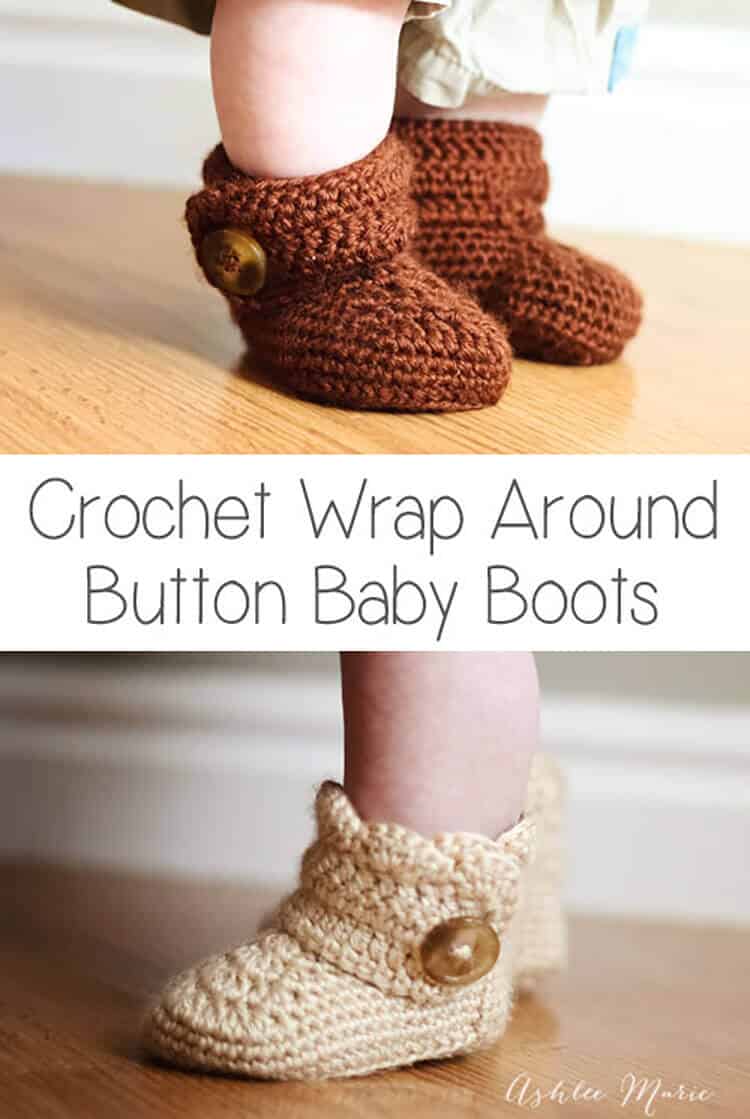
I love the scallops on the girl version, but the boy version is adorable too! I started with a size to fit my model, Baby Boy.
I ended up with boots that are around a size 4~ YES, 4 and they area already tight on him. According to a shoe website that’s like a 9-12 month shoe for the average babies feet!
I was going to share just that size, but a friend, Summer, asked me to make a pair for her baby, a size 1. So I figured it out, and added those numbers to the pattern at the last min! (on another post now)
Buy BOTH the Ad-Free pattern pdf’s for both the Baby AND Infant sized discounted here!
UPDATE: after some confusion I separated the pattern, the larger version is still right here, comparable to a size 4, and the smaller crochet wrap around button infant boot is on it’s own post.
Buy the Ad-Free pattern pdf for just the baby size here!
Baby wrap around boots:
materials:
caron simply soft yarn
large buttons
G6- 4 mm hook (To go up a size use a G-4.25mm, to go down a size use an f-3.75mm hook)
abbreviation:
ch (chain)
sl st (slip stitch)
sc (single crochet)
hdc (half double crochet)
dc (double crochet)
sc2tog (single crochet 2 together)
dc2tog (double crochet 2 together)
dc3tog (double crochet 3 together)

sole:
ch 13
row 1- sc in 2nd ch, sc 7 times, hdc 3 times, 7hdc in last ch, finish the rest of the round working along the back of the chain, hdc 3 times, sc 7 times, 4sc in the last/first ch, sl st to the first sc (32)
row 2- ch1, sc in same sc, sc 9 times, hdc, 2hdc 3 times, 3hdc, 2 hdc 3 times, hdc, sc 10 times, 2sc 3times, sl st to first sc (43)
row 3- ch2, hdc in same sc, hdc 11 times, *2hdc, 1hdc* 7 times, hdc 11 times, 2hdc, hdc, 2hdc twice, hdc, 2 hdc, sl st to first hdc (54)
shoe:
row 4- ch1, working in back stitches, sc around, sl st to first sc (54)
rows 5-6- ch1, sc around, sl st to first sc sc (54)
row 7ch1, sc in same sc, sc 12 times, sc2tog, dc2tog 7 times, sc2tog, sc around, sl st to first sc (45)
row 8- ch 1, sc in same sc, sc 10 times, sc2tog, dc2tog, dc, dc3tog, dc, dc2tog, sc2tog, sc around, sl st to first sc (39)
row 9- ch 1, sc in same sc, sc 8 times, sc2tog, dc2tog, dc3tog, dc2tog, sc2tog, sc around, sl st to first sc (33)
row 10- ch 1, sc in same sc, sc 6 times, sc2tog, dc, dc3tog, dc, sc2tog, sc around, sl st to first sc, cut yarn weave in ends. (29)

Boot cuff:
for the right boot sl st in the 8th stitch from the seam, for the left boot sl st in the 12th stitch from the seam
ch 15
row 1- dc in 4th ch from hook -first 3ch counts as first dc, dc in next 11 ch, dc in first sc (the one you sl st in), dc 24 times (there will be 4 spaces left), skip 3 spaces, sc in last space. (39) **note – some people had a problem with getting two right or two left feet. remember to not cross over the front, work down the inside, around the back and back up the outside, so you’ll work in opposite directions for each bootie, counterclock wise – looking top down, or “wrong” side out for the right booties and clockwise, or “right” side out for the left bootie**
row 2- ch3 (counts as dc), turn, dc in first dc and around 35 times, ch 1 skip one dc, dc in last 2 (38- with a ch1 space)
row 3- ch3 (counts as dc), turn, dc, dc in ch1 space, dc around (39)
row 4 scallops (girls)- turn, 5dc in second dc, *skip 1dc, sc in next dc, skip 1dc, 5dc in next dc*, repeat around (10 shells), sc down the side (I do 2 for each row so a total of 6 down the side), continuing around sc across the bottom along the original chain (13), sl st, cut yarn and weave in ends

row 4 simple (boys)- ch1, turn, sc across top (39), down the side (6) and across the bottom chain (13), sl st, cut yarn and weave in ends
Do you love them??? Considering the twins are HALF the size of Baby boy when he was born (let alone they don’t have his massive hobbit feet) I doubt they’ll even come close to fitting until they are at LEAST 9 months, maybe a year?? So next winter, perfect!
Don’t forget to add a button where ever you like and your done! I placed mine at the bottom of the 6th dc over from the front- I might go lower next time… or maybe two smaller buttons?
And one final picture, I thought you might want an inside shot so you can see how it wraps a bit… I’m still so very much in love with these boots. And when I finish Baby Boy’s I’ll post picture’s!!!


tammy
Hello I really want to do these shoes. If I use other yarn than the simply soft, and use a 5mm hook to make a size 5 – 6 shoe. Will that work? Or any suggestions? Please email me the reply at tgolub89@Gmail.com.
Ashlee
using a thicker yarn and larger hook will def go up sizes, try one first, make the sole and see if it’s measuring where you want, if it’s still too small try changing both.
Amie
I just finished one bootie……and I see that it will be too big…where is the infant pattern?
Ashlee
it’s the post just after this one, and there are like 4 links in the post over to it. here it is again as well… infant baby booties
Kathryn
Thank you so much for this pattern!!! Its really nice to have a free pattern for something thats not cheesy! I made the right boot so now I’m going to tackle the left. Next I’m going to do your top hat pattern! Thanks again!!! 😀
Ashlee
your so welcome (and I agree, there is a lot of cheese out there…) I hope you enjoy them!
HilaryC
This is the first thing other than beanies that I have crocheted. I am finishing up my second pair now…so cute! I made the first pair to match the outfit my son wore for his baptism. They were absolutely perfect for the occasion and so special. THANK YOU so much for sharing this pattern for free…you are awesome!!! 🙂
Ashlee
you are so welcome, I’m so glad you liked them and used the pattern for such a special event! I’m honored!
Lara
I appreciate you sharing this pattern, I have been hunting for it for a while now. I started my first one and I ran into a small problem. Somehow my bootie looks like a ballerina slipper. The heel of the boot did not form correctly, somehow I increased stitches. Do you have any suggestions as to where I went wrong? Please help, I am a armature crocheter. Thanks!!
Ashlee
um, without a more specific question it’s hard to help… don’t increase along the heel!
maybe send me a picture and I can try to guess better what went wrong.
Elizabeth
Thanks for the pattern I modified it a bit to make a taller boot for a baby girl it came out great tho.!!wish I could leave you a picture/
Ashlee
sounds great! Feel free to email me a picture! I love seeing what you guys come up with.
Courtney
Question: after you start working in the back loops of the pattern step 4… do you stay that way through out the rest of the pattern? Thank you! all but that question I have done fairly well! thanks for the easy read pattern:)
Ashlee
your welcome, no only that row, if you were supposed to do it in every row it would say – work in the back loops- in every row.
bosh ra
Hi; thank you for charing this pattern I lllloooooooove the shoes I wish I know how to make them
Ashlee
I taught myself how to crochet using a book, it’s actually pretty easy! good luck!
Jolecia
Hi Ashlee, Im having trouble making this. I don’t understand what you mean by sl st to the first sc . I thought it meant to do a slip stitch in the next single crochet bt we i do that and then go to the second row of the sole and make a chain it just doesnt come out totally right, especially when I am doing the third row.
Ashlee
you sl st in the very first sc you made in that row, completing the circle. does that help?
jessica
Hi ashlee, i am wondering if im doing these correct. When i start the flap on the right boot, the first row is wrong side out, but the left boot the first row is right side out. Is that correct??
Ashlee
TOTALLY that’s exactally right. I couldn’t come up with any other way to do it.
Emily
Thank you so much for sharing this pattern, I have been looking everywhere for one like this to make booties for my lil guy 🙂 Thanks so much.
Ashlee
you are so welcome! I hope you enjoy working it up!
Mary Wall
Hi there
These boots are super cute but I can’t seem to make them come out right. I get everything done but when I’m finished I have one boot with the scallops right side facing out and the other boot with right side facing in. It doesn’t look right that way. Can you help me sort this out? When I start the strap and continue on with the boot should I be crocheting on the inside of the boot or the outside? It seems to be different for each boot.
Ashlee
that’s the way all mine are. I start coming down the chain, around the outside, back and then inside. because they are opposite then the row that is right side out on one bootie is wrong side out on the other. No one ever noticed on my baby, and it’s the only way I could think to do it without making it separately and then attaching it later.
Yarnie
That is so adorable!! I will probably making some of these soon 🙂
Ashlee
thank you so much!
Yarnie
mine turned out super cute!! 🙂 Love them!
Ashlee
I’m so glad! They are so fun to make!
Tanisha L.
Do you turn the left boot inside out or do the buttons face the same direction?
Ashlee
nope, the cuffs go around different directions. On sl st on the right of the center and one sl st on the left of the center. after you chain you work down the chain, down the side, around the back and back up the other side. do NOT work across the front.
Tanisha L.
Do you turn the left shoe inside out when you’re done?
Ashlee
nope, that’s why the cuffs start on different sides, and you work the rows in different directions.
Shana
I seem to be having great difficulty on starting the cuff, do you happen to have a video on how to do it ? Do you ? 🙂 im not entirely sure where to start as my “seam” is on the side of the heel …… Halp!
Ashlee
the seam should be on the side, you’ll count over 8 or 12, each side of the center, 4 stitches between. There is a picture of where both cuff starts.
Shana
So i actually ended up figuring it out eventually 😀 but thank you
Ashlee
Good, Sorry I only get around to my comments twice a month! I’m glad you figured it out!
Catherine
Thank U for the pattern. I can´t wait to crochet it.
God bless U 🙂
Ashlee
you are so welcome! I’m so glad you found my pattern and I hope you like it!
Keren Al
Hi Ashlee. Your web site and booties pattern are superb , clear instruction (loved the diagram and number of stitch count in each row). I have been a pastry chef myself (and cake deco) for 8 years, but now that I’m at home with bub I taught myself to crochet 9 month ago and haven’t stop since …
I wanted to make the booties a size 5 so I doubles the yarn and use a size 6mm which end up to be almost like a size 7 (doesn’t matter bigger is better than smaller , cause it means it will fit one day).
I am having trouble with the left boot cuff (with which I started) . I have reached the end of the first row of the cuff, I ended up with 5 empty space, I thought I can overcome this by skipping 4 spaces and then sc, but the skipping creating a huge hole/ gap, is that how it suppose to look like ?
BTW thanks for sharing , I really appreciate it.
I tried to make my own pattern but I can’t get my head around it.
Ashlee
with the cuff your actually doing rows, not rounds anymore, you turn the work and go back the other way, so there is an opening to get the foot into then the cuff wraps around. does that help?
Jenny
This is so AWESOME!. I’ve been looking for a long time for a nice crochet boot pattern. I’m currently working (using your pattern) on making these for an adult. So far so good. Will post as soon as I finish one. Thank you for making your pattern free and the instructions and chart easy to read. The instruction style is a little different than what i’m use to, but once I read all the comments it was easy. The summer sandals are next on my list. You are AWESOME! Keep up the great work! Look forward to seeing more of your projects.
Ashlee
Thank you so much! I’ve been in a bit of a rut, I’ve started about 12 new patterns and dropped them all… hopefully I’ll get back in the swing of things soon! I’m glad you like them, and if you write down your variation I’d love to share them with my readers.
Catherine
¡Thanks for your patter!!! That’s of my Facebook’s page, where you can see the precious result of your help.
God bless you!!!!!!!
Ashlee
they turned out adorable! Great job, I’m glad you liked my pattern.