I am SO excited to share this tutorial with you. My cousin just had twins last week so I made a boy and girl version! Of course I made them to fit my model so they won’t fit the twins for SOME time. But they are precious!
Yes, I made my sweet little boy wear the girls boots for this picture. Better than a skirt or something, right?
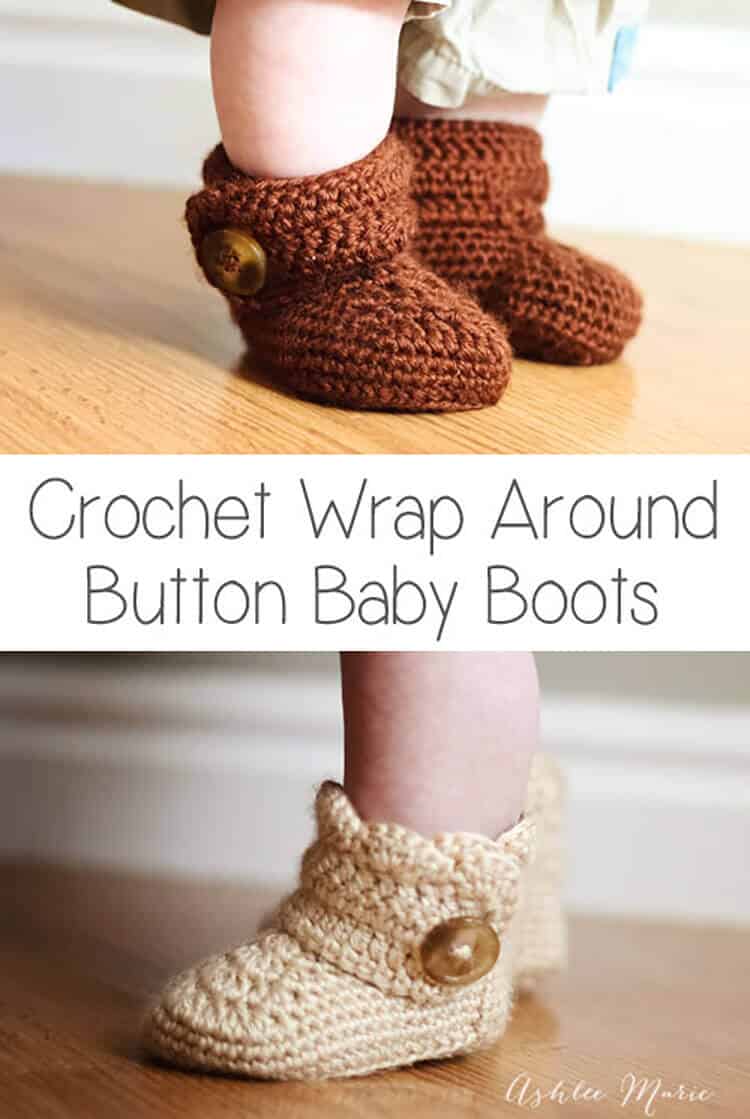
I love the scallops on the girl version, but the boy version is adorable too! I started with a size to fit my model, Baby Boy.
I ended up with boots that are around a size 4~ YES, 4 and they area already tight on him. According to a shoe website that’s like a 9-12 month shoe for the average babies feet!
I was going to share just that size, but a friend, Summer, asked me to make a pair for her baby, a size 1. So I figured it out, and added those numbers to the pattern at the last min! (on another post now)
Buy BOTH the Ad-Free pattern pdf’s for both the Baby AND Infant sized discounted here!
UPDATE: after some confusion I separated the pattern, the larger version is still right here, comparable to a size 4, and the smaller crochet wrap around button infant boot is on it’s own post.
Buy the Ad-Free pattern pdf for just the baby size here!
Baby wrap around boots:
materials:
caron simply soft yarn
large buttons
G6- 4 mm hook (To go up a size use a G-4.25mm, to go down a size use an f-3.75mm hook)
abbreviation:
ch (chain)
sl st (slip stitch)
sc (single crochet)
hdc (half double crochet)
dc (double crochet)
sc2tog (single crochet 2 together)
dc2tog (double crochet 2 together)
dc3tog (double crochet 3 together)

sole:
ch 13
row 1- sc in 2nd ch, sc 7 times, hdc 3 times, 7hdc in last ch, finish the rest of the round working along the back of the chain, hdc 3 times, sc 7 times, 4sc in the last/first ch, sl st to the first sc (32)
row 2- ch1, sc in same sc, sc 9 times, hdc, 2hdc 3 times, 3hdc, 2 hdc 3 times, hdc, sc 10 times, 2sc 3times, sl st to first sc (43)
row 3- ch2, hdc in same sc, hdc 11 times, *2hdc, 1hdc* 7 times, hdc 11 times, 2hdc, hdc, 2hdc twice, hdc, 2 hdc, sl st to first hdc (54)
shoe:
row 4- ch1, working in back stitches, sc around, sl st to first sc (54)
rows 5-6- ch1, sc around, sl st to first sc sc (54)
row 7ch1, sc in same sc, sc 12 times, sc2tog, dc2tog 7 times, sc2tog, sc around, sl st to first sc (45)
row 8- ch 1, sc in same sc, sc 10 times, sc2tog, dc2tog, dc, dc3tog, dc, dc2tog, sc2tog, sc around, sl st to first sc (39)
row 9- ch 1, sc in same sc, sc 8 times, sc2tog, dc2tog, dc3tog, dc2tog, sc2tog, sc around, sl st to first sc (33)
row 10- ch 1, sc in same sc, sc 6 times, sc2tog, dc, dc3tog, dc, sc2tog, sc around, sl st to first sc, cut yarn weave in ends. (29)

Boot cuff:
for the right boot sl st in the 8th stitch from the seam, for the left boot sl st in the 12th stitch from the seam
ch 15
row 1- dc in 4th ch from hook -first 3ch counts as first dc, dc in next 11 ch, dc in first sc (the one you sl st in), dc 24 times (there will be 4 spaces left), skip 3 spaces, sc in last space. (39) **note – some people had a problem with getting two right or two left feet. remember to not cross over the front, work down the inside, around the back and back up the outside, so you’ll work in opposite directions for each bootie, counterclock wise – looking top down, or “wrong” side out for the right booties and clockwise, or “right” side out for the left bootie**
row 2- ch3 (counts as dc), turn, dc in first dc and around 35 times, ch 1 skip one dc, dc in last 2 (38- with a ch1 space)
row 3- ch3 (counts as dc), turn, dc, dc in ch1 space, dc around (39)
row 4 scallops (girls)- turn, 5dc in second dc, *skip 1dc, sc in next dc, skip 1dc, 5dc in next dc*, repeat around (10 shells), sc down the side (I do 2 for each row so a total of 6 down the side), continuing around sc across the bottom along the original chain (13), sl st, cut yarn and weave in ends

row 4 simple (boys)- ch1, turn, sc across top (39), down the side (6) and across the bottom chain (13), sl st, cut yarn and weave in ends
Do you love them??? Considering the twins are HALF the size of Baby boy when he was born (let alone they don’t have his massive hobbit feet) I doubt they’ll even come close to fitting until they are at LEAST 9 months, maybe a year?? So next winter, perfect!
Don’t forget to add a button where ever you like and your done! I placed mine at the bottom of the 6th dc over from the front- I might go lower next time… or maybe two smaller buttons?
And one final picture, I thought you might want an inside shot so you can see how it wraps a bit… I’m still so very much in love with these boots. And when I finish Baby Boy’s I’ll post picture’s!!!


Karla
Jana, you can go on youtube and look for crochet for beginners that’s how I learn to crochet and learned the instructions in english as well, my first language is spanish and believe me this booties now are easy for me 🙂 thanks for sharing your pattern I love it
Ashlee
thanks for sharing!
Melissa
Excellent pattern! I consider myself a beginner and, minus a lot of struggling and frogging, I am almost done. They are so ridiculously cute and I’m very glad I didn’t give up! Being self-taught, I am very excited to have made these for my daughter. Thank you for sharing the pattern!
Ashlee
your so welcome, glad you stuck with it and it worked out!
Dee
Thanks for the adorable pattern. I made a pair for my grandson and was very happy with how they turned out. I found your instructions to be very well written.
Ashlee
I’m so glad! Thank you so much for taking the time to leave such a sweet comment, it really makes my day!
AmbyreR
Hi! These are super adorable, and I’ve been trying to make them tonight for my daughter who is exactly a size 4! I’m super upset because mine doesn’t look like the pic, and I counted and I’m on track, but my sides don’t add up. one side is longer than the other, and the middle of the top of the shoe doesn’t match up with the sole. I’m so lost as to what I did wrong. :/ If you could email me, and I can email you a pic so you know what I’m talking about, that’d be great! Thanks! glitterbugzcrochetdlove@gmail.com
Ashlee
sure feel free to email me. I’m happy to help.
Ashlee
I added a diagram of the sole to the pattern if that helps
Tanya
I figured it out:) im sure if ill do more then ill be perfect.
Ashlee
Let me know if you need more help!
Amanda
I am so glad I found your post with these directions and pictures. A friend had a post on her pinterest of boots similar to these and the website wanted $25 for a pair! As a crocheter, I knew I could make them for much less, booties are so quick and easy.
Ashlee
GAH, wrong comment for the wrong post! – bleh – ANYWAY, I’m so glad you like the booties, let me know how it works out for you!
Amanda
lol, no problem. My trial one turned out funky, but they all do. I haven’t made booties for a while, and never one with a “wrap around” cuff. It seemed okay until row 2 of the cuff. when it came to “ch 1 skip one dc, dc in last 2” I only had the ability to “ch 1, skip one dc, dc in last 1”. Not sure what I did, but I had no pictures with me to help, I think I’ll print the pictures too next time =)
I was curious if instead of cutting and weaving at the end of row 10 then reattaching, if I couldn’t slip stitch to the appropriate spot and continue? The less weaving I have the better it appears to be for my current skill.
Ashlee
your creating the button hole, so just do it 3 away from the end for more strength.
you CAN just sl st, BUT sl st add a little bulk AND it makes it less stretchy so you lose some of the GIVE to get the baby’s foot in. IMO
Amanda
ah yes, I forgot about that. I printed out the pictures and diagram so hopefully it will turn out less funky this time, lol. Thanks again for posting, I’m having a blast practicing with it (my only child is 4yrs old, long out of booties)
Ashlee
my baby is over a year now, so I need someone else go have a baby to make stuff for now!
Amanda
I don’t seem to have a shortage of pregnant friends this year, lol. I think if I didn’t, I would find a charity that helped with infants and children and donate the booties…or any other clothing I made. But that’s just me, children are my weak spot.
Ashlee
Agreed, but my sisters are both done having babies, and my friends are too! I need new friends 😉
Bonnie
I am horrible at reading patterns but great at youtube videos do you happen to have a video on making this wrap around bootie?
Ashlee
I don’t. Making videos takes equipment I don’t have, editing software, someone to help video and time to video without all my noisy kids around so it’s not going to happen anytime soon, sorry.
Diana
Love the boots, working on the first one now for my baby girl. Having a minor problem, but trying to figure it out on my own after seeing how many posts you had. If everyone would take the time to read the posts first, maybe you wouldn’t have to answer the same questions multiple times . Also, basic crochet help can be found all over the web, like how to do a dc decrease or what does 3hdc mean. Sorry if this sounds offensive to the posters, but you are very nice to give out this wonderful free pattern, and far too nice to point this out to people. Thanks so much for sharing your talent!
Ashlee
your so welcome. I’m glad you found the answers you were looking for in the other comments! your comment totally made my day 😉
lisa
Just finished these! I put a cute fringe around the top and flap…..very cute!
Ashlee
very very fun!! glad you put your own twist on them.
Diana
I just finished the right boot and its perfect! I’m sure the next onevwill go quick since I figured out what I was doing wrong , and probably doing on all my projects. I use stitch markers and still could never get my count right, well I was doing my last stitch of each round in the stitch I used to make a slip stitch on the previous round, instead of my last stitch. Thanks again for this amazing pattern, baby girl Charli will have these in colors to match every outfit!
Ashlee
I’m glad you figured it out! It always bugs me when I can’t get something quite right, and am so relieved when I figure it out!
Diana
This is for Lisa: just curious, what kind of fringe? Same color as the boot or different? That sounds really cute .
Ashlee
did you click reply on her comment and did she ever get back to you?
Lyndzee
I’ve tried to make these booties a few times now, and every time I get past the sole it just keeps making more sole. “row 4- ch1, working in back stitches, sc around, sl st to first sc (54)” where it says this working in the back stitches means to work in the stitches furthest away from me right? the ones that if I flatten out the stitches of the booty are where it would touch the ground. I just don’t know why it keeps staying flat instead of folding up like the pictures show. Please help =)
Ashlee
if you just doing one stitch in every stitch it won’t grow, it CAN’T grow if your not adding stitches. so it will start to get taller. i don’t konw what to tell you, other than maybe your still adding stitches for it to stay flat.
Kylie
Thanks a million for the free pattern. These are amazing and will make some great gifts!
Ashlee
you are so welcome! Let me know if you like them!!! They were SO much fun to make!
Mgrib
Thanks for the pattern! They are super cute and I’m almost done a pair for my son. Is there any way to make the right cuff with the right side out like the left one? I’ve been trying to figure it out but I just can’t. I know the way the pattern is written it ends up being right side in, but wondering if there’s a way to change that. Thanks again.
Ashlee
nope, sorry. plus the cuff is three rows high so on one foot 2 rows are right side out and one side is wrong side out, while the other bootie there are two wrong side out rows and one right side in row. there really isn’t one cuff that’s completely right side out.
Pam Clark
Why am I struggling SO much with the right bootie. I can not seem to get the flap, so it will be on the right side(opposite of the 1st bootie) ???? 🙁
Ashlee
I’m not sure why… i can’t really help you with out more information, what is going wrong? the two sl st to start the cuffs are just a few stitches apart, for both when your coming back down the chain continue working down the outside, the back then up the inside. just make sure you go around different directions.
Pam Clark
I can not figure out how to get the flap and button to be on the opposite side. I made the first bootie and the flap is on the outside, which would have to be the left bootie, so what am I doing wrong that the second bootie also flaps to the same way(to the inside then) HELP
Ashlee
it means your coming back down the sl st and going around the right, back then left rather than one side going around the left, back and then right.
Malia
First of all, let me say I absolutely LOVE this pattern. The only part I’m having trouble with is row 3 where you say *2hdc, *1hdc 7 times. I thought you meant to do 2hdc in one st and then 1hdc in the next and repeat that pattern 7 times. When I did that I ended up with more than 54 st around. What am I doing wrong?
Ashlee
yup, your totally right, that’s what it means.
row 3- ch2, hdc in same sc, (1)
hdc 11 times, (+11=12)
*2hdc, 1hdc* 7 times, (+21=33)
hdc 11 times, (+11=44)
2hdc, (+2=46)
hdc, (+1=47)
2hdc twice, (+4=51)
hdc, (+1=52)
2 hdc, (+2=54)
sl st to first hdc (54)