I am SO excited to share this tutorial with you. My cousin just had twins last week so I made a boy and girl version! Of course I made them to fit my model so they won’t fit the twins for SOME time. But they are precious!
Yes, I made my sweet little boy wear the girls boots for this picture. Better than a skirt or something, right?
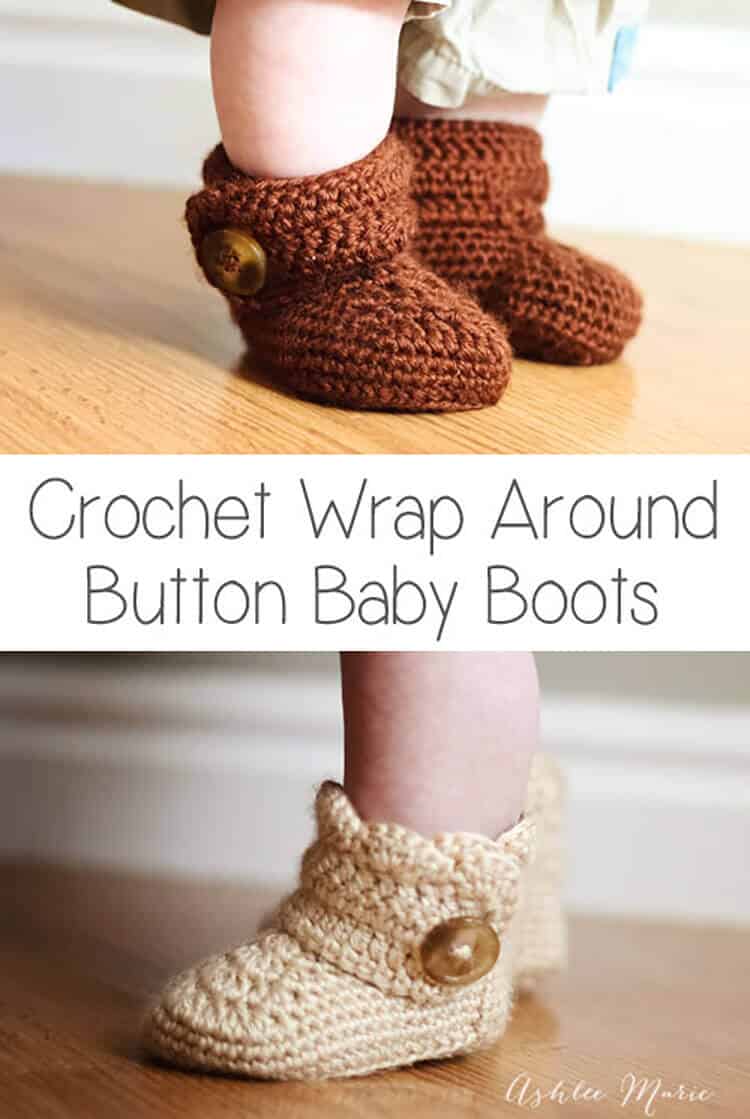
I love the scallops on the girl version, but the boy version is adorable too! I started with a size to fit my model, Baby Boy.
I ended up with boots that are around a size 4~ YES, 4 and they area already tight on him. According to a shoe website that’s like a 9-12 month shoe for the average babies feet!
I was going to share just that size, but a friend, Summer, asked me to make a pair for her baby, a size 1. So I figured it out, and added those numbers to the pattern at the last min! (on another post now)
Buy BOTH the Ad-Free pattern pdf’s for both the Baby AND Infant sized discounted here!
UPDATE: after some confusion I separated the pattern, the larger version is still right here, comparable to a size 4, and the smaller crochet wrap around button infant boot is on it’s own post.
Buy the Ad-Free pattern pdf for just the baby size here!
Baby wrap around boots:
materials:
caron simply soft yarn
large buttons
G6- 4 mm hook (To go up a size use a G-4.25mm, to go down a size use an f-3.75mm hook)
abbreviation:
ch (chain)
sl st (slip stitch)
sc (single crochet)
hdc (half double crochet)
dc (double crochet)
sc2tog (single crochet 2 together)
dc2tog (double crochet 2 together)
dc3tog (double crochet 3 together)

sole:
ch 13
row 1- sc in 2nd ch, sc 7 times, hdc 3 times, 7hdc in last ch, finish the rest of the round working along the back of the chain, hdc 3 times, sc 7 times, 4sc in the last/first ch, sl st to the first sc (32)
row 2- ch1, sc in same sc, sc 9 times, hdc, 2hdc 3 times, 3hdc, 2 hdc 3 times, hdc, sc 10 times, 2sc 3times, sl st to first sc (43)
row 3- ch2, hdc in same sc, hdc 11 times, *2hdc, 1hdc* 7 times, hdc 11 times, 2hdc, hdc, 2hdc twice, hdc, 2 hdc, sl st to first hdc (54)
shoe:
row 4- ch1, working in back stitches, sc around, sl st to first sc (54)
rows 5-6- ch1, sc around, sl st to first sc sc (54)
row 7ch1, sc in same sc, sc 12 times, sc2tog, dc2tog 7 times, sc2tog, sc around, sl st to first sc (45)
row 8- ch 1, sc in same sc, sc 10 times, sc2tog, dc2tog, dc, dc3tog, dc, dc2tog, sc2tog, sc around, sl st to first sc (39)
row 9- ch 1, sc in same sc, sc 8 times, sc2tog, dc2tog, dc3tog, dc2tog, sc2tog, sc around, sl st to first sc (33)
row 10- ch 1, sc in same sc, sc 6 times, sc2tog, dc, dc3tog, dc, sc2tog, sc around, sl st to first sc, cut yarn weave in ends. (29)

Boot cuff:
for the right boot sl st in the 8th stitch from the seam, for the left boot sl st in the 12th stitch from the seam
ch 15
row 1- dc in 4th ch from hook -first 3ch counts as first dc, dc in next 11 ch, dc in first sc (the one you sl st in), dc 24 times (there will be 4 spaces left), skip 3 spaces, sc in last space. (39) **note – some people had a problem with getting two right or two left feet. remember to not cross over the front, work down the inside, around the back and back up the outside, so you’ll work in opposite directions for each bootie, counterclock wise – looking top down, or “wrong” side out for the right booties and clockwise, or “right” side out for the left bootie**
row 2- ch3 (counts as dc), turn, dc in first dc and around 35 times, ch 1 skip one dc, dc in last 2 (38- with a ch1 space)
row 3- ch3 (counts as dc), turn, dc, dc in ch1 space, dc around (39)
row 4 scallops (girls)- turn, 5dc in second dc, *skip 1dc, sc in next dc, skip 1dc, 5dc in next dc*, repeat around (10 shells), sc down the side (I do 2 for each row so a total of 6 down the side), continuing around sc across the bottom along the original chain (13), sl st, cut yarn and weave in ends

row 4 simple (boys)- ch1, turn, sc across top (39), down the side (6) and across the bottom chain (13), sl st, cut yarn and weave in ends
Do you love them??? Considering the twins are HALF the size of Baby boy when he was born (let alone they don’t have his massive hobbit feet) I doubt they’ll even come close to fitting until they are at LEAST 9 months, maybe a year?? So next winter, perfect!
Don’t forget to add a button where ever you like and your done! I placed mine at the bottom of the 6th dc over from the front- I might go lower next time… or maybe two smaller buttons?
And one final picture, I thought you might want an inside shot so you can see how it wraps a bit… I’m still so very much in love with these boots. And when I finish Baby Boy’s I’ll post picture’s!!!


colleen
Hi all i am having a very hard time with these booties i can not get a right bootie i dont know what i am doing wrong. can someone please help i love these booties and yet i cant seem to get it!!!!!!!!!!!!!!!!!!!!!!!!!!! i am not new to crocheting and i can also read a patter so what am i doing anyone else having this problem PLEASE PLEASE SOMEONE HELP
Ashlee
the right and left cuff each start just to one side of the center. after you chain and start working down the chain continue down the side, around the back and up the other side, do NOT cross over the center. So for one bootie you’ll be working “right side” out that first row and for the other it will be “wrong” side out the first row. Does that help?
Chandana
Hi..I loved this pattern .. Just wanted to check that if i have to make the pattern for a 6 month old or in a larger size , what should i do?
Ashlee
It all depends on the 6th month old. This size fit my 4 month old, but the twins I made them for didn’t fit into them until they were a year! So make the sole, measure it against the baby’s foot and go from there. if it needs to be slightly larger then use a larger hook.
Michelle Mills
Oh MY, these are adorable. I cannot wait to get started on them, thank you so much for sharing
Ashlee
you are so welcome. I love how they turned out, I’m just sad Baby Boy grew out of them. Time to make a larger pattern!
Daniella
hello. i wonder if its okay if i translate this pattern to swedish?
Ashlee
for yourself, yes, for posting, no.
Dominique
Have you considered up-sizing for adults? Hubby would love these, they’d stay on his feet!!!
Ashlee
I get asked that alot, honestly I hate the feel of yarn on my feet, in fact it gives me the heebie jeebies just thinking about it so no, but I encourage anyone interested to take what I made and come up with your own adult size, the basic idea is the same!
Ellen M
Hello there,
Cute, cute. I am starting the cuff today. Making baby boy version for upcoming baby shower. Began crocheting last year and enjoy it immensely!
Two questions regarding starting cuff/slip into 8th stitch from seam for the right (and into 12th stick for the left):
1) “From the seam” means the stitch where I finished off?
2) Count eight (and 12) stitches TOWARD THE FRONT?
Thank you so much for the adorable pattern and advice!
Ashlee
Yes and Yes! you can see in the picture where each stitch should be.
Zoe
I just made the right bootie and it came out perfectly! I can crochet anyway but I’ve never done anything thats not flat! Really easy to follow, even though at times I didn’t see how it would pan out, but it did! So pleased with them! Thanks for sharing!!!
xoxoxox
Ashlee
YAY! I’m so glad you stuck with it! I hope the left bootie came out easily too.
Nicole H
Ashlee, great pattern and instructions. Thanks so much for offering up this FREE pattern (and being so kind and patient with everyone’s questions, too!). I Favorited this design on ravelry, and now it’s on my to-do list for this week 🙂 I’ll let you know when I finish…
Ashlee
thanks so much (and I’m not always patient but I try). Let me know how it goes!
Joyce
Is there any way you could post an adult version pattern? I’d love to make these for myself and my friends!
Thank you 🙂
Ashlee
Sorry, but no, I hate the feel or yarn on my feet so I have no interest in making adult sizes. And for some reason I just can’t force myself to work on patterns untless I really really love them. But using any adult bootie pattern and adding a cuff would be super easy
Yogesvari queen
I am really confused i have made the sole like sooooo many Times and still end up with 3extra st, each row i do i count it’s the last row i end up with extra st, when i saw your Boots i was so happy and got working than even after so many tries am still happy to make them but I am with extra stiches, when you say work in same sc I am a little confused sorry but if u could help me would realy be happy.
Ashlee
I’m not sure why you’d have extra stitches on the last row, but not have that same problem with the other rows? when I sy work in the same sc it’s the sc you just did your ch’s from, that you had just sl st in to close off the last row. does that help? So your on the right stitch count for row 1 and 2 but not 3? I’m not sure what it could be, looking at the sole stitch chart do think you know where your going off?
JD
Hi, So I was wondering. I made this tonight and my soles curve…are they supposed to curve and if they are then how do I make them so it curves the opposite way??
Ashlee
They curve a bit for me too, I just kept going, and when I finished them completely I blocked them to get them in shape. honestly once they start getting worn the curve goes away really fast.
Karolina
Love this pattern! I’m a self taught beginner at crochet and struggled a lot with the sole of the boots. Went at it for two weeks, almost giving up so many times. So glad I kept at it, finally figured out my mistakes from comments and other booty tutorials. I have only done to main body and am moving onto the cuffs, but I thought I’d share some tips for newbies that might be having a hard time with the sole;
1. Do not crochet into chain stitches (other than the first row of course) and do not count them as stitches.
2. Do not count the slip stitch as a stitch, but do count the first crochet that you slip stitched into.
3. Reading pattern – if number first, crochet that many times into one crochet. If stitch first followed by number it means crochet that stitch into x amount of crochets.
4. For a newbie like me, helps to mark rounds with markers. For every round I marked where I slip stitched and the first crochet. Always could tell where the chain was (in between the two markers) and where my first crochet was. Also if you mess up, you can take apart your work up until the slip stitch and start round over.
Hope this helps other newbies!
Ashlee
unless a pattern says “count as a stitch” you never count a chain or work in it (other than the first row)
no pattern I have ever read counts a slip stitch as a stitch
I’m glad you figured it out
Melinda
Thank you so much for this pattern! The finished product is absolutely adorable! I am in the middle of making my first boot, in a light purple. So far the pattern has been very easy to read. So thankful I found this!
Ashlee
thank you so much! I love hearing that (after so many complaints)!
Dye
I love these I’m excited to see my little one wearing them this winter 🙂 I’m still a bit fresh at crocheting so I’m hoping this isn’t too much for me they do seem pretty easy to follow. I already attempted to make the sole but I’m a bit confused on where it says row 5-6 does that mean do the same thing for both rows. Just wondering since it doesn’t saw repeat or show *Just want to make them right before I end up undoing my work
Thanks again! 🙂
Ashlee
yep, same thing for both rows.
Kala
Hi! First of all, these are so cute, thanks for sharing! Ok so I’m sure this is a stupid question since no one else has asked, but do you need to flip inside out so that the right side is on the outside? If so, when? Before you start the cuff, or after all is said and done? Maybe my right side is already out and I’m just confused? I’ve done the first 8 rows and my starting tail is sticking out on the outside of the boot. And the little ridge around the sole part from crocheting into the back loops in row 4 is inside of the boot.
Ashlee
actually if you read all the comments I’ve gotten this question a few times. the answer is NO! If you turned them inside out the sharp edge you get from crocehing in the back stitches at the sole would be lost. That’s also why each cuff has a different start location, one off to the right of the center, the other cuff on the left side of the center. You chain and then work your way down the chain, then down the inside (NOT across the center) so opposite sides, then around the back an up the outside. So one cuff will be “right” side/ “wrong” side/ “right” side… and the other is “wrong” side/ “right” side/ “wrong” side…
Kala
Hmmm, I thought I read all the comments before asking and I did not see anyone else ask, sorry! By the way, you have more patience than I for answering the question about left/right soles about 100 times!! Anyways, I must be mixed up because I’ve finished the boot part (end of row 10) and if I don’t turn it inside out, it definately doesn’t have the correct shape. The sole doesn’t sit flat and the boot is sort of flattened looking. But once I turn it inside out, voila, problem solved!
Ashlee
it might have been on the other pattern, the infant size, I just know I’ve answered it a lot. If that’s what works for you go for it, I often change patterns to fit my style of crochet, it’s not what I do, it rounds the corners too much for me. but maybe your working it inside out so your actually turning it right side out? if you actually turning it inside out you could always work in the front stitches instead of the back stitches so when you turn it inside out you’ll still get the sharp edge?
Kala
Finished the first one and it looks awesome! Thanks again!! By the way I think you misunderstood my question. I was not asking whether you turn one boot inside out to make one left and one right, what I meant was, do I flip the boots right side out when they’re done. But I figured it out 🙂
If you ever consider trying to explain what you did to move the seam on the opposite boot to the inside, I’d love to try it! I’m also pretty OCD about things being symetrical!! To be honest I’ve actually contemplated trying to do one left-handed since that would produce the opposite and I’m just in love with your pattern aside from that one minor detail (which I realize no one sees anyways).
Ashlee
It’s easy, if you understand patterns visually, instead of going down the side first go around the heel first, then down the side, you basically want to do the heel first all the way around (so start with the end of the pattern and then do the rest. Does that make since?
Yoanna Miron
Hey, I love the boots, so I’ve decided to give them a try. I am having difficulties on row 7. I am getting the stitches correct but the front of the boot is coming somehow wrong and on the side. It says sc in same st as the sl st, sc 12 times, sc2tog… etc and then sc to the end. Isn’t it supposed to have the same amount of sc on both sides of the decreases for the boot to be symmetrical? I am ending up with 13 in the beginning and 23 on the other side. Can you please help me figure it out what I am doing wrong.
I hope I am making some sort of sense.
Have a great day.
Yoanna
Ashlee
not at all, your working off to one side, that’s why they aren’t even, if you look at the diagram from the sole you can see that you end on one side, as you continue to work your way up your still on one side, that’s why it’s less stitches on the first side and more after the toe, you have to go down the second side AND all the way around the heel.
Jenna
I need help! I am confused on row 7. When you say sc2tog, dc2tog . 7 times. Do I do both stitches 7 times or just the dc2tog? Any advice would be helpful. Thank You! ~ Jenna 🙂
Ashlee
just the dc2tog 7 times, if it was more than that one stitch there would have been ** around multiple stitches.
DiMoose
Hey, I used your pattern for an order I tried emailing you through Facebook for permission before, but I must have done something wrong, I did credit you for the pattern though, you are super talented, congrats! 🙂
Ashlee
Thank you so much! I totally allow selling items from my pattern and just ask for a link so that people who want to make their own can! Thank’s for the credit!
Brittany
I use this pattern to make slippers for my little cousin and it was perfect! So I was wondering if you have ever tried using this pattern for adult slippers because they are so cute!
Ashlee
nope, sorry, I can’t stand things on my feet, so I have no interest in it. You could just take any adult bootie and add a cuff to it though!
Ali
Thanks for the pattern! I used the scalloped edging part to complete my baby boots! If you want to see pictures, they are posted on my facebook page, Ali-cat’s Amigurumi. –> https://www.facebook.com/media/set/?set=a.230576337103435.1073741832.213058548855214&type=3&uploaded=7#!/alicatsamigurumi