I am SO excited to share this tutorial with you. My cousin just had twins last week so I made a boy and girl version! Of course I made them to fit my model so they won’t fit the twins for SOME time. But they are precious!
Yes, I made my sweet little boy wear the girls boots for this picture. Better than a skirt or something, right?
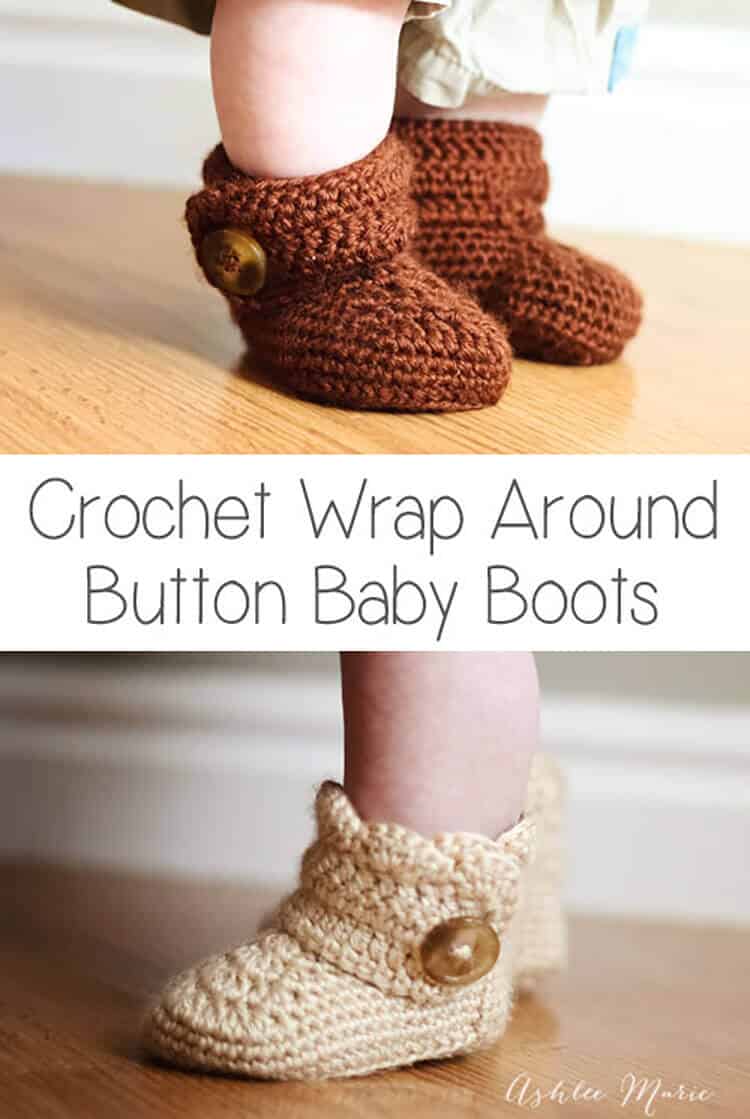
I love the scallops on the girl version, but the boy version is adorable too! I started with a size to fit my model, Baby Boy.
I ended up with boots that are around a size 4~ YES, 4 and they area already tight on him. According to a shoe website that’s like a 9-12 month shoe for the average babies feet!
I was going to share just that size, but a friend, Summer, asked me to make a pair for her baby, a size 1. So I figured it out, and added those numbers to the pattern at the last min! (on another post now)
Buy BOTH the Ad-Free pattern pdf’s for both the Baby AND Infant sized discounted here!
UPDATE: after some confusion I separated the pattern, the larger version is still right here, comparable to a size 4, and the smaller crochet wrap around button infant boot is on it’s own post.
Buy the Ad-Free pattern pdf for just the baby size here!
Baby wrap around boots:
materials:
caron simply soft yarn
large buttons
G6- 4 mm hook (To go up a size use a G-4.25mm, to go down a size use an f-3.75mm hook)
abbreviation:
ch (chain)
sl st (slip stitch)
sc (single crochet)
hdc (half double crochet)
dc (double crochet)
sc2tog (single crochet 2 together)
dc2tog (double crochet 2 together)
dc3tog (double crochet 3 together)

sole:
ch 13
row 1- sc in 2nd ch, sc 7 times, hdc 3 times, 7hdc in last ch, finish the rest of the round working along the back of the chain, hdc 3 times, sc 7 times, 4sc in the last/first ch, sl st to the first sc (32)
row 2- ch1, sc in same sc, sc 9 times, hdc, 2hdc 3 times, 3hdc, 2 hdc 3 times, hdc, sc 10 times, 2sc 3times, sl st to first sc (43)
row 3- ch2, hdc in same sc, hdc 11 times, *2hdc, 1hdc* 7 times, hdc 11 times, 2hdc, hdc, 2hdc twice, hdc, 2 hdc, sl st to first hdc (54)
shoe:
row 4- ch1, working in back stitches, sc around, sl st to first sc (54)
rows 5-6- ch1, sc around, sl st to first sc sc (54)
row 7ch1, sc in same sc, sc 12 times, sc2tog, dc2tog 7 times, sc2tog, sc around, sl st to first sc (45)
row 8- ch 1, sc in same sc, sc 10 times, sc2tog, dc2tog, dc, dc3tog, dc, dc2tog, sc2tog, sc around, sl st to first sc (39)
row 9- ch 1, sc in same sc, sc 8 times, sc2tog, dc2tog, dc3tog, dc2tog, sc2tog, sc around, sl st to first sc (33)
row 10- ch 1, sc in same sc, sc 6 times, sc2tog, dc, dc3tog, dc, sc2tog, sc around, sl st to first sc, cut yarn weave in ends. (29)

Boot cuff:
for the right boot sl st in the 8th stitch from the seam, for the left boot sl st in the 12th stitch from the seam
ch 15
row 1- dc in 4th ch from hook -first 3ch counts as first dc, dc in next 11 ch, dc in first sc (the one you sl st in), dc 24 times (there will be 4 spaces left), skip 3 spaces, sc in last space. (39) **note – some people had a problem with getting two right or two left feet. remember to not cross over the front, work down the inside, around the back and back up the outside, so you’ll work in opposite directions for each bootie, counterclock wise – looking top down, or “wrong” side out for the right booties and clockwise, or “right” side out for the left bootie**
row 2- ch3 (counts as dc), turn, dc in first dc and around 35 times, ch 1 skip one dc, dc in last 2 (38- with a ch1 space)
row 3- ch3 (counts as dc), turn, dc, dc in ch1 space, dc around (39)
row 4 scallops (girls)- turn, 5dc in second dc, *skip 1dc, sc in next dc, skip 1dc, 5dc in next dc*, repeat around (10 shells), sc down the side (I do 2 for each row so a total of 6 down the side), continuing around sc across the bottom along the original chain (13), sl st, cut yarn and weave in ends

row 4 simple (boys)- ch1, turn, sc across top (39), down the side (6) and across the bottom chain (13), sl st, cut yarn and weave in ends
Do you love them??? Considering the twins are HALF the size of Baby boy when he was born (let alone they don’t have his massive hobbit feet) I doubt they’ll even come close to fitting until they are at LEAST 9 months, maybe a year?? So next winter, perfect!
Don’t forget to add a button where ever you like and your done! I placed mine at the bottom of the 6th dc over from the front- I might go lower next time… or maybe two smaller buttons?
And one final picture, I thought you might want an inside shot so you can see how it wraps a bit… I’m still so very much in love with these boots. And when I finish Baby Boy’s I’ll post picture’s!!!


Jennifer Crewe
I love the look of these boots and I am sure from reading all the comments that they should be easy to make, however my experience is becoming different. I had a problem with the stitch count on Row 3 no matter how many times I tried it I didn’t have room for your last 2hdc hdc. I just went from there anyway and now I am trying g to do the cuff. I have begun the strap and am doing the 24 dbc. Do these go around from the strap to the back and toward the front.? How does the left strap get attached to the correct side of the shoe if there is only a 4 stitch difference in placement. Or do I count 12 stitches in the opposite direction from the seam than I counted the six for the rot? It is shard to even word my questions so I do hope they are u certai dabble. I will,persevere and hope the muddle in my mind clears up. Than, you for sharing and for your patience and help.
Ashlee
you must have your count off in the early rows somehow, we all crochet so differently that totally happens! it happens to me all the time! As long as you are happy with the fit in the end it doesn’t matter. as for the cuff there is only 4 stitches apart, but it should be centered, one front and to the right and one front and to the left. you chain and then when you come back down the back of the chain is where it’s different, you dc down the back of the chain and then continue around the back, don’t cross over into the front for either cuff. does that help?
Ashlee
I added a diagram of the sole, hopefully that will make the sole easier
Jennifer Crewe
One further question. I took seam to mean where my rounds have been ending but now thati am another round into my cuff I. Otice that it is starting much too back on the shoe. What is the seam?
Ashlee
because you didn’t get in that last 2hdc hdc in row 3 it will move your seam farther to the back, instead of off to the side where it should be so you’ll have to make up for that when you sl st and start the ch for the cuff. just center the two, with the small gap in the front
Jennifer Crewe
Thank you for your help. I Now have it figured out and really like the end result. Thank you for the pattern.
Jennifer
Ashlee
I’m so glad you figured it out, and again I’m sorry for the delayed response!
Vicki
These look beautiful and I’m now on my third attempt but can’t get it working? After row 7 I have 45 stitches, but after row 8 I have 40 or so? For some reason I just can’t get the top of the boot to come together when decreasing?
Ashlee
well after row 8 you should have 39, so if your at 40 your only off one stitch.
row 8- ch 1, sc in same sc, sc 10 times,
sc2tog, (1 decrease)
dc2tog, (1 decrease)
dc, dc3tog, (2 decreases)
dc, dc2tog, (1 decrease)
sc2tog, (1 decrease)
sc around, sl st to first sc (so 6 decreases takes you from 45 to 39)
Sandra
The diagram you added is Genius! saved me a lot of guess work when I made a blunder doing the sole. I’m sort of a beginner – my grandmother taught me to crochet as a child but I never really learned a proper technique. I haven’t crochet in years – but, saw these darling boots and thought I’d give it a shot. I had been doing great – until I got to row 8 – for the life of me I can’t get 39 stitches – I’ve avoided stitching into the center of the dc2tog & dc3tog stitches to continue the decrease – but, I”m still off – I have 45 stitches on row 7 – somehow my decreasing isn’t working = ( – am I doing it wrong?
Ashlee
yes, if your not at the right stitch count then something went wrong. It’s hard to help too much over comments. But, if you made it to row 7 and the right stitch count then you clearly know how to decrease, since you just went from 54 to 45 in row 7. So I’m not sure why you’d be have a hard time with row 8. Don’t skip any stitches, work in all 45 from row 7 and decrease the same way you did before. Let me know if that helps at all, I’ll keep trying to think what it could be.
Jennifer
I just finished a pair today and they are so cute. Thank you for sharing the pattern. I can’t wait to show them off.
Ashlee
your so welcome! I’m glad you like them! it’s a fun pattern!
Vicki
Thanks! I was doing something wrong but started again and has come out perfectly! Thanks for sharing!
Ashlee
I’m SO glad! We all get off sometimes when reading patterns! I’m glad it worked out for you!
Shawna Smith
Hi, love the pattern, these look sooo cute! I’m having trouble with row 3 though, it says:
hdc in same sc, hdc 11 times, 2hdc, 1hdc 7 times, hdc 11 times, 2hdc, hdc, 2hdc twice, hdc, 2 hdc.
I keep re-counting, but I only count 42 stitches here, when it is supposed to be 54. I’m finished the stitches, but I haven’t gone all the way around the heel!! If you could shine some light on what I’m doing wrong that would be wonderful!! Thank-you 🙂
Ashlee
let’s count it out together then
row 3- ch2, hdc in same sc (1), hdc 11 times (11), *2hdc, 1hdc* 7 times (21), hdc 11 times (11), 2hdc (2), hdc (1), 2hdc twice (4), hdc (1), 2 hdc (2), sl st to first hdc (54)
1+11+21+11+2+1+4+1+2=54
I think your not repeating the *2hdc, 1hdc* seven times (when there are * you repeat the SECTION 7 times)
Ashlee
I added a diagram of the sole, hopefully that will make it more clear
Shawna Smith
OH, haha silly me, I get it now! You’re right, I did 2 hdc and then only repeated 1hdc 7 times. New to crochet, didn’t know what the * meant. Thank-you for the help, and the quick reply!
Ashlee
No problem! Glad it makes sense now!
Diana Hartney
I have made 3 and ended up ripping them out because I think I’m missing something somewhere. How do you get the top stitched together so that you can go on and start the cuff. All I end up with is a cute littl
E bootie not together with the pattern on one side. So, how do I get the top from toe to ankle together????? HELP, my first granddaughter and I can’t figure this out ;( thanks in advance for your help!!
Ashlee
can you tell me what row your having trouble with? where does it start to not look like my pictures?
Paige
These are so lovely!!! I’m about 25% done with the ones I’m working on. I was asked to make a pair by a girl my husband works with so I decided to test these out! The ones I’m making right now are going to be perfect as a birthday gift for my niece! Also they’ll be just in time for winter! Thank you so much for sharing!!
Ashlee
your so welcome!
Eva
Dear ashlee,
I can’t understand the beginning of each row, what you mean by sc in the same sc?
Can you please drow a diagram of just the beginning of tow rows so If I will see it iwill understand what you mean. I tried to crochet but it get very confused rows.
Ashlee
every crocheter has a preference on how they start, I like to sc in the same sc as the one you had just sl st then ch in. some people sl st, ch then sc in the NEXT sc, but I find it makes the seam crocked instead of straight.
Beth
These booties are adorable, and I’ve enjoyed crocheting them. I just have one teensy, weensy problem. I keep winding up with 2 right ones! I can’t figure out what I’m doing wrong. any suggestions would be much appreciated! Thanks, Beth
Ashlee
the shoe part is the same for both, you get the left and right boots by where you start the cuff
Boot cuff:
for the right boot sl st in the 8th stitch from the seam, for the left boot sl st in the 12th stitch from the seam
nariamma
I love them! I made them today for my 9 months old and found out they are almost 2cm too small in the sole… U___u and his chubby feet doest help much. Is it dificult to resize the pattern? Any suggestion? 🙂
Ashlee
first I’d try a larger hook size, see if that helps, measure his foot against the sole before you make the rest of the shoe. it’s amazing how much difference a larger hook can make.
if that doesn’t work then add a chain or 2 then add to the SC section of the first row, and just make sure you remember to add that extra stitch (or two) on BOTH sides as you work your way around ever row. Also when you add the cuff make sure you remember to add one (or two) as your counting to get to the right sitch for adding the cuff.
Does that make sense?
Sara
Love this pattern! The booties look adorable! I’m new to crocheting (only taught myself last week) and I’m having trouble understanding when you go from sole to boot – what are the ‘back stitches’? Is the sole that you’ve just made turn into the bottom of the boot, or does the ‘right’ side end up inside? I tried what I thought were back stitches as it looks ok but not right at the sole edge (smooth) like yours, its like I’ve got a edge on the sole outside which is fine but it’s going I mean the inside of my boots will be smaller now….
Ashlee
here is an image of the back stitch http://www.crochetspot.com/wp-content/uploads/2009/06/crochet-loops-1.jpg
The right side ends up as the outside of the boots.
Alice
Love this pattern, they are so super cute! I’ve done the first boot then just had an idea that I’m pretty sure will work. To make the seam come out on the opposite side for the left boot, (so that it will be on the inside of both boots) you can crochet each row in reverse order, ie start with the final stitch and work backwards through the instructions for that row, ending with the first stitch. Then join as normal, and then go onto the next row, working that one backwards in the same way. Hope that makes sense!
Ashlee
feel free to do it however you want, I actually my second one a bit different (I’m a bit OCD about things being symmetrical…) but it was MUCH harder to explain than this way. I don’t think I’ve ever crochet from a pattern without changing it up a bit, so feel free! just don’t confuse other (more beginner) crocheter please.
Sara
Nevermind me – I figured out the back stitches! However I did end up with two possible buttonholes somehow – on the first turn around on the cuff, and again towards the end (last row before the scallops started) not sure what happened there but hopefully I can disguise it!
Ashlee
HA! I just replied to that one! not sure what you did wrong, but maybe do two buttons instead of one? it would look super cute!
nariamma
Thank you! Im doing with 2 extra chains, havent finish yet but it seems right. I will also add another row to make it taller, i love the pattern and gives me so many ideas! 😀
Ashlee
Great! I hope it works out well for you!!! I always change up patterns to fit my subject! I hope it fits well now!
Sarah
Hi! Love these boots! I’ve made your tophat for several babies and it is the cutest thing I’ve ever seen!
Struggling with first row. If I ch13 then start in 2nd chain from hook i’m left with 2 chains after the 7sc and 3hdc. So do I skip the second last ch and 7hdc in the last one? I am finding my stitch count off when I do it that way.
Ashlee
try again, here are the stitches by chain…
ch 13
row 1- sc in 2nd ch, {2nd chain}
sc 7 times, {3rd-9th chains}
hdc 3 times, {10th-12th chains}
7hdc in last ch, {13th chain}
finish the rest of the round working along the back of the chain, hdc 3 times, {12th-10th chains}
sc 7 times, {9th-3rd chain}
4sc in the last/first ch, {2nd chain}
sl st to the first sc (32)
vanessa
Hi, these are soo incredibly adorable! Just a quick question though – I noticed someone asked how to do the opposite boot, and you’d pointed out the sole is for either boot, but every time I make the sole it always leans across and I have a ton of left footed boots. Any tips where I’m going wrong? I follow the pattern closely but always have this problem….
Ashlee
just pull it into place, it twists a little or a lot depending on how you crochet, loose or tight, etc… your not doing anything wrong, it twisted a bit for me, too. I just kept crocheting! Once I put them on the baby they were fine.
Ashlee
I added a diagram of the sole, hopefully that will make it more clear
chelsea
hi i was having a problem with the cuff. im doing the right side and i cant figure out what you want me to do at the end of the first row. it says skip 3 spaces and sc chain in the fourth. am i bringing the sides together?
Ashlee
yes, your closing up the top a bit, you can skip it if you want, but you won’t get the same overlap look.