I am SO excited to share this tutorial with you. My cousin just had twins last week so I made a boy and girl version! Of course I made them to fit my model so they won’t fit the twins for SOME time. But they are precious!
Yes, I made my sweet little boy wear the girls boots for this picture. Better than a skirt or something, right?
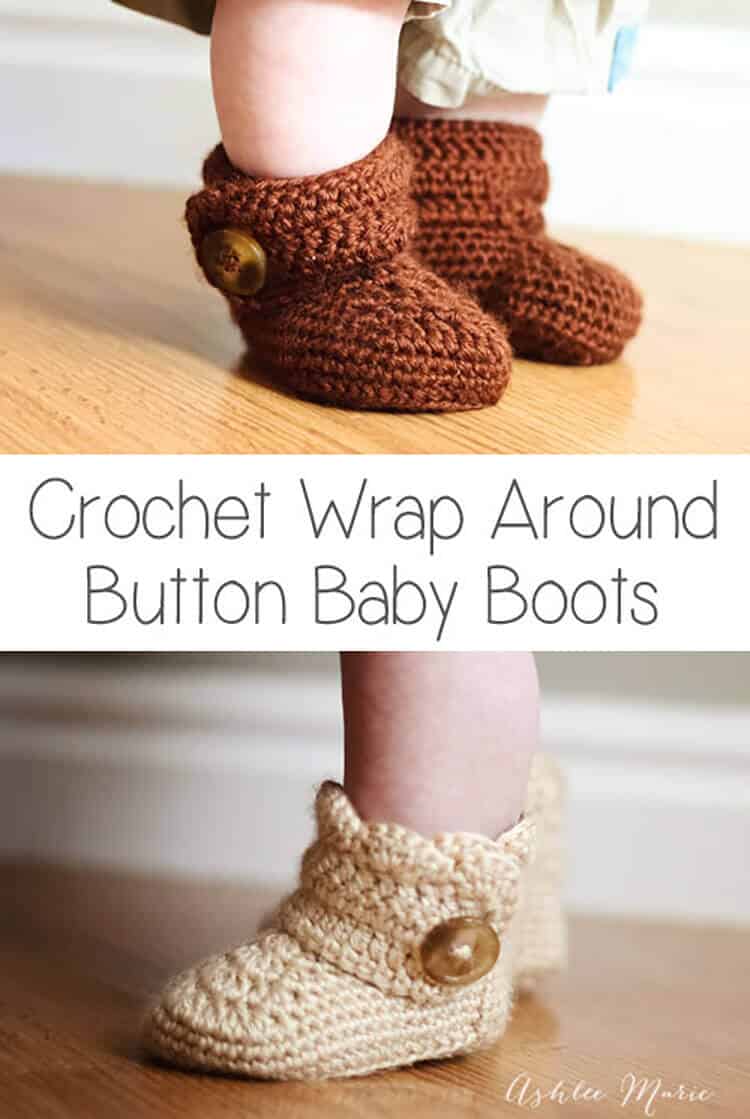
I love the scallops on the girl version, but the boy version is adorable too! I started with a size to fit my model, Baby Boy.
I ended up with boots that are around a size 4~ YES, 4 and they area already tight on him. According to a shoe website that’s like a 9-12 month shoe for the average babies feet!
I was going to share just that size, but a friend, Summer, asked me to make a pair for her baby, a size 1. So I figured it out, and added those numbers to the pattern at the last min! (on another post now)
Buy BOTH the Ad-Free pattern pdf’s for both the Baby AND Infant sized discounted here!
UPDATE: after some confusion I separated the pattern, the larger version is still right here, comparable to a size 4, and the smaller crochet wrap around button infant boot is on it’s own post.
Buy the Ad-Free pattern pdf for just the baby size here!
Baby wrap around boots:
materials:
caron simply soft yarn
large buttons
G6- 4 mm hook (To go up a size use a G-4.25mm, to go down a size use an f-3.75mm hook)
abbreviation:
ch (chain)
sl st (slip stitch)
sc (single crochet)
hdc (half double crochet)
dc (double crochet)
sc2tog (single crochet 2 together)
dc2tog (double crochet 2 together)
dc3tog (double crochet 3 together)

sole:
ch 13
row 1- sc in 2nd ch, sc 7 times, hdc 3 times, 7hdc in last ch, finish the rest of the round working along the back of the chain, hdc 3 times, sc 7 times, 4sc in the last/first ch, sl st to the first sc (32)
row 2- ch1, sc in same sc, sc 9 times, hdc, 2hdc 3 times, 3hdc, 2 hdc 3 times, hdc, sc 10 times, 2sc 3times, sl st to first sc (43)
row 3- ch2, hdc in same sc, hdc 11 times, *2hdc, 1hdc* 7 times, hdc 11 times, 2hdc, hdc, 2hdc twice, hdc, 2 hdc, sl st to first hdc (54)
shoe:
row 4- ch1, working in back stitches, sc around, sl st to first sc (54)
rows 5-6- ch1, sc around, sl st to first sc sc (54)
row 7ch1, sc in same sc, sc 12 times, sc2tog, dc2tog 7 times, sc2tog, sc around, sl st to first sc (45)
row 8- ch 1, sc in same sc, sc 10 times, sc2tog, dc2tog, dc, dc3tog, dc, dc2tog, sc2tog, sc around, sl st to first sc (39)
row 9- ch 1, sc in same sc, sc 8 times, sc2tog, dc2tog, dc3tog, dc2tog, sc2tog, sc around, sl st to first sc (33)
row 10- ch 1, sc in same sc, sc 6 times, sc2tog, dc, dc3tog, dc, sc2tog, sc around, sl st to first sc, cut yarn weave in ends. (29)

Boot cuff:
for the right boot sl st in the 8th stitch from the seam, for the left boot sl st in the 12th stitch from the seam
ch 15
row 1- dc in 4th ch from hook -first 3ch counts as first dc, dc in next 11 ch, dc in first sc (the one you sl st in), dc 24 times (there will be 4 spaces left), skip 3 spaces, sc in last space. (39) **note – some people had a problem with getting two right or two left feet. remember to not cross over the front, work down the inside, around the back and back up the outside, so you’ll work in opposite directions for each bootie, counterclock wise – looking top down, or “wrong” side out for the right booties and clockwise, or “right” side out for the left bootie**
row 2- ch3 (counts as dc), turn, dc in first dc and around 35 times, ch 1 skip one dc, dc in last 2 (38- with a ch1 space)
row 3- ch3 (counts as dc), turn, dc, dc in ch1 space, dc around (39)
row 4 scallops (girls)- turn, 5dc in second dc, *skip 1dc, sc in next dc, skip 1dc, 5dc in next dc*, repeat around (10 shells), sc down the side (I do 2 for each row so a total of 6 down the side), continuing around sc across the bottom along the original chain (13), sl st, cut yarn and weave in ends

row 4 simple (boys)- ch1, turn, sc across top (39), down the side (6) and across the bottom chain (13), sl st, cut yarn and weave in ends
Do you love them??? Considering the twins are HALF the size of Baby boy when he was born (let alone they don’t have his massive hobbit feet) I doubt they’ll even come close to fitting until they are at LEAST 9 months, maybe a year?? So next winter, perfect!
Don’t forget to add a button where ever you like and your done! I placed mine at the bottom of the 6th dc over from the front- I might go lower next time… or maybe two smaller buttons?
And one final picture, I thought you might want an inside shot so you can see how it wraps a bit… I’m still so very much in love with these boots. And when I finish Baby Boy’s I’ll post picture’s!!!


Wenona
Thank you for making this pattern available. The booties are adorable. I just finished the first bootie….I cant wait to finish the pair. They work up very easily. It is my first try at booties and I’m hooked! Thank you again!
Ashlee
our so welcome! And thank you for the positive feedback, it’s nice to balance the problems or issues (which are fine, but can get overwhelming without such nice comments!)
Mandy
Hello! Thank you so much for posting this! These are darling and I am trying to make them for my daughter. I am not the most amazing crochet-er, I was wondering if you could further explain what you mean when you say to chain (after the slip stitch) and then single crochet in the same single crochet? I am not sure I am single crocheting in the right spot…. Thank you!
Ashlee
every pattern is written a bit different. to avoid the “seam” sliding over every row this is how I choose to write it, but feel free to change it to fit your crocheting style! so you Sl St in the first SC of the previous row (rather than the Ch- sometimes the ch counts as a stitch, but not in this case) then ch to get the height to start the next row. sc in the same sc, the same sc that you JUST sl st in rather than the NEXT sc. Does that help?
Mandy
Yes, I think so. I will try working it again. Thanks for getting back to me!
Ashlee
Anytime! Let me know if you have any other questions!
Anne
Hello There! I Absolutely LOVE Your Work, Big Fan! I Have A Question For You! When It Says Sc In Same Sc, Does That Mean To Crochet In The Same St Or What Exactly? Oh Newbie Here! : )
Ashlee
sc in the same sc- single crochet in the same single crochet you have been working in, the one you JUST sl st in.
Lutxi
Hi! Your baby boots are so cute! Thank u for sharing ;D
I started to make a pair of them and I have a question… At row 7, you made 9 decreases (sc2tog + dc2tog x 7 + sc2tog) in addition of 26 (13+13) sc stitches, so you have 26+9 = 35 stiches. But the instructions indicates 45 stitches for the 7th row…. I can’t understand it, if I follow the instructions it is impossible to get 45 stitches at the 7th row. Can u help me?
Thank u!
Ashlee
it’s because there are 13 sc the first part before the decreases, but after that you SC AROUND, which is the 13 down the side but then 10 around the heel! so 13 sc, the 9 decreases and 23 sc to the sl st
Lutxi
Oh! I’ve just found out how u did it! I though that you started the 4th row from the center of the heel but you started just where you finished the 3rd row. Sorry, I made a change of color for the sole so I made my mistake 😀
Ashlee
I guess I should have read this comment first! I never stated to finish off the row before so you start right from where you leave off the row before!
Sam Beardsmore
Hiya, Thank you so much for this pattern. I have had to tweek it a little for the boots I’ve made for my daughter, but I would have never been inspired to make them if I had not seen this. I’ve posted what I have made on to my blog if you want to have a look.
Thanks again
Sam
Ashlee
you did a great job! I’m glad you had fun with it and made them your own!
Nicole
Do you crochet tightly? I have tried doing this pattern over and over and over and for whatever reason, my stitch number is coming out correctly. do you count the chain 2?
Ashlee
Ummmm Tighter than some, not as tight as others… I know that doesn’t help a bit! I do NOT count the ch, you say your stitch number is coming out correctly so what’s your question?
Margot
Hello Ashlee, first of all thank you very much for this pattern. The baby booties are really cute. Anyway, I would like to ask you for advice: in the row 7, shouldn’t there be the same number of of SC on each side of baby shoe? I’ve tried to make it exactly like you in your pattern, but the front pattern of the bootie started to come on a side, so the bootie looks asymetrical.
I’ve changed it after that for scheme CH1, 17 SC, sc2tog, dc2tog 7 times, sc2 tog, 18 SC (to make sure, that there will be the same number of SC on each side, since the start of the row in the middle of heel) – but would like to know why I’m not able to do it due to your pattern (I’ve checked number of chains in each row and it fits)
thanks very much for your advice and once more thanks so much for your work!
Margot
Ashlee
no, you should NOT have the same number of SC on each side, the seam, or starting point for each row, is on the side of the bootie, so if you had the same number on each side your heel and toes would be totally twisted by a dozen or so stitches! I’m not sure why you think the starting point of the row is in the middle of the heel since it is NOT.
The pattern is written so that the decreases are centered above the increases in the sole. Don’t change your numbers unless you want it seriously off.
Caitlyn
I think her question (which is mine as well) is that the sole is shaped for the left foot. How do we adjust the pattern so that we can use the second sole to be shaped for the right foot.
Ashlee
the soles are symmetrical, so you use the same sole for both booties. They get a little (or sometimes alot depending one how tightly or loosely you crochet) twisted while making them, but stick with it. Once your don’t block them and they’ll be just fine!
Ashlee
I added a diagram of the sole, hopefully that will make it more clear that it’s symmetrical, not specific to one foot
Megan Borah
Hi, I just love your beautiful design! I was wondering, since your page says it’s okay to share your projects, would you mind if I shared a picture of your booties on my new crochet business page as an item I could make? I would of course credit you and link back here. I have made countless beautiful items over the last couple of years but since I never intended to sell them, I mostly gave them away without photographing anything. Now that I’m trying to offer things to sell it’s making life pretty difficult that I don’t have photos! lol 🙂
Ashlee
please don’t crop my watermark, and please replace it with your own picture as soon as you can, since we all crochet differently I’d hate for you to sell someone on my image and have yours look a bit different, if that makes sense! Good luck and I hope you have fun!
Karen Hill
I want to try these out for a young girl, not sure size yet. What would you suggest?
Ashlee
I only have the patterns for the two sizes, the infant and baby, the way I crochet the baby size is around a size 4 shoe. If you use a larger hook you’ll get a larger size!
Paige
I absolutely love these!! I am so glad you are willing to share this for free, its hard to find really good patterns online for free.
I am having trouble though with the cuff. I did the chain 15 and the dc in 4th ch from hook but after the dc in next 11ch I got lost, So i get that i dc in where i did the sl st but theyn what do i do from there? I don’t understand what it means, where do i do the 24 dc and what is the 4 spaces left?
Ashlee
your so welcome! so after you dc down the ch and in the same dc where the sl st was you’ll dc in the stitches down the side, around the back and up the other side. So on one foot it’s right side out and on the other foot it’s right side in. Does that help?
Paige
Ohh, i see is says dc 24 times, but if its for row 1 which direction do i go with it and where are the 4 spaces left?
Ashlee
I think I just answered this in the last response, go down the side, around the back and up the other side. the 4 spaces left are in the front.
Ika
Hi! Boots are adorable. I want to make them for my little girl. But I’m new in crochet, and my english is not so good. Can someone explain me what means 2 hdc 3 times? Thank you very much for this pattern. All the best from Serbia
Ashlee
if the number is before the stitch abbriviation then it’s the number of times you do that in one stitch, if the number is after it’s the number of stitches you repeat. when the number is both before and after it’s “2 half double crochets in each of the next 3 stitches” does that help?
jen
I really like this pattern but I’m having a hard time with it. At the end of the second row, I found myself halfway down the sole, instead of at either end of the sole. Shouldn’t I end the row at either the toe or the heel? It’s ending at about the arch instead. Then it says to chain two, but that leaves a hole right in the middle of the sole. I admit, I’m not a great crocheter, but I’ve pulled it out several times with the same results. Thank you.~jen
Ashlee
kay, you ended row 1 with 32 stitches, right?
row 2- ch1, sc in same sc, (in the 1st stitch)
sc 9 times, (in the 2nd-10th stitches)
hdc, (11th stitch)
2hdc 3 times, (12th-14th stitches)
3hdc, (15th stitch)
2 hdc 3 times, (16th-18th stitches)
hdc, (19th stitch)
sc 10 times, (20th-29th stitches)
2sc 3times, (30th-32nd sitches)
sl st to first sc (43)
and your all the way around… so where did you go wrong?
Ashlee
I added a pattern diagram of the sole, hopefully that will make it more clear
Jen
Im so impressed that you were kind enough to post this pattern for everyone, then to take the time to help with all these questions! Very, VERY awesome of you. Happy hooking!
Ashlee
your so very welcome! I’m a total amateur when it comes to writing patterns so I’m sure there is a better way to write it out, I just write what makes the most sense to me! so when people have trouble I feel terrible and what it to make sense and work out for them! I hope it helps in the end!
Shannon
So cute! I found this searching ravelry, thank you for posting it there! I am going to make a pair for my toddler, I’ll probably blog about it and link everyone back here! Not that I get alot of hits, but I think it is very cute!
Ashlee
your so welcome! thanks for linking back, i really appreciate it!
Dannie
i love this pattern i. gonna try to make my daughter some today! but is there any way to make boot taller so i can use a double button instead of one??
Ashlee
just add rows, 2 at a time before the shell border
Laura
I also do not understand the whole right foot, left foot of the pattern. After i finish the sole and begin making the shoe it is clearly a left foot boot. The only thing i can think of it that you flip the sole of the second shoe before continueing to make the bootie? Or maybe i messed up and the sole is not suppose to have a slight curve in it to indicate which foot it is for?
Ashlee
it’s not a left foot, and you don’t flip it. the sole pattern is symmetrical, the same number of stitches on each side. depending on how tightly or loosely you crochet it will twist/curve a bit while you make it. you can either block it before moving on, or simply move on, and block it afterwards, that’s what I do.
Ashlee
I added a diagram of the sole, hopefully that will make the fact that it’s symmetrical more clear