I am SO excited to share this tutorial with you. My cousin just had twins last week so I made a boy and girl version! Of course I made them to fit my model so they won’t fit the twins for SOME time. But they are precious!
Yes, I made my sweet little boy wear the girls boots for this picture. Better than a skirt or something, right?
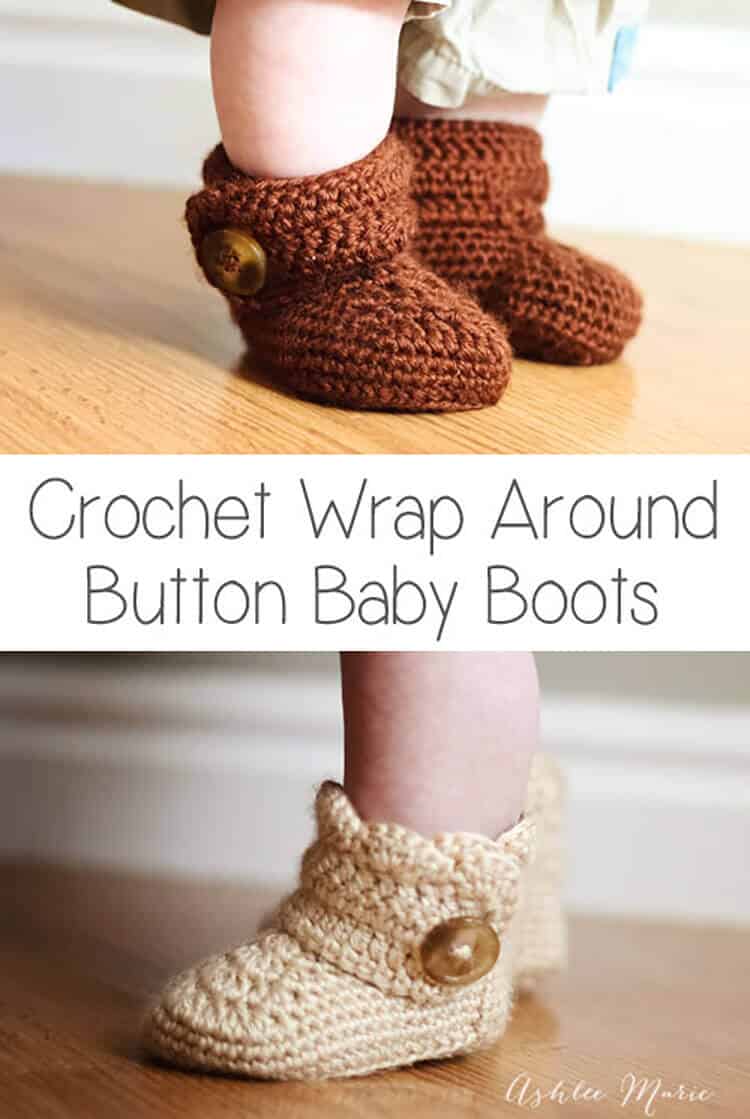
I love the scallops on the girl version, but the boy version is adorable too! I started with a size to fit my model, Baby Boy.
I ended up with boots that are around a size 4~ YES, 4 and they area already tight on him. According to a shoe website that’s like a 9-12 month shoe for the average babies feet!
I was going to share just that size, but a friend, Summer, asked me to make a pair for her baby, a size 1. So I figured it out, and added those numbers to the pattern at the last min! (on another post now)
Buy BOTH the Ad-Free pattern pdf’s for both the Baby AND Infant sized discounted here!
UPDATE: after some confusion I separated the pattern, the larger version is still right here, comparable to a size 4, and the smaller crochet wrap around button infant boot is on it’s own post.
Buy the Ad-Free pattern pdf for just the baby size here!
Baby wrap around boots:
materials:
caron simply soft yarn
large buttons
G6- 4 mm hook (To go up a size use a G-4.25mm, to go down a size use an f-3.75mm hook)
abbreviation:
ch (chain)
sl st (slip stitch)
sc (single crochet)
hdc (half double crochet)
dc (double crochet)
sc2tog (single crochet 2 together)
dc2tog (double crochet 2 together)
dc3tog (double crochet 3 together)

sole:
ch 13
row 1- sc in 2nd ch, sc 7 times, hdc 3 times, 7hdc in last ch, finish the rest of the round working along the back of the chain, hdc 3 times, sc 7 times, 4sc in the last/first ch, sl st to the first sc (32)
row 2- ch1, sc in same sc, sc 9 times, hdc, 2hdc 3 times, 3hdc, 2 hdc 3 times, hdc, sc 10 times, 2sc 3times, sl st to first sc (43)
row 3- ch2, hdc in same sc, hdc 11 times, *2hdc, 1hdc* 7 times, hdc 11 times, 2hdc, hdc, 2hdc twice, hdc, 2 hdc, sl st to first hdc (54)
shoe:
row 4- ch1, working in back stitches, sc around, sl st to first sc (54)
rows 5-6- ch1, sc around, sl st to first sc sc (54)
row 7ch1, sc in same sc, sc 12 times, sc2tog, dc2tog 7 times, sc2tog, sc around, sl st to first sc (45)
row 8- ch 1, sc in same sc, sc 10 times, sc2tog, dc2tog, dc, dc3tog, dc, dc2tog, sc2tog, sc around, sl st to first sc (39)
row 9- ch 1, sc in same sc, sc 8 times, sc2tog, dc2tog, dc3tog, dc2tog, sc2tog, sc around, sl st to first sc (33)
row 10- ch 1, sc in same sc, sc 6 times, sc2tog, dc, dc3tog, dc, sc2tog, sc around, sl st to first sc, cut yarn weave in ends. (29)

Boot cuff:
for the right boot sl st in the 8th stitch from the seam, for the left boot sl st in the 12th stitch from the seam
ch 15
row 1- dc in 4th ch from hook -first 3ch counts as first dc, dc in next 11 ch, dc in first sc (the one you sl st in), dc 24 times (there will be 4 spaces left), skip 3 spaces, sc in last space. (39) **note – some people had a problem with getting two right or two left feet. remember to not cross over the front, work down the inside, around the back and back up the outside, so you’ll work in opposite directions for each bootie, counterclock wise – looking top down, or “wrong” side out for the right booties and clockwise, or “right” side out for the left bootie**
row 2- ch3 (counts as dc), turn, dc in first dc and around 35 times, ch 1 skip one dc, dc in last 2 (38- with a ch1 space)
row 3- ch3 (counts as dc), turn, dc, dc in ch1 space, dc around (39)
row 4 scallops (girls)- turn, 5dc in second dc, *skip 1dc, sc in next dc, skip 1dc, 5dc in next dc*, repeat around (10 shells), sc down the side (I do 2 for each row so a total of 6 down the side), continuing around sc across the bottom along the original chain (13), sl st, cut yarn and weave in ends

row 4 simple (boys)- ch1, turn, sc across top (39), down the side (6) and across the bottom chain (13), sl st, cut yarn and weave in ends
Do you love them??? Considering the twins are HALF the size of Baby boy when he was born (let alone they don’t have his massive hobbit feet) I doubt they’ll even come close to fitting until they are at LEAST 9 months, maybe a year?? So next winter, perfect!
Don’t forget to add a button where ever you like and your done! I placed mine at the bottom of the 6th dc over from the front- I might go lower next time… or maybe two smaller buttons?
And one final picture, I thought you might want an inside shot so you can see how it wraps a bit… I’m still so very much in love with these boots. And when I finish Baby Boy’s I’ll post picture’s!!!


Lindsey
i love love LOVE these boots!! i’m a new crocheter, but i tend to take on projects that are ‘too big’ for me, so of course i wanted to try this pattern RIGHT AWAY! i had a little trouble keeping the number of stitches correct, and mine aren’t NEARLY as cute as yours, but i’m happy with the finished product 🙂
thanks for providing the pattern for free!!
Ashlee
Your so welcome! I kind of have a thing about paying for things I can figure out myself and I love to share! I hope you didn’t have too many stitch count problems. Every pattern maker writes with a different style so sometimes just figuring out that style helps with understanding and reading it! I’m glad you were happy with the end results, that’s all that really matters, right?
Shar
I found your site from Pinterest. I love your boot pattern and converse pattern. Thank you so much for sharing them. I have a niece and nephew on the way and will be making these for them!!
Ashlee
Thanks so much! I love the converse too, My little man grew out of them WAY too fast, I might have to design a larger pattern for those!
Lateria
Hi! Thank you so much for sharing your pattern, these are so cute I had to try to make them for my baby girl. I tried making the infant size first, but they were too small, I’ve made one shoe in this size (working on the cuff now) but it’s too big. Do you have any suggestions for a beginner on how I can adjust it for a six month size? Any help would be appreciated.
I think I came across your site through ravelry, found it last night and pinned it since then it has been pinned 26 times and liked 11! I love how easy your pattern was to follow, I’ve tried making a few boots/shoes and each time was unable to get them right, I’m so excited to finally get one right (even if she’ll have to grow into this pair : ) Maybe I can figure it out to make a smaller one in another color.
Thanks again!
Ashlee
the patterns are just 2 stitches off each, so to adjust to a different size use smaller or larger hooks. My 4 month old has already grown out of this baby size, so going by months is not a good gauge. so use a larger hook for the infant version, or a smaller hook on this baby version. You can just do the sole as a guage, if it looks right finish the rest of the bootie, if not try again, no reason to make the whole shoe! Good luck!
Holly
Thanks for posting these darling boots. I am not very experienced in following patterns and am a bit confused. At the beginning of the cuff it says sl st in 8 stitches. I did a sl st in each of 8 stitches thinking this was for the part the flap wrapped over i wondered why you said to cut yarn at end of shoe but now I think I was suppose to sl st in the 8th stitch only to start the cuff with new piece of yarn. is that right? I want to make these for a friends twins. If I figure it out I’ll try to post pics. Such a darling patten. Thanks again for sharing your talent! (also forgive typing I’m doing this from my phone. 😀
Ashlee
okay, I reworded it a bit, you just do ONE sl st for each cuff, in the 8th stitch from the seam or the 12th stitch from the seam. Thank you so much!
Kat Bowman
I still can’t find the instructions for the right foot… am I missing it somewhere? I think Kathy Wysuph was asking how many “chains” you make once you slip stitch the 8 stitches from the seam. I got the left boot made…. let me know where I can find the pattern for the right boot.
Ashlee
Boot cuff:
for the right boot sl st in the 8th stitch from the seam, for the left boot sl st in the 12th stitch from the seam
after that the cuff is made the same way for either side, ch, turn, dc around, turn, dc back, etc….
Kat Bowman
I’m having trouble with creating the right “sole” and then building the boot up from that. The instructions you have are definitely for a left boot. I understand the instructions for the right and left cuff. Thanks!
Ashlee
the soles and boot part are symmetrical and therefore don’t have a right and left foot, the right and left are created by the cuffs. when you work in a round your work natrually starts to curve to one side, but once your done you can pull and stretch it out and once they are on the babies feet it doesn’t matter. But there is no right or left sole, they start with 7hdc at the tip and 5 sc at the end and the sides are even and it goes from there.
Ashlee
I added a diagram of the sole, hopefully that will help show how they are completely symmetrical
kayla mullis
I am having the same problem. I am most defiantly doing it right by the diagram and everything but no matter what I do the sole goes left footed. I tried to pull and shape it for a right but it just wont work. I dont know if it has something to do with being right handed maybe?
Ashlee
nope not right handed. If you were left handed it would twist the other way, it’s TOTALLY NORMAL for them to twist and turn while working in the round. it does take some blocking (or simply start wearing it like I did with my baby) and it works itself out.
Denise
Im new at crocheting and am having some trouble reading the pattern. What does it mean, after 3 hdc, to 7hdc? Am I doing 7 HFCs in the same stich?
Ashlee
It helps if you tell me what row your having a hard time with. Are you talking about row one? then yes, 7 hdc in the last ch, the same stitch, it creates a half circle and then you work down the back stitches of the chain and create an oval to start your sole with.
Kat Bowman
I didn’t think about stretching the boot into shape…. duh! Thanks so much for your help. I can’t wait to get started on the other boot!
Ashlee
It is a bit trippy to look at at first, but I promise it will work out just fine. After wearing them for a day you can’t even tell they were ever a bit off
Alison
Hi,
My friend came across this pattern on Pinterest and shared it with me. I just started my own little baby crochet business via facebook. I am currently building up an inventory of various baby items and I would like to know if its okay if I sell booties using your pattern on my facebook page. I will be sure to include a link to your website and give you credit for the pattern.
Thanks so much!
Ashlee
I’m totally okay with you selling items made from my tutorials and patterns. just don’t sell the pattern please and if you could link back to my page for those people who want to make their own I’d appreciate it! Good luck with your store!
Kirsty
So um, I’ve tried making these quite a few times now, but I’m having trouble with the seam? If i start each round the way it says to, I end up with extra stitches and my seam moves backwards. If i go one forward and start the round in the stitch after the slip stitch, my seam curves forwards. I’ve only been crocheting a few months so I have no idea what I’m doing wrong, or how to fix it. It would be awesome if you could help!
Ashlee
I’m GUESSING that your doing one of two common mistakes. Either 1) your sl st in the ch1 from the beginning of the round instead of in the sc? That is my only guess about getting an extra stitch without seeing a picture. The other one 2) is accidentally sc in the sl st from the last row, thus adding an extra stitch. Make sure to ONLY sc in other sc’s. It’s TOTALLY common and I still do it sometimes and have to go back and count! your seam will move backwards a bit, that’s totally normal, but not an extra stitch!!
Susan
I love these so much that I would be super over-joyed if I could ever make it. I am left handed and pretty much self taught. I can crochet but I struggle. These are super adorable. Great job!!
Susan
Ashlee
Keep it up! I’ve been crocheting for 9 years and it just takes time and practice to get a feel for it! You’ll totally be able to do these!
Lisa
Hi, I just began crochet n I saw these and I would love to make it! But it seems like its too complicated do u think you could make a video of you making it! Cuz that would be awesome! Or if you could write out exactly what I am suppose to do for row 2 ” row 2- ch1, sc in same sc, sc 9 times, hdc, 2hdc 3 times, 3hdc, 2 hdc 3 times, hdc, sc 10 times, 2sc 3times,
sl st to first sc (43)”
Like I am suppose to sc 9 times n then what does 2hdc three times mean? Like 2 hdc in the next three?
Sorry to bother you but I would really like to learn how to make these. Thanks in advance!
Ashlee
when the number is after the stitch: sc 9 times, it’s in the next 9 stitches
when the number is BEOFRE the stitch: 3hdc it’s in the SAME stitch
so 2hdc 3 times is 2hdc in the next 3 stitches
Ashlee
I added a diagram of the sole, hopefully that will help make row 2 more clear for you
mimi
Hi.
Does it make a difference what yarn you use? Because i have sugar n’ cream yarn and for some reason my bootie looks much bigger than yours? I’m also use a size 4.0 mm hook,
Ashlee
I’m sure it does, but the way you crochet will make the biggest difference, tight or loose. But they ARE big shoes, as I said my baby that I made these for has HUGE feet. The twins I made both of these for probably won’t fit them until they are one! you can try the smaller version, the infant size.
sonja
I figured it out 🙂 btw WAY TOO CUTE!!!
Ashlee
I’m SO glad you were able to figure it out!
Heather
These booties are adorable!! My cousin is expecting twin girls this August and I would love to make two pairs since everything I am making is in twos 🙂 The pattern seems very simple and i’m just a beginner at crocheting so I always read to pattern to make sure I can understand it before I start. My question to you is on the sole portion you have, 2hdc 3 times, 3hdc, 2 hdc 3 times, on the 2nd row. Are the 2 hdc in the same stitch and then I just repeat 3 times, then 3 hdc in the same stitch..etc?? Everyone writes their patterns different so this is always were I get tired up!! I would greatly appreciate your advice so that I can make these. Thanks again, and thanks for sharing the pattern!!!
Ashlee
I’m new to pattern writing too, so I write what makes sense to me, but since I get a lot of questions clearly you aren’t the only one not perfectly understanding. I just hate to write a paragraph when a sentence will do! yes, 2hdc 3 times means 2hdc in one stitch then repeat, so you’ll have 6 hdc over 3 stitches. I hope you enjoy making them!
Ashlee
I added a diagram of the sole, hopefully that will make it more clear
Sophia
Hey there! These are just TOO cute! i’ve made my first little bootie of the boys version and while it’s a little bit funny looking at the moment i can tell that it will sit ok when on baby’s foot. My question though is that, even though the shape obviously ok, when I did the ‘dc2tog 7 times’ on row 7, it doesn’t end up anywhere close to being in the centre of the toe of the boot. And in the finished product, all the beautiful detail at the toe sits off centre. Like it’s at least 4 stitches to more to one side. But i’ve checked the number of stitches again and again. You said that the sides are symmetrical, so is this something that sorts itself out when on baby’s foot too? cos I really don’t see how it can be right? Thanks!!
Ashlee
the bootie soles are symmetrical, so just tug it a bit and it should be centered.
the ch it starts and ends with is 5 stitches, then one stitch in each of the chains down and back with 7 stitches in the tip
As long as your 7 stitches are in the last chain I don’t see how they can’t possibly be centered.
Angela
Hi there – love these!! Was wondering what weight the wool you used is?? (I’m from New Zealand, and I haven’t seen the wool you used before) Thank you:)
Ashlee
any brand that has a line for baby’s would work just fine, these are medium weight, but because you don’t want them to scratch or annoy the baby using the special soft baby yarn is really the best.
Rebecca Wickenton
was wondering how i find instructions to do opposite foot?
Ashlee
the base of the bootie is the same for both left and right feet. The different cuffs is the only difference between the two.
“Boot cuff:
for the right boot sl st in the 8th stitch from the seam, for the left boot sl st in the 12th stitch from the seam”
Jessica
So I’ve attempted to make the cuff for the left foot a few times and still am getting caught up and I’m having to start all over on that part. When I tried to make the left boot first, the cuff ended up facing the opposite direction, making it the right instead. This isn’t the problem, but with making the left boot this time around (since I have the right one now) I’ve started from both locations from the seam and my cuff is still facing the wrong direction. Could you clarify ‘the seam’? Do you mean from the sl st spot when you are finished with the initial boot part and what direction should I be counting? To the right of the seam or to the left? I would really love to finish these off for my sister who’s expecting but I can’t figure this out or what I’m doing wrong. Thanks!
Ashlee
your probably starting at the right spot for each, your just going the wrong direction around. For each cuff you’ll do the chain, then work down the chain, THEN down the INSIDE, around the heel and back up the outside of the boot, then back around. SO each cuff is a bit different, one is “right” side “wrong” side “right” side and the other is “wrong” side, “right” side “wrong side.
kelly
Thanks, I was having this same problem and this clarified it for me. I have enjoyed making these, thank you for sharing.
Ashlee
you are so welcome! i’m glad it clarified things for you! I have been thinking about doing a FAQ post to help people who don’t want to go through all these comments!
Avie
Thank you very much for sharing the pattern. This I’ve been looking for this pattern every since I saw for the first time on e-net
Ashlee
your so welcome! I just saw one I loved and played around until I thought I got it decently right! I’m sure the original is even better, but good enough for me!
Jen
I just wanted to say thanks so much for the free patterns, you are so cute and so are your creations! Complete with picture! It was very sweet of you! xx
Ashlee
thank you so much! I love love LOVE getting such sweet compliments, they mean SO much to me and I really appreciate you taking the time to say something so nice~!
Christelle Watson
Hi Ashlee, this really is a very nice pattern. I am very new at crochet and do not have kids to make it for. how do i adapt the pattern to fit my feet UK 3 (US 36).
I would so appreciate your help.