I am SO excited to share this tutorial with you. My cousin just had twins last week so I made a boy and girl version! Of course I made them to fit my model so they won’t fit the twins for SOME time. But they are precious!
Yes, I made my sweet little boy wear the girls boots for this picture. Better than a skirt or something, right?
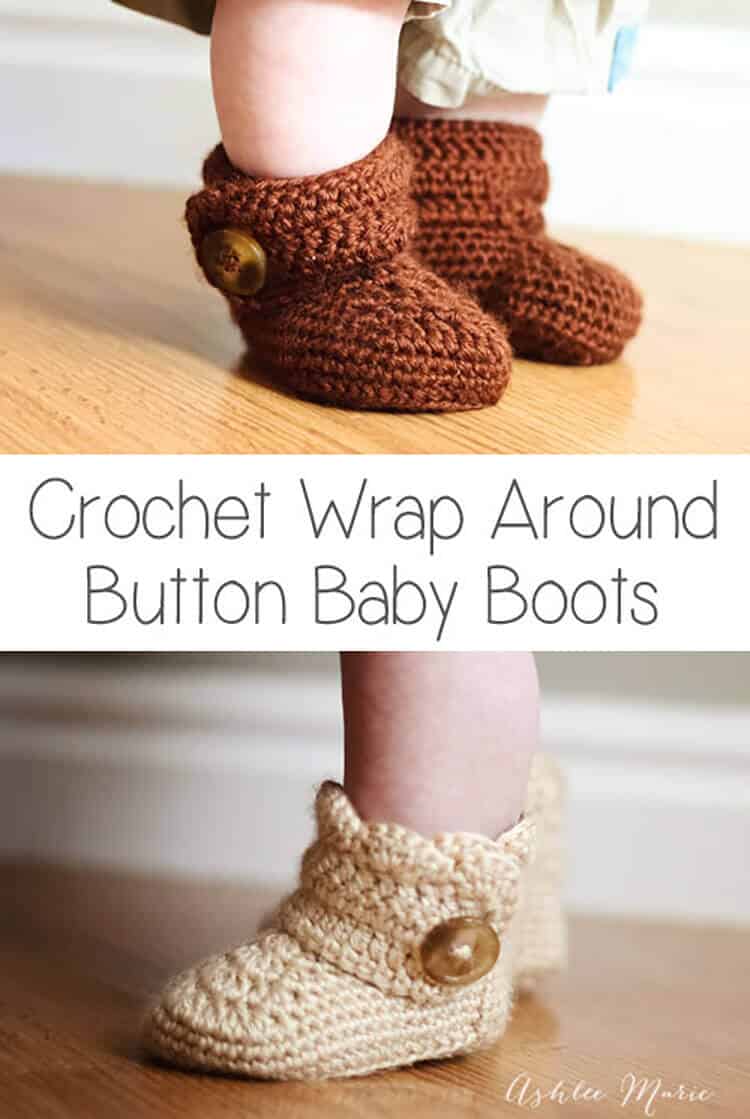
I love the scallops on the girl version, but the boy version is adorable too! I started with a size to fit my model, Baby Boy.
I ended up with boots that are around a size 4~ YES, 4 and they area already tight on him. According to a shoe website that’s like a 9-12 month shoe for the average babies feet!
I was going to share just that size, but a friend, Summer, asked me to make a pair for her baby, a size 1. So I figured it out, and added those numbers to the pattern at the last min! (on another post now)
Buy BOTH the Ad-Free pattern pdf’s for both the Baby AND Infant sized discounted here!
UPDATE: after some confusion I separated the pattern, the larger version is still right here, comparable to a size 4, and the smaller crochet wrap around button infant boot is on it’s own post.
Buy the Ad-Free pattern pdf for just the baby size here!
Baby wrap around boots:
materials:
caron simply soft yarn
large buttons
G6- 4 mm hook (To go up a size use a G-4.25mm, to go down a size use an f-3.75mm hook)
abbreviation:
ch (chain)
sl st (slip stitch)
sc (single crochet)
hdc (half double crochet)
dc (double crochet)
sc2tog (single crochet 2 together)
dc2tog (double crochet 2 together)
dc3tog (double crochet 3 together)

sole:
ch 13
row 1- sc in 2nd ch, sc 7 times, hdc 3 times, 7hdc in last ch, finish the rest of the round working along the back of the chain, hdc 3 times, sc 7 times, 4sc in the last/first ch, sl st to the first sc (32)
row 2- ch1, sc in same sc, sc 9 times, hdc, 2hdc 3 times, 3hdc, 2 hdc 3 times, hdc, sc 10 times, 2sc 3times, sl st to first sc (43)
row 3- ch2, hdc in same sc, hdc 11 times, *2hdc, 1hdc* 7 times, hdc 11 times, 2hdc, hdc, 2hdc twice, hdc, 2 hdc, sl st to first hdc (54)
shoe:
row 4- ch1, working in back stitches, sc around, sl st to first sc (54)
rows 5-6- ch1, sc around, sl st to first sc sc (54)
row 7ch1, sc in same sc, sc 12 times, sc2tog, dc2tog 7 times, sc2tog, sc around, sl st to first sc (45)
row 8- ch 1, sc in same sc, sc 10 times, sc2tog, dc2tog, dc, dc3tog, dc, dc2tog, sc2tog, sc around, sl st to first sc (39)
row 9- ch 1, sc in same sc, sc 8 times, sc2tog, dc2tog, dc3tog, dc2tog, sc2tog, sc around, sl st to first sc (33)
row 10- ch 1, sc in same sc, sc 6 times, sc2tog, dc, dc3tog, dc, sc2tog, sc around, sl st to first sc, cut yarn weave in ends. (29)

Boot cuff:
for the right boot sl st in the 8th stitch from the seam, for the left boot sl st in the 12th stitch from the seam
ch 15
row 1- dc in 4th ch from hook -first 3ch counts as first dc, dc in next 11 ch, dc in first sc (the one you sl st in), dc 24 times (there will be 4 spaces left), skip 3 spaces, sc in last space. (39) **note – some people had a problem with getting two right or two left feet. remember to not cross over the front, work down the inside, around the back and back up the outside, so you’ll work in opposite directions for each bootie, counterclock wise – looking top down, or “wrong” side out for the right booties and clockwise, or “right” side out for the left bootie**
row 2- ch3 (counts as dc), turn, dc in first dc and around 35 times, ch 1 skip one dc, dc in last 2 (38- with a ch1 space)
row 3- ch3 (counts as dc), turn, dc, dc in ch1 space, dc around (39)
row 4 scallops (girls)- turn, 5dc in second dc, *skip 1dc, sc in next dc, skip 1dc, 5dc in next dc*, repeat around (10 shells), sc down the side (I do 2 for each row so a total of 6 down the side), continuing around sc across the bottom along the original chain (13), sl st, cut yarn and weave in ends

row 4 simple (boys)- ch1, turn, sc across top (39), down the side (6) and across the bottom chain (13), sl st, cut yarn and weave in ends
Do you love them??? Considering the twins are HALF the size of Baby boy when he was born (let alone they don’t have his massive hobbit feet) I doubt they’ll even come close to fitting until they are at LEAST 9 months, maybe a year?? So next winter, perfect!
Don’t forget to add a button where ever you like and your done! I placed mine at the bottom of the 6th dc over from the front- I might go lower next time… or maybe two smaller buttons?
And one final picture, I thought you might want an inside shot so you can see how it wraps a bit… I’m still so very much in love with these boots. And when I finish Baby Boy’s I’ll post picture’s!!!


ChiWei
Thank you for sharing this pattern! I’ve always been a bit nervous about bootie patterns, but this one looks very do-able for a amateur crocheter like me.
http://www.onedogwoof.blogspot.com
Ashlee
I hope you try it and find it easy! Let me know if you have any questions!
Katelyn
Hello! I am a beginner and I have a quick question! In row 3 of the sole, what does the star before 2hdc and after the 1hdc 7 times mean? and how is that different from the next hdc 11?
Thanks!!
Ashlee
when there are star’s like this around stitches and then it says x times afterwards you repeat the area in the stars that many times.
Leah Koenig
These are so darling they almost make me tear up! They make me want to learn how to crochet so badly!
Better yet I want to buy them… I’ll love them more that way. Are you on Etsy?
Found you on Someday Crafts
Visiting from Well Rounded, leahkoenig.blogspot.com
Ashlee
Thank you so much, and for your interest. I used to have a store, but it’s just not for me, I don’t like making more than one or two things of something ever. Having a store almost made me quit alltogether. So no, I don’t have a store, but if you have someone who knows how to crochet in your life send them over to get the pattern and make them for you!!! Sorry!
Jillian
I really love these booties! I just made them in a coral/pink, they are adorable!! I am a crochet-er on Etsy and I was wondering if I could sell the product from your patterns? I would credit the pattern to you and your website, or any other source you’d like. Tell me what you think!
I can’t wait to add some color combos to your fun pattern, thanks again,
Jillian
Ashlee
yes, please credit the pattern link so people who want to make their own can. Have fun and thank you SO much for asking
Chris
Love, love, love these booties! Thank you so much for posting this pattern, can’t wait to try them. As someone else stated, I would love to have an adult version of this pattern. I have 2 teenage girls that would love a pair of these. I have never tried to convert a pattern from child to adult? Again, thank you!
Ashlee
Thanks so much! I personally hate anything my feet, I don’t even own socks, slippers or flats (I’m either barefoot or in stilettos) so I doubt I’ll feel inspired enough to make a larger pattern! I would suggest making any favorite larger bootie pattern, making sure to fill in over the foot as close to the ankle as you can get while still fitting your foot inside, then use my baby pattern cuff as a base for making an adult size!
Terri B
I love the booties, I’m following the pattern, but I’m somewhat confused to when the front of the shoe got sewn together. I don’t know if I didn’t follow the pattern correctly, or if the front is somehow crochet later. I got to row 10 and the front of my shoe is not together as shown in the photo. Can you please help me? I can read patterns but somehow this one has me stumped. 🙁
Ashlee
I’m so sorry! I’m confused myself. the shoe is worked in round and nothing is ever sewn together. I think you missed something completely. The sole is made first , then building in the back chains the shoe is built up and in rounds until it’s tall enough then the cuff is added on. there is now sewing together. could you maybe send me a picture of where you started to get confused? When did it not look like the pictures?
kara
These are SO SO cute Ashlee! Perfect for a babe’s footsie! Id love for you to link up to my fashion linky! It’s called DIY Diva Thursdays and it’s dedicated to all things fashion. We party every Th-M 😉
Kara
http://www.mineforthemaking.com
Ashlee
Thanks so much! Baby Boy get’s compliments everywhere we go! So much fun!
Hanni
This is cute! I am gonna make a few pairs!
Ashlee
Thanks! I hope you do!
cindy
absolutely love this pattern and really want to finish the pair i have started, however i am struggling with the boot cuff where it says “for the right boot sl st in the 8 stitches from the seam, for the left boot sl st in the 12 stitches from the seam then chain 15” where is the seam is it where i sl st into the first stitch at the end of the previous rows or is it at the front of the boot and then it says ch 15, do i slip stich back down the chain and around the top of the boot to begin the first row of the cuff? would be so grateful if someone could explain this to me so i could finish them off. x
Ashlee
Yes to the first question, it’s from the seam left from where each row ends while making the shoe part. If I was better at this I’m sure I could swap it so the seam was on the inside of both boots, but I’m just not that good yet. The first Sl St before the chain is actually in the two sc2tog stitches but I thought saying that would be even more confusing. Does that help at all?
No to the 2nd question, once your done with the ch 15 you’ll dc in the 4th chain from the hook and start the DC’s around that create the first row of the cuff.
Cindy
Actually, saying it this way makes more sense to me. Until I read this comment, I had no idea what you meant by “seam” because as you mentioned in a comment above, you’re haven’t sewn anything together. Thank you for the clarification and THANK YOU for such a lovely little project!
Ashlee
you are welcome! sorry it was unclear before
Lucija
Lovely pattern! Thanks for sharing, I´ve pin it!
Ashlee
Thanks so much!!! I’m so glad you like them.
Alison
Dang girl! These are so, so cute! I love them! Maybe someday I can learn to crochet!
Ashlee
I’m so glad I learned how! And knitting too. It’s so much fun!
Limar
These are absolutely adorable! Thank you SO much for the tut! 🙂
Ashlee
Your so welcome! Thanks so much for coming by AND stopping to leave a comment! I love getting them and am so happy when people love something I’ve created, so thank you!
Tiffany
I wish I knew how to crochet more than what I do! These are so adorable!! Maybe I can convince someone to make them for me instead. Thanks for sharing 🙂
Ashlee
You can totally convince someone to make them for you, OR try them out yourself? Good luck!
Ajaire
I love these booties!! I came over from Flamingo Toes (congrats on the feature) and I think I’ll stick around, hehe. So cute.
Ashlee
Thanks so much!!! I tend to feature Bev so much because her stuff is amazing, it’s SUCH an honor to be featured by her! Glad you like my booties!
Sherri Gillis
Thank you soo much for sharing this pattern! I have been looking for so long to find a pattern like this for free! Cant wait to see them on my lil guy! 🙂
Ashlee
I’m with you, I love free patterns for cute things, so that’s why I put my stuff out there for free… I honesty can’t imagine charging! I hope you love them as much as I do!
Kathy Wysuph
It appears that the pattern is for the left foot, how do I adjust for right foot. How many chains do you make to start the boot cuff.
Thank you for you assistiance, the pattern is darling.
Kathy
Ashlee
both feet are listing in the pattern.
“Boot cuff: for the right boot sl st in the 8 stitches from the seam, for the left boot sl st in the 12 stitches from the seam:”
just under the picture of the two sides starting points.
Jill
Yay! I’ve been looking for this pattern every since I saw these on pinterest! Thanks for sharing!!!!!!!
Ashlee
Your so welcome! I love figuring out a pattern and not paying $$$$ for it! So I’m glad to help!
amber
Hello,
I just wanted to say how easy it is to follow your pattern. I have learned to crochet on my own and this is my first time following a pattern ever. Since I am really green to all of this could you please let me know how to connect the stitches when the multiple SC and DC come into the pattern. When it is forming the covering of the toes…so row 7. I wanting to thank you for offering this pattern for free and really would appreciate your help!
Thank you!
Amber
Ashlee
they are just normal decrease stitches, any book or website that teaches stitches should be able to help you out. here is one http://www.stitchdiva.com/tutorials/crochet/working-stitches-together
Zoe
thank you so much for the perfect most absolute cutest baby booties!!! I cant stop making them! They look so handsome on my 5 month old baby 🙂 My 3 year old keeps trying to try them on….I would love to make some for him, and my mother in law too, if you could figure the patterns to those I would be honored to have the patterns to make 🙂 Thank you Thank you Thank you
Ashlee
You’ll notice I said if you use a larger hook you’ll get larger booties? Mine were huge with just that change, like 2-3 sizes bigger. If it’s still not big enough (you can tell by just doing the sole, no need to do the whole bootie) then add 2 ch’s to the beginning and add 2 stitches on each side as you enlarge the sole/pattern… (think of it as near the heel so you don’t need to do any other increase, but 2 stitches on each side for length) and as you make the bootie part you might add an extra sc row for shoe height as well. Does that make any sense?
Emily
OMG! ive been trying to find a really good website on baby booties with pics!
everytime i tyrd with other websits that dont have pics i always have to take the whole thing apart and re-do everything and count, now that i found this website with pics now i know what im doing and not miss counting. THANK YOU SO MUCH 😛
Ashlee
good luck! I hope the pattern makes sense and you can follow it!
Courtney
I had a similar issue 🙂 Ok, so it makes sense that the first SL ST before the chain is in the sc2tog for the one boot. For the other boot, do you start at the seam, do 11 sl st around the front until you get to the other side’s sc2tog
OR
do you start at the seam, 11 sl st around the back to get to the other side’s sc2tog?
Also, you say you have three sc left. Does this mean the front of the cuff is not actually attached to the boot part? It just folds over the front and appears to be attached?
Thank you SO much for your help! This pattern is ADORABLE and I can’t wait to finish the boots! 🙂
Ashlee
the picture just above the cuff instructions shows the placement for starting the sl st for both the right and left cuffs. You start counting form the old seam and count towards the front. you’ll be starting both chains for the cuffs in the sc2tog stitches, one on each side, but I thought saying it that way would cause even more confusion. You should read some of the questions I get emailed about my patterns. I could spend hours everyday just responding to some of them.
as for your second question? I’m not sure what part your referring to, but the cuff does wrap around and attach with a button, could you give me a row number your having a hard time with?
Lauren
Oh how I love these! My sister in law just found out she is having a girl and I just can’t wait to make these for her! Thanks for the pattern. I found it from Pinterest. Have to have a look around your blog.
I’d love for you to link up and share at my Pinterest Party: http://www.tutusteaparties.com/2012/02/pinteresting-party-week-28.html
Ashlee
Thanks so much! I’m so glad you like them and I hope your sister does too!