I am SO excited to share this tutorial with you. My cousin just had twins last week so I made a boy and girl version! Of course I made them to fit my model so they won’t fit the twins for SOME time. But they are precious!
Yes, I made my sweet little boy wear the girls boots for this picture. Better than a skirt or something, right?
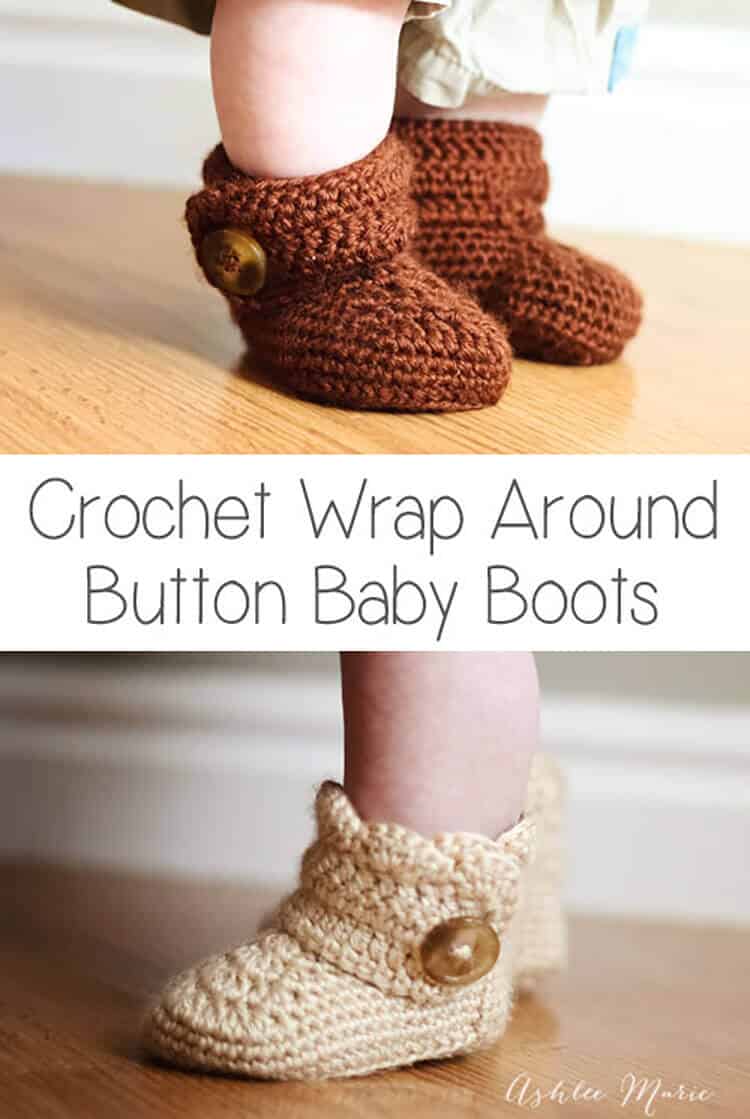
I love the scallops on the girl version, but the boy version is adorable too! I started with a size to fit my model, Baby Boy.
I ended up with boots that are around a size 4~ YES, 4 and they area already tight on him. According to a shoe website that’s like a 9-12 month shoe for the average babies feet!
I was going to share just that size, but a friend, Summer, asked me to make a pair for her baby, a size 1. So I figured it out, and added those numbers to the pattern at the last min! (on another post now)
Buy BOTH the Ad-Free pattern pdf’s for both the Baby AND Infant sized discounted here!
UPDATE: after some confusion I separated the pattern, the larger version is still right here, comparable to a size 4, and the smaller crochet wrap around button infant boot is on it’s own post.
Buy the Ad-Free pattern pdf for just the baby size here!
Baby wrap around boots:
materials:
caron simply soft yarn
large buttons
G6- 4 mm hook (To go up a size use a G-4.25mm, to go down a size use an f-3.75mm hook)
abbreviation:
ch (chain)
sl st (slip stitch)
sc (single crochet)
hdc (half double crochet)
dc (double crochet)
sc2tog (single crochet 2 together)
dc2tog (double crochet 2 together)
dc3tog (double crochet 3 together)

sole:
ch 13
row 1- sc in 2nd ch, sc 7 times, hdc 3 times, 7hdc in last ch, finish the rest of the round working along the back of the chain, hdc 3 times, sc 7 times, 4sc in the last/first ch, sl st to the first sc (32)
row 2- ch1, sc in same sc, sc 9 times, hdc, 2hdc 3 times, 3hdc, 2 hdc 3 times, hdc, sc 10 times, 2sc 3times, sl st to first sc (43)
row 3- ch2, hdc in same sc, hdc 11 times, *2hdc, 1hdc* 7 times, hdc 11 times, 2hdc, hdc, 2hdc twice, hdc, 2 hdc, sl st to first hdc (54)
shoe:
row 4- ch1, working in back stitches, sc around, sl st to first sc (54)
rows 5-6- ch1, sc around, sl st to first sc sc (54)
row 7ch1, sc in same sc, sc 12 times, sc2tog, dc2tog 7 times, sc2tog, sc around, sl st to first sc (45)
row 8- ch 1, sc in same sc, sc 10 times, sc2tog, dc2tog, dc, dc3tog, dc, dc2tog, sc2tog, sc around, sl st to first sc (39)
row 9- ch 1, sc in same sc, sc 8 times, sc2tog, dc2tog, dc3tog, dc2tog, sc2tog, sc around, sl st to first sc (33)
row 10- ch 1, sc in same sc, sc 6 times, sc2tog, dc, dc3tog, dc, sc2tog, sc around, sl st to first sc, cut yarn weave in ends. (29)

Boot cuff:
for the right boot sl st in the 8th stitch from the seam, for the left boot sl st in the 12th stitch from the seam
ch 15
row 1- dc in 4th ch from hook -first 3ch counts as first dc, dc in next 11 ch, dc in first sc (the one you sl st in), dc 24 times (there will be 4 spaces left), skip 3 spaces, sc in last space. (39) **note – some people had a problem with getting two right or two left feet. remember to not cross over the front, work down the inside, around the back and back up the outside, so you’ll work in opposite directions for each bootie, counterclock wise – looking top down, or “wrong” side out for the right booties and clockwise, or “right” side out for the left bootie**
row 2- ch3 (counts as dc), turn, dc in first dc and around 35 times, ch 1 skip one dc, dc in last 2 (38- with a ch1 space)
row 3- ch3 (counts as dc), turn, dc, dc in ch1 space, dc around (39)
row 4 scallops (girls)- turn, 5dc in second dc, *skip 1dc, sc in next dc, skip 1dc, 5dc in next dc*, repeat around (10 shells), sc down the side (I do 2 for each row so a total of 6 down the side), continuing around sc across the bottom along the original chain (13), sl st, cut yarn and weave in ends

row 4 simple (boys)- ch1, turn, sc across top (39), down the side (6) and across the bottom chain (13), sl st, cut yarn and weave in ends
Do you love them??? Considering the twins are HALF the size of Baby boy when he was born (let alone they don’t have his massive hobbit feet) I doubt they’ll even come close to fitting until they are at LEAST 9 months, maybe a year?? So next winter, perfect!
Don’t forget to add a button where ever you like and your done! I placed mine at the bottom of the 6th dc over from the front- I might go lower next time… or maybe two smaller buttons?
And one final picture, I thought you might want an inside shot so you can see how it wraps a bit… I’m still so very much in love with these boots. And when I finish Baby Boy’s I’ll post picture’s!!!


Sumo
They are so cute, I can hardly stand it! I can’t wait to put them on Baby H! You rock!
Ashlee
Your so welcome! Can’t wait to see you again!
Barbie Jenkins
Do you have a video on moving from the sole to the shoe? I’m having issues making it look right.
Ashlee
nope, you simply work in the back stitch of each stitch around. by working in the back stitch your creating a sharper edge, that’s all. If it’s frustrating you just work around regular.
lacie
Could you tell me the color that you used for the little girl version
Ashlee Prisbrey
it was Caron Simply Soft in Bone
Kelsey
I’m having trouble figuring out the 7th row of the shoe meeting back up with the beginning of the row. HELP!!!
Ashlee
Kay, you start with 54 stitches
row 7 ch1, sc in same sc, sc 12 times,
sc2tog, (1 decrease)
dc2tog 7 times, (7 decreases)
sc2tog, (1 decrease)
sc around, (meaning the rest of the way around to the close)
sl st to first sc (45)
So that’s a total of 9 decreases, 54-9=45
Ana santos
How would I make these fit a newborn baby? Please help
Ashlee
try the other pattern, the infant one. if it’s still too big go down a hook size.
Bonnie
Holy 13 pages of pattern ?????
Ashlee
All you have to do when you click the green print button is click on the paragraphs you don’t want and they’ll disappear before you print. Also I’m not sure why your getting 13 pages, I’m only getting 2? what browser are you using, maybe the images aren’t disappearing for you like they are for me? Anyway you can pick just one size if you want.
Diane Erickson
I tried everything too and I ended up with 10 sheets of pattern. They are really cute but I wish the pages were less like you said yours were 2.
Ashlee
that is so weird, I’ve only had about 3 people have trouble with this, what browser are you using? trying to see if there is a common issue is what’s not working
Dani
Dumb question, how do I “flip” the pattern? For example if I follow the pattern exactly twice, I end up with 2 right foot shoes, what do I do to form the left foot?
Ashlee
the shoe part is completely symmetrical, there is no left or right shoe until you add the cuff. When you crochet tight it tends to curl a bit, but they aren’t left or right, you can either just have the baby wear them and they will work themselves out or if you want it to LOOK right you can block the shoes first.
Jana
So cute!! I wish I knew how to crotchet. Emily can’t fit in hers that I got do her anymore 🙁
Ashlee
I wish you lived closer! I’m going to teach Leanne this year and it would be fun to have you too!
Chrissy
These are adorable!! I love them and I think I am going to give them a try! How long did they take you to make?
Ashlee
I made another pair yesterday, so just a few hours, but it was my 4th pair so it went faster!
Beverly {Flamingo Toes}
oh gosh Ashlee!! These are adorable!!! I am love with both versions – and now I want a pair to fit me!! 😉
Ashlee
Thanks!!! And I’m sure we could figure out a larger size 😉
Hannah
Could you send me the Infant directions… I know me, and I will definitely get confused… : ) thanks!
Ashlee
I created a second post instead! Here you go Infant version
Ana Maria Paiva Leonel
muito lindo obrigada pela explicação vou tenta fazer obrigada um abraço
Ashlee
you are welcome! i’m so glad you like the pattern!
Chelsea
I was wondering if you could adjust the pattern for a two year old. I made a pair for my new niece on the way and now a friend would like a pair for her niece. They are so adorable.
Ashlee
It all depends on the size of the 2 yo’s feet. This size fit my cousin’s twins when they were 2, but fit my baby as a 1 yo! Try going up a hook size, start with just making the sole, and compare it to the babies feet (have them send you the heel to toe and width measurements to use). once you get the sole right the rest will fit too!
Andie
I was about to ask the same thing.. glad I searched through comments! lol. My question is once you change the sole size, how muck will the stitches going around change? I want to make a pair for my 3 year old, her shoe size is an 8 *sob*
Ashlee
if your just going up a hook size none of the stitches will change cause you aren’t adding any stitches. Good luck!
Amie
I was experimenting last night to try and make a larger pair for my size 7 wearing 3 year old.
I used 2 strands of the simply soft and a j hook, 6.00 (I think it is). They came out a tad big so I think you would find they fit your little one perfect.
They look just as cute as the smaller sized ones too!
Ashlee
thx for this!
Amy
These are adorable. I mean, simply amazing, I mean incredible!! I love them Ash- especially the scallops on the girl version, but I have to say those boy ones are almost making me hope for a boy. almost.
xoxo,
Ashlee
Thanks!!! When you find out what your having I’ll totally make you a pair!
Christine
These are so cute! I love them! I need to find a baby to make them for 🙂
Christine @ Projectsaroundthehouse.blogspot.com
Ashlee
I hope you do! There are always cute babies around!
Christine
I wanted to let you know I pinned this pattern and it got repinned 98 times! That’s a record for one of my pins!
Ashlee
INSANE!!! I don’t know that I’ve ever had a pin repinned so much either! Thanks for sharing- it totally made my day!
Terri
your blog is awesome!!! i came here via pinterest and i’m so happy with what else is on here. keep up the good work.
Ashlee
wow! Thank you so much! What a fun comment to sit down and find. I really appreciate it!
Rhonie K
Ashlee, these are so cute. I can’t wait to make these for my granddaughters, and grandson. Thank you for the pattern.
Ashlee
Thanks! I hope they love them! I added some text about how to size up and down a bit I hope it helps!
Roz
I haven’t crocheted in years but these make me want to start up again for my granddaughters. Thanks for sharing.
Ashlee
You should! I’ll go crazy for a few months then put down my hooks and not touch them for years too!
Jennifer
I love the look of these booties and have been trying to figure out the formula to enlarge them to a size 7-8 to fit my 2 yr old daughter. I know its a bit of work but i was wondering if you could possibly tell me how much extra to add? I tried using the bigger pattern and adding 2 to everywhere you had added stiches from the smaller one but it still wasn’t big enough lol. Thank you for this wonderful pattern i love it!
Ashlee
Try going up a hook size, as well. When I added 2 everywhere with a larger hook I got about a size 8! I hope that helps! I still have my larger bootie, I’ll add writing the pattern to my list of things to do!
Nadia
Would I add an extra row everytime I tried to make the pattern bigger. I noticed you added an extra row on the sole when you made the bigger size
Ashlee
not necessarily, if your going up a few sizes, then yes. If your just wanting to go up one size I’d just go up a hook size, it’s amazing what a difference that makes!
Kristin
These are stinkin adorable – and thanks for the information on making it larger. My son is between a size 6 and 7, so I think that these would make amazing slippers for him!! Thank you for the pattern!
Ashlee
you are so welcome! If going up a hook size or two (maybe with thicker yarn or doubling thin yarn- this baby yarn is a bit thinner) try adding another row?
Heather
I LOVE these booties! I was wondering if you had a larger size? My little niece has larger feet, like your son and needs a size 9-10 (at only 19 mo. -she is tall!!) Can you help?
Ashlee
When I made the SAME bootie and pattern with a larger hook I got a much larger shoe, about a 6!
Heather
And I agree with Roz -I would love a matching pair! (size 9-10 women’s)
Ashlee
HA! I’m into making things for babies, so an adult size isn’t something I plan on doing anytime soon, it’s all about Baby Boy these days! But I think taking a normal adult size bootie pattern and adding a few rows on for cufts and then the scalloped edge wouldn’t be TOO hard! It’s mostly about filling in above the foot
Theresa
Found you via a creative link up! love your pattern, I am learning to crochet & can’t wait to use it! Hope it doesn’t take forever to get to this level. lol Added you on twitter too! 😉 drop by sometime! I’m over at DearCreatives.com have a great week!
Ashlee
Thanks! I don’t think it’s too hard, but kind of hard to gauge for myself, of course I don’t think my pattern is hard 😉 It does use quite a few different stitches and techniques. if you understand everything in the abbreviation section above where the pattern starts you’ll do great!
Jen
Adorable! Those cute little legs AND the booties. 🙂
Ashlee
I agree, I love the sweet legs, we’re working on fattening him up, I just love rolls on babies. His thigh rolls are getting better and better!
Alissa@CraftyEndeavor
ahhhhh they’re so cute! I need to learn how to crochet.
Ashlee
Yes you do! Everyone should learn how, its SO much fun!
Dee
So cute and you are super talented. I hope you will link these up this week to the CSI Project. The challenge is yarn projects, knitting and Crochet.
http://www.thecsiproject.com
The link party begins on Wednesday at midnight through Friday at noon.
Come on over!!!
Dee, the CSI Girl
Ashlee
I’m getting to my comments late, but thanks for the heads up, I DID link up, so thank you so much!
Sarah Lou
Oh these are far to darling!! I can see these on my lil girls feeties!!!! I wish my boys were still lil enough to have them as well!!
Ashlee
And I wish my little girl was small enough! It was fun to make them for another little girl, but kind of made me wish for one as well!!! But My little man is sure handsome with his!
Mrs. Delightful
These are too adorable!
~Mrs. Delightful
ourdelightfulhome.blogspot.com
Ashlee
Thanks so much! I love them too!