I am SO excited to share this tutorial with you. My cousin just had twins last week so I made a boy and girl version! Of course I made them to fit my model so they won’t fit the twins for SOME time. But they are precious!
Yes, I made my sweet little boy wear the girls boots for this picture. Better than a skirt or something, right?
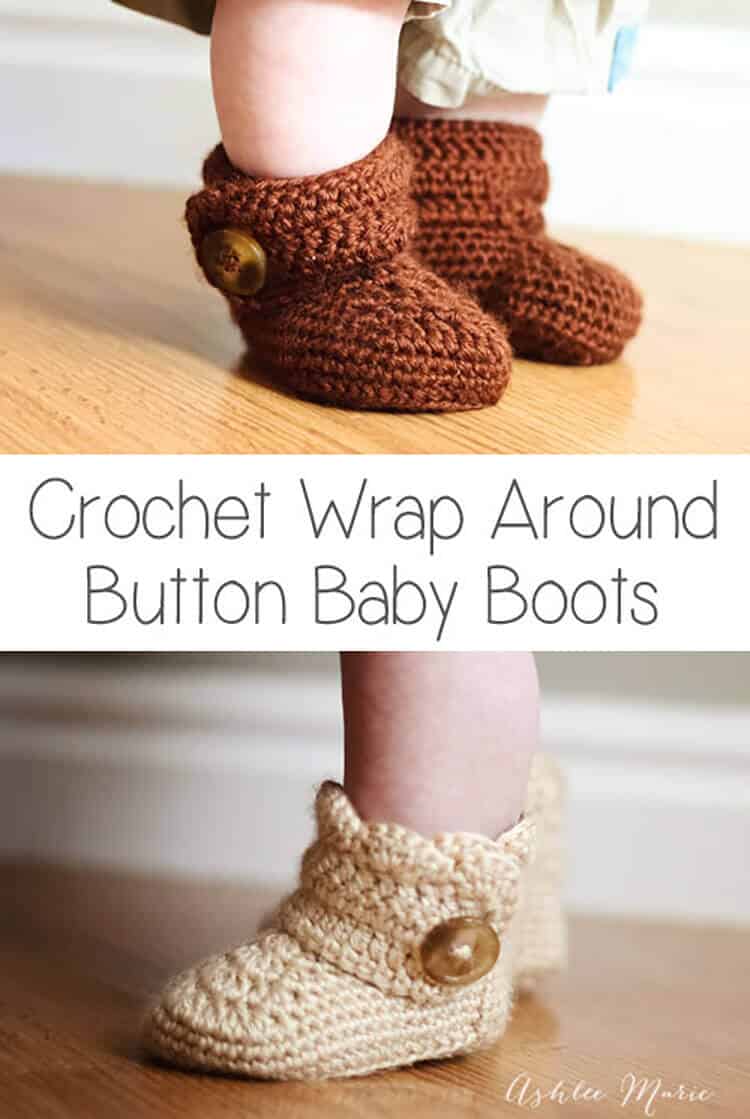
I love the scallops on the girl version, but the boy version is adorable too! I started with a size to fit my model, Baby Boy.
I ended up with boots that are around a size 4~ YES, 4 and they area already tight on him. According to a shoe website that’s like a 9-12 month shoe for the average babies feet!
I was going to share just that size, but a friend, Summer, asked me to make a pair for her baby, a size 1. So I figured it out, and added those numbers to the pattern at the last min! (on another post now)
Buy BOTH the Ad-Free pattern pdf’s for both the Baby AND Infant sized discounted here!
UPDATE: after some confusion I separated the pattern, the larger version is still right here, comparable to a size 4, and the smaller crochet wrap around button infant boot is on it’s own post.
Buy the Ad-Free pattern pdf for just the baby size here!
Baby wrap around boots:
materials:
caron simply soft yarn
large buttons
G6- 4 mm hook (To go up a size use a G-4.25mm, to go down a size use an f-3.75mm hook)
abbreviation:
ch (chain)
sl st (slip stitch)
sc (single crochet)
hdc (half double crochet)
dc (double crochet)
sc2tog (single crochet 2 together)
dc2tog (double crochet 2 together)
dc3tog (double crochet 3 together)

sole:
ch 13
row 1- sc in 2nd ch, sc 7 times, hdc 3 times, 7hdc in last ch, finish the rest of the round working along the back of the chain, hdc 3 times, sc 7 times, 4sc in the last/first ch, sl st to the first sc (32)
row 2- ch1, sc in same sc, sc 9 times, hdc, 2hdc 3 times, 3hdc, 2 hdc 3 times, hdc, sc 10 times, 2sc 3times, sl st to first sc (43)
row 3- ch2, hdc in same sc, hdc 11 times, *2hdc, 1hdc* 7 times, hdc 11 times, 2hdc, hdc, 2hdc twice, hdc, 2 hdc, sl st to first hdc (54)
shoe:
row 4- ch1, working in back stitches, sc around, sl st to first sc (54)
rows 5-6- ch1, sc around, sl st to first sc sc (54)
row 7ch1, sc in same sc, sc 12 times, sc2tog, dc2tog 7 times, sc2tog, sc around, sl st to first sc (45)
row 8- ch 1, sc in same sc, sc 10 times, sc2tog, dc2tog, dc, dc3tog, dc, dc2tog, sc2tog, sc around, sl st to first sc (39)
row 9- ch 1, sc in same sc, sc 8 times, sc2tog, dc2tog, dc3tog, dc2tog, sc2tog, sc around, sl st to first sc (33)
row 10- ch 1, sc in same sc, sc 6 times, sc2tog, dc, dc3tog, dc, sc2tog, sc around, sl st to first sc, cut yarn weave in ends. (29)

Boot cuff:
for the right boot sl st in the 8th stitch from the seam, for the left boot sl st in the 12th stitch from the seam
ch 15
row 1- dc in 4th ch from hook -first 3ch counts as first dc, dc in next 11 ch, dc in first sc (the one you sl st in), dc 24 times (there will be 4 spaces left), skip 3 spaces, sc in last space. (39) **note – some people had a problem with getting two right or two left feet. remember to not cross over the front, work down the inside, around the back and back up the outside, so you’ll work in opposite directions for each bootie, counterclock wise – looking top down, or “wrong” side out for the right booties and clockwise, or “right” side out for the left bootie**
row 2- ch3 (counts as dc), turn, dc in first dc and around 35 times, ch 1 skip one dc, dc in last 2 (38- with a ch1 space)
row 3- ch3 (counts as dc), turn, dc, dc in ch1 space, dc around (39)
row 4 scallops (girls)- turn, 5dc in second dc, *skip 1dc, sc in next dc, skip 1dc, 5dc in next dc*, repeat around (10 shells), sc down the side (I do 2 for each row so a total of 6 down the side), continuing around sc across the bottom along the original chain (13), sl st, cut yarn and weave in ends

row 4 simple (boys)- ch1, turn, sc across top (39), down the side (6) and across the bottom chain (13), sl st, cut yarn and weave in ends
Do you love them??? Considering the twins are HALF the size of Baby boy when he was born (let alone they don’t have his massive hobbit feet) I doubt they’ll even come close to fitting until they are at LEAST 9 months, maybe a year?? So next winter, perfect!
Don’t forget to add a button where ever you like and your done! I placed mine at the bottom of the 6th dc over from the front- I might go lower next time… or maybe two smaller buttons?
And one final picture, I thought you might want an inside shot so you can see how it wraps a bit… I’m still so very much in love with these boots. And when I finish Baby Boy’s I’ll post picture’s!!!


Vida
Hi! I know I’m in the non-infant section but I was planning on making a pair of these very cute boots for a 3-month old in DK cotton. Any tips on which hook I should go for? I was planning on using a 3-3.5mm hook but I’m also thinking I might have to go down even lower. What do you think?
Ashlee
well first off use the other infant pattern, not the baby one, this one is huge. I’d make the sole of the infant one the way it is written and hold it up against your models foot. (everyone crochets so different it’s hard to know what’s going to fit or not so a quick sole is a great way to find out) If it’s too small or big at that point try going up or down a hook size
Michelle
Hi I’m having some trouble with the pattern I’m doing the small size starting with a chain of 11 everything is fine until I get to the boot cuff at the end of row 1 boot cuff part I only have 30 stitches instead of 32 please help x
Ashlee
I’m a bit confused, this pattern has 39 at the end of the first row of the cuff, not 32? are you working with the other pattern, the infant one and you accidentally left the comment on the wrong size? Did you have the right number the last row of the shoe? my guess would be that your not counting the ch2 as a stitch? and that you probably missed doing an HDC in the same SC as you connected the cuff to (an easy one to skip)
Aleah
I’ve been trying to do these booties and I am not sure what is going wrong!? Maybe you can help me? I’ve already started over 3 times! Every time I get to the part where you start to do the decreasing and every time every time every time every time every time every time is in the wrong position? The decrease starts on the side! I’ve even tried to not back stitch beforehand and to continue along the same stitch and the decrease still ends up on the side making the bootie deformed! I’m assuming that the decrease is supposed to be centered not off to the side?
Ashlee
is it off stitches? or is it simply twisted because your working in a round? you can follow the center stitches from the sole up to the bootie and if your in the same line (but the line twists around) then your just fine, once your done with the bootie you’ll need to BLOCK it to get it back into place. IF the center is truly off sitches then it’s probably because your starting the beginning of the row in a wrong place. There are so many ways people end and start new rows, it sometimes is tough to follow a new style if the way I do it is different than how your used to, so I would suggest being really meticulous in that area.
Sheridan
Hi there. I’ve had a few goes at this pattern and can’t work out what I’m doing wrong – the boot seems a bit wonky, out of shape. I’m guessing that I’m doing something wrong with the decreasing. Any suggestions? Can I send a photo perhaps!
Kind regards, Sheridan
Ashlee
of course you can send a photo, just respond to this email! It’s probably the normal twisting that comes with working in the round. Once your done you simply need to block the bootie (or skip blocking and just let the baby wear them and it will work itself out, I’m lazy)
Jasmine
This pattern is so easy to follow and clearly written. The boots are gorgeous, thanks so much for sharing!
Ashlee
THANK YOU so much, It’s so nice to hear when people have an easy time with the pattern, thank you for taking the time to comment!
Jennifer
On the off chance you are still looking at comments, I just wanted to say thank you for posting this pattern! The pattern was easy to follow & the boots so cute. The mommy-to-be just loved them!
Ashlee
you are so welcome! and thank you so much for taking the time to comment, so many people only comment when they have a problem (totally understandable of course) but it’s so so SO nice to hear that it was easy and you loved it!
Daena
Hiya, I just completed my first pair of baby (toddler) booties since I started crocheting (1 entire year!) These are just too cute and the pattern was very easy to follow considering I have a hard time cocheting things in pairs, I find it difficult to make sure they are the same both times. I ran out of yarn at the end of the second boot so the cuff is a bit shorter than the other 🙁
There was one thing that I did have a small problem with though for some reason, was the front of the boot behind the cuff. I wasn’t actually sure if i was suppose to crochet right across so the left and right side meet up or not, I did it anyway (but not joining them)
Thanks so much for sharing anyways! and don’t worry, my son is almost one and has little hobbit feet too haha
Ashlee
love those hobbit feet babies! Glad you figured out what worked for you, sorry about the confusion
samantha
When we start on SHOE row 1 we chain on and then sc in next stitch and around correct?? (not in same as ch 1)
Ashlee
the Ch1 doesn’t count as a stitch so I do sc in that first stitch and around.
christina
help! I am trying to make these but the top of the foot doesn’t look right. The “sc2tog, dc2tog,dc3tog” etc is leaving holes in my top. I am using a worsted weight with a size 3.75 hook (f)
Ashlee
I’m not sure what to tell you, everyone crochets a little bit differently, maybe you need to tighten your crochet just for those stitches? It’s hard to know without seeing, but even mind has minor gaps around that area, but after it’s all done and you block the booties a lot of the problems get fixed.
Peggy Droddy
Looking for baby sweater pattern and came across your boots pattern I am in love with these. I have two new greatgrandchildren, one boy one girl and another boy due in less than a month. I am going to be very busy, have been already, making afghans. hats and mitts. these are grands # 13, 14, and 15.
thanks for the pattern.
Ashlee
Awwww congrats on all the new great grandbabies! Now that my kiddo’s are all bigger I’m not as inspired to make stuff as I was when they were younger! Something so fun about making things for babies!
Courtney
Hi! I love your free pattern for these cute booties! I am wondering… do you have this pattern in an adult size? Or may I have your permission to try and tinker your pattern for an adult size? I love these booties so much that I would love to make myself a pair! Maybe even make the cuff a little longer as well?
Ashlee
I do not have an adult version. I suggest just finding a slipper/bootie pattern you like and use this technique to add a cuff.
Emily
Hi there!
I just wanted to say – these cute little boots inspired me to finally teach myself to crochet! I’m youtubing the stitches as I go, and its looking slightly wonky, but for the most part resembles a boot. I call that a win! Awesome job for having instructions that literally any skill level can figure out! I’m sure my second boot will look much better than the first…
Ashlee
YAY! good for you! and just remember to block it at the end and that will take a lot of the wonky out!
mz
beautiful. However, I wish there was a video tutorial, too.
Karin
Hello Ashleemarie, thanks so much for posting this pattern. Have been looking for these kind of booties for ages. So glad my friend found them for me. Started yesterday right away but the sole already gets very wavey. Is that normal? Does not look like this on your pictures. Thanks for your help. Karin (from Germany)
Ashlee
yes, I blocked my patterns as I went, so it would be pretty, but a wave is totally normal, you can just wait until the end to block, OR you can just put them on the baby and it will work itself out
jen p
oh honey… first row. chain 13. sc in second chain from hook leaves us with 12 chains. 7 sc leaves us with 5 chains. 3 hdc leaves us with 2 chains. then, heres where it gets off, 7 hdc in last chain.. you have 2 chains left at this point.. momma when you count back chains to start into you include the one your hook is on too. now i’m not sure if i need all 13 chains or to cut back to 12. no response. i’ll amend. they are awesome boots BUT someone that hasn’t been doing this for years could easily get lost.for the people that breezed through it. gotta say i’m very surprised. i can whip a pattern out in no time and with this one i’ve had to rework it quite a bit. great final product though
.
Ashlee
ACTUALLY if you chain 13, sc in second ch from hook leaves you with 11 chains, the one you skipped (#13) and one you just SC in (#12), that leaves 11. Then 7sc (#11-5), 3 hdc (#4-2) then 7hdc in the last one (#1)
Nancy
Ashlee, I told my son and DIL that I planned to crochet a pair of hot pink crocs for my new baby granddaughter because she loves my hot pink crocs and just NEEDS a pair like GaGa’s! The next day, they posted me on FB with your boot pattern…”while I was at it”. I loved the pattern – and the way you wrote, it was so easy to follow! Thank you for sharing. I whipped up the boots in no time then began working with a couple different croc patterns I’d found but none of them had such a perfect sole as yours – so I stole it and built on it to make the crocs. I used an F hook to make them a tad smaller -(approx. 5-5 1/2″ long the way I crochet), the same Caron yarn and 1/2″ buttons to make them adjustable. Since I stole your sole I thought it only fair to share. 🙂 Starting with row 5:
row 5- ch1, sc 7 times, hdc 2 times, dc 9 times, dc2tog 2 times, dc3tog, dc2tog 2 times, dc 9 times, hdc 2 times, 1 sc, turn
row 6- ch 2, hdc in 2nd st, dc 5 times, dc2tog 3 times, dc3 tog, dc2tog 3 times, dc 5 times, hdc, turn
row 7- ch 2, hdc in 2nd st, dc 2 times, dc2tog 2 times, dc3tog, dc2tog 2 times, dc 2 times, hdc, sc down side (3 sc), hdc in 1st sc of sole, sc around (12 sc), sl st in beg st. Tie off and weave in ends.
strap:
ch 27
dc in 3rd ch from hook and remaining chs to end. Weave in ends.
Attach buttons on each side at junction of sole and shoe.
The 1/2 in. buttons should fit through the dc strap to make them adjustable. If not, use a slightly smaller button or a larger hook for the dc.
Thanks again for the wonderful pattern!
Ashlee
thx for sharing! and what a great idea
Jenny
Hello-
Just wanted to thank you for the adorable boot pattern! I write a few myself and I know that it takes a bit of work to put them together so I always appreciate it when someone offers them up free. I just have one done so far, but I wanted to let you know that I think the pattern (and included pics) is very clear. I had 0 problems working up this little bootie. I’m going to add a little fur to the edges just for fun 🙂 I’ve been looking around the web forever trying to find something just like this so I’m glad I finally stumbled across your blog!
Ashlee
thank you so much! and I appreciate you taking the time to leave such a sweet comment
Shilpa Uparkar
Loved the boots the minute I saw them. A perfect gift for my dear friend who recently had a baby boy. I followed the pattern to the tee but and made the shoe but I am stuck at the cuff. I am not able to understand stitch from the seam part. Which seam and where do I find the 8th stitch? Please help. I am stuck with two cuffless boots.
Ashlee
the seam is where you sl st to connect the end of the row to the start (where you sl st and move up to the next row.
Shilpa Uparkar
Ahhhh. Thanks. 🙂
Tiffany
Hi, forgive me for my crochet ignorance, but I am a beginner and may be getting ahead of myself trying something like this but Im having a hard time figuring out what you mean by 2hdc 3 times, etc. The abbreviation guide tells me what “hdc” is but what is the “2” in front telling me to do?
Ashlee
if the number is before the stitch name it’s the number of times you are going to do it in ONE stitch space. If the number is AFTER the stitch name it’s the number of times you are going to repeat it across the next stitch spaces. SO 2hdc 3times means you’ll be doing 2hdc in the next 3 stitches
Latosha
Hello!
Im new to crocheting and pick up on things pretty quickly… however this is the 3rd time I tried this pattern (by the way, Thank YOU for taking the time to do so, for people like myself!) and I have FAILED all 3 times! lol
Somehow the front of the shoe is ALWAYS off centered! it always starts to off center at row 7 after the sc 12 times! if you are able to help me figure this out I would greatly appreciate it! I have a niece and 2 cousins due between the middle of april and the 2nd week of may plus a baby girl of my own who I would love to make this pattern for!
looking forward to your reply! happy holidays!
latosha
I figured it out! Thanks for the pattern I love them!
Ashlee
I’m so glad!
Ashlee
the soles are symmetrical, look at the chart and make sure your stitches are matching up on the sole, if it is then the rest should be fine too. . It’s normal when working in the round for things to twist. Once I’m done with the boots I block them and it straightens right out! if your stitches are off then your probably adding something at the beginning of each row, like working in the ch instead of the stitch or skipping a stitch (happens all the time, the most common mistakes I’d say)