I am SO excited to share this tutorial with you. My cousin just had twins last week so I made a boy and girl version! Of course I made them to fit my model so they won’t fit the twins for SOME time. But they are precious!
Yes, I made my sweet little boy wear the girls boots for this picture. Better than a skirt or something, right?
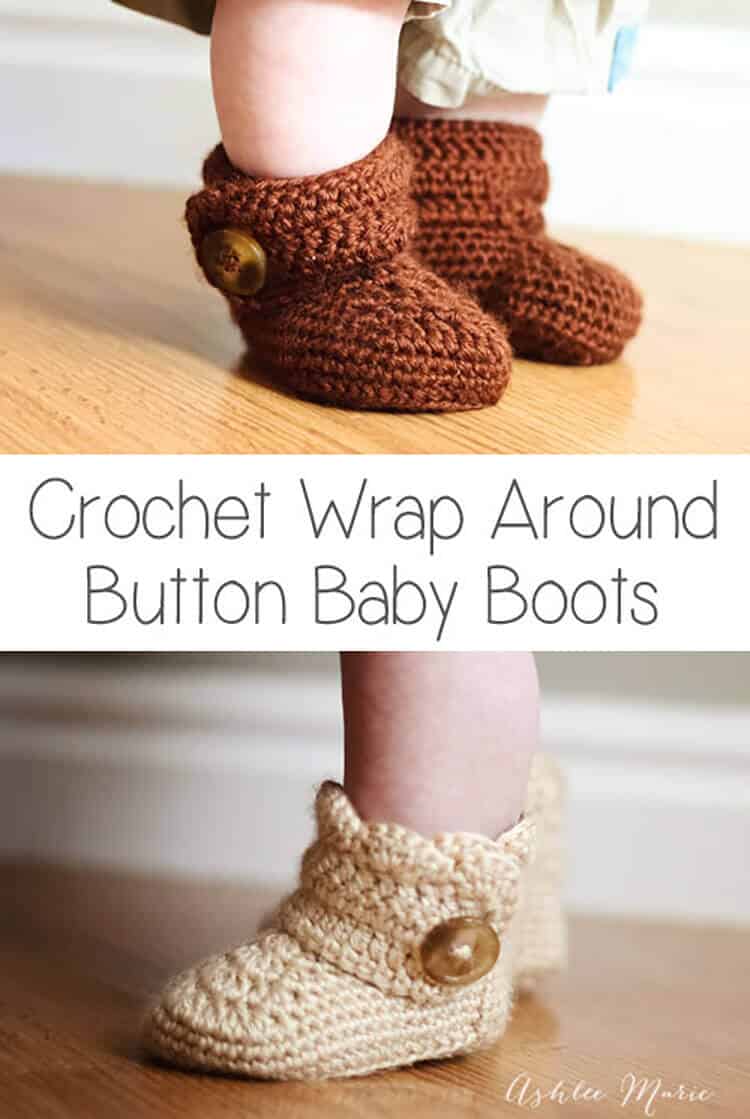
I love the scallops on the girl version, but the boy version is adorable too! I started with a size to fit my model, Baby Boy.
I ended up with boots that are around a size 4~ YES, 4 and they area already tight on him. According to a shoe website that’s like a 9-12 month shoe for the average babies feet!
I was going to share just that size, but a friend, Summer, asked me to make a pair for her baby, a size 1. So I figured it out, and added those numbers to the pattern at the last min! (on another post now)
Buy BOTH the Ad-Free pattern pdf’s for both the Baby AND Infant sized discounted here!
UPDATE: after some confusion I separated the pattern, the larger version is still right here, comparable to a size 4, and the smaller crochet wrap around button infant boot is on it’s own post.
Buy the Ad-Free pattern pdf for just the baby size here!
Baby wrap around boots:
materials:
caron simply soft yarn
large buttons
G6- 4 mm hook (To go up a size use a G-4.25mm, to go down a size use an f-3.75mm hook)
abbreviation:
ch (chain)
sl st (slip stitch)
sc (single crochet)
hdc (half double crochet)
dc (double crochet)
sc2tog (single crochet 2 together)
dc2tog (double crochet 2 together)
dc3tog (double crochet 3 together)

sole:
ch 13
row 1- sc in 2nd ch, sc 7 times, hdc 3 times, 7hdc in last ch, finish the rest of the round working along the back of the chain, hdc 3 times, sc 7 times, 4sc in the last/first ch, sl st to the first sc (32)
row 2- ch1, sc in same sc, sc 9 times, hdc, 2hdc 3 times, 3hdc, 2 hdc 3 times, hdc, sc 10 times, 2sc 3times, sl st to first sc (43)
row 3- ch2, hdc in same sc, hdc 11 times, *2hdc, 1hdc* 7 times, hdc 11 times, 2hdc, hdc, 2hdc twice, hdc, 2 hdc, sl st to first hdc (54)
shoe:
row 4- ch1, working in back stitches, sc around, sl st to first sc (54)
rows 5-6- ch1, sc around, sl st to first sc sc (54)
row 7ch1, sc in same sc, sc 12 times, sc2tog, dc2tog 7 times, sc2tog, sc around, sl st to first sc (45)
row 8- ch 1, sc in same sc, sc 10 times, sc2tog, dc2tog, dc, dc3tog, dc, dc2tog, sc2tog, sc around, sl st to first sc (39)
row 9- ch 1, sc in same sc, sc 8 times, sc2tog, dc2tog, dc3tog, dc2tog, sc2tog, sc around, sl st to first sc (33)
row 10- ch 1, sc in same sc, sc 6 times, sc2tog, dc, dc3tog, dc, sc2tog, sc around, sl st to first sc, cut yarn weave in ends. (29)

Boot cuff:
for the right boot sl st in the 8th stitch from the seam, for the left boot sl st in the 12th stitch from the seam
ch 15
row 1- dc in 4th ch from hook -first 3ch counts as first dc, dc in next 11 ch, dc in first sc (the one you sl st in), dc 24 times (there will be 4 spaces left), skip 3 spaces, sc in last space. (39) **note – some people had a problem with getting two right or two left feet. remember to not cross over the front, work down the inside, around the back and back up the outside, so you’ll work in opposite directions for each bootie, counterclock wise – looking top down, or “wrong” side out for the right booties and clockwise, or “right” side out for the left bootie**
row 2- ch3 (counts as dc), turn, dc in first dc and around 35 times, ch 1 skip one dc, dc in last 2 (38- with a ch1 space)
row 3- ch3 (counts as dc), turn, dc, dc in ch1 space, dc around (39)
row 4 scallops (girls)- turn, 5dc in second dc, *skip 1dc, sc in next dc, skip 1dc, 5dc in next dc*, repeat around (10 shells), sc down the side (I do 2 for each row so a total of 6 down the side), continuing around sc across the bottom along the original chain (13), sl st, cut yarn and weave in ends

row 4 simple (boys)- ch1, turn, sc across top (39), down the side (6) and across the bottom chain (13), sl st, cut yarn and weave in ends
Do you love them??? Considering the twins are HALF the size of Baby boy when he was born (let alone they don’t have his massive hobbit feet) I doubt they’ll even come close to fitting until they are at LEAST 9 months, maybe a year?? So next winter, perfect!
Don’t forget to add a button where ever you like and your done! I placed mine at the bottom of the 6th dc over from the front- I might go lower next time… or maybe two smaller buttons?
And one final picture, I thought you might want an inside shot so you can see how it wraps a bit… I’m still so very much in love with these boots. And when I finish Baby Boy’s I’ll post picture’s!!!


Hannah
Love this pattern, have made several pairs for friends babies 🙂
Ashlee
That makes me so happy! I’m so glad you liked my pattern!
Caroline
Love your pattern, just made no 1. And I am quite new to crochet. Me little niece is getting the size 4 shoe and I’m gonna make a size 1 after. Thanks alot for the pattern.
Ashlee
you are so welcome! good luck and have fun and I hope they go smoothly for you, they are a little advanced, but be patient and take your time.
mallory
what size is this pattern in my daughter is a infant size 4, thank you so much
Ashlee
because people crochet so differently it’s hard to put a size on it. I suggest trying to make JUST the sole of this pattern AND the infant one and seeing which one is closer to the size you are looking for. then from their if you need to go up or down a size just change the hook size to make it perfect
Diana
Hi there, I have had the hardest time trying to figure out your pattern. After many times of trying and trying I finally figured it out and was able to create the right boot. Know I am having a hard time figuring out how to make the left boot. Please help! Can you post pictures for that side (left). I would love to have a complete set for my baby boy who is 4 months (almost 5 months). Thank you!
Ashlee
there are pictures of both sides in the post already, the shoe is symmetrical and same for both, it’s just the placement of the cuff that is different, one starts on the left (looking at the shoe from the front) and you work down the chain then around the left, back and up the right side. For the other bootie you start on the right side, work down the chain, down the right side, around the back and up the left!
Glory Shofowora
hi! Are we allowed to sell the product we made??
Ashlee
yes, I just ask that you take your own pictures so clients can see YOUR work AND give me credit for the design with a link to the pattern.
shabnam
Hello mam, I’m in love with these booties and since I’m new at crotcheting I’m a bit confused. What does it mean by sl st to the 1st sc. I’m stuck at row 1 and after going according to the pattern I have 2 to 3 chains left without crotcheting. Please help mam.
Ashlee
I don’t count the chains at the beginning of any row as part of the pattern, so you skip it and slip stitch in the first single crochet you made in that row (and you should have anything chains left.)
Hanna
I made these for a friend’s new little girl. ADORABLE! Thank you for sharing this. It is hard to find free patterns that include the pictures!
Ashlee
you are so welcome! glad you liked them
Casey
I am having a hard time with row 7. When you start the decrease it should be at the front of the shoe right? For me its coming out to the out side part of the shoe. I have all the right number of stitches and have redone everything over 5 times and its still coming out the same, decrease on the side. What am I doing wrong? This is my first time trying to crochet shoes.
Ashlee
it sounds like it’s turning quite a bit, are you a tight crocheter? what side of the shoe, is it decreasing BEFORE it should or AFTER it should?
abyknitnknots
Hi! i could not figure out where to start counting for the cuff..is it from the centre of the heel?
Ashlee
no, it’s from the seam, not the heel.
Dem
Hello Ashlee, I’m glad I found your blog 🙂
It took me a while to learn to make them, and thank God I did it 🙂
They’ll make a cute and precious present this Christmas !
I actually skipped a few steps to make it look exactly the way I wanted, but you can’t see any difference.
How can I show you the result ? 🙂 I’d love to share it with you
Thank you for this free, simple and cute pattern !!!
Ashlee
YAY! I hope the recipient loves them. Feel free to email me ashlee@ashleemarie.com or tag me on social media (intagram, fb, etc….)
Pat Blake
Thank you for this pattern, it’s just what I was looking for. Although I’ve adjusted the top and made a ruffled top to look like “Chicago Blackhawks” team colors. wish I could post a photo.
Ashlee
feel free to email me a picture ashlee@ashleemarie.com or tag me in social media (instagram, fb, twitter, etc…)
Judith
Dear Sweetheart,
thank you so much for the awesome pattern. I crocheted it and did a entry about in my blog. I linked your Blog.
Greetings from Germany.
Judith <3
Ashlee
so glad you liked it!
Linda
Just would like some info. Row 1 ends with 32 stitches (which I have) Row 2 is required to have 34 stitches to make it to 43 stitches for the next row……Just wonder how this works???
Ashlee
nope, 32 is just what you need
row 2- ch1, sc in same sc (1), sc 9 times (2-10), hdc (11), 2hdc 3 times (12-14), 3hdc (15), 2 hdc 3 times (16-18), hdc (19), sc 10 times (20-29), 2sc 3times (30-32), sl st to first sc (43)
maybe your doing the middle 3hdc in 3 stitches instead of in one?
Linda
Yes, thats it. But it really should read 3hdc in the same stitch. Thank you!
Ashlee
when the number is before the stitch 3hdc it’s in one stitch, when the number comes after the stitch hdc 3 times, it’s in the next 3 stitches.
Linda
What is the actual measurement on the sole of the infant and also the larger size? I’m making a pair with a G hook but they look so big. I’m using a 4ply yarn. Thank you
Ashlee
it depends on how you crochet, tight or loose (and of course the hook and the yarn). If you feel it’s too big try going down a hook size or two and maybe go down a yarn weight
Annie Alexander
I absolutely ADORE this pattern! I have made a bunch of pairs of booties from both this pattern, and the infant one. However, each bootie seems to twist. It doesn’t sit straight. Is there a way to avoid this, or is that just how the bootie comes out? Regardless, they look adorable every time!
Ashlee
it always curls (normal for working in the rounds), you can either block it to straighten it out, or just put them on the babies and while they wear them they will work themselves out!
Elaine
Just made these for my granddaughter and they’re adorable. Thank you so much for this great pattern!
Ashlee
awwww thx, hard to go wrong with anything for babies!
Sydney Klause
I love this pattern, thank you! I just puchased the downlaoded version, I paid a dollar, But I can`t seem to find the download! Are you able to help? TIA
Ashlee
my records show that you opened the email with the pattern, did it not work?
Janice
Hello,
Thank you for this adorable pattern!
I have just completed one shoe and will do the other one tomorrow.
The first shoe has the seam on the outside of the foot….but I think the seam should be on the inside of the foot….I know how to correct it for the next pair…. 🙂
What I am wondering though is: Are both shoes in a pair going to have the seam on the same side or will the pattern work out so that the seams are either both on the inside or both on the outside depending on which way I hold the chain 15 to start the cuff? I can’t tell from the pictures!
Thank you
Ashlee
the seam is on the inside of one and the outside of the other. You can of course change the start and create the seam someplace else but that would have been the pattern so much longer and more confusing that I didn’t bother – but if you understand crochet enough it’s an easy “fix” I do it for my own, but I already get so many questions that I tried to keep the pattern as simple as possible.
Jasmin
Thank you for the patter!!
I made my little 11 month year old cousin these booties and I’m pretty sure she is going to love them:3
I kinda changed up the pattern a little so I wouldn’t have the button part and that all of it would be intact. And I’m really satisfied.
I hope you have a wonderful day because you must be a wonderful person (^w^)/
Ashlee
thank you so much
Esmeralda L.
So how many total stitches for row 2 of the boot cuff? I’m confused because it says 31- with ch1 space. so i don’t know if you meant 31 in total or 31 + ch1 space equaling 32 stitches