I am SO excited to share this tutorial with you. My cousin just had twins last week so I made a boy and girl version! Of course I made them to fit my model so they won’t fit the twins for SOME time. But they are precious!
Yes, I made my sweet little boy wear the girls boots for this picture. Better than a skirt or something, right?
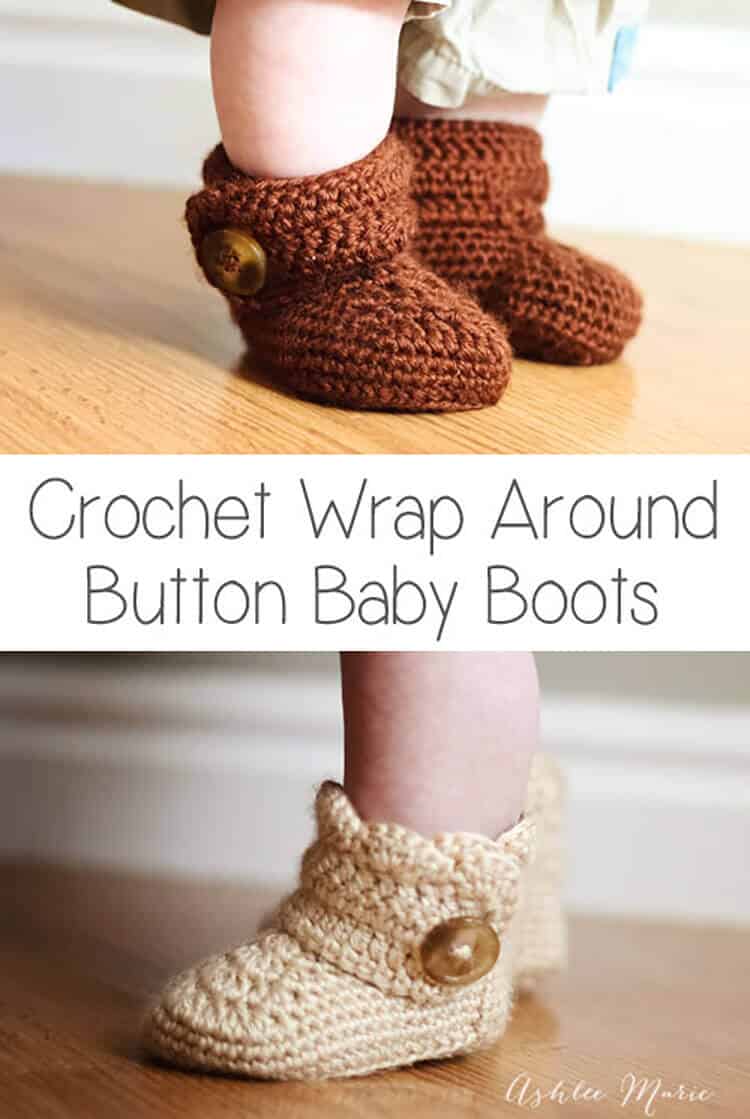
I love the scallops on the girl version, but the boy version is adorable too! I started with a size to fit my model, Baby Boy.
I ended up with boots that are around a size 4~ YES, 4 and they area already tight on him. According to a shoe website that’s like a 9-12 month shoe for the average babies feet!
I was going to share just that size, but a friend, Summer, asked me to make a pair for her baby, a size 1. So I figured it out, and added those numbers to the pattern at the last min! (on another post now)
Buy BOTH the Ad-Free pattern pdf’s for both the Baby AND Infant sized discounted here!
UPDATE: after some confusion I separated the pattern, the larger version is still right here, comparable to a size 4, and the smaller crochet wrap around button infant boot is on it’s own post.
Buy the Ad-Free pattern pdf for just the baby size here!
Baby wrap around boots:
materials:
caron simply soft yarn
large buttons
G6- 4 mm hook (To go up a size use a G-4.25mm, to go down a size use an f-3.75mm hook)
abbreviation:
ch (chain)
sl st (slip stitch)
sc (single crochet)
hdc (half double crochet)
dc (double crochet)
sc2tog (single crochet 2 together)
dc2tog (double crochet 2 together)
dc3tog (double crochet 3 together)

sole:
ch 13
row 1- sc in 2nd ch, sc 7 times, hdc 3 times, 7hdc in last ch, finish the rest of the round working along the back of the chain, hdc 3 times, sc 7 times, 4sc in the last/first ch, sl st to the first sc (32)
row 2- ch1, sc in same sc, sc 9 times, hdc, 2hdc 3 times, 3hdc, 2 hdc 3 times, hdc, sc 10 times, 2sc 3times, sl st to first sc (43)
row 3- ch2, hdc in same sc, hdc 11 times, *2hdc, 1hdc* 7 times, hdc 11 times, 2hdc, hdc, 2hdc twice, hdc, 2 hdc, sl st to first hdc (54)
shoe:
row 4- ch1, working in back stitches, sc around, sl st to first sc (54)
rows 5-6- ch1, sc around, sl st to first sc sc (54)
row 7ch1, sc in same sc, sc 12 times, sc2tog, dc2tog 7 times, sc2tog, sc around, sl st to first sc (45)
row 8- ch 1, sc in same sc, sc 10 times, sc2tog, dc2tog, dc, dc3tog, dc, dc2tog, sc2tog, sc around, sl st to first sc (39)
row 9- ch 1, sc in same sc, sc 8 times, sc2tog, dc2tog, dc3tog, dc2tog, sc2tog, sc around, sl st to first sc (33)
row 10- ch 1, sc in same sc, sc 6 times, sc2tog, dc, dc3tog, dc, sc2tog, sc around, sl st to first sc, cut yarn weave in ends. (29)

Boot cuff:
for the right boot sl st in the 8th stitch from the seam, for the left boot sl st in the 12th stitch from the seam
ch 15
row 1- dc in 4th ch from hook -first 3ch counts as first dc, dc in next 11 ch, dc in first sc (the one you sl st in), dc 24 times (there will be 4 spaces left), skip 3 spaces, sc in last space. (39) **note – some people had a problem with getting two right or two left feet. remember to not cross over the front, work down the inside, around the back and back up the outside, so you’ll work in opposite directions for each bootie, counterclock wise – looking top down, or “wrong” side out for the right booties and clockwise, or “right” side out for the left bootie**
row 2- ch3 (counts as dc), turn, dc in first dc and around 35 times, ch 1 skip one dc, dc in last 2 (38- with a ch1 space)
row 3- ch3 (counts as dc), turn, dc, dc in ch1 space, dc around (39)
row 4 scallops (girls)- turn, 5dc in second dc, *skip 1dc, sc in next dc, skip 1dc, 5dc in next dc*, repeat around (10 shells), sc down the side (I do 2 for each row so a total of 6 down the side), continuing around sc across the bottom along the original chain (13), sl st, cut yarn and weave in ends

row 4 simple (boys)- ch1, turn, sc across top (39), down the side (6) and across the bottom chain (13), sl st, cut yarn and weave in ends
Do you love them??? Considering the twins are HALF the size of Baby boy when he was born (let alone they don’t have his massive hobbit feet) I doubt they’ll even come close to fitting until they are at LEAST 9 months, maybe a year?? So next winter, perfect!
Don’t forget to add a button where ever you like and your done! I placed mine at the bottom of the 6th dc over from the front- I might go lower next time… or maybe two smaller buttons?
And one final picture, I thought you might want an inside shot so you can see how it wraps a bit… I’m still so very much in love with these boots. And when I finish Baby Boy’s I’ll post picture’s!!!


Nikki
I’m making a pair of these for a friend and was wondering what size you would recommend that I make. She said that she just bought dress shoes for her in an infant size 2.
Thanks,
Nikki
Ashlee
honestly I have no clue, my babies were born wearing size 4 I swear (not really) but it’s been years since I made these and gave them away, I remember they fit my size 4 son, and the infant pattern I made was smaller, but I didn’t keep any and can’t compare them to anything.
Marta
Hi!! thank you for sharing this pattern, it is very nice!
I have a couple of questions on it. I do not have problem until row 6 when there are total 54 stitches but then I do not understand how you get from 54 to 45 stitches in row 7, 39 in row 8 and 33 in row 9 and so on. Where is it the point in which you diminish the stitches?
Second question is about the sc2tog and the other stitches where they are together. Does it mean that sc2tog are 2 stitches together in the same stitch/chain?
Thank you very much!
Marta
Dear Ashlee,
I figured out what I was doing wrong 🙂
Thank you again for sharing the pattern!
Heather
Hi Marta, Could you share what you discovered about going from 54-45 stitches? I just made a bootie and my seam is a little off and I have extra stitches. Not sure how to correct this.
Thanks for any help 🙂
Ashlee
The sc2tog and the dc2tog are decrease stitches, they merge two stitches into one
Ashlee
I’m glad you figured it out, as I only respond to comments once a month so i know it’s sometimes out of date.
Ashlee
the sc2tog is a decrease stitch, that’s how you go from 54 to 45, the decrease stitches.
Heather
Hi, I just made one of the girl ones but somehow messed up the seam and ended up with about 6 extra stitches, any idea what I did wrong??
Love then regardless!!
Ashlee
there is a stitch count on every row, what row did you get off on, thats usually where you had the problem. Without knowing what row or rows you had trouble with it’s hard to help too much.
Sharon
Thank you so very much for sharing your pattern, these booties are absolutely adorable! Can’t wait to make them for my grand-daughter!
Ashlee
Thank you so much! I hope you enjoy making them.
Lauran
What do you mean by seam?
Ashlee
where your doing the ch2 and moving up each row? that’s the seam, make sense?
Lauran
I noticed my shoe part bubbled out a bit is that normal? Also where is the seam?
Ashlee
I’m sorry, I don’t know what you mean by bubbled out? it should be shoe shaped???? send me a picture if you want, pictures are easier to diagnosis a problem when I can see it. Also the seam is that area where your ch 2 and moving up a row.
eui souchra
hi!all of your handmade thinks are perfect!!bravo!!i would like to ask you about the baby boots!the boy is 1,5 years old,so how am i start?how many chains?do you know??thanks!!i love your thinks!!
Ashlee
I would make with this size pattern, make the sole first and measure it against your model. If you need to make it a bit bigger go up a hook size. (making a sole doesn’t take too long and it’s a great test) and it says right in the pattern to ch 13.
Meghan
Hi, I just wanted to say thank you very much for the free patterns! I really appreciate it. These booties are lovely.
Ashlee
you are so welcome! I hope you enjoy the pattern.
Caitlin
These are beautiful! I’m new to crocheting and am a terrible learner when reading patterns but learn very fast by watching videos. Do you have a video tutorial of how to make these? I want to make a pair for my daughter’s 1st birthday the beginning of March. Thank you!
Ashlee
I don’t at the moment, making videos of my patterns is actually on the list, and at the top at the moment, just trying to figure out the best way to make the videos easy to understand!
shawna
Hi,
I looove this pattern especially the illistration since im so new. Im having issues with rows of 54 where u ch1 and sc in same sc . My stitches at the end of the row and connect seem to increase.Not stay at 54 stitches. Ive unraveled snd tried again. Am I doing something wrong? U slip slitch in first crochet of the beginnibg crochet. Chain 1 and then sc in that same chain? Each row I end up with 2 extra and after bother roes I ended up with 6 extra stitches?
Ashlee
if your ending up with extra stitches you might be sc in the sl st, instaed of just the previous stitches? that’s usually where people have problems, if you only doing one sc in each sc you CAN’T increase unless your sc into the sl st or other non stitches.
Courtney Stirmel
I love how these look! I am a little stumped though. I made the whole boot, and I am to the point of the cuff, and I made one following the pattern, and I just feel like it isn’t looking the same. When I made the right foot, it wraps around like the left foot should. :/ So what am I doing wrong?
Thank you so much for this pattern though! I love them. I am making the new born size for my friend’s new baby!
Ashlee
when you work down the ch your probably simply going the wrong direction, do NOT cross the front, make sure you work around the side, back and side again.
Cyndi
I love these boots and I am currently trying to make them for my great niece. I’m a little
Confused after row 8. It seems I’m not as far along as your pics show. Any help you could give me
Would be GREATLY APPRECIATED!! Thanks!
Ashlee
is your count off? or are you on? I need more info than just row 8 in order to help better, what exactly is off?
Lyric
Thank you I”m Topsy Turvy for creating AND sharing this way cute pattern with the world. Here is my first attempt at a pair of these way cute booties. I am sure there will be more to come.
Cheers,
Lyric
Ashlee
you are so welcome! I’m so glad you liked the pattern!
Sarah
I don’t know how to weave the top of the boots together! please help!!! me
Ashlee
I’m not sure what you mean? are you talking about weaving in the ends? since the cuff is made attached to the shoe, it’s not separate.
Bo
Thanks for sharing your wonderful patterns!
I always have problems with making a base like you did: making a chain and then working in circles. When I have to make multiple stitches in one stich from the chain (at the ends: heel and toes) I always end up with a big hole were I have made these multiple stitches 🙁 And it is a big hole which will not disappear when I have finished the next row. How do you prevent getting big holes like I have?
Ashlee
I’ve never had a problem, but everyone crochet’s so differently. I wonder if maybe your chain is too loose? you can loosen the knot from the start of the chain and try to pull that first ch tight? or someone else said they weaved the ch ends into that hole and pulled it tight.
Alexandra
These are so adorable! I made a pair and I love how they turned out! Thanks! I shared your pattern on my blog! 🙂
Ashlee
awww thanks so much! I’m so glad you like them and thanks for the link!
Aimée
Help =(
When i reach the last row of the sole, the last stitch is still too far away from the first one… What do the stitches with * mean?
Aimée
NEVERMIND! I found the answer u gave to the same question in the comments above. I finished the first pair and they turned out perfect and SO adorable! Thank you so much for the pattern and great instructions! xx
Ashlee
GAH, saw that you already figured this out AFTER I answered your question. Glad you got it done before I got around to answering questions (I only answer once a month)
Ashlee
*2hdc, 1hdc* 7 times means to repeat 2hdc, 1hdc 7 times. When there are *’s like that and it says repeat afterwards you repeat the whole section between the *’s. Does that help?
Nada
Cutest ever!!!Thank you SO much for the pattern, Miss Ashlee!!
I hesitated at first, but made them, and :-0 was successfull. I don’t care that they had one with the upper showing the wrong side of the crotchet, so I attempted to make the Second one with two separate pcs worked awesome. Takes a little extra effort, but works out!
Not sure how to post the pictures if how I did it, tho. Thank you, again !!
Ashlee
your so welcome! I’m glad you enjoyed my bootie pattern and that you figured out a hack that worked for you to get the wrap the right way.
Maria Osborne
DID YOU KNOW Your booties for baby I believe the instruction are off by one stitch……I think that why everyone is having trouble. it should read 6 stitches in one row and 9 instead of 8 in another. :/ I tried this pattern once and caught it going to the left then if you make another do flip it over you can have a right one……with the mistakes in the pattern.
Ashlee
nope they aren’t off. I’m not sure what problem you are having but these have been made a few hundred times without any issues. and they don’t need to be flipped. I’m sorry your having issues but it’s not the pattern.
Michelle
How can I make a size newborn and 0-3 months?
Ashlee
it all depends on the size of your babies feet, and your crochet style (tight or loose). I always suggest that you make the sole and see how it fits your model before moving on. I’d go with the INFANT size though, not this pattern (baby size) as this one fit’s a much older baby.
Lena
I tried to make these booties, but when I came to row 10 the leg opening is too wide (I couldn’t bring it close enough). It’s like I am missing a few rows.
Did I use wrong yarn or is it possible to add 3 or 4 rows?
(I would add photo if I could).
Ashlee
feel free to email me pictures, it’s hard to help without more details. Are you doing the decreases right? Some people don’t know the dc2tog stitch very well.