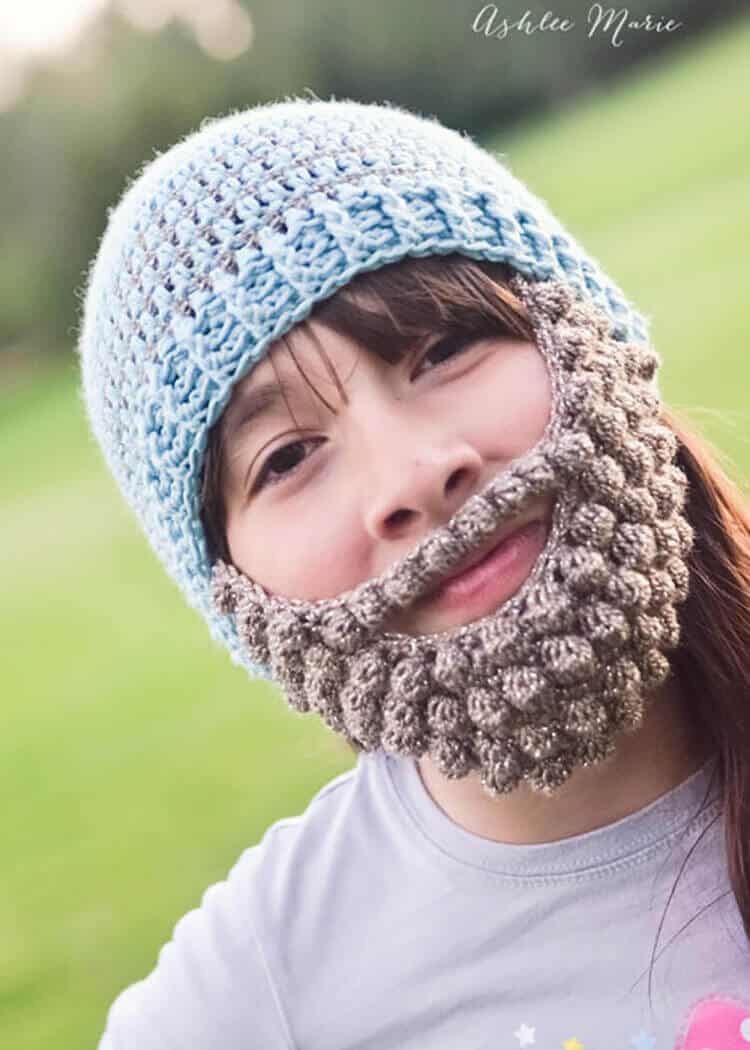
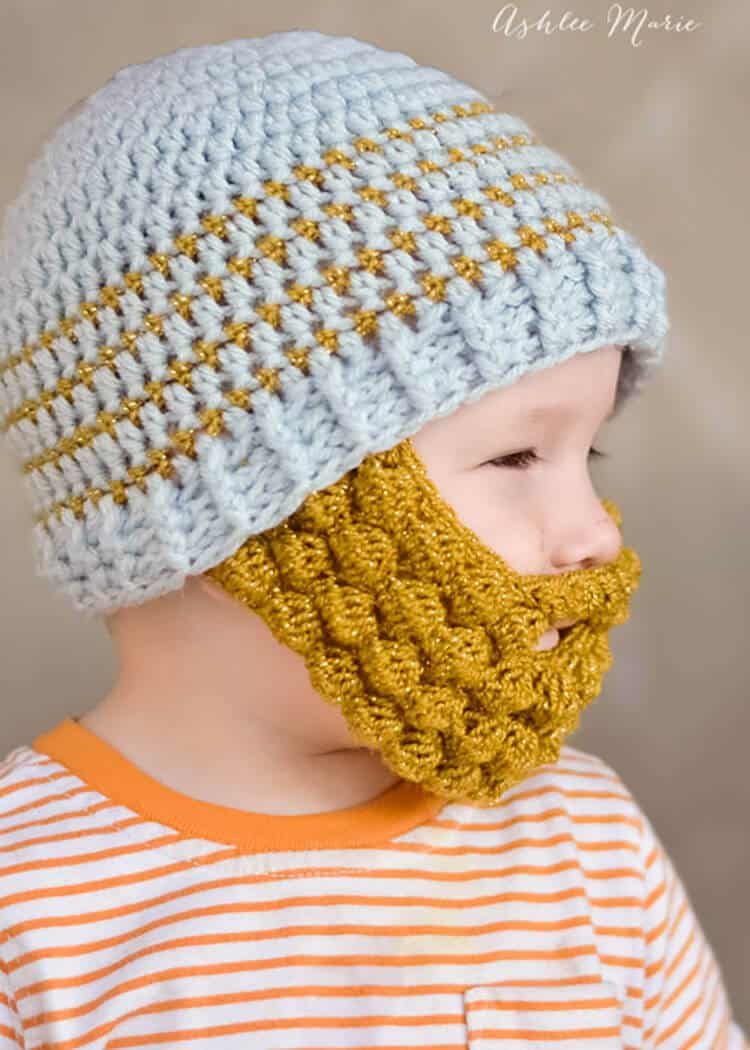
Is there anything cuter than a baby with a beard? This easy crochet bobble beard pattern comes in every size from infant to adult.
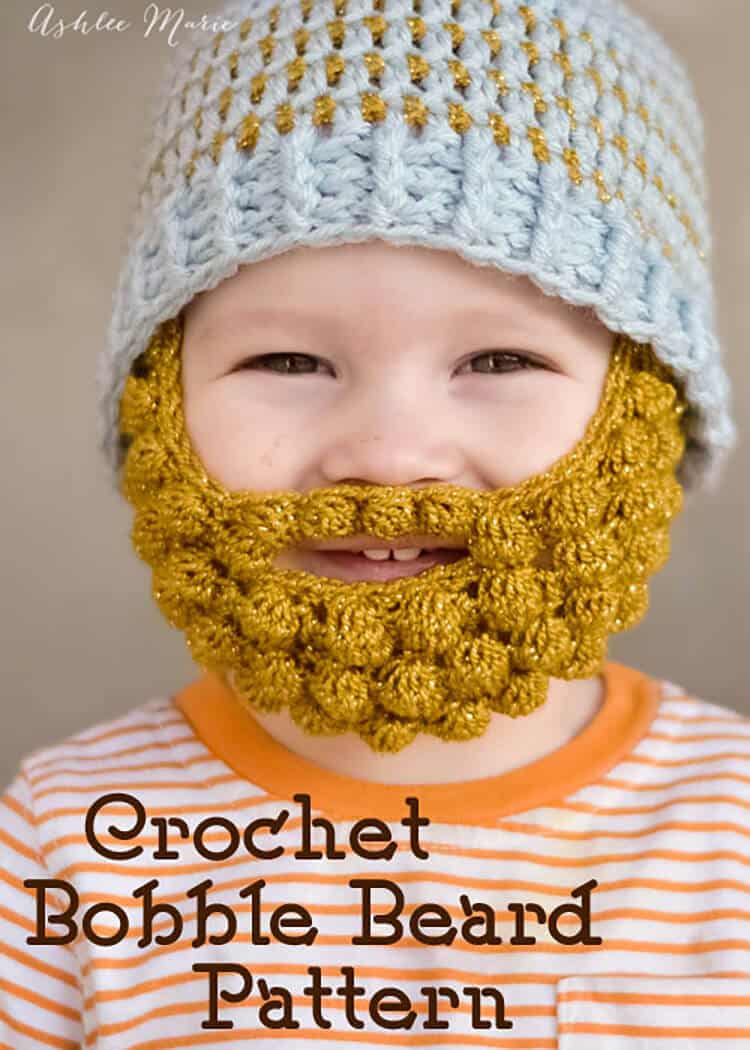
I originally made a simple beard pattern as a white elephant gift, but it seemed so simple I wanted to make it look like it had more life. Then I decided to try making the beard with these bobbles and I’ll never go back to the simple beard again!
Since then I’ve added a double loop beard that is perfect for times you want to be even hairier, or santa!
To attache the beard I make this simple striped beanie pattern in 7 sizes from newborn to extra large adult.
If you want to purchase all 5 patterns ad-free and printable at a discount click below.
Buy all 5 beard and beanie Ad-Free pattern pdf’s discounted here!
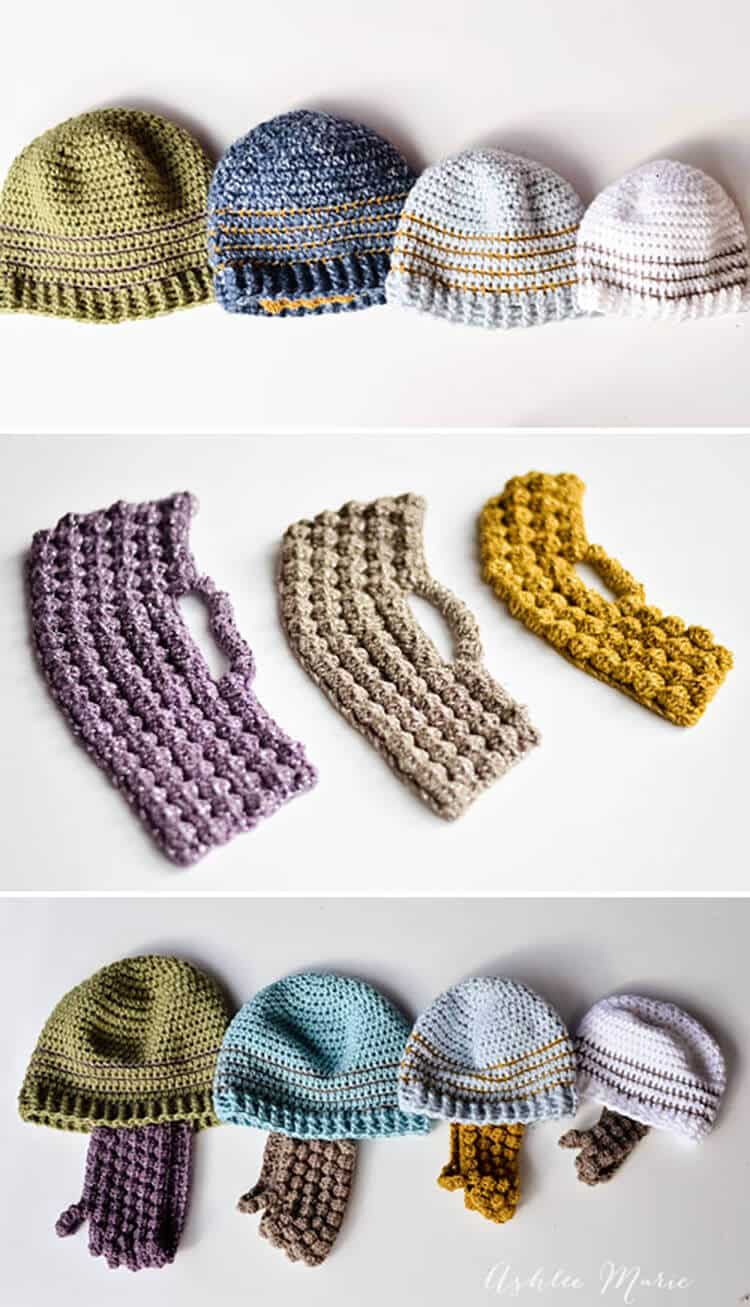
Here is an example of all 4 beards, Large, Medium, Small and Extra Small (on an Adult, adult, toddler and baby beanies). You can see the difference in length as well as width (or is that height?) Which is why I’d suggest a hook change over beard size change if trying a different yarn.
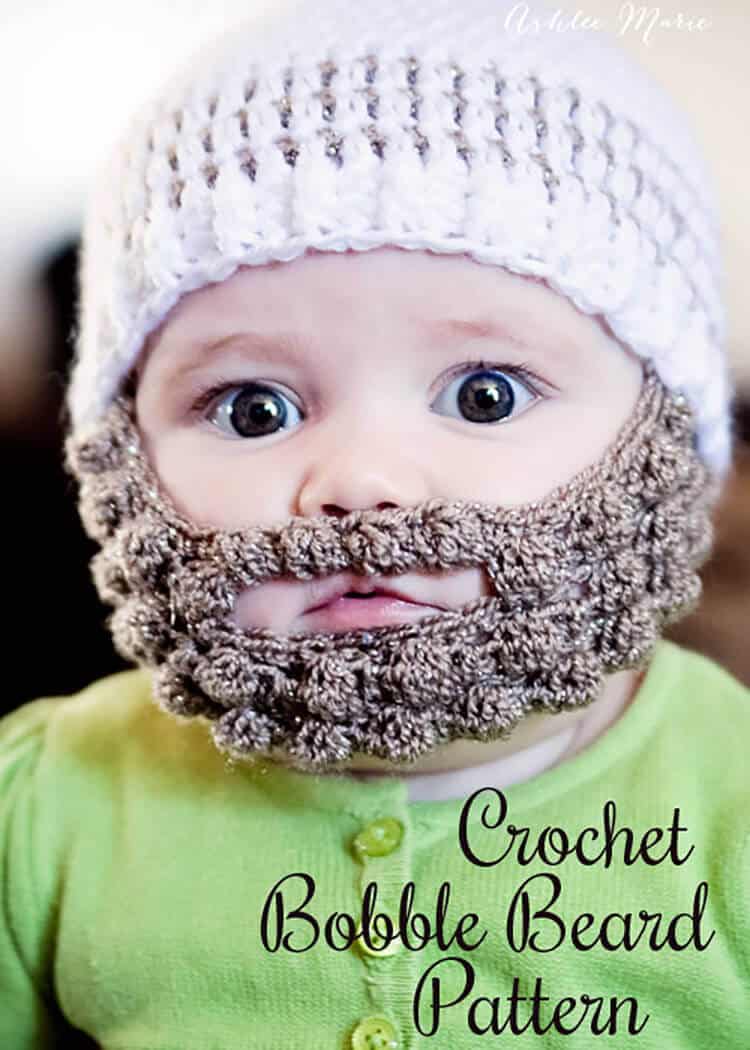
And Baby Boy looked so cute I decided I had to add an even smaller version, here is Miss K showing off the Extra small!!! Seriously, could this BE any cuter?
I love the thinner yarn for more details, but if you’d rather use a thicker yarn try it out first, if it makes the beard too large try either going down a hook size or down a beard size.
Buy the Ad-Free pattern pdf here!
Bobble Beard
Material:
vanna glamour (you can use any yarn of similar size, if you go up a yarn weight you might want to go down a beard size or down a hook size)
Hook I- 5.50mm
Stripped beanie
Stitches used:
chain (ch)
single crochet (sc)
half double crochet (hdc)
half double crochet decrease (hdc2tog)
bobble- Yarn over, insert your hook in the stitch, yarn over and draw up a loop, yarn over once more and draw it through the first 2 loops on your hook.Repeat that process (yarn over, insert your hook in the stitch, yarn over and draw up a loop, yarn over once more and draw it through the first 2 loops on your hook) 3 more times in the same stitch. There are now 5 loops on your hook. Yarn over and draw the loop through all 5 stitches. You’ve made one bobble stitch. Notice that the bobble puffs to the back side of the swatch you’re working, which will be the right side of the work.
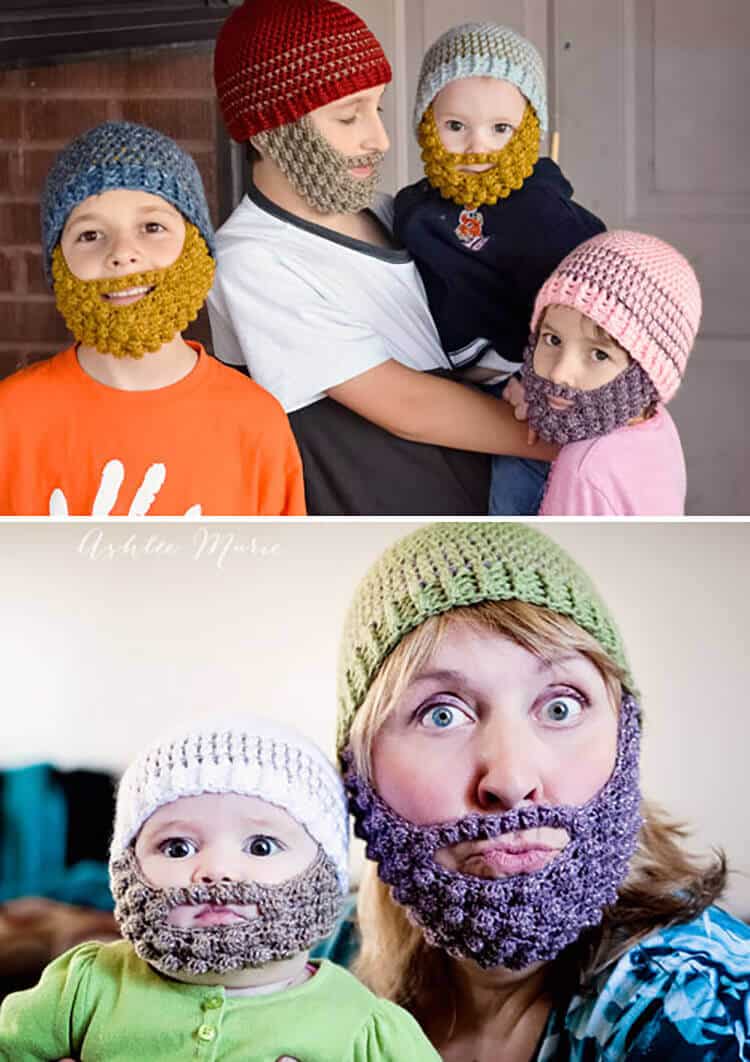
Lego boy in a child’s beanie and medium beard, Computer boy in child’s beanie and Medium beard, Baby Boy in a toddler beanie and small beard (he was pulling on it, I swear it fits good) and Princess in a child’s beanie and small beard.
My mom is modeling the Large beard with Miss K… Love the zoolander look (seriously though, it’s a bit creepy on adult women without some fun face of some kind)
extra small
Chain 28
Row 1- sc in second ch from hook and in each st across. (27)
Row 2- ch2, turn, *hdc, bobble stitch* repeat across, hdc (27)
Row 3- ch1, turn, sc in next 12 st, hdc in next 3 st, sc in last 12 st, (27)
Row 4- ch2, turn, hdc, *hdc, bobble stitch* 3 times, *hdc2tog, bobble* 2 times, hdc, *bobble, hdc2tog* 2 times, *bobble, hdc* 3 times, hdc (23)
Row 5- ch1 turn, sc across, (23)
Row 6- ch2, turn, *hdc, bobble* 4 times, ch5 skip 7 st, *bobble, hdc* 4 times
Row 7- ch1, turn, sc 8 times, working in the ch space- *bobble, sc*, 3 times, bobble, (now work in the stitches) sc 8 times
finish off
(the bobbles from Row 7 will be backwards, just push them through to the other side with your pinky or a pencil eraser)
Small
Chain 32
Row 1- sc in second ch from hook and in each st across. (31)
Row 2- ch2, turn, hdc, *hdc, bobble stitch* repeat across, hdc twice (31)
Row 3- ch1, turn, sc in next 11 st, hdc in next 9 st, sc in last 11 st, (31)
Row 4- ch2, turn, *hdc, bobble stitch* repeat across, hdc (31)
Row 5- ch1, turn, sc in next 12 st, hdc in next 7 st, sc in last 12 st, (31)
Row 6- ch2, turn, hdc, *hdc, bobble stitch* 4 times, *hdc2tog, bobble* 2 times, hdc, *bobble, hdc2tog* 2 times, *bobble, hdc* 4 times, hdc (27)
Row 7- ch1 turn, sc across, (27)
Row 8- ch2, turn, *hdc, bobble* 5 times, ch5 skip 7 st, *bobble, hdc* 5 times
Row 9- ch1, turn, sc 10 times, working in the ch space- *bobble, sc*, 3 times, bobble, (now work in the stitches) sc 10 times
finish off
(the bobbles from Row 9 will be backwards, just push them through to the other side with your pinky or a pencil eraser)
Medium
Chain 36
Row 1- sc in second ch from hook and in each st across. (35)
Row 2- ch2, turn, *hdc, bobble stitch* repeat across, hdc (35)
Row 3- ch1, turn, sc across (35)
Row 4- ch2, turn, hdc, *hdc, bobble stitch* repeat across, hdc, hdc (35)
Row 5- ch1, turn, sc in next 12 st, hdc in next 11 st, sc in last 12 st, (35)
Row 6- Repeat row 2, (35)
Row 7- ch1, turn, sc in next 13 st, hdc in next 9 st, sc in last 13 st, (35)
Row 8- ch2, turn, hdc, *hdc, bobble stitch* 5 times, *hdc2tog, bobble* two times, hdc, *bobble, hdc2tog* 2 times, *bobble, hdc* 5 times, hdc times (31)
Row 9- ch1 turn, sc across, (31)
Row 10- ch2, turn, *hdc, bobble* 5 times, hdc, ch7 skip 9 st, *hdc, bobble* 5 times, hdc
Row 11- ch1, turn, sc 11 times, working in the ch space- *bobble, sc* 5 times, bobble, (now work in the stitches) sc 11 times
finish off
(the bobbles from Row 11 will be backwards, just push them through to the other side with your pinky or a pencil eraser)
Large
Chain 40
Row 1- sc in second ch from hook and in each st across. (39)
Row 2- ch2, turn, hdc, *hdc, bobble stitch* repeat across, hdc two times (39)
Row 3- ch1, turn, sc across (39)
Row 4- ch2, turn, *hdc, bobble stitch* repeat across, hdc (39)
Row 5- ch1, turn, sc in next 13 st, hdc in next 13 st, sc in last 13 st, (39)
Row 6- Repeat row 2, (39)
Row 7- ch1, turn, sc in next 14 st, hdc in next 11 st, sc in last 14 st, (39)
row 8- repeat row 4, (39)
Row 9- ch1, turn, sc in next 15 st, hdc in next 9 st, sc in last 15 st, (39)
Row 10- ch2, turn, hdc, *hdc, bobble stitch* 6 times, *hdc2tog, bobble* two times, hdc, *bobble, hdc2tog* two times, *bobble, hdc* 6 times, hdc (35)
Row 11- ch1 turn, sc across, (35)
Row 12- ch2, turn, *hdc, bobble* 6 times, ch9 skip 11 st, *bobble, hdc* 6 times
Row 13- ch1, turn, sc 12 times, working in the ch space- *bobble, sc* 7 times, bobble, (now work in the stitches) sc 12 times
finish off
(the bobbles from Row 13 will be backwards, just push them through to the other side with your pinky or a pencil eraser)
Sew row ends of beard to the inside edge of your favorite beanie, or my striped beanie, making sure it is spaced evenly between the two sides. I sewed mine about 1/2 inch up inside. I like the way it pulls and looks better than attaching RIGHT to the edge, gives you a bit of a lip. You can place the beards as far front or back as you want.


AYAKO
Dear Ashlee,
Thank you so much for sharing your fabulous pattern! I’m Ayako from Japan and I organize a small knitting and chrochetting volunteer group. Somebody shared your posts on our facebook page and we all love your beautiful photoes (Beard Babies sooooo cute!!). I made some bobble stitch beards for men and found it was easy to make and lot’s of fun not only make everybody laugh. ( Instead of sewing on I made chain loops both side to put on like a mask. ) Lot’s of my chrochetting friends on facebook also eager to make one, but most of them couldn’t read your pattern written in English. So I am wonderig whether you would be kind to let me translate your pattern into Japanese and share it with the link of your posts on our facebook page? (Hope you understand my baby English.)
Ashlee
I do NOT allow people to share the pattern on their own site.
I’ve been asked many times over the years about translating my patterns. I’ve given it a lot of thought and can’t quite find a good solution. Pageviews are how I make a living and help support my family, that’s why I offer the patterns I create for free. But if people start translating them and offering them on their own site not only do I lose traffic, but my SEO through google and other websites goes down as the pattern becomes oversaturated.
I have decided I would be willing to offer an authorship page on MY blog for a translated pattern. You would sign into my site, and link it to your google + authorship account. that way you get the google credit for authoring, and a link to your site from mine. If that’s something you would be interested in. But for me it’s still hosted on my site
Kathy
Thanks so much for this adorable pattern. I have made three for my grandchildren and they love them. Thanks for posting this easy to follow pattern.
Ashlee
You are welcome, I am so glad you found the patterns fun and easy!
candycanandco
My husband wants one of these for Christmas. How long do you think these take to make (I am a beginner)?
Also, I thought Velcro on the side might be a good idea for baby versions for safety to prevent risk of strangulation.
Ashlee
I’m not sure, It only takes me about an hour and a half to make a beard, prob a few hours the first time. as for the baby version you can use velcro instead but either way OI would never leave a baby unattended with a bearded hat, buttons, sewn, velcro, any of it.
Jess
Earlier today I purchased a bearded hat pattern from Etsy… and it is total crap compared to yours. Thank you for taking the time to think up and provide us with these patterns. It’s greatly appreciated. 🙂
Ashlee
you are SOOO welcome! Since I just share patterns for fun I always have a slight worry they are terrible, I’m so glad it worked so well for you
Tatha
I used these for my family’s Christmas card this year!
Ashlee
very fun! I’m glad you liked them
Khara Plicanic
Thanks for these very well thought out patterns! (The beards and the beanies.) I just finished 5 hats and 5 beards for enough nephews to constitute a boy band. Ha. Your efforts are much appreciated!
Ashlee
WOW! what a fun boy band! Glad you liked them so much~!
sarah
Needing some help I have started your adult beard pattern. It came out perfect but is way to big. I am using I love this yarn medium weight 4. Should I go to a g hook? Or go down a beard size. I know my yarn weight is quite a bit more than the vanna
Ashlee
prob go down a beard size to start with, the yarn size makes a huge difference
Sherron
I’m having an awful time trying to get the pattern to come out the right size. I’m using a 7 oz. yarn and a size I hook. The extra small beard will fit an adult even though I only started with 4 less chains than stated. What am I doing wrong? I like the idea of the beard! Please email me the solution!
Ashlee
I’m not sure what 7 oz yarn is? it should be Weight Category: 2 – Sport Weight: Fine. Pretty thin. So if the weight is right but it’s still coming out too big it simply means you are crocheting very loose. If the weight is right then try going down a hook size or two (or three if it’s THAT big).
Sheryl
Thank you so much for sharing your pattern, I just finished my first hat with beard, it was so exciting making it and it turned so cute . You have such amazing talent
Ashlee
I’m so happy for you! Glad it turned out so well!
Kahoru
Hi there. Just to introduce a knit volunteer group in Japan making funs with this beard.
They adjusted the pattern to a style of medical mask, putting on ears.
Not quite so cute like babies, yet still sort of cute, aren’t they?
Ashlee
yes, still kind of cute! how fun!
Mystie
So would the sizes be large (adult male) medium (adult women) small (toddler) xs (baby) ??? I am making one for my husband and i am not sure if i should use the large or meduim!!!!
Ashlee
I made a large for both me and my husband (but with different sized beanies) and the small for my 2 yo and the extra small for my 6 month old niece. hope that helps
Brittney H
So as I was making the beard from your pattern (the Medium one) I was thinking you could add a row in-between Row 10 and 11 to make the bobbles on the same side as the rest of the pattern.
this would be the extra row I think that would work
ch1, turn, slip stitch 11 times, working in the ch space sc 7 times, slip stitch 11 times
and then continue on with the pattern as written
just a thought. love the pattern and the beards.
Ashlee
feel free to change it however you want, I do it with patterns all the time. however I don’t suggest it because it would add so much extra tightness and all those sl st would curl it back. They actually push through to the other side easily
Karen
Thanks so much for the beard pattern! My 23 yr old step son told me at Thanksgiving that he wanted one, so I decided to make one for Christmas. I used my own favorite beanie pattern, then used your beard. The one change I made was instead of sewing the beard to the beanie, I put the hard velcro on the beard so it can be removed AND be adjustable. The original placement didn’t work and he had to move the ends higher up to tighten it up. He loved it.
Ashlee
I’m so glad he liked it! I usually just bast it in if It’s a gift then sew it in once I can try it on the recipient!
Karen
I used my own hat pattern, but had tried a different beard for a Christmas gift. Yuck! Decided to try this one instead and fell in love with it. My step-son (23) was so excited when he saw it that he put it right on and kept it on the entire day.
The only thing I did different was instead of sewing the beard to the hat, I sewed the stiff velcro to the beard so it could be adjusted by sticking it to the inside of the hat. Good thing since I had it positioned in such a way that it didn’t fit him properly. Great pattern!
Ashlee
I’m so glad you like my pattern! and hope your family all loved it too!
Shelle
I haven’t made the whole ensemble yet, just worked up a couple of beards yesterday, and I have to tell you that your pattern/instructions were very user friendly!
Ashlee
That makes me SO glad to hear it! Thank you so much and I’m so glad you have liked the beards
Amelia
I had no problems with your pattern, and everything came together within a couple hours! Very well written, and I love how the newborn size came out. I used the same coloring as your baby size one. Thanks for a great pattern!
Ashlee
YAY! I love hearing that, I’m so glad it came together so well for you
Emily Winn
Hi Ashlee!
I wanted to say thank you for posting this pattern. I have made several as gifts for friends, as well as three for my brothers for Christmas, and they loved them! I just wanted to let you know that I posted pictures of my beard hats, as well as a link to your post, on my blog. I would love to hear from you!
Thanks again,
Emily
Ashlee
you are so welcome! you did a great job and I love the pictures!
Susan
MY daughter-in-law just found out she is pregnant and has added this to the growing list of things I’m to make! Thanks for providing the pattern. Can’t wait to make one for the baby and a matching one for my son!
Ashlee
you are so welcome! and Congrats on the grandbaby!
Heather
Thank you so much for sharing your free pattern with the rest of us! What talent you have to make a pattern with the bobble stitch 🙂 Thanks so much, and happy hooking! ~Heather
Ashlee
you are so welcome! thank you so much for taking the time to leave such a sweet comment!
CindyB
My daughter wants a beard & beanie for my 5 yr. old grandson. Haven’t tried it yet, but excited to make it for him! I haven’t read the many remarks (I’d never get started!) I intend to crochet a button-type thing and attach it inside the beanie and crochet loops on each side of the beard. That way, he can wear it looped around his ears for play or attached inside the beanie for warmth! I hope it works out! Thank you for this very cute pattern!
Ashlee
Good luck and have fun! I hope you enjoy them as much as we do!