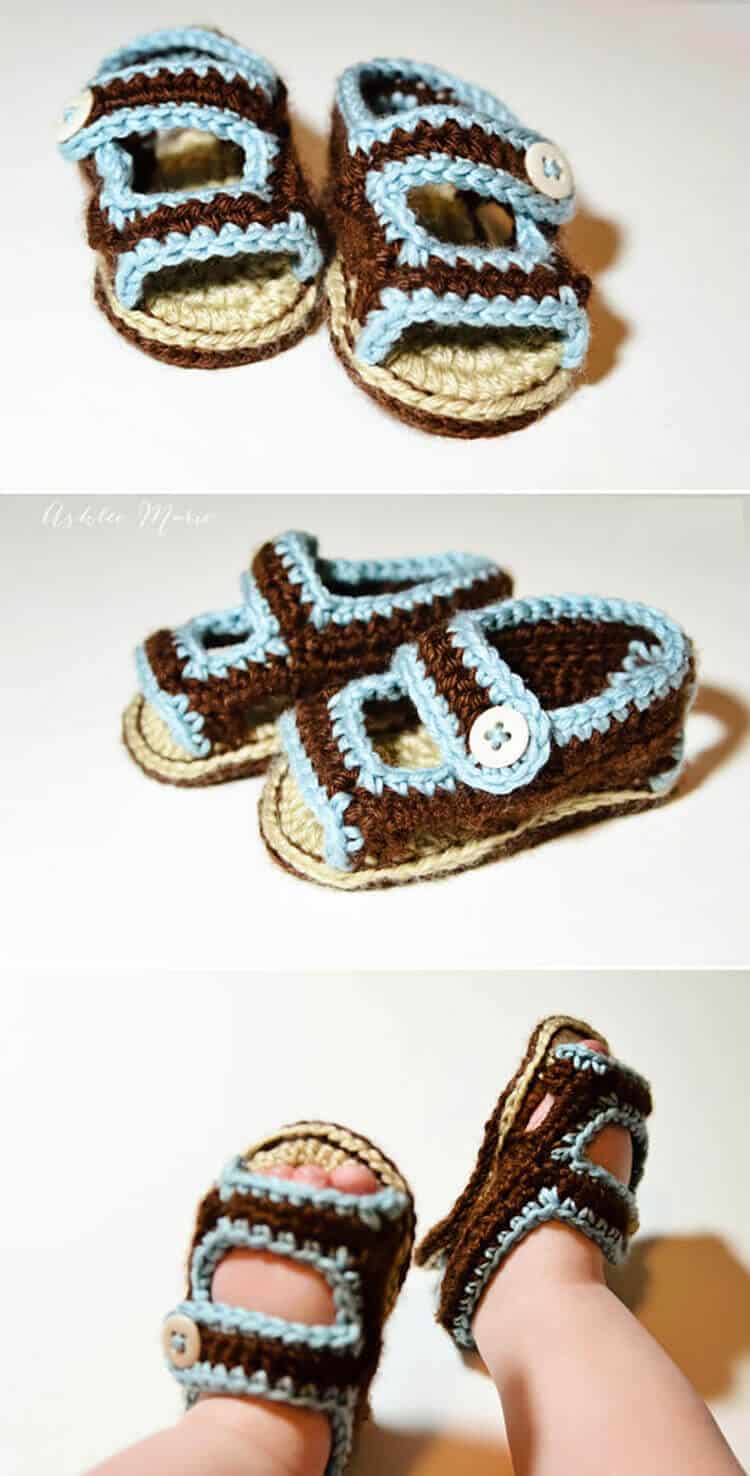
Adorable and easy to make crochet baby sandals pattern. With double soles and contrasting colors they look just like adult sandals.
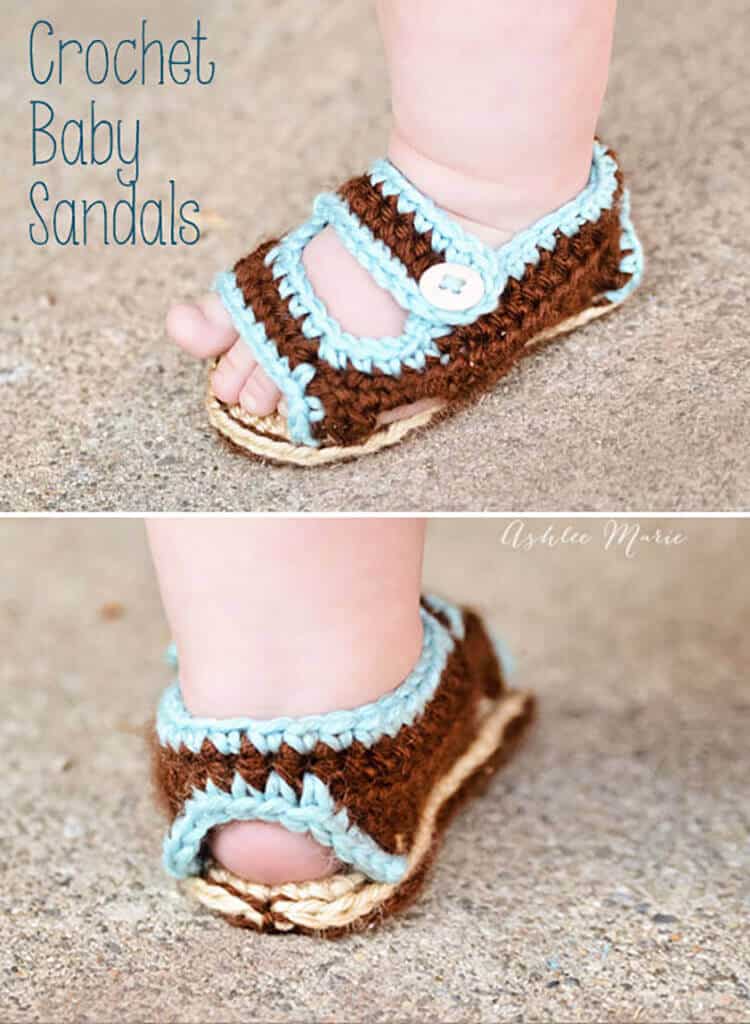
I’m so excited about these crochet baby sandals! I’ve been wanting to make some for awhile, there are lots of cute patterns out there, but they are all so expensive, so I played around and made my own.
I matched them to the ones I BOUGHT the older boys for the summer. loved making these and I’m totally going to make a few different styles as well!
Maybe even another size!?! Any requests? I love these sweet fat ankles and those cute chubby toes! Don’t you wish you had these toes kicking you all night long? I love it.
He’s not a fan… yet, he doesn’t like to stand in them, but I adore them! And I’m sure he’ll get used to them!!! He keeps kicking them off, but they sure are cute! I love the heel as well! I’m just so tickled with how they turned out!
Buy the Ad-Free pattern pdf here!
Baby sandals:
materials:
Lion Brand Baby Soft Yarn in 2 colors
Lion Brand Martha Stewart Extra Soft Wool Blend for trim
small buttons
G6- 4.25 mm hook (To go down a size use a G-4mm, to go down a second size use a f-3.75mm hook)
abbreviation:
ch (chain)
sl st (slip stitch)
sc (single crochet)
hdc (half double crochet)
dc (double crochet)
sc2tog (single crochet 2 together)
sc3tog (single crochet 3 together)
first sole (color you want under their feet/top side:
in the first color
ch 12
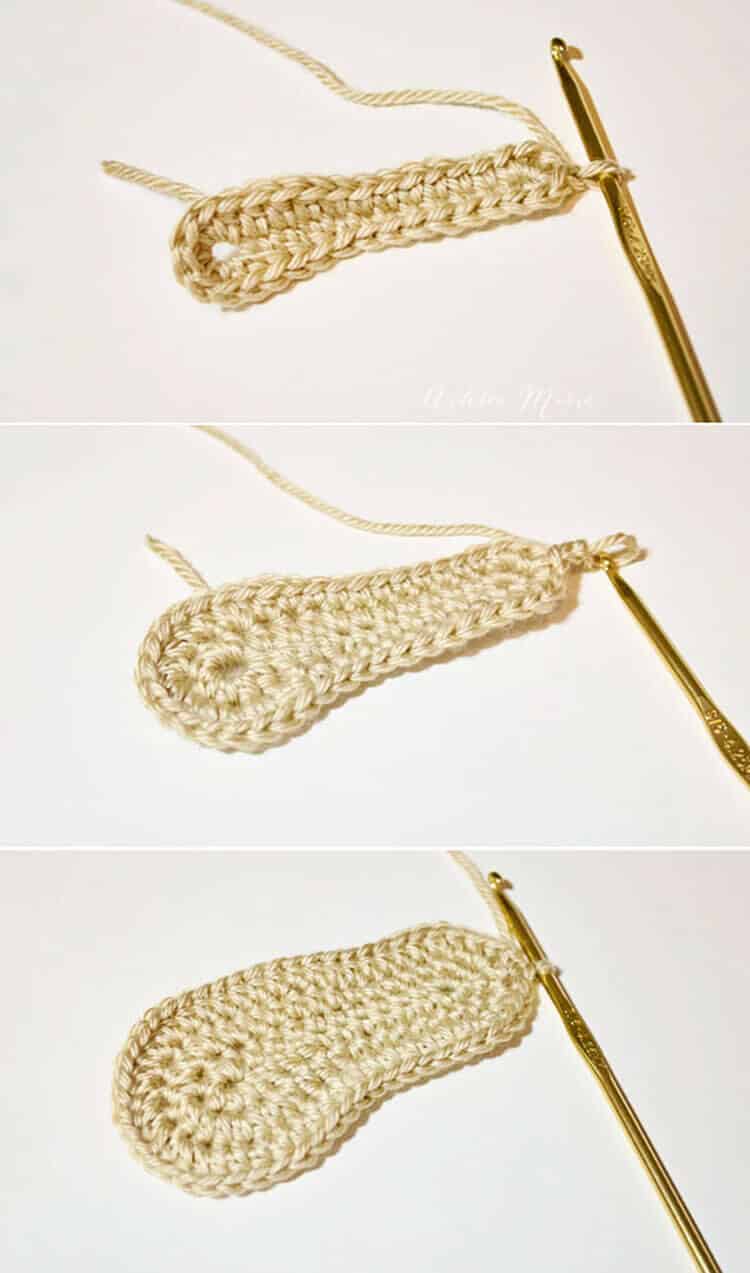
row 1- 3sc in 2nd ch, sc 6 times, hdc 3 times, 7hdc in last ch, finish the rest of the round working along the back of the chain, hdc 3 times, sc 6 times, 2sc in the last/first ch, sl st to the first sc (30)
row 2- ch1, sc in same sc, 2sc, sc 6 times, hdc 4 times, 2hdc 3 times, 3hdc, 2 hdc 3 times, hdc 4 times, sc 6 times, 2sc, sc in SAME stitch as the first sc, sl st to first sc (41)
row 3- ch2, 2hdc in same sc, hdc, 2hdc, hdc 14 times, 2hdc 7 times, hdc 14 times, 2hdc, hdc, 2hdc, sl st to first hdc (52) finish off
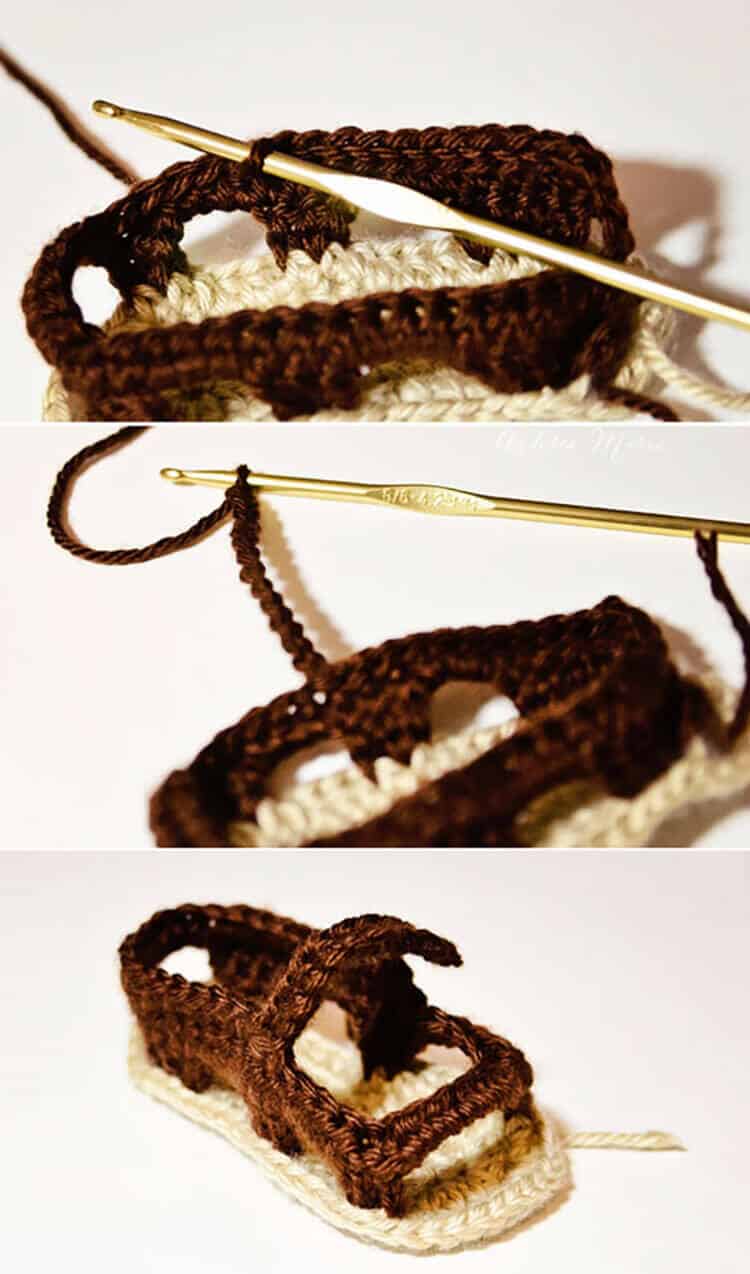
Now the key to getting these to look like sandals (with an edge of the sole sticking out) work in the POSTS rather than the top of the stitches. See where the toothpick is? Pick up 2 stitches in the POST, this will leave that EDGE around the shoes.
shoe:
in a second color
count over 5 stitches and sl st in the POST
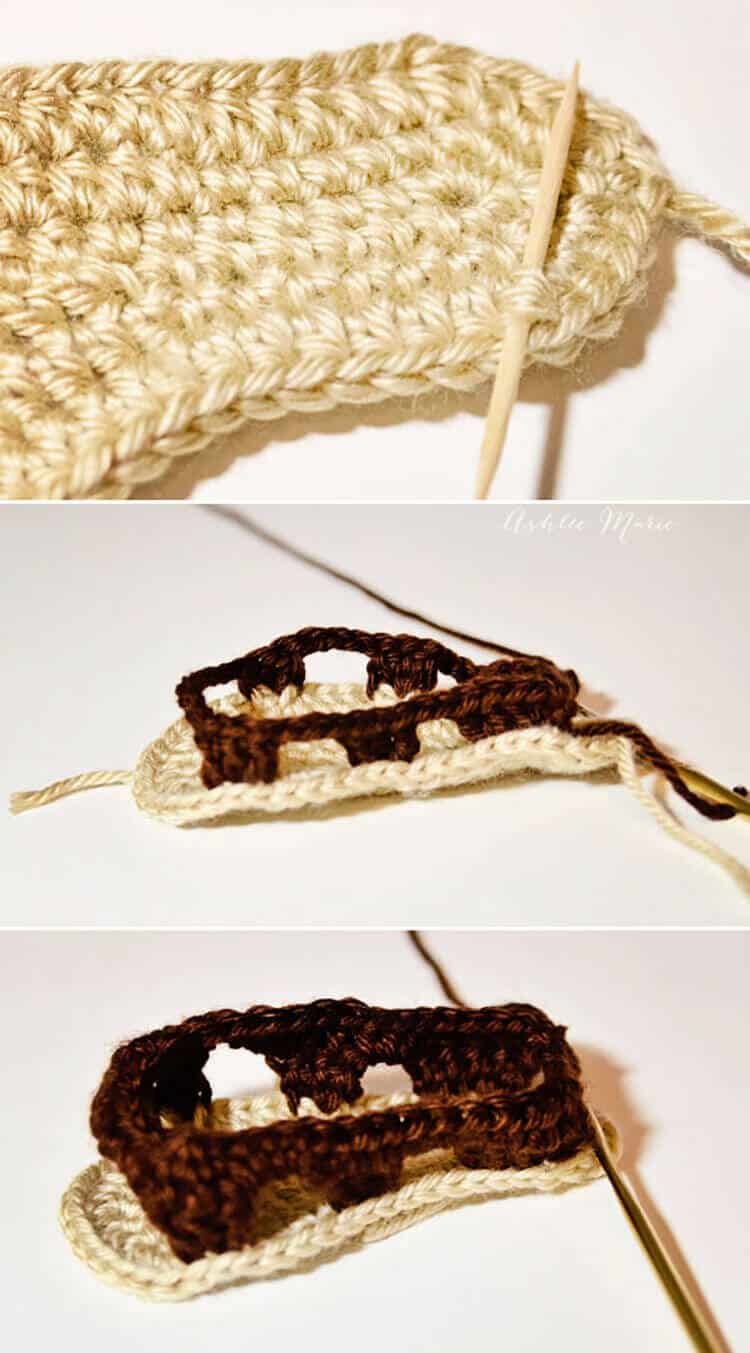
row 1- ch3, 2dc in the same post, dc, 2dc, ch3, skip 5 posts, 2dc in next post, dc, ch3, skip 4 posts, 2dc in next post, dc, ch6, skip 12 posts, dc in next post, 2dc, ch3, skip 4 posts, dc in next post, 2dc, ch3, skip 5 posts, 2dc in next post, dc, 2dc
row 2- ch2, turn, hdc in the next 15 stitches/ch, sc3tog (this includes the last 2 dc on the right side of the shoe AND the first ch across the toes), 4hdc in ch across the toes, sc3tog (this includes the last ch from across the toes and the first 2 dc on the left side of the shoe), hdc in the next 15 stitches (you should be at the end), ch4, sl st in first hdc, finish off
left shoe
(counting from the sl st in row 2) sl st in the 11th stitch on the RIGHT side
ch13
row 3- hdc in 5th ch (creating a button hole), hdc in next 7 ch, sc3tog (this includes the last ch and first 2hdc in from row 2 after the sl st), hdc 20 times (this includes 4 across the ch 4), finish off
right shoe
(counting from the sl st in row 2) sl st in the 15th stitch on the LEFT side (counting the ch4 as 4 stitches)
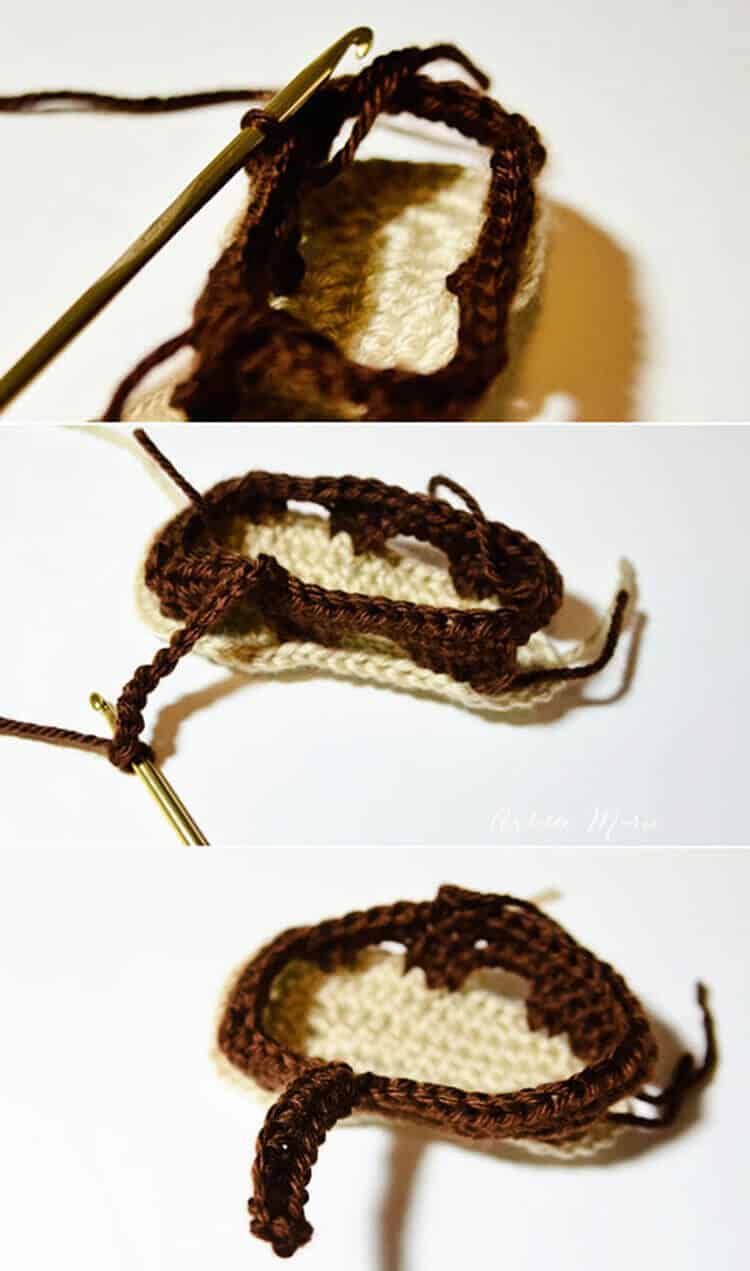
ch13
row 3- hdc in 5th ch (creating a button hole), hdc in next 7 ch, sc3tog (this includes the last ch and first 2hdc in from row 2 after the sl st), hdc 20 times (this includes 4 across the ch 4), finish off
Trim:
in the first color again, or third contrasting color
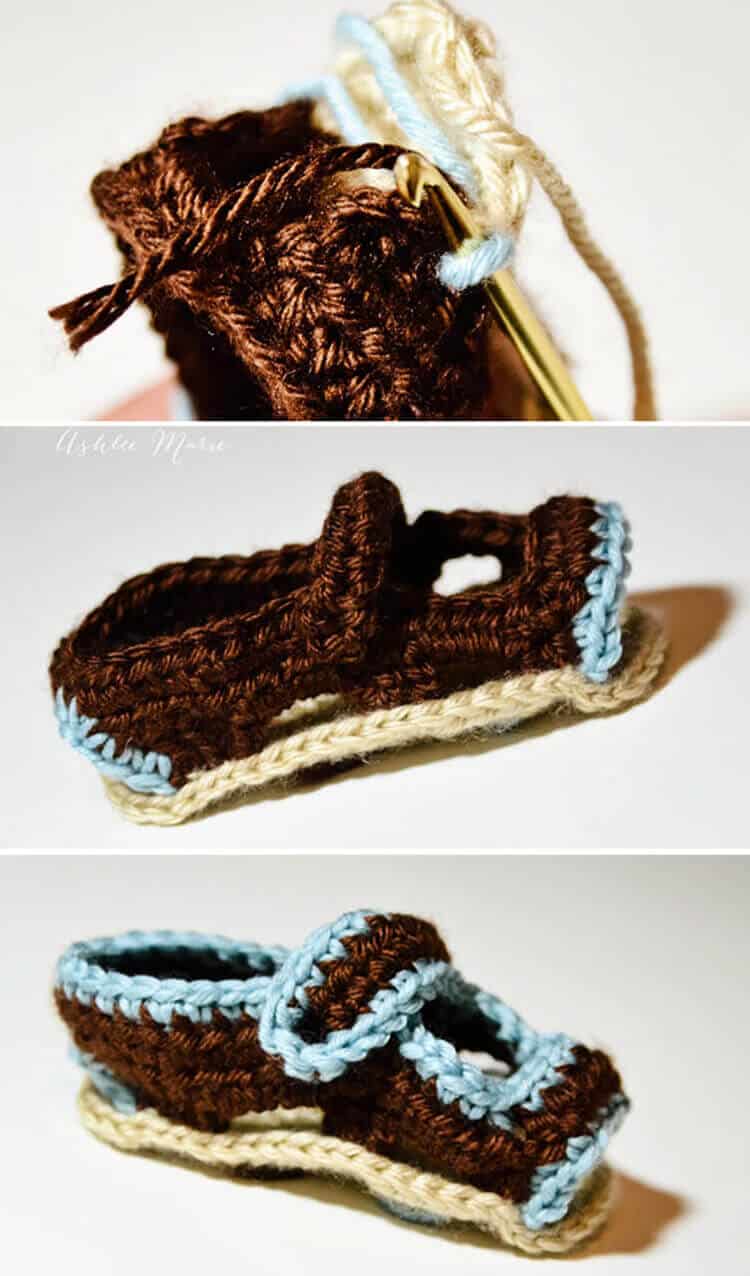
sc across the edge of the toe and along the heel, weave the ends through the sole.
sc around the top of the shoe, using sc2tog in the corners, and 5 sc in the button hold ch, sl st and finish off
pull all the ends through to the bottom of the sole.
second sole:
in the second color again or the contract color
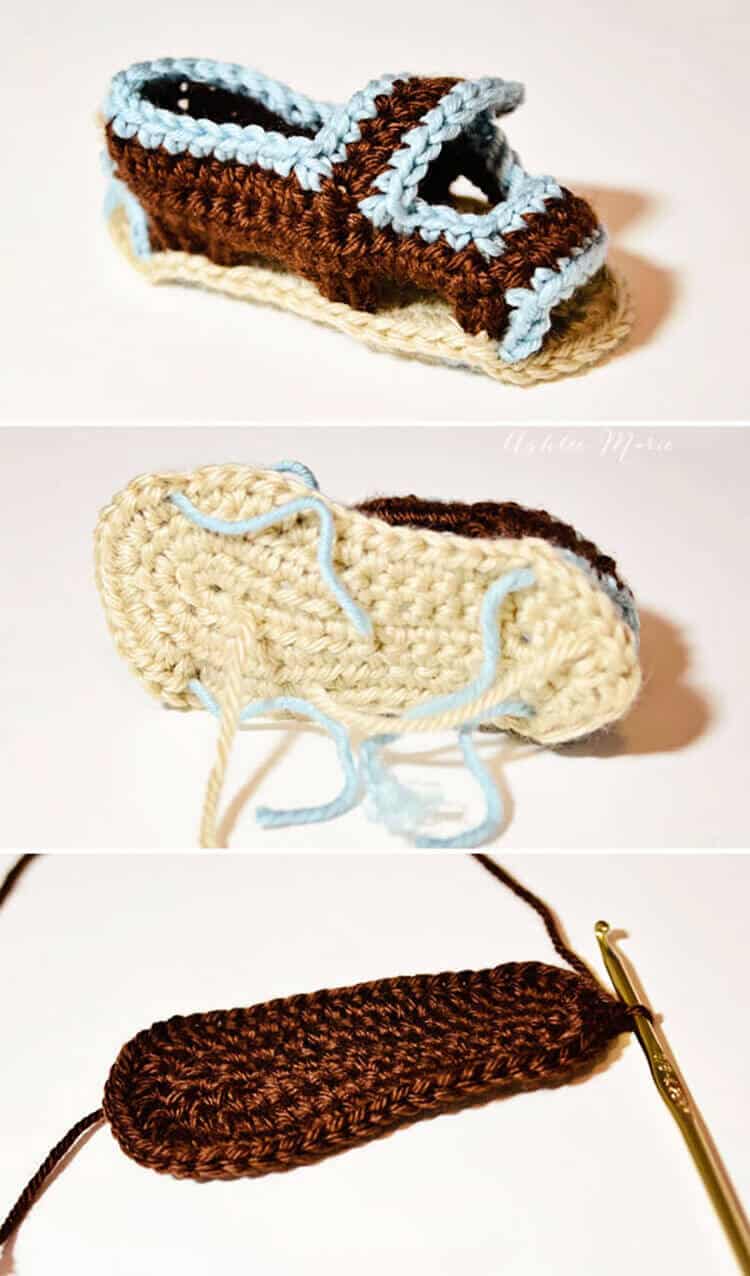
ch 12
row 1- 3sc in 2nd ch, sc 6 times, hdc 3 times, 7hdc in last ch, finish the rest of the round working along the back of the chain, hdc 3 times, sc 6 times, 2sc in the last/first ch, sl st to the first sc (30)
row 2- ch1, sc in same sc, 2sc, sc 6 times, hdc 4 times, 2hdc 3 times, 3hdc, 2 hdc 3 times, hdc 4 times, sc 6 times, 2sc, sc in SAME stitch as the first sc, sl st to first sc (41)
row 3- ch2, 2hdc in same sc, hdc, 2hdc, hdc 14 times, 2hdc 7 times, hdc 14 times, 2hdc, hdc, 2hdc, sl st to first hdc (52)
DON’T FINISH OFF
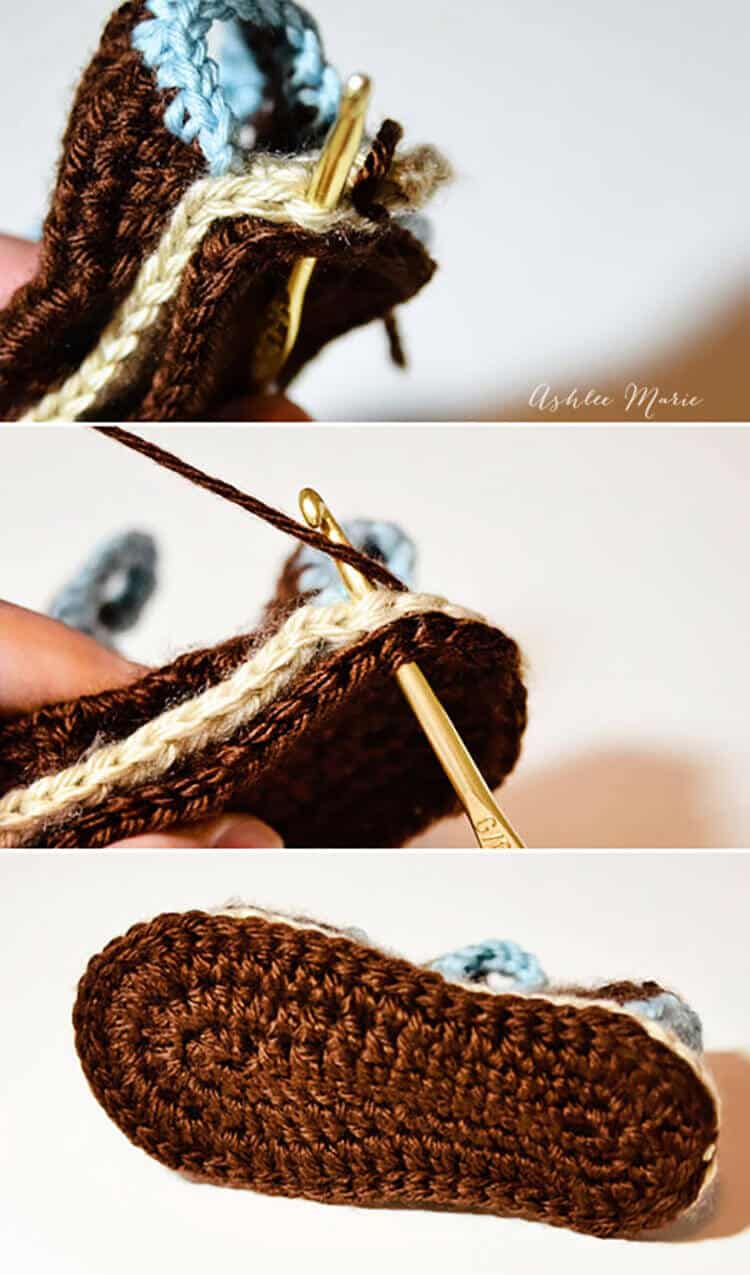
place against the first sole, matching up the 2 soles
sl st the two soles together all the way around,
this will create a thicker stronger sole as well as add a contrast trim around the edge
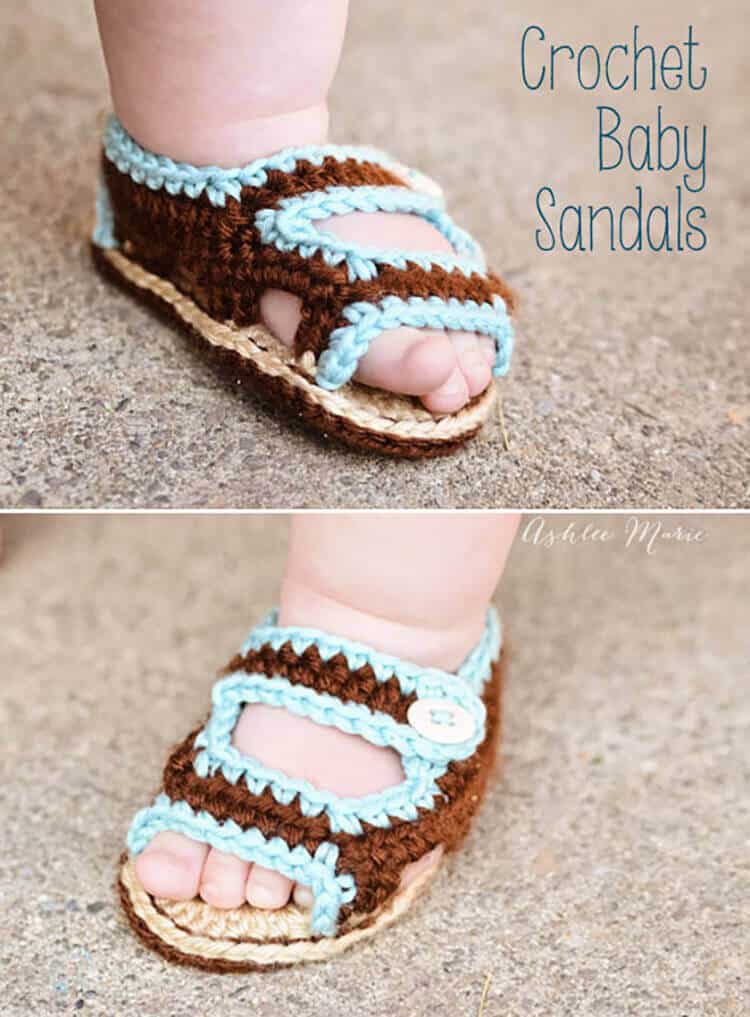
Seriously? Could they be any cuter???? I considered not having the top strap button, but be permanent, but then it’s trickier to get them on, and I love buttons…
Remember my baby is a hobbit and has HUGE, FAT feet, so if these don’t fit your baby there are places to tighten up the pattern, smaller hooks, less chains, etc..


Carin Smilde
Hi! I really love these sandals!! They are soooo beautiful!!! My baby boy is 12 months now, and the sandals are still to big, cant wait till they fit!!! Thanks so much for sharing!!
Ashlee
Crazy how different babies feet are! My baby grew out of them at 10 months! It’s hard to guess on the best size. I hope they fit soon!
leelagovind
i made one pair for my grandson ..thanks a lot for sharing step by step tutorial..i love the pattern..it was .very interesting while doing it..you can see it here in my blog..
http://leelashobbies.blogspot.in/2012/09/crochet-baby-accessories.html
Ashlee
Your so welcome! I’m glad you liked them, they look GREAT! And that paci is too cute!
Simona
I cannot wait to try these, my son has huge fat feet too! The are going to be adorable, the question I have is are they slippery when he walks?
Ashlee
I made these when my little guys was sitting, but not crawling or walking yet. They are mostly just to be cute, I wouldn’t make yarn shoes for him now that he’s walking. But it’s a personal preferance.
Tiffany
I LOVE these sooo much! I wish I knew how to crochet 🙁
Ashlee
Thanks so much! I am so happy with how they turned out! And I taught myself, it’s really fun to learn!
Fran
Adorable sandals!! I am working on a pair now and I’m confused about the left foot/right foot. In the part of the instructions where we are making the strap that goes across the top of the foot, you say to start at the sl st from row 2 and count 11 on the right side. But then that ends up being the left side of the shoe when you turn it so that the toes are up. And the buttonhole is at the end of the chain you make, which means the button would be sewn onto the right side of the shoe. So isn’t that, then, the right shoe???
Ashlee
when I say sl st into the left side I actually mean the left side of the shoe, toes up, normal shoe style.
Zara
Is it worked us or uk sorry I’m a bit confused and new in crochet
Ashlee
well I’m in America so US 😉
Petreana
I really love your work and this pattern is really cute, will be making them this weekend, think i will put small snaps on the back of where the bottons are, so that they will be easy to put on and off
Ashlee
sounds fun! let me know how it goes.
Tiffany Hansen
Hello! I may be speaking too soon sense I haven’t made these sandals yet! I would just like to thank you for this FREE pattern and compliment you on how great of a job you have done! Not only is this sandal adorable, the pattern is super detailed and very organized. You took great pictures and used the best colors of yarn to really show off what you are doing. I can’t wait to give this pattern a try! I hope it is as easy as you make it look! Hope to share pictures of my finished product! Thank you so much!!
Ashlee
you are so welcome! I hope the pattern works up as well as you hope while you make them! Let me know what you think!
Vikki Starr
Ashlee, agree totally with Tiffany. Your pictures were clear AND easy to see what you mean in the instructions. You did such a good job answering the questions one at a time and easy to understand for the beginners. You have a wonderful gift and you give that gift to those of us who are not so gifted. Thank you!
Ashlee
you totally just made my night, thank you so much! It’s wonderful to get such a sweet note amid the questions! I really appreciate you taking the time
Rachel
I made these last night and it only took me a couple of hours. Great pattern instruction. Is there a way to shrink the pattern to create a much smaller size sandal.
Ashlee
I only made this one size, since that’s what size my baby boy was at the time. if you just want to go a tad bit smaller use a smaller hook size, if you want to go even smaller than that leave off a row of the sole, and make up the rest as you go?
Jessica
I’m working on these sandals right now and I’m having a little trouble understanding the part in shoe: row 2 where it goes back across the toe 4hdc in chain, does that mean that I do four half double crochet in each chain across the toe so 16 total or just 4 hdc around the chain?
Ashlee
just across the chain, not worked IN the chains themselves. does that help?
Esther
Oh my god! so lovely! And I love his feet! 🙂
Ashlee
awwww thanks! I love those sweet fat toes myself!
Brenda Rowland
I just loved making these sandals, but they turn out much bigger than I wanted. Have you written the pattern in a smaller pattern. Thank you so much for sharing your gift with me!
Ashlee
no I only made the one size, the size my baby was making at the time. I don’t have plans to make any other size now that he’s walking, sorry.
Lisa
Hi there! Do you remember the length and with of the sole in inches?
Ashlee
4 1/2 inches long and 2 1/4 inches wide, but it depends on how you crochet, tight or loose, and changing hook sizes will change it too. I always tell people to make one sole and see how it measures up against the foot your making it for. better to make changes then than finish the whole shoe and not have it fit right.
Helen K. McMaster
I am seeing these sandals for the first time and they are adorable. I don’t have any little ones to crochet these for; but I may have to make some just to have on hand….never know when I might need a baby gift. Thank you for sharing your pattern
Ashlee
you are so welcome! My baby didn’t love them as much as I did, but they sure looked cute!
Evelia
Hola, en verdad que lindos trabajos y lo mas hermoso que compartes las instrucciones, me ayudarias mucho si los tuvieras en grafico ya que desgraciadamente no en tiendo. Gracias de antemano
Ashlee
I’m sorry, the graphs take a long time to make and I haven’t gotten around to it yet.
ronda
I was wondering where to find the instructions for the sandals with the flowers or the hello kitty ones in you picture?
Ashlee
i have no idea what your asking me? I don’t have sandels with flowers or hello kitty anywhere on my site
Dorothy Villanueva
Ronda on May 13th, 2013, asked for the patttern for the flower and Hello kitty sandels. I too, saw them, They’re on your Facebook site.
Ashlee
can you send me a link to were you saw them? i have no idea what your talking about. i think my sandal was included in a round up of sandal ideas, but I was just one of many pattern makers featured, the others were made by someone else.
Susan Daniels
I made my first shoe and working on the second. I used a button on the first pair and on the second pair I am going to sew on a button,, but underneath I am going to sew on a snap so that it can be easier to get on and off. Thought about Velcro but didn’t use it because it gets caught on the yarn. Thank you so much for this great pattern and I love your other project on your FB page as well. You are a GREAT CRAFTIER.
Ashlee
sounds smart! just be careful when pulling the snaps apart, some are so strong it pulls and stretches the yarn a bit too much! I’m so glad you like the pattern!
Renee M
Thanks so much for the free pattern! These are adorable and I plan to try them this weekend. Thanks so much for sharing!!
Ashlee
you are so welcome! Let me know how it goes!
Marissa
What size are these?
Ashlee
it depends on your crochet style. for me they made a size 4
Jessie Jones
Can I use cotton yarn, the kind you make dish cloths out of? Can I use any softee baby yarn as well?
Ashlee
different yarns will change the size a bit, so just start with the sole and see how the size works for you.