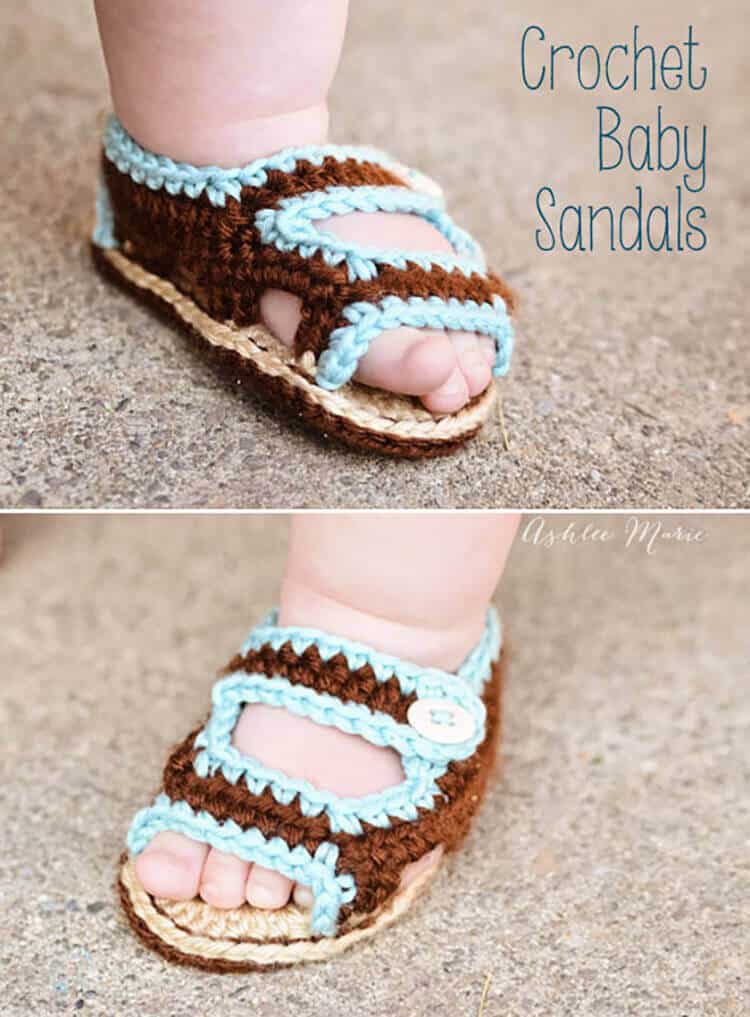
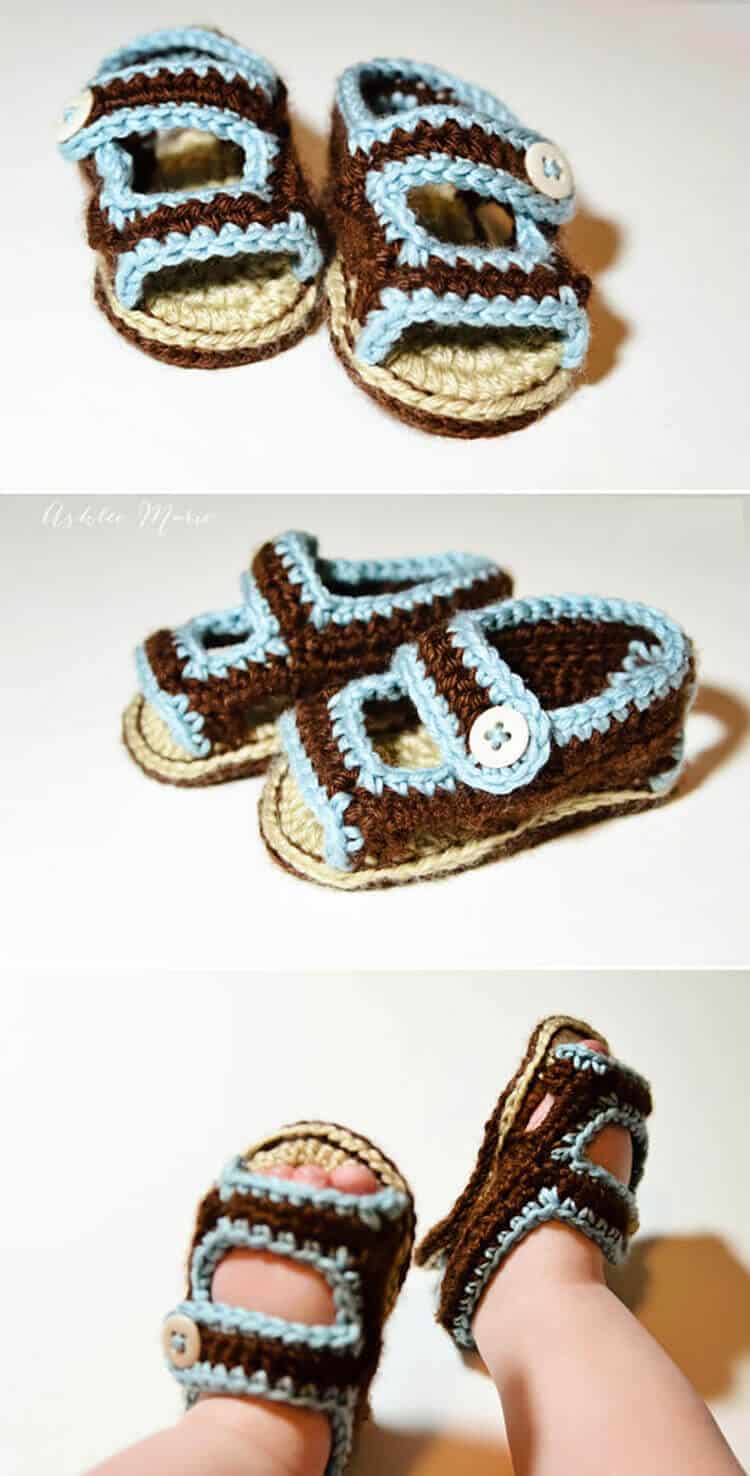
Adorable and easy to make crochet baby sandals pattern. With double soles and contrasting colors they look just like adult sandals.
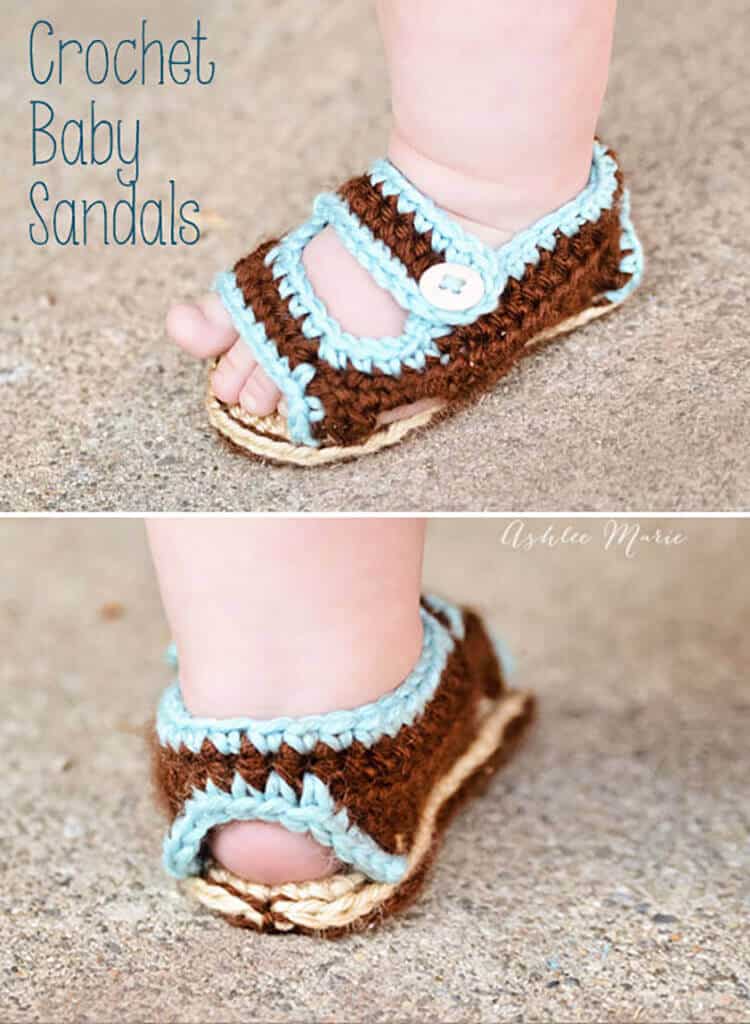
I’m so excited about these crochet baby sandals! I’ve been wanting to make some for awhile, there are lots of cute patterns out there, but they are all so expensive, so I played around and made my own.
I matched them to the ones I BOUGHT the older boys for the summer. loved making these and I’m totally going to make a few different styles as well!
Maybe even another size!?! Any requests? I love these sweet fat ankles and those cute chubby toes! Don’t you wish you had these toes kicking you all night long? I love it.
He’s not a fan… yet, he doesn’t like to stand in them, but I adore them! And I’m sure he’ll get used to them!!! He keeps kicking them off, but they sure are cute! I love the heel as well! I’m just so tickled with how they turned out!
Buy the Ad-Free pattern pdf here!
Baby sandals:
materials:
Lion Brand Baby Soft Yarn in 2 colors
Lion Brand Martha Stewart Extra Soft Wool Blend for trim
small buttons
G6- 4.25 mm hook (To go down a size use a G-4mm, to go down a second size use a f-3.75mm hook)
abbreviation:
ch (chain)
sl st (slip stitch)
sc (single crochet)
hdc (half double crochet)
dc (double crochet)
sc2tog (single crochet 2 together)
sc3tog (single crochet 3 together)
first sole (color you want under their feet/top side:
in the first color
ch 12
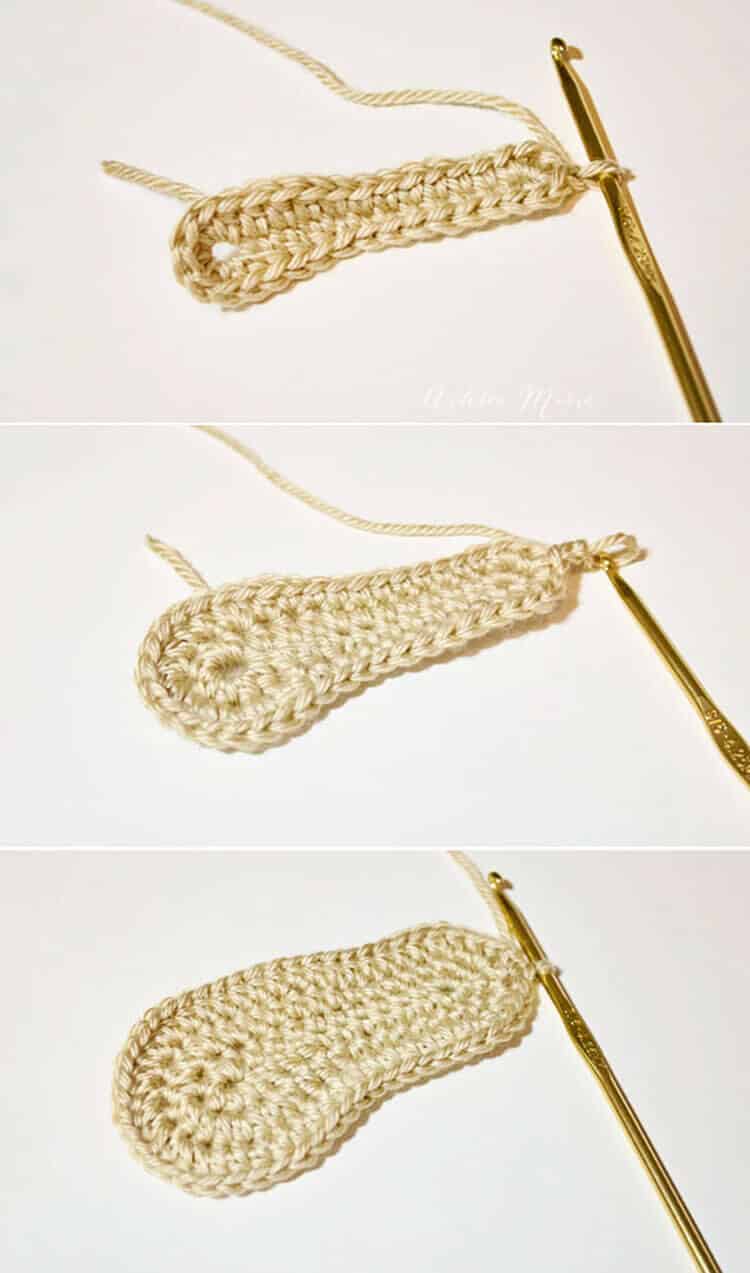
row 1- 3sc in 2nd ch, sc 6 times, hdc 3 times, 7hdc in last ch, finish the rest of the round working along the back of the chain, hdc 3 times, sc 6 times, 2sc in the last/first ch, sl st to the first sc (30)
row 2- ch1, sc in same sc, 2sc, sc 6 times, hdc 4 times, 2hdc 3 times, 3hdc, 2 hdc 3 times, hdc 4 times, sc 6 times, 2sc, sc in SAME stitch as the first sc, sl st to first sc (41)
row 3- ch2, 2hdc in same sc, hdc, 2hdc, hdc 14 times, 2hdc 7 times, hdc 14 times, 2hdc, hdc, 2hdc, sl st to first hdc (52) finish off
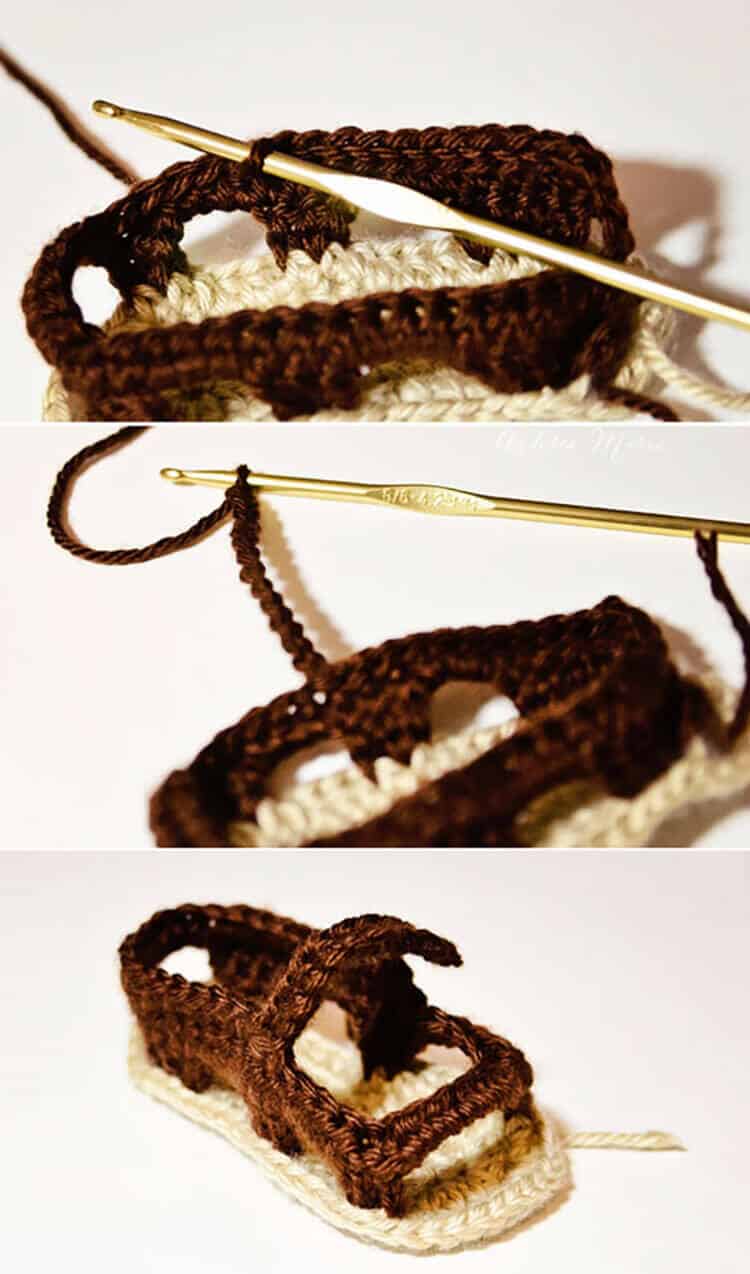
Now the key to getting these to look like sandals (with an edge of the sole sticking out) work in the POSTS rather than the top of the stitches. See where the toothpick is? Pick up 2 stitches in the POST, this will leave that EDGE around the shoes.
shoe:
in a second color
count over 5 stitches and sl st in the POST
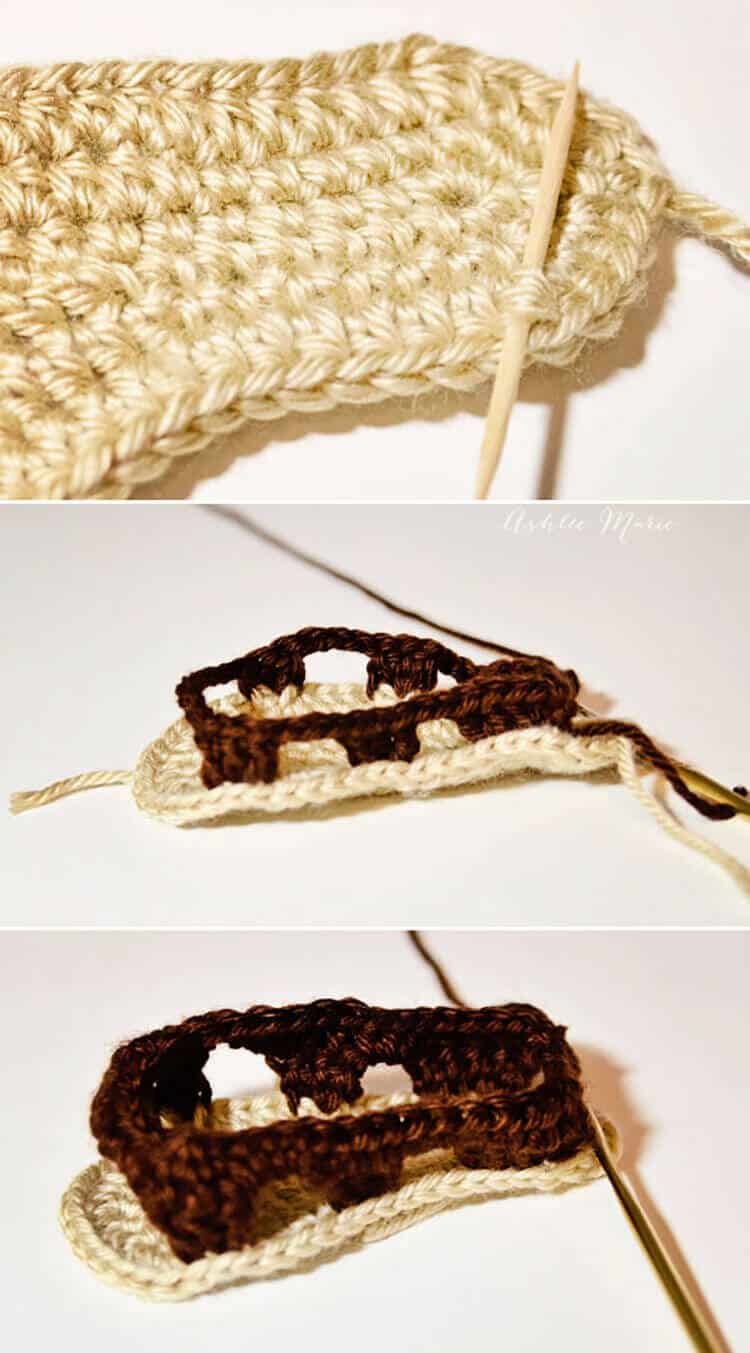
row 1- ch3, 2dc in the same post, dc, 2dc, ch3, skip 5 posts, 2dc in next post, dc, ch3, skip 4 posts, 2dc in next post, dc, ch6, skip 12 posts, dc in next post, 2dc, ch3, skip 4 posts, dc in next post, 2dc, ch3, skip 5 posts, 2dc in next post, dc, 2dc
row 2- ch2, turn, hdc in the next 15 stitches/ch, sc3tog (this includes the last 2 dc on the right side of the shoe AND the first ch across the toes), 4hdc in ch across the toes, sc3tog (this includes the last ch from across the toes and the first 2 dc on the left side of the shoe), hdc in the next 15 stitches (you should be at the end), ch4, sl st in first hdc, finish off
left shoe
(counting from the sl st in row 2) sl st in the 11th stitch on the RIGHT side
ch13
row 3- hdc in 5th ch (creating a button hole), hdc in next 7 ch, sc3tog (this includes the last ch and first 2hdc in from row 2 after the sl st), hdc 20 times (this includes 4 across the ch 4), finish off
right shoe
(counting from the sl st in row 2) sl st in the 15th stitch on the LEFT side (counting the ch4 as 4 stitches)
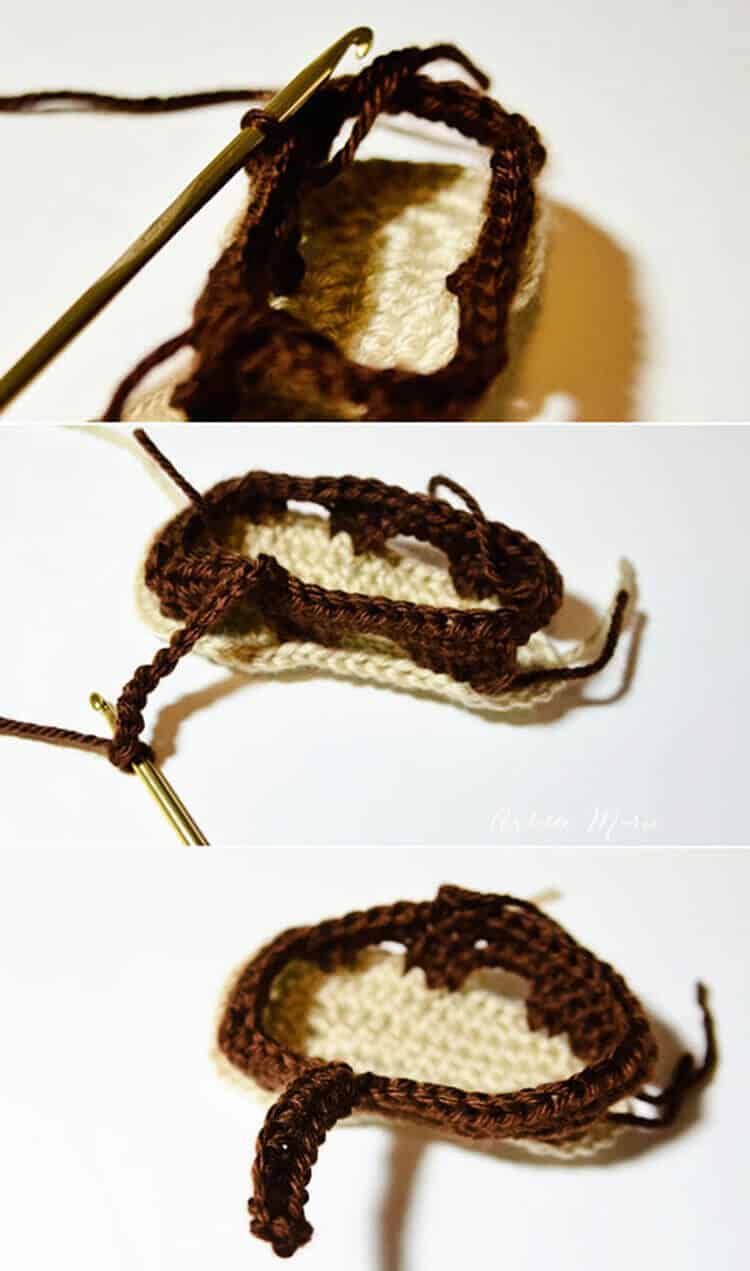
ch13
row 3- hdc in 5th ch (creating a button hole), hdc in next 7 ch, sc3tog (this includes the last ch and first 2hdc in from row 2 after the sl st), hdc 20 times (this includes 4 across the ch 4), finish off
Trim:
in the first color again, or third contrasting color
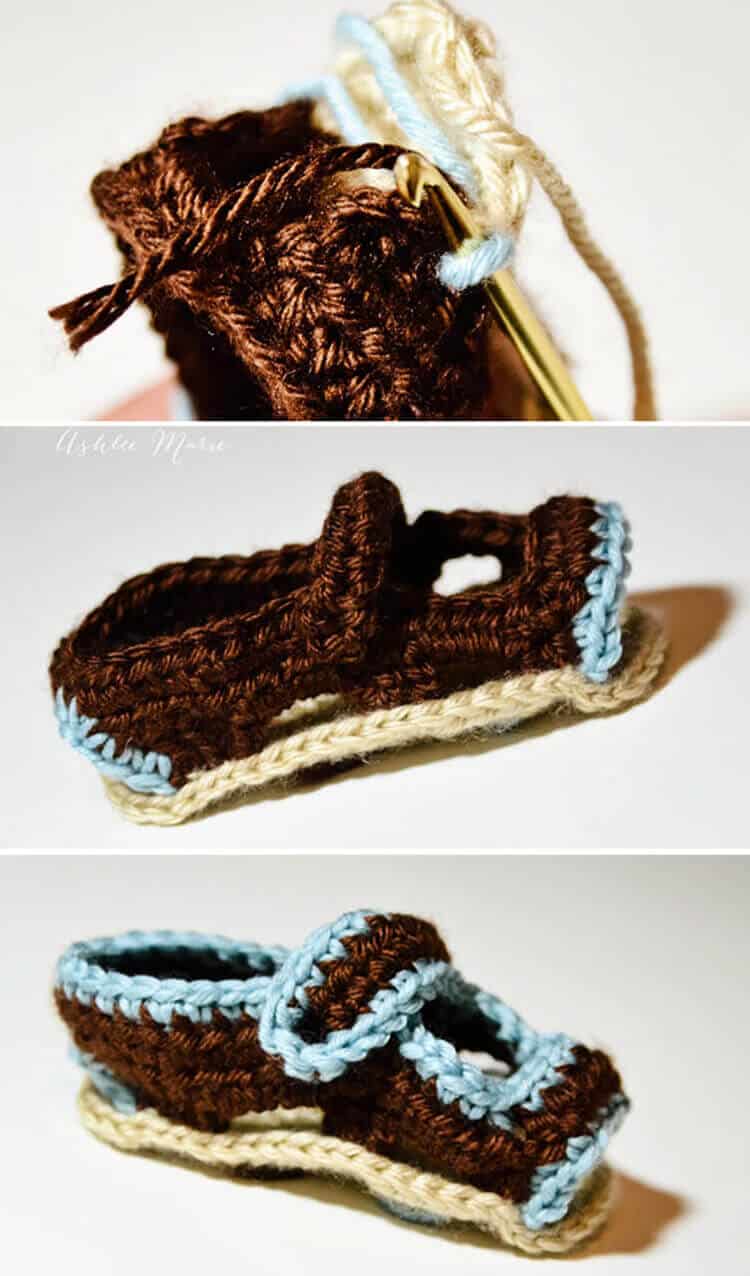
sc across the edge of the toe and along the heel, weave the ends through the sole.
sc around the top of the shoe, using sc2tog in the corners, and 5 sc in the button hold ch, sl st and finish off
pull all the ends through to the bottom of the sole.
second sole:
in the second color again or the contract color
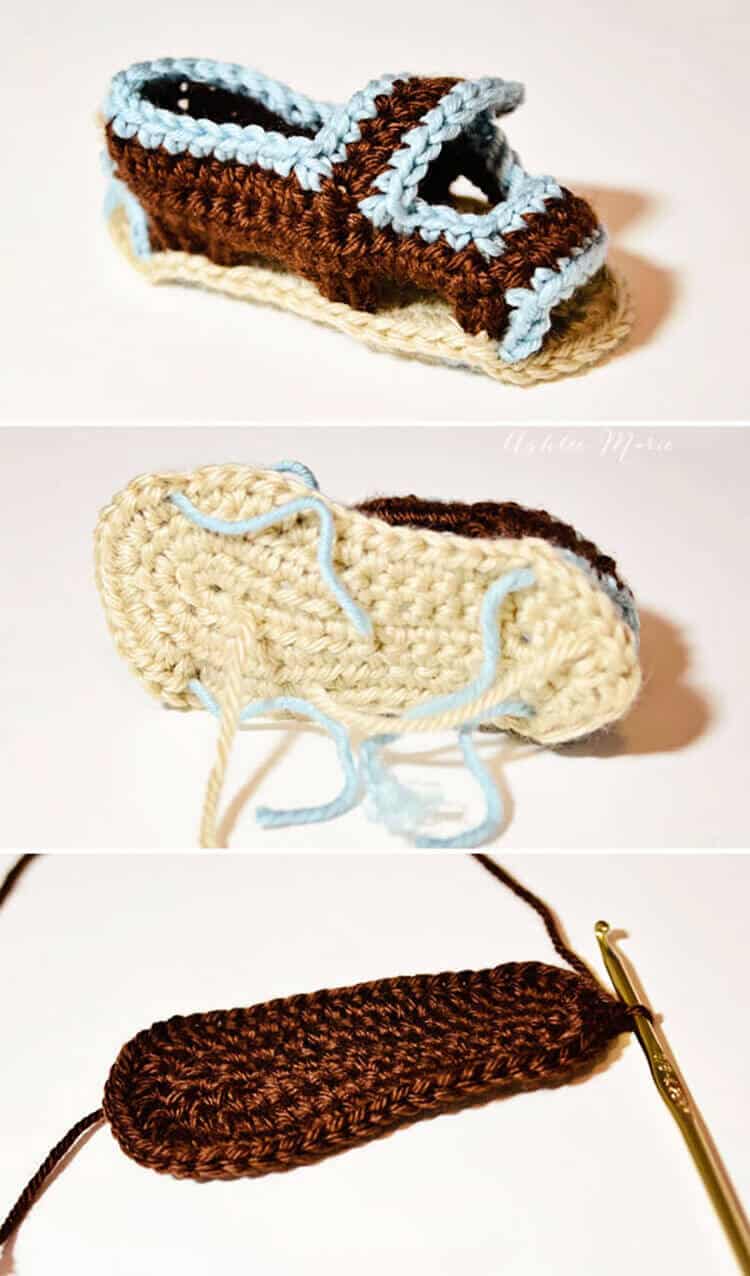
ch 12
row 1- 3sc in 2nd ch, sc 6 times, hdc 3 times, 7hdc in last ch, finish the rest of the round working along the back of the chain, hdc 3 times, sc 6 times, 2sc in the last/first ch, sl st to the first sc (30)
row 2- ch1, sc in same sc, 2sc, sc 6 times, hdc 4 times, 2hdc 3 times, 3hdc, 2 hdc 3 times, hdc 4 times, sc 6 times, 2sc, sc in SAME stitch as the first sc, sl st to first sc (41)
row 3- ch2, 2hdc in same sc, hdc, 2hdc, hdc 14 times, 2hdc 7 times, hdc 14 times, 2hdc, hdc, 2hdc, sl st to first hdc (52)
DON’T FINISH OFF
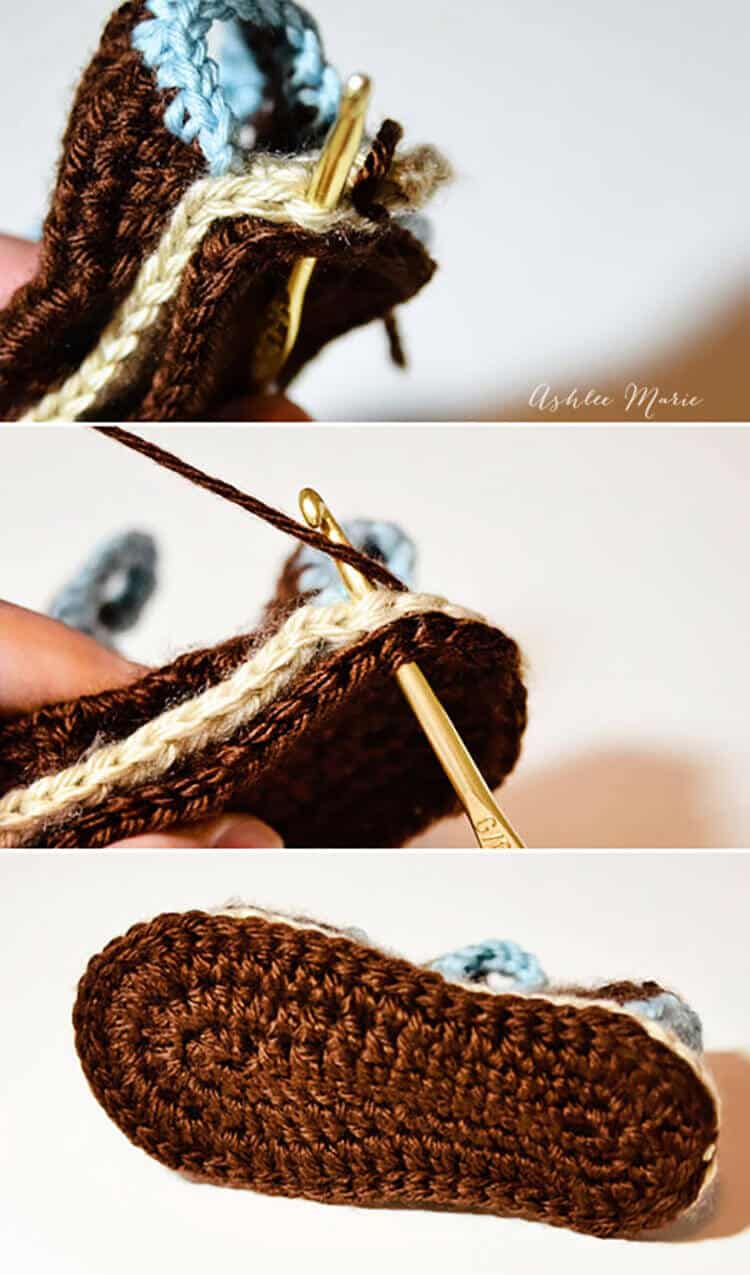
place against the first sole, matching up the 2 soles
sl st the two soles together all the way around,
this will create a thicker stronger sole as well as add a contrast trim around the edge
Seriously? Could they be any cuter???? I considered not having the top strap button, but be permanent, but then it’s trickier to get them on, and I love buttons…
Remember my baby is a hobbit and has HUGE, FAT feet, so if these don’t fit your baby there are places to tighten up the pattern, smaller hooks, less chains, etc..


Irina
This sandals are very beautiful, and your blog is amazing, congratulation!!!
thanks for the tutorial, I try it!!
https://queliodehilo.com/
Ashlee
your so welcome! I’m glad you like my crochet sandals!
leelagovind
love it so much ..big thanks for sharing the tutorial..following your blog..
Ashlee
your welcome!!! I’m glad you like my tutorial and I hope you make it and enjoy it!
Valentina
simplemente adorables y las posibilidades de variar el modelo infinitas!!!…gracias por compartir ; )
estoy muy segura que lo usare en un próximo proyecto personal…MUY PERSONAL!!!
Ashlee
Thank you so much! let me know if you end up making them! I hope you like them as much as I do!
Chris
Those are so adorable! Thank you so much for sharing!
Ashlee
Thank you! I still love them, I just wish he’d quite taking them off!
Sharon
Hi Ashlee,
This is truly one of the cutest sandals I’ve seen. I love that it is so versatile. It will work for boy or girl. I have one question regarding the shoe part of the pattern. Do I need to do a few chains to connect the beginning and ending part of the heel? Is there something else after “2dc in next post, dc, 2dc” that I miss? Thank you for your help!
Ashlee
not in that row, it’s just one direction, with an open heel, then the NEXT row you’ll close it up, this way the back strap is higher up on the back of the heel! Sorry for the late response, I JUST got my new computer and am finally able to catch up (using my computer instead of my phone!!!)!
Mandy |Small Fine Print|
SOOOOOOOOOOOOOOOOOOo adorable!!!!!
Ashlee
Thank you so much!!!! Have to show off these cute toes somehow, right?
blissfulsewing
I would love to try something like this for my niece who is just 6 months old.
http://www.blissfulsewing.blogspot.com
Ashlee
they would be so cute in pink!!!
Sarah
I do not have a store but I want to be clear on your terms for your AMAZING patterns. (I tried searching for any of your previous input.) Do you allow people to sell what they’ve created using your free patterns? I know on this thread you mentioned people do but I’d love clarity on the topic from the creator! 🙂
Ashlee
I do allow it, and I TOTALLY appreciate being asked. My request is that anyone who sells things from my pattern links to my pattern so those that want to make their own can. the people who don’t want to make their own, and want to buy them will either way! but either way of course you can sell what you make from my pattern! If I wanted to have a store I wouldn’t share it for free!!!
Peg Apgar
these are so cute, would you happen to have a pattern for Baby flipflops?
Ashlee
I don’t! I personally can’t stand flip flops so I haven’t thought about it, but with a couple request I’ll add it to The List (it’s a big list…)
Alison
Hi!
LOVE your pattern! I have an 11 month old baby with huge fat feet. Regular shoes don’t fit b/c her foot is just too thick so I have decided to make some. My question is whether or not the soles will be really slippery. She is on the verge of walking and my fear is that she will slip if I use such soft yarn. Have you found this to be an issue at all? I was thinking of just using a courser (sp?) yarn for the bottom layer of the sole, but I’m not even sure that would work. Any suggestions?
Thanks!!!
Alison
Ashlee
probably, I wouldn’t use crochet or knit booties on slippery floors, only on carpet. they really are cute over functionality in my opinion. I don’t think a course yarn would be any better. you could do a crochet sole and then a felt sole that you sew together with a needle, and then add puffy paint to the bottom to create a rubber sock effect maybe???
Donna
You could buy the paint on stuff they use to make rugs non slip. You can get it at Michaels by the hooked rug kits or go for the cheaper option of Puggy paint.
Ashlee
yup, that would totally work.
Amy
I made a pair of these just because I Loved the pattern but dont have any little ones to give them too. Are you still interested in a pair? I made them in brown and ecru with ecru trim instead of blue. If you are, you can send me an email to chl4a@aol.com.
Lisa Hayes
I made my grandson a couple of pairs of booties that he didn’t particularly like, but kept them on for a bit, and now I wonder if instead of using wool yarn for the sole, if it might be a good idea to use something more sturdy and then put a piece of felt on the foot side so it wouldn’t be quite so sticky on the bottom of his feet. I know that would make it a bit more time consuming, but it seems that the sturdier they are, the better the little guys would like them, and their brothers might be jealous of their new shoes, too.l
Ashlee
you are welcome to try anything you want! my little guy doesn’t like shoes no matter what, so I haven’t even gotten to the sticky sweaty side. I use baby soft yarn, so it’s super soft! and he pretty much only wears them inside, as they never last very long! I think crochet shoes are more for looks than function!
Elisa
Gladiator sandals is what I was thinking too. Like something with a few straps across the top of the foot and a couple of ankle straps. But I know I will love anything you come up with. Thanks so much for your patterns, love them! I am working on these right now. I modified it a bit by making the strap more of an ankle strap to hopefully stop my little one from kicking them off lol. I will post them on ravelry when I’m done! Thanks again! making your wrap around boots next. Hoping to start some fall shoes now so I’ not making them last minute like I have been for summer haha.
Ashlee
I’ve been meaning to make a few more versions, but summer is kind of kicking my butt, I love having the kids home, but with all electronics breaking and some last min cake orders I’m WAY behind… Still planning on it, but we’ll see when I get around to it!
Alindamay
i love all of your creation.. it’s great…and easy to follow.
Ashlee
why thank you so much! your so sweet!
Mandy |Small Fine Print|
How do you get it sized so perfectly? Your post made me go out and have a lady custom make one for my little girl and although she took the measurements of her feet, they came out HUGE i couldn’t believe i was so disappointed. I guess she wasn’t as experienced as she had claimed…
Ashlee
I start with the sole, then measure it against baby boys foot, if something isn’t right I adjust! once the sole is right I move on, during the first row you can measure the ch across to get it right, then in row 2 make sure the heel ch’s as well! It’s hard to do without the baby there to try it on! Tracing the babies feet would get the sole right, but the rest is trial and error, I take crochet things apart ALL the time as I create until I get it just right! I’m sorry you’r disappointed! Any chance they’ll fit soon?
helen
OMG! you are sharing this for free! so kind of you. thanks a bunch!
Ashlee
you are SUPER welcome! Thanks for taking the time to leave a sweet comment! I often only get questions and frustration from my patterns, so I really love that you took the time to reply!
Shraddha
Do the symmetrical soles work? I feel like it would look odd…
Ashlee
this is what works for me, I’m just sharing what I created for my own baby, and wanted to share for people who wanted to try it. but if it doesn’t work for you feel free to modify it, or create your own! It’s what works for me, but when I follow patterns and they aren’t working quite right for me I just alter them. Feel free to alter this pattern in any way you want! It’s all in good fun (it’s why I don’t sell it, I don’t want to be responsible for charging someone and it not working for their crochet style!)
Janice
Wow, just wanted to send a quick note to say that I’m thrilled to have found this little corner of the web!! You are so generous with your time to have created these sweet sandals and then also take the time to teach us. Thanks so much.
Janice
Ashlee
I’m so glad you found me! I have a lot of fun with it, although it’s been really slow around here this summer!
Ramya
Thanks for sharing, these are so so cute…perfect for the weather where we are!
We’re expecting our second baby boy….so this will be my next project while he’s getting ready to say hello to the world. 🙂
I’d like to try them out in cotton yarn though, ’cause it’s so hot here…any suggestions for the best hook size (in mm) to acheive a similar size/gauge?
Thanks again
Ashlee
I’d use the same hook size, cotton yarn is still a medium gauge yarn and it should be the same!
Lisa Kelley
I was wondering the same thing … My grandson is 13 mths and has been walking for about 3 months now and has taken to running to keep up with his older siblings … I wanted to make him some for the beach and thought of adding some strips of the rubber gripping (like you use to keep rugs from sliding) to the bottom and have recently read somewhere that the puffy paint or even just strips of hot glue provide a gripping surface … I was wondering though what size the pattern is written for … he’s in a size 4 shoe now but rapidly growing out of all his shoes
Ashlee
you can adjust the size easily. make one sole and decide what adjustments you need to make. Mine is a size 4, but everyone’s gauge is different so personalizing it if you can is best. You can add or take away length if you need to. Then for the chain across the toes and around the back of the heels you can add or take away to get the right size. you won’t need gripe on the sand, and inside I wouldn’t bother with shoes… but you could try anything you want to add a grip.