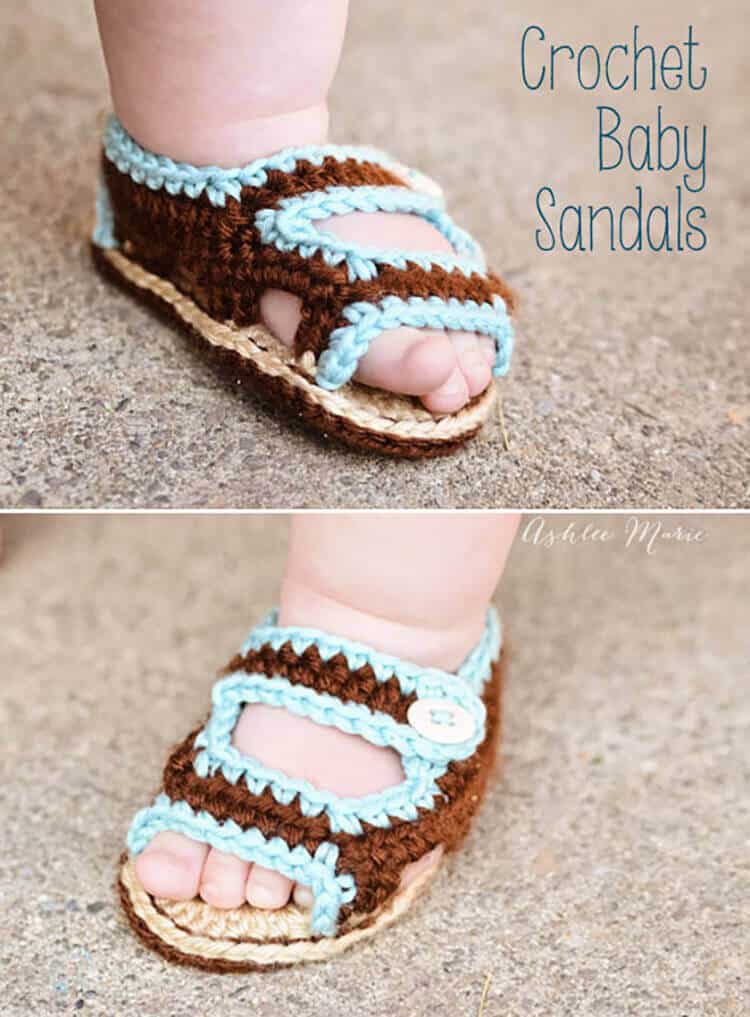
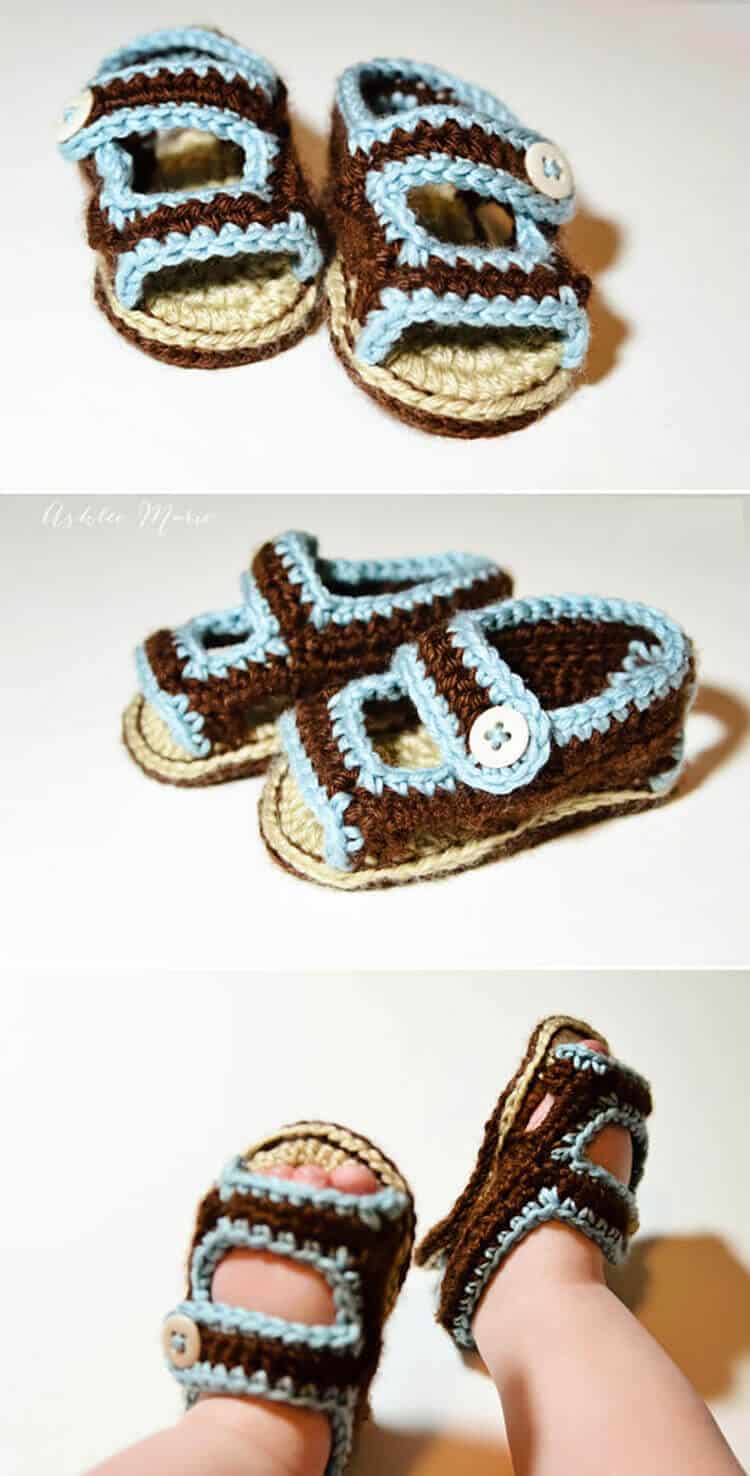
Adorable and easy to make crochet baby sandals pattern. With double soles and contrasting colors they look just like adult sandals.
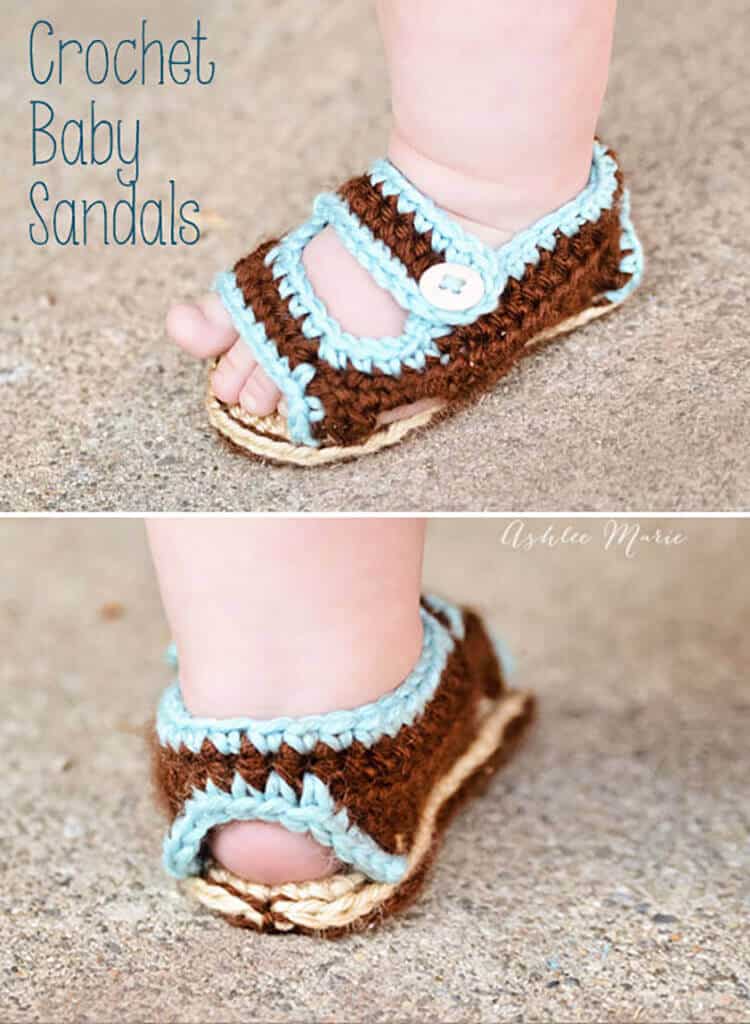
I’m so excited about these crochet baby sandals! I’ve been wanting to make some for awhile, there are lots of cute patterns out there, but they are all so expensive, so I played around and made my own.
I matched them to the ones I BOUGHT the older boys for the summer. loved making these and I’m totally going to make a few different styles as well!
Maybe even another size!?! Any requests? I love these sweet fat ankles and those cute chubby toes! Don’t you wish you had these toes kicking you all night long? I love it.
He’s not a fan… yet, he doesn’t like to stand in them, but I adore them! And I’m sure he’ll get used to them!!! He keeps kicking them off, but they sure are cute! I love the heel as well! I’m just so tickled with how they turned out!
Buy the Ad-Free pattern pdf here!
Baby sandals:
materials:
Lion Brand Baby Soft Yarn in 2 colors
Lion Brand Martha Stewart Extra Soft Wool Blend for trim
small buttons
G6- 4.25 mm hook (To go down a size use a G-4mm, to go down a second size use a f-3.75mm hook)
abbreviation:
ch (chain)
sl st (slip stitch)
sc (single crochet)
hdc (half double crochet)
dc (double crochet)
sc2tog (single crochet 2 together)
sc3tog (single crochet 3 together)
first sole (color you want under their feet/top side:
in the first color
ch 12
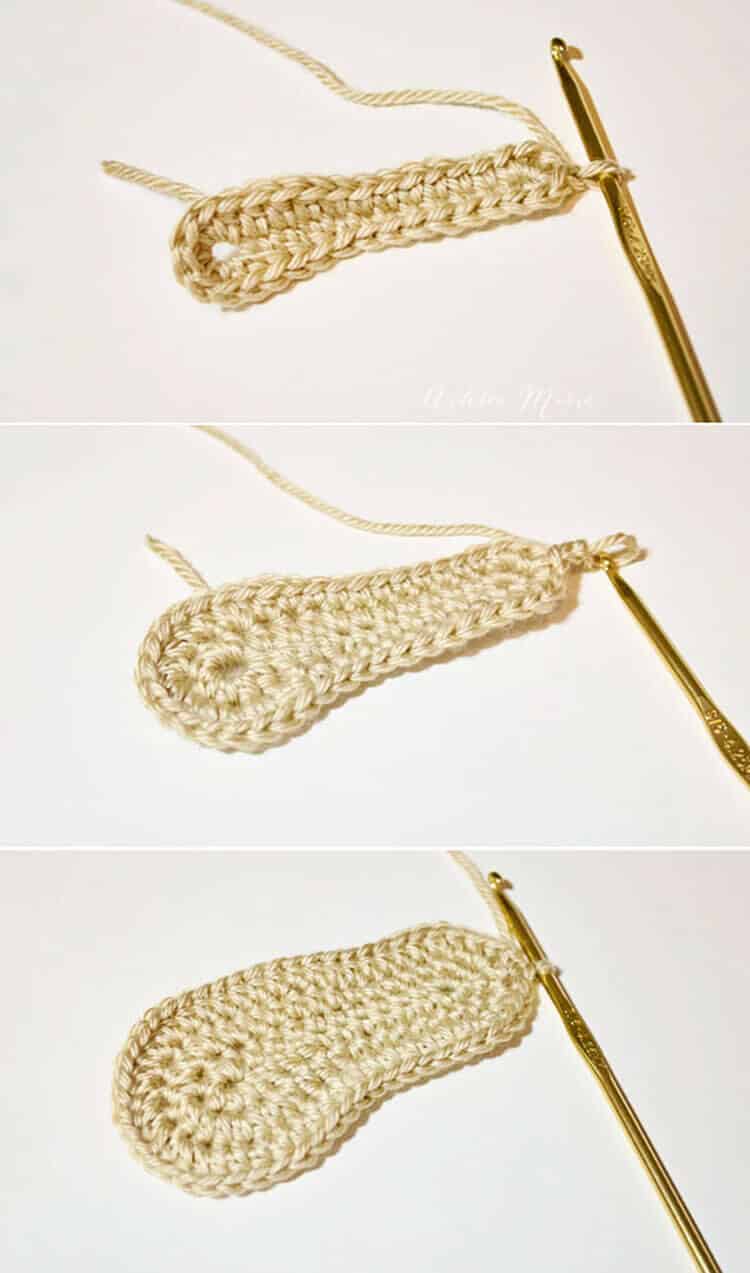
row 1- 3sc in 2nd ch, sc 6 times, hdc 3 times, 7hdc in last ch, finish the rest of the round working along the back of the chain, hdc 3 times, sc 6 times, 2sc in the last/first ch, sl st to the first sc (30)
row 2- ch1, sc in same sc, 2sc, sc 6 times, hdc 4 times, 2hdc 3 times, 3hdc, 2 hdc 3 times, hdc 4 times, sc 6 times, 2sc, sc in SAME stitch as the first sc, sl st to first sc (41)
row 3- ch2, 2hdc in same sc, hdc, 2hdc, hdc 14 times, 2hdc 7 times, hdc 14 times, 2hdc, hdc, 2hdc, sl st to first hdc (52) finish off
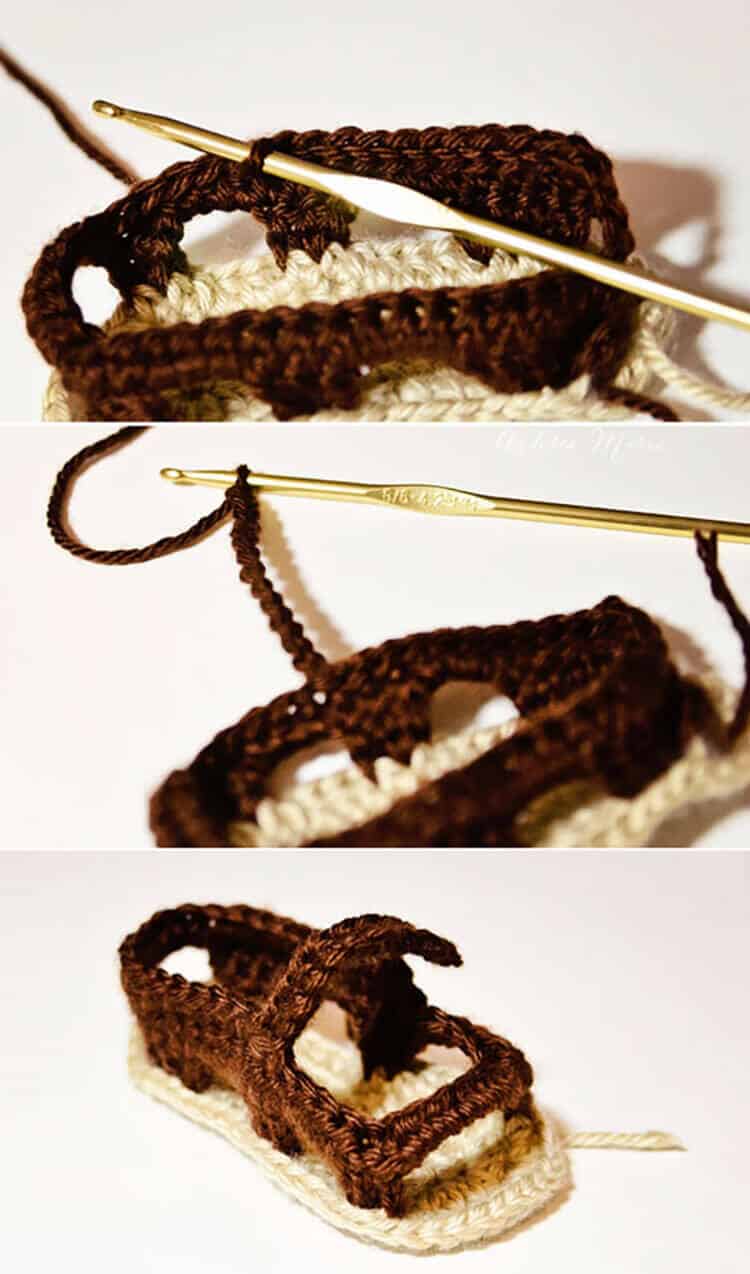
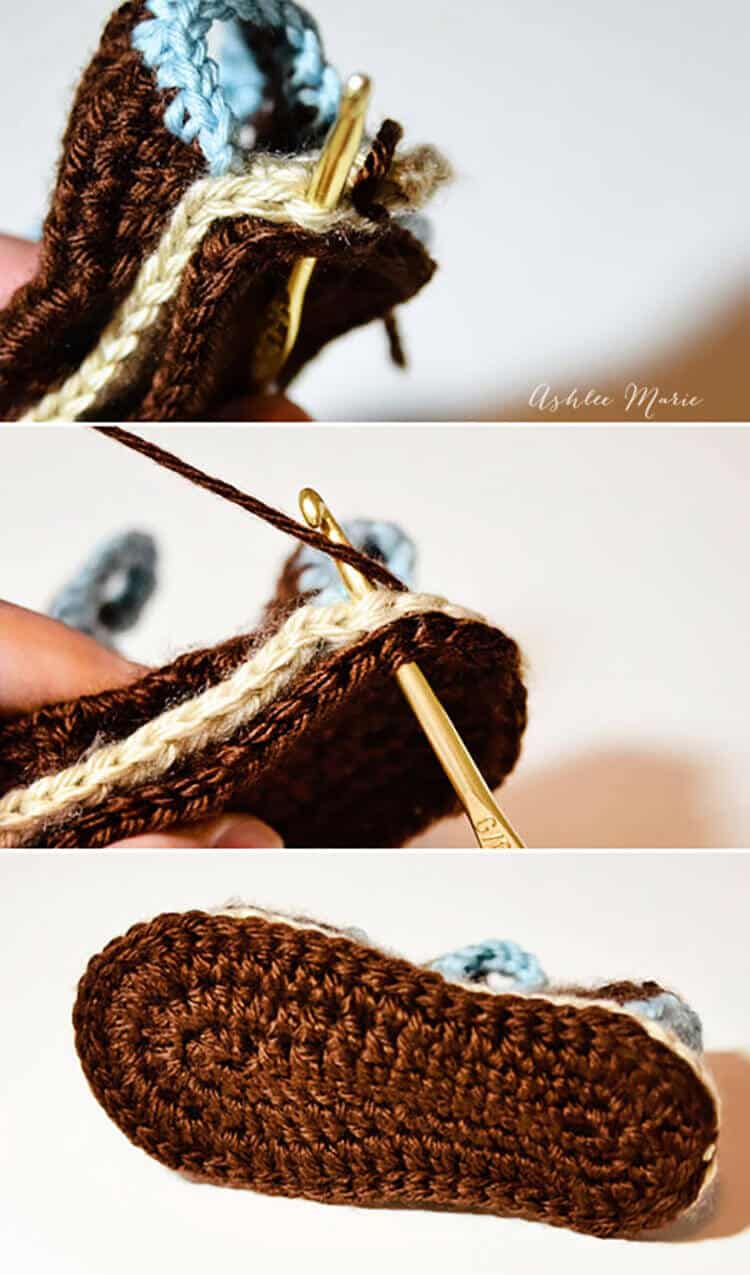
Now the key to getting these to look like sandals (with an edge of the sole sticking out) work in the POSTS rather than the top of the stitches. See where the toothpick is? Pick up 2 stitches in the POST, this will leave that EDGE around the shoes.
shoe:
in a second color
count over 5 stitches and sl st in the POST
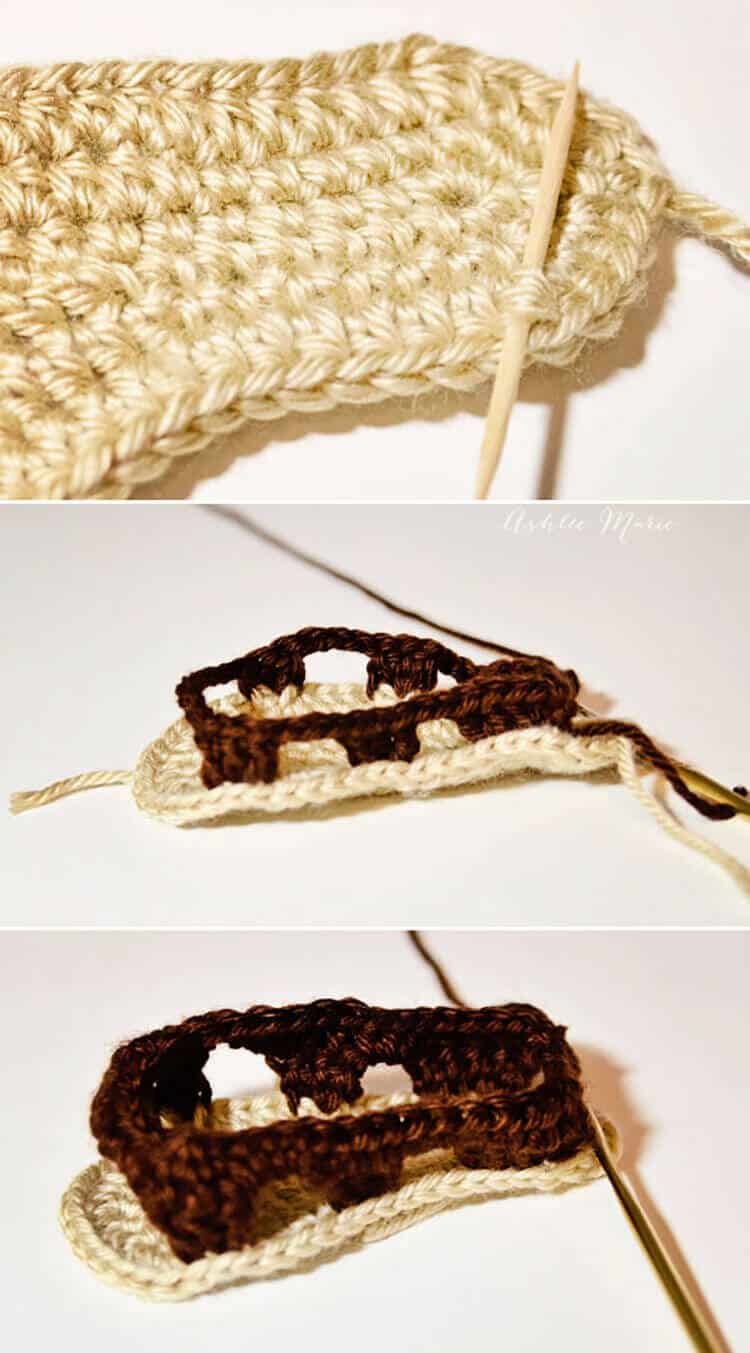
row 1- ch3, 2dc in the same post, dc, 2dc, ch3, skip 5 posts, 2dc in next post, dc, ch3, skip 4 posts, 2dc in next post, dc, ch6, skip 12 posts, dc in next post, 2dc, ch3, skip 4 posts, dc in next post, 2dc, ch3, skip 5 posts, 2dc in next post, dc, 2dc
row 2- ch2, turn, hdc in the next 15 stitches/ch, sc3tog (this includes the last 2 dc on the right side of the shoe AND the first ch across the toes), 4hdc in ch across the toes, sc3tog (this includes the last ch from across the toes and the first 2 dc on the left side of the shoe), hdc in the next 15 stitches (you should be at the end), ch4, sl st in first hdc, finish off
left shoe
(counting from the sl st in row 2) sl st in the 11th stitch on the RIGHT side
ch13
row 3- hdc in 5th ch (creating a button hole), hdc in next 7 ch, sc3tog (this includes the last ch and first 2hdc in from row 2 after the sl st), hdc 20 times (this includes 4 across the ch 4), finish off
right shoe
(counting from the sl st in row 2) sl st in the 15th stitch on the LEFT side (counting the ch4 as 4 stitches)
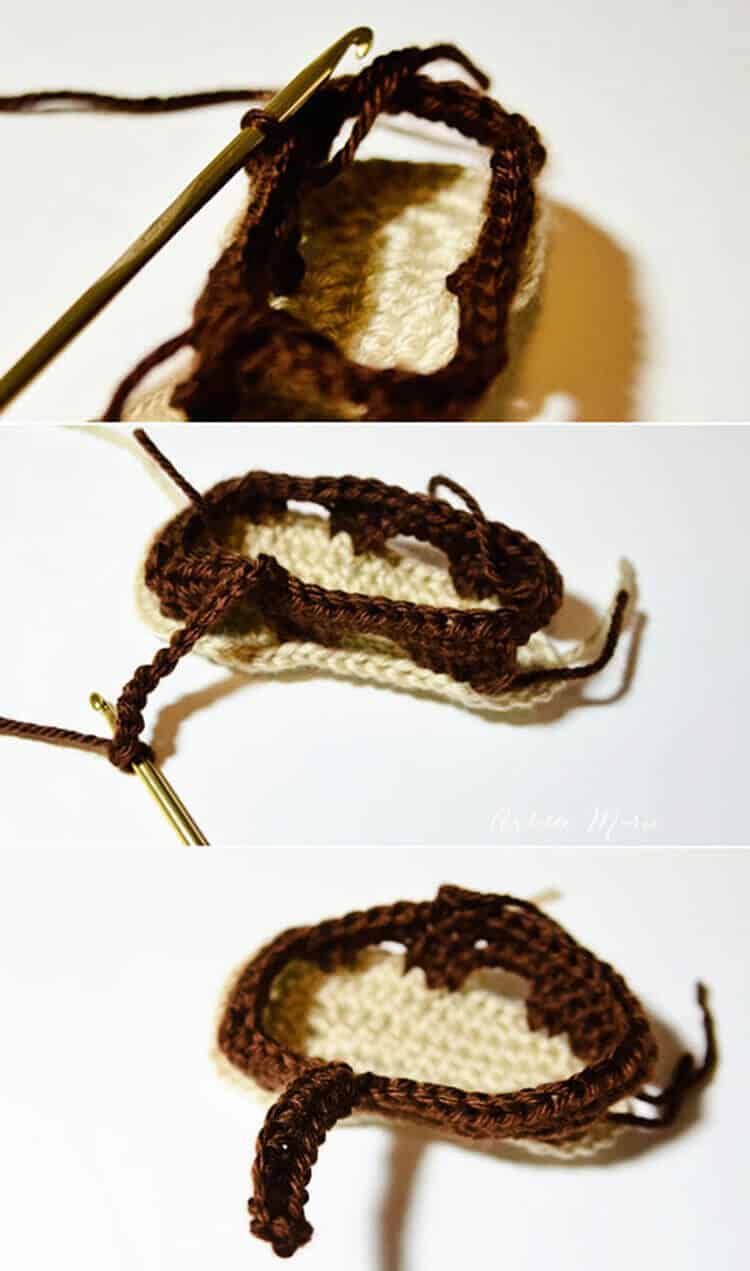
ch13
row 3- hdc in 5th ch (creating a button hole), hdc in next 7 ch, sc3tog (this includes the last ch and first 2hdc in from row 2 after the sl st), hdc 20 times (this includes 4 across the ch 4), finish off
Trim:
in the first color again, or third contrasting color
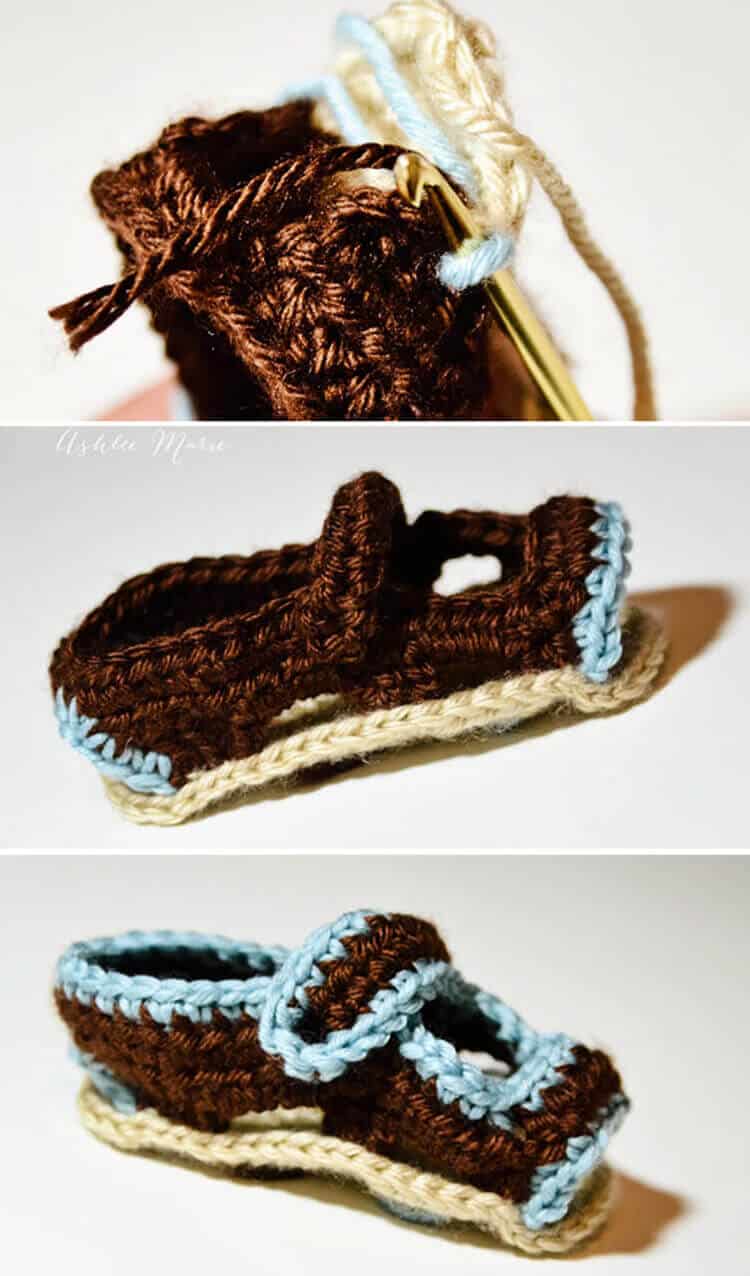
sc across the edge of the toe and along the heel, weave the ends through the sole.
sc around the top of the shoe, using sc2tog in the corners, and 5 sc in the button hold ch, sl st and finish off
pull all the ends through to the bottom of the sole.
second sole:
in the second color again or the contract color
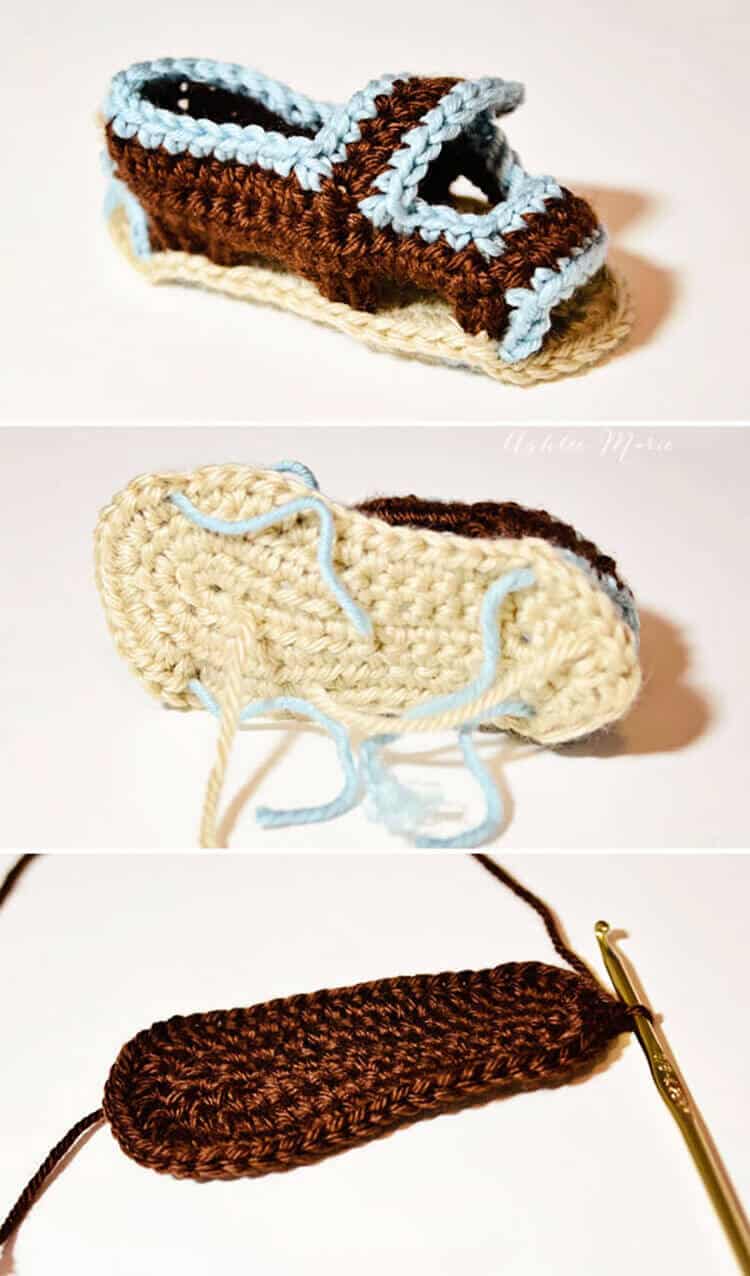
ch 12
row 1- 3sc in 2nd ch, sc 6 times, hdc 3 times, 7hdc in last ch, finish the rest of the round working along the back of the chain, hdc 3 times, sc 6 times, 2sc in the last/first ch, sl st to the first sc (30)
row 2- ch1, sc in same sc, 2sc, sc 6 times, hdc 4 times, 2hdc 3 times, 3hdc, 2 hdc 3 times, hdc 4 times, sc 6 times, 2sc, sc in SAME stitch as the first sc, sl st to first sc (41)
row 3- ch2, 2hdc in same sc, hdc, 2hdc, hdc 14 times, 2hdc 7 times, hdc 14 times, 2hdc, hdc, 2hdc, sl st to first hdc (52)
DON’T FINISH OFF
place against the first sole, matching up the 2 soles
sl st the two soles together all the way around,
this will create a thicker stronger sole as well as add a contrast trim around the edge
Seriously? Could they be any cuter???? I considered not having the top strap button, but be permanent, but then it’s trickier to get them on, and I love buttons…
Remember my baby is a hobbit and has HUGE, FAT feet, so if these don’t fit your baby there are places to tighten up the pattern, smaller hooks, less chains, etc..


Maithili Haasan
Beautiful!!!!!!! ur creations r so fantabulous!!!!! luv dem, dear!!!!!
Ashlee
thank you so much! I love those cute little toes!
Alecia D
I am new to crocheting and am wondering if there is a video on how to do these? I have the sole finished, but when it comes to the POSTS and how to work in them for the upper part of the sandals, I’m at a loss…
Ashlee
sorry, I don’t have a video, just the pattern! Some people have made videos of my patterns on youtube, you can look there.
Donna
These sandals are soooo stinking cute. They are also addicting. I make them with leftover scraps of dishcloth cotton and use velcro dots for the closures because buttons are very expensive and I am giving them away to a women and children’s domestic abuse shelter where everyone must wear shoes or slippers at all times. Have 5 pairs done already and I only got the pattern 4 days ago.
Thank you from my sore hands (lol)
Ashlee
how wonderful! I’m so glad you like them, and the velcro is a great idea! Thanks for sharing your talent helping others!
Trudi Brannon
Thanks so much for sharing this pattern! I’m fairly new to crochet but wanted to make these for my 14month old son. I made a sole, added an extra round and measured it against a pair of his shoes. It seemed a good size. I’ve just finished them and they’re too big lol! Looks like I didn’t need the extra round after all. They don’t look quite as good as yours but they’re still cute and will look better when his feet have grown a bit (I know you said your son has big feet but they really must be big lol!) I’ll definitely be returning to look for other projects 🙂 xxx
Ashlee
ha! I call him my Hobbit, seriously HUGE feet! these fit him when he was 8 months old- CRAZY, huh? sorry they ended up too big! I hope it was easy enough to follow that you can create the perfect fit for your little guy!
Laine
Does anyone sell these?
Please let me know.
Thanks.
Ashlee
try Etsy, I know a few people were selling them at one point.
Susan
Very cute! So tenuous of you to come up with this pattern, and more importantly, so generous of you to share….Thanks!
Ashlee
your so welcome! It was fun, now that winter is coming I’m feeling inspired again!
Susan
Nice job!!!
Ashlee
Thank you so much!
Abbey
Hello there!
I would love to feature this pattern on our blog with a few other baby shoe patterns. Would you let me know if that’s okay and if I can use a picture of the shoes from this post?
You did an excellent job on these! Patterns I feature need to have a high cuteness factor AND be a well written pattern – you blew me away with the picture tutorials!
Warmly,
Abbey (for The Firefly Hook)
Ashlee
yes, one image with a link back to my pattern is totally okay! Thank you so much!
Sue
Cute and I was also interested and hoping to make the pumpkin booties, froggie and flower booties also….
Ashlee
I am sorry but I have no idea what your talking about, I don’t have pumpkin, froggie or flower booties, maybe my sandles were part of a round up of patterns somewhere?
Amanda
What size hook did you use for 3-6months
Ashlee
every baby feet are so different that it’s hard to guess. if going down one hook size is still too big than you’d probably need a completely different pattern, with one less row in the sole, I haven’t written a smaller pattern, I only made the one pair for my own baby.
Alice
These are adorable . I am having a problem with this. The soles are shaped for the arch of the foot and if you make all 4 soles the same you have 2 right feet and if you turn 2 of the soles over to the wrong side the pattern for the upper dosen’t seem to work. Can you please help
Ashlee
the soles are symmetrical, there is no right or left feet. Because your working in the round they tend to twist while your working, but they’ll work up and stitch together just fine. If it really bothers you you can block them before moving on, but I usually just keep going.
charity
I am not new to crochet but am very confused by row 3 on the first color. So the amount of stitches adds up to 90 not 52. Am I reading the pattern wrong? The hdc, 2hdc, hdc 14 times? How do you do that and the rest for 52 stitches.
Ashlee
ch2, 2hdc in same sc, (1-2)
hdc, (3)
2hdc, (4-5)
hdc 14 times, (6-19)
2hdc 7 times, (20-33)
hdc 14 times, (34-47)
2hdc, (48-49)
hdc, (50)
2hdc, (51-52)
sl st to first hdc
does that help?
Caryn
The sole is huge lol that’s all I could understand to do…I can’t get the actual sandal part to come out right :/
Ashlee
My baby did have big feet, but people also crochet differently so you could try going down a hook size and see if that helps. It is an advanced pattern, it takes a lot of counting and keeping track of stitches. sorry your having a hard time!
Amanda
Beautiful sandal pattern! I featured them in a round-up at MNE Crafts! – http://www.mnecrafts.com/2014/04/10-free-patterns-sandals.html
Thanks for your beautiful pattern!
Ashlee
Thanks so much for the feature! I miss those cute little toes, my little model is SO big now! it’s fun looking back on older pictures and posts seeing how they’ve grown
April
Where are the frog sandals shown in the picture in diy Cozy Home that displays the link to this site? Thanks.
http://diycozyhome.com/cute-diy-baby-sandals/
Ashlee
I’m not sure why they don’t include a picture of my sandals when they link to me. I don’t make ANY of the patterns in the picture they show. In fact I believe every one of those patterns are PAID patterns on Etsy.
Deah
I knitted these cute Sandals Many thanks for the pattern.
Ashlee
you are so welcome! I’m so glad you liked the pattern!
Deah
You can see the sandals I knitted because of you on my facebook – Deah Zeimer Lev
Ashlee
that’s great! I actually don’t have access to your FB page so I can’t see it, but I hope you enjoyed making them!
Monika Brkic
Love the sandals i made the soles bigger i used a 5,5 mm hook and in the last round i used all double crochets in the end i came out in a size 7/8 and its perfect for my little 3 year old girl.
Thanks allot for the pattern.
Ashlee
YAY! I’m so glad you got it to work for the size you needed! So many people aren’t brave enough to do that but it’s perfect!
anikenitet
Ooooh, really so cut !! I love them !! Congratulations and thank you so much for the pattern !!
Ashlee
Thank you so much! And I hope you enjoy making them!
Angie
Do you have any idea on what size these may be??? I’m wanting a newborn size, do you suppose a smaller hook? and if so, what size would you recommend. thanks
Ashlee
these are definitely not newborn, I didn’t create a newborn size. If you want to create your own newborn size I’d actually just do 2 rows, not three, for the sole. If it’s a bit small at that point then go up a hook size, but with the three rows even with a smaller hook size it will never be newborn. From there you’ll have to make up your own, just using this as a basic guide/idea.
Susan Bro
I will be making these using the same crochet cotton that people often use for making dishcloths. I have my nephew’s foot measurements and will adjust the pattern as necessary. Then puffy paint or buckskin soles will be added. These are adorable!
Ashlee
sounds perfect!!! I hope your nephew leaves his on (since my baby didn’t)