Here is the Tutorial I did last week for U-Create Parties. I like to always repost any guest post tutorial I do back here!!!
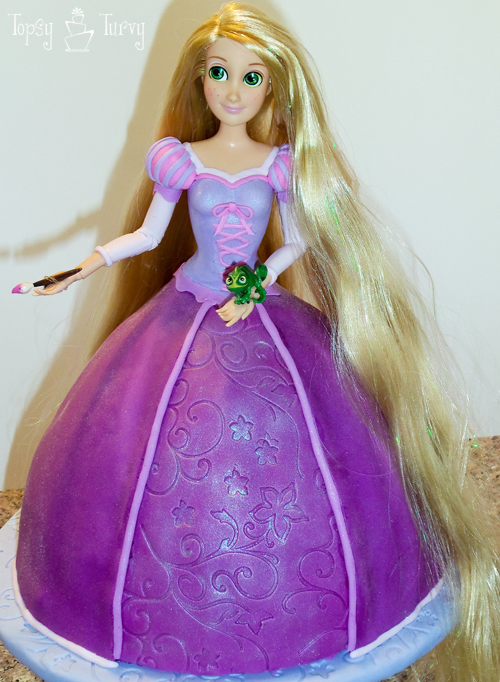
Here is the Rapunzel cake I made last week for a birthday party. The techniques I’m going to show you can work for any of the princesses or other women doll cakes you’d like to make yourself.
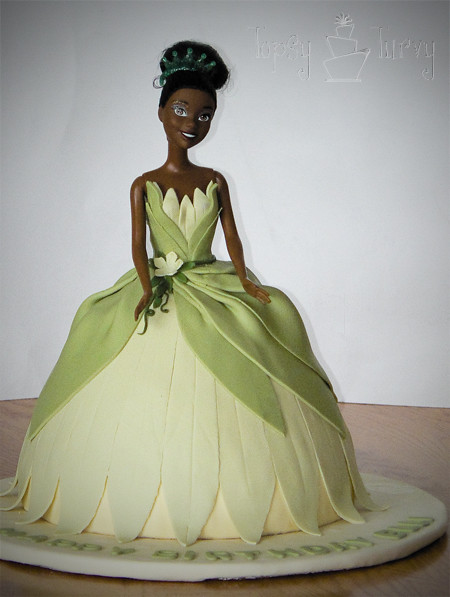
I used these same techniques to make this Princess Tiana Barbie Doll cake too!
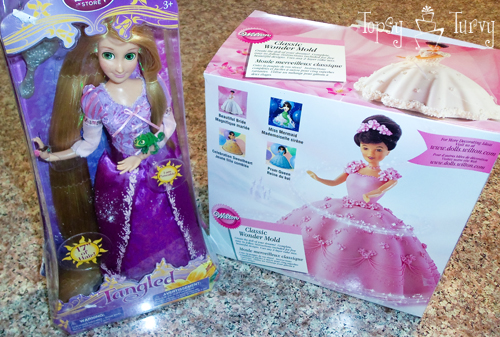
The main supplies are the princess doll you want to make, and Wilton Wonder Mold cake pan. This cake takes a while to cook because it’s so thick. Make sure you use the metal tube down the center for even cooking. If you leave it out the cake will fall. Not pretty. I’ve had this pan for years, But somehow in the last few month I lost a key piece, the screw on the bottom. I emailed Wilton and they immediately sent on to me! It was terrific service!
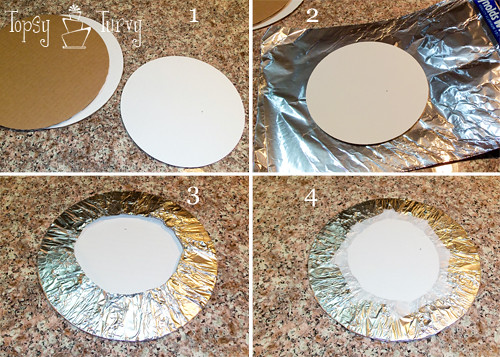
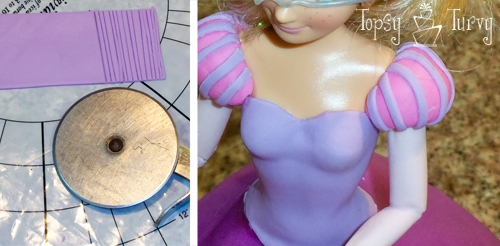
First we need to do the prep work. We need to cover some cake boards. We need one cake board the same size as the the cake itself. Then we also need 2 or 3 cake boards stacked together for the decorative board. Don’t use just one, it will be too thin and too weak. I’d make these 2-4 inches larger than the base of the cake, depending on how much of the cake base you want showing. You don’t want to put the cake directly on cardboard, it will get soaked. So I cover it with foil! Wrap it around the back, trim and then tape it down.
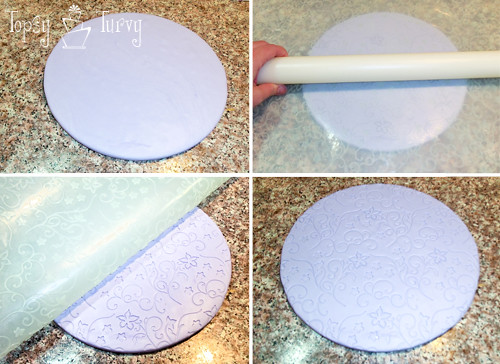
Let’s start with the decorative cake base. You want to start by covering it with fondant. In order to get it to stick and STAY on the foil covered board I use corn syrup. I rub in all over the board before I cover it! You can leave it like that OR you can make it decorative like I did. I used an Imprint mat, put it on the board and rolled the rolling pin over it! Peel it off and you have a detailed bake base!
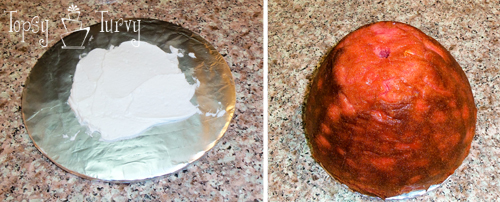
Take the cake sized cake board and cover it with some frosting so that the cake will stick to the board. And put the cake on the board! And frost the cake! I totally forgot to take a picture of that part! I always forget one picture in every tutorial it seems!
For any of the Barbie cakes what we need to start with is start at the inside/bottom and work your way out/up! So the underskirt is where we’re starting.
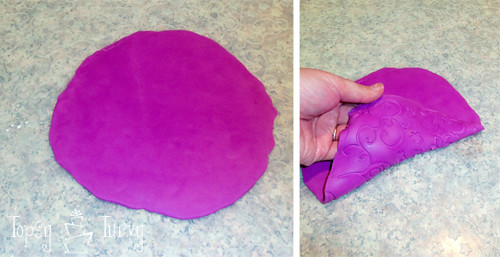
Rapunzel’s underskirt has a lot of detailing in it so I decided to roll the fondant out onto an impression mat and then used that to cover the cake! As you cover a cake the fondant tends to stretch a bit so to keep the details I just focused on keeping one section pretty, the rest I didn’t mind if the impression got stretched and warped.
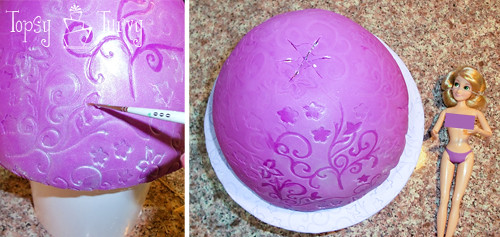
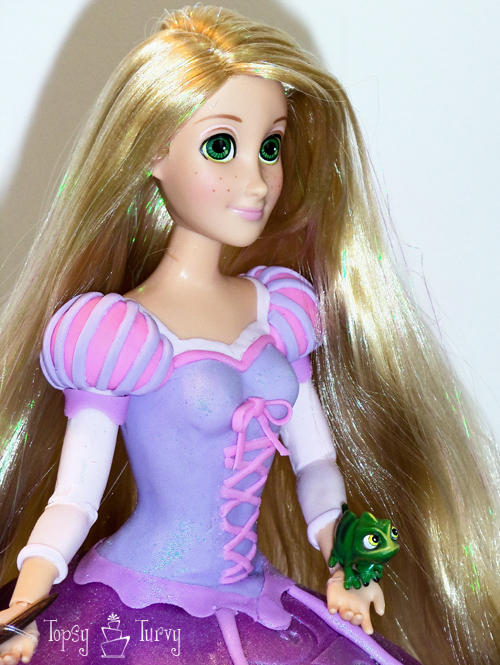
I covered the pretty section with some luster dust and then to bring out the detail I painted the lines with a paint brush and clear vanilla! (notice I rolled up her 16 inch long hair and using a twist tie kept it out of her face, and out of the way while I worked on the dress!)
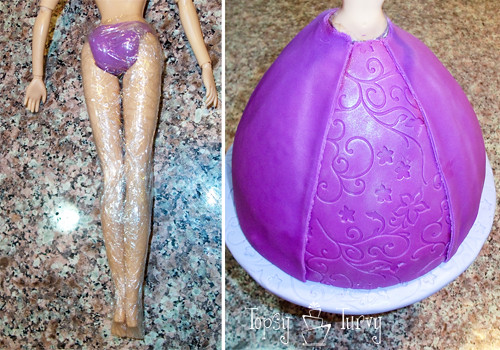
Now we need to add the doll and start working our way up! Usually I rip the legs off. But this was a higher quality doll and the legs couldn’t be pulled off without ruining them for the future. SO I decided to leave the legs on. I wrapped them with plastic wrap. The bad part about leaving the legs on is that when you push the legs in it kind of disrupts the cake a bit. Do it when the fondant is fresh so it has a bit of a stretch to it. I waited too long and it cracked the fondant. I had to do some repair work…
Back to the design, next on the out/up is the outer skirt. It’s the same purple, but it’s more simple. So I rolled it out and wrapped it around the base. Before I started wrapping I made sure to add clear vanilla to the base fondant so that the outer skirt would stick! Cutting it at the bottom and straight edges in the front. Don’t worry about the rough edges, we’ll cover them later.
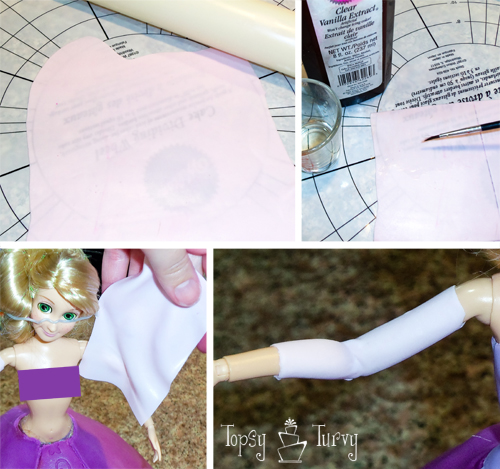
Next up? The sleeves. Her dress has sheer sleeves. Since I can’t get completely sheer I did roll it out as thin as I could, see… You can see the writing through the fondant. Cut it down to strips, about the width of the arm. Paint it with clear vanilla and carefully wrap it around her arms. Trim the edges under the arm!
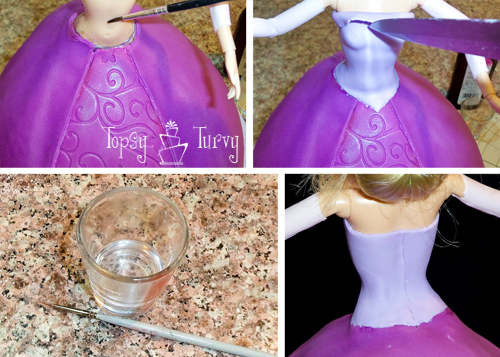
Now for the bodice. Paint her body with clear vanilla. I should mention why we’re using clear vanilla, or vanilla at all! Vanilla is mostly alchol and so it dampens the fondant and makes it sticky, but it also evaporates quickly so it dries quickly too! If you use regular vanilla the brown could dye or show up if you get it on any of the fondant that shows!. The clear vanilla won’t leave any marks!
Now using a sharp knife trim the bodice into shape! Remember you can do any princess you want, so use the colors and bodice shape of the princess your trying to make.
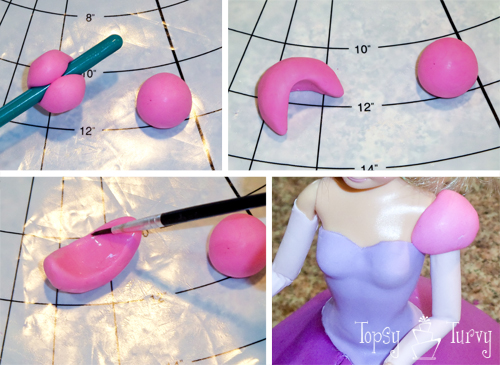
Her puffy sleeves. I started with 2 fondant balls to make sure they are equal and match. Then I started shaping them! Add the vanilla and add it to our princess! Now we have the base design complete. You could leave it here for a decent cake, but to take it over the top it’s time to start working on the details. That’s what really makes the cake.
Stripes for her puffy sleeves
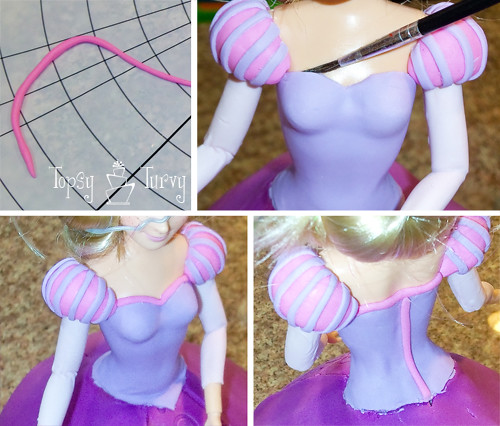
The pink trip details around the bodice neckline an cover the seam line in the back.
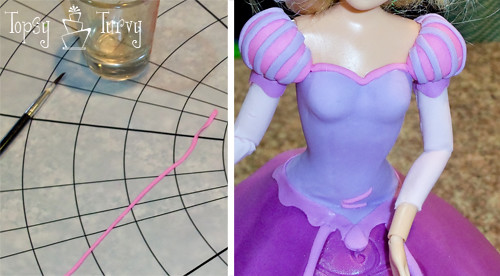
Cover the seam where the bodice and skirt meet… And now time to add the criss crossing of the ribbon onto the bodice. I rolled out the pink really thin, and then using a pizza cutter cut it really narrow. This way I didn’t have to try to roll it evenly into such a small snake! I painted the bodice with clear vanilla (see, you can’t even see it!). Now one strip at a time start cutting and building the criss crossing!
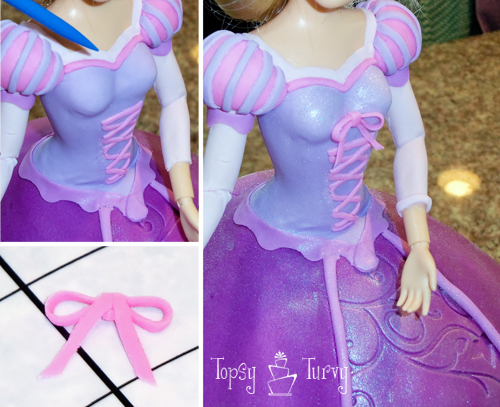
And for the final details: I added a bit of white around the neckline, added some purple between the puffy sleeves and “sheer” sleeves, some detail at the ends of the sleeves, the edges of the outer skirt, the base of the dress AND the bow at the top of the criss cross lace up front!
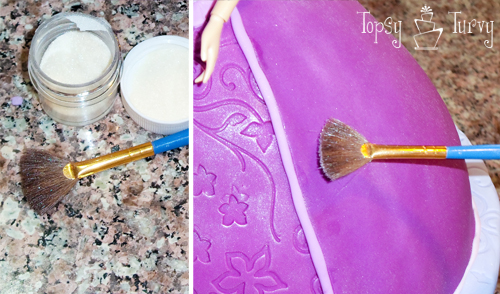
Her skirt is all shiny, so using a brush (not one you EVER use with paint or make up or anything, JUST for food!!! Anyway, use the brush and edible glitter, or luster dust! I brushed it all over the skirt, bodice, etc… It adds that final shine/glow to the dress.
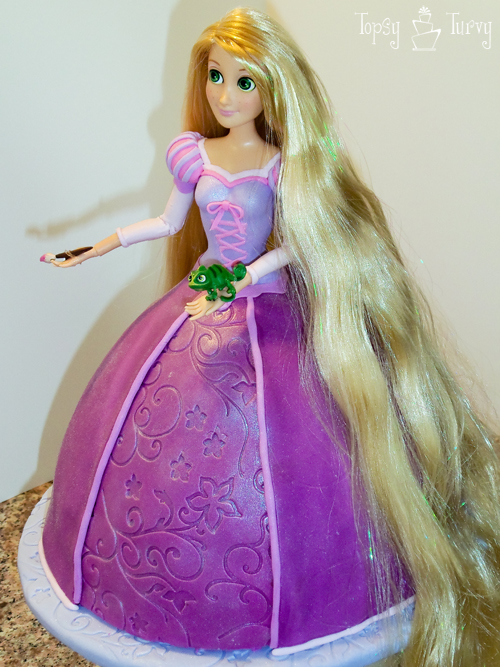
Undo her hair, add her tiny gecko and paint brush and Presto! She’s done and gorgeous!
And she’s done!


Kimkizzies
Your work is amazing! She looks flawless and just like Rapunzel.
I am trying to bake a cake like this for my niece and you have given me a great tutorial to work with.
Thanks so much…keep up the good work!!!
Ashlee
Thanks so much! let me know if something doesn’t make sense or if I can answer any questions for you
dana
Hi ashlee! I’m in the middle of making this cake for my neice’s birthday. How did you make the bow? This is my first time with fondont. Your tuturial makes this cake very doable!
Thank you for publishing!
Ashlee
The bow on the top of the dress? I rolled out the fondant really thin, then using a pizza cutter cut a very narrow strip. I made two loops, and let them dry a bit, along with 2 “tails”. I “glued” them to the bodice using clear vanilla. finally I used a bit more of the fondant strip to cover where they all met, like the center of a bow! I hope that help sin some way!
Kimkizzies
Thanks for replying, I will certainly let you know if I need help with anything that’s not clear to me.
Ashlee
Great! I can’t wait to see how it turns out!
Kimkizzies
Hello Ashley… Happy Thanksgiving to you…I have one quick question..How much Fondant did you use to do the clothing for the doll overall. What are the colors you use to color to fondant?
Thanks
Ashlee
Ummmm I’m not sure. I make so many cakes I don’t keep track of stuff like that. my guess? about a tennis ball size for the dark shade for the skirt, about the same for the underskirt/bodice if not a tad bit more, and tiny amounts of everything else. As for color? I have about 20 gel food colors and tend to blend my own, just start adding a bit at a time, shades of pinks, purples, blues and eve some reds until you start getting the results you like. Sorry I’m not much help!
Tina W
Did I miss the cake recipe or did you use a boxed cake mix. If boxed, just one? Love, love this cake and am going to try and make it this weekend. Thanks
Ashlee
I didn’t put a recipe on the post. I assume people have their own preference for flavors. I never EVER use a box mix for a cake, I prefer working with dense cakes that are easy to carve and hold up the weight of fondant easily. Wilton- (they make the pan) makes almost all their pans to fit one cake mix. So about 4 cups of batter. I tend to add extra batter so I have a bit more height to work with. If your using the doll pick that doesn’t weight much a box mix will work just fine, but if your using a rapunzel doll (with or without legs) you’ll want a stronger cake to help hold it up!
maddy
Hello, I must say that I love r cake and would like to make it for my daughter. How far ahead of time should I make it?
Ashlee
Sorry for the late reply- I decorate my cakes the night before if I have to but the morning of usually!
Samantha
Where did you get that specific rapunzel doll? LOoks great!
Ashlee
I honestly have no idea. The mother of the girl the cake was for ordered it online and had it sent to me. It was over a year ago now so I doubt it’s not as easy to find.
Rita Smith
Hi! I really love this cake! I have two daughters, who both want a princess-themed birthday party this year, once Cinderella and one Rapunzel. I attempted a Barbie cake for a birthday last year and I failed miserably! I didn’t get the wonder mold kit and tried to do myself! Never again! I consider cake decorating to be a hobby. I mostly do it to save money (I have 5 young children). I haven’t really worked with fondant before and I was wondering if there was a fondant you recommend. I have tried the Wilton ready-to-use fondant and I didn’t care for the taste or texture. Is there a way around that?! I have also tired making my own out of powdered sugar, but I didn’t care for the taste of that either. I would greatly appreciate any advice and suggestions you could give me! Thank you so much!! You are extremely talented!
Rita
Ashlee
That’s why I started to, to create fun cakes for my kids without spending a ton! I would def stay away from wilton, it’s not great (but I’ve heard they are working on a new recipe I want to try). I’ve heard that the Duff fondant is easy to work with if you warm it a bit. I love love LOVE Satin Ice, best fondant I’ve ever worked with. And have been dying to work with MASSA fondant, I hear it’s amazing. Personally none of it is really appealing to me to eat, just a huge chewy wad, but love how it looks on cakes! Also work with a dense cake, not a box mix that will help a ton as well!
Ashley
Where did you get the mat with the dress detail? I would like to make this cake for my daughter, thanks.
Also I want to make a Belle cake and Pocahontas cake… Any tips?
Ashlee
Mmmmm I think it was a wilton mat, I used to teach and I believe I got it at a teaching conference. But years ago… Tips for other cakes, start on the underneath layers, skirt yellow, boddice yellow. Then when you have that done start slowly adding extra peices little by little until you love it! Not sure how to even start a pocahontas cake, with her short skimpy skirt???
Ashley
Also what cake do you suggest we use instead of a box cake?? Thank you
Ashlee
I like working with dense homemade cakes, pound cakes are a great way to go too, nothing too light and airy or it tend to crumble when you put the doll in.
denna's ideas
Hi Ashlee! so pleased to “happen” on this tutorial, as I’m supposed to be doing a Rapunzel for this weekend….I also haven’t worked with fondant, but have heard some good things about the homemade stuff with marshmallows, have you used that before?? Your cake looks super–it’s great inspiration! But i have a feeling I’m going to have to do a lot of improvising *sigh*….oh well, like I said, it’s good inspiration and I appreciate the photos and tutorial, thanks!! So I just need to decide whether to buy some fondant (thanks for the tips in the above comment!), make some, or stick to buttercream! haha! just wanted to say thanks, and was wondering about the marshmallow fondant….
Ashlee
I hate hate HATE the marshmallow stuff, Wilton fondant is also a nightmare to work with. Satin ice is affordable and easy to work with and I’ve heard great things about Duff’s fondant as well. The best stuff (massa) is more expensive and hard to find, but the good stuff works just great!
making the cake your own is totally fun it’s not like the birthday girl has seen my cake, so they’ll be tickled with whatever you do! Have a GREAT time!
Kay
So did you make the lizard and paintbrush or did it come with the doll?
Ashlee
they came with the doll the mother of the birthday girl bought for me to use with the cake
Kay Miller
I just finished a cake like this. I know you like to see our work after your tutorials but I wasn’t sure how to post to your blog?
Ashlee
You did a GREAT job! Thanks for the email! I’ve actually decide to start a flickr group where people can add pictures of what they made and I can feature them on my FB page! Or if you have a blog I can feature a post as well! Or you can link it up on my FB wall as well! and emailing me obviously works too! I love it! I’m glad the tutorial worked out for you and I bet the girls LOVED it! http://www.flickr.com/groups/1855962@N24/
Colleen
I have just looked at your cake you have done a great job, I have one on the Craftsy site and someone put your link on it so here I am. Mine is only loosely based on this doll which by the way is very expensive to buy here in New Zealand. I completely understand what you are saying because that is how I work too. Great cake! You can always learn something new and I have today.
Ashlee
Thanks so much! I know the doll is hard to find here now as well. Last year was a much easier year to find them!
Ami w/AliLilly
WOW!! How did I miss this one!! Your cake and your skills are just INCREDIBLE Ashlee!!! I’m throwing Alice a Rapunzel party in June!! I WISH I could pull something like this off!!
Ashlee
HA! This was over a year ago! Maybe you just passed over it back then. Glad you found it again, give it a try!
cecilia
hermoso trabajo, mi hija quiere esta torta
Ashlee
Thank you so much!!! Little girls all love this one! My Daughter and niece adore it!
Mia
I would love to make that cake, where did you bough Rapunzel doll from?
Ashlee
I didn’t, the mother that ordered the cake from me bought the doll and dropped it off. It was a few years ago when the movie was new so dolls were everywhere.
Helen
Instead of taking the doll’s legs off, I always bake an extra 9″ round cake, cut out a hole in the center and frost the top, trim the top of the domed cake flat, and stack them, trimmimg the sides of the round cake as needed to continue the line of the dome’s curve. I wrap the doll’s legs in plastic wrap before sticking it through. That allows the birthday girl to have a complete doll. I’ve done this successfully with two doll cakes. It also helps the proportions look better because the height of the “dress” and the doll torso match.
Thank you for this breakdown, especially of the bodice. It will make doll cake # 3 (Cinderella and Belle previously) much easier for me!
Ashlee
I like to take the legs off when I can because it disrupts the cake less, the legs length isn’t the issue, it’s the fact that so much plastic inserted into the cake tends to crack the cake, and I simply don’t like it, but thanks!
Lauren
Does the metal tube come with the Wilton Wonder Mold Cake? Sorry if it seems a bit of a stupid question. 🙂
Ashlee
it SHOULD!! I had to open a few in store to make sure I got one with it. If it doesn’t come with it (or you loose it) contact Wilton and they’ll send you another one!
Lauren
I’m twelve years old I’m planning my sisters seventh birthday party and the theme is Tangled. I have so many ideas and this cake is so perfect I could scream! (With delight of course.) One thing-how do you actually make the cake??? I normally make cakes out of packet mixes so I don’t have a clue and can’t find anything on the Internet. Can you give me details please? Thanks.
-Lauren
Ashlee
the wilton pans are sized to be made with a box mix. So just put together the pan, mix up the mix, pour it in and bake! the pan comes with instructions and baking times!