Here is the Tutorial I did last week for U-Create Parties. I like to always repost any guest post tutorial I do back here!!!
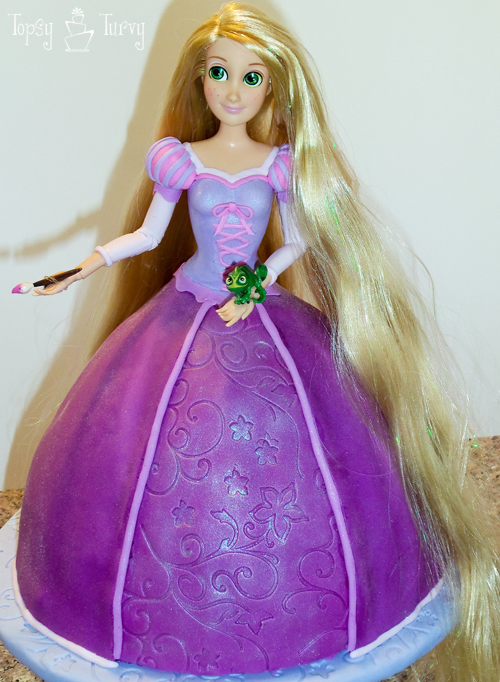
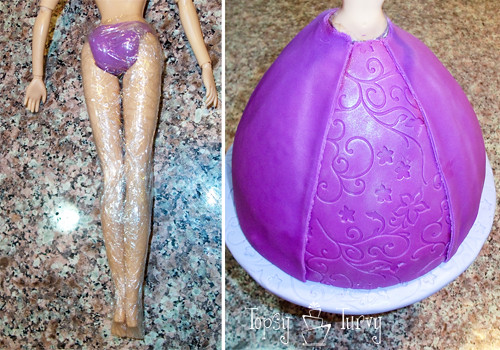
Here is the Rapunzel cake I made last week for a birthday party. The techniques I’m going to show you can work for any of the princesses or other women doll cakes you’d like to make yourself.
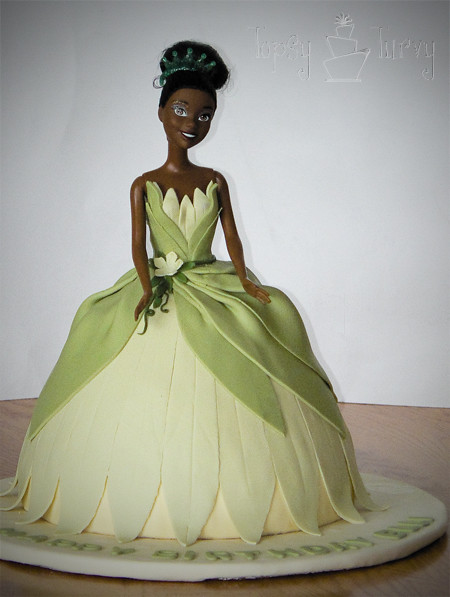
I used these same techniques to make this Princess Tiana Barbie Doll cake too!
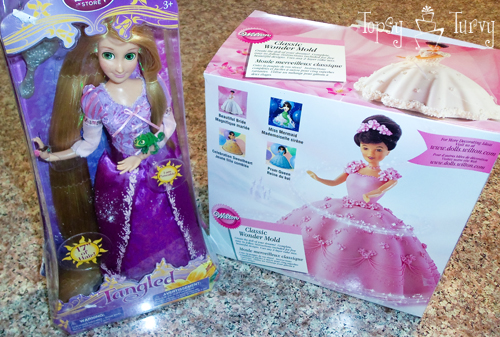
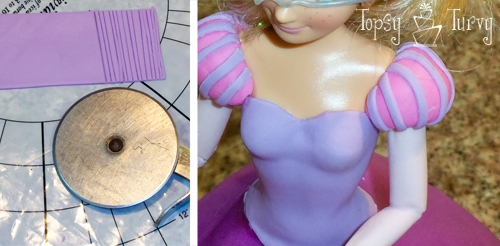
The main supplies are the princess doll you want to make, and Wilton Wonder Mold cake pan. This cake takes a while to cook because it’s so thick. Make sure you use the metal tube down the center for even cooking. If you leave it out the cake will fall. Not pretty. I’ve had this pan for years, But somehow in the last few month I lost a key piece, the screw on the bottom. I emailed Wilton and they immediately sent on to me! It was terrific service!
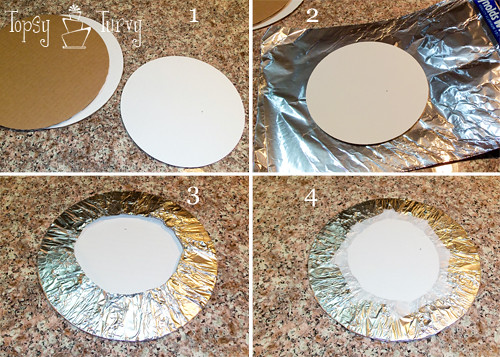
First we need to do the prep work. We need to cover some cake boards. We need one cake board the same size as the the cake itself. Then we also need 2 or 3 cake boards stacked together for the decorative board. Don’t use just one, it will be too thin and too weak. I’d make these 2-4 inches larger than the base of the cake, depending on how much of the cake base you want showing. You don’t want to put the cake directly on cardboard, it will get soaked. So I cover it with foil! Wrap it around the back, trim and then tape it down.
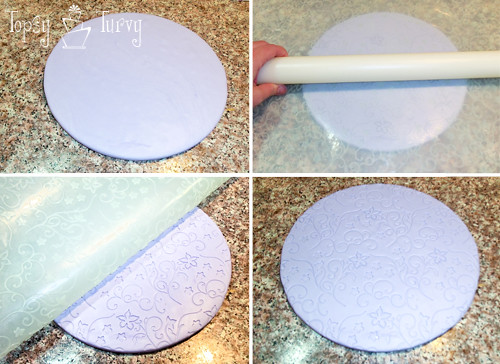
Let’s start with the decorative cake base. You want to start by covering it with fondant. In order to get it to stick and STAY on the foil covered board I use corn syrup. I rub in all over the board before I cover it! You can leave it like that OR you can make it decorative like I did. I used an Imprint mat, put it on the board and rolled the rolling pin over it! Peel it off and you have a detailed bake base!
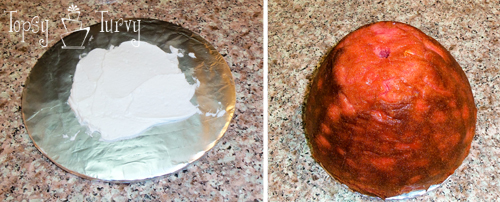
Take the cake sized cake board and cover it with some frosting so that the cake will stick to the board. And put the cake on the board! And frost the cake! I totally forgot to take a picture of that part! I always forget one picture in every tutorial it seems!
For any of the Barbie cakes what we need to start with is start at the inside/bottom and work your way out/up! So the underskirt is where we’re starting.
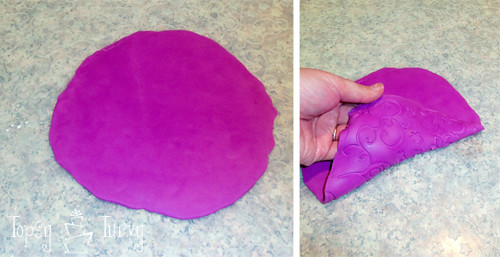
Rapunzel’s underskirt has a lot of detailing in it so I decided to roll the fondant out onto an impression mat and then used that to cover the cake! As you cover a cake the fondant tends to stretch a bit so to keep the details I just focused on keeping one section pretty, the rest I didn’t mind if the impression got stretched and warped.
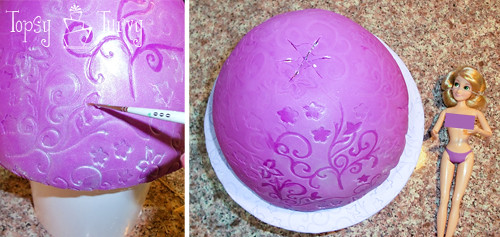
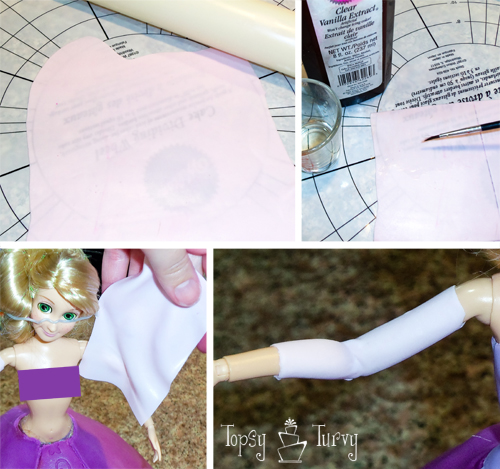
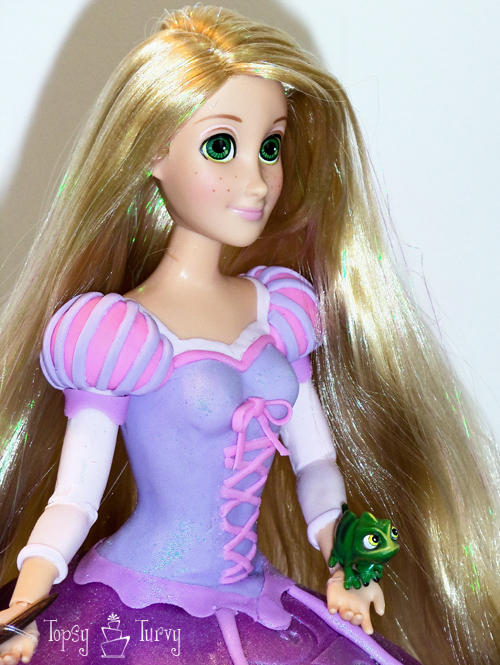
I covered the pretty section with some luster dust and then to bring out the detail I painted the lines with a paint brush and clear vanilla! (notice I rolled up her 16 inch long hair and using a twist tie kept it out of her face, and out of the way while I worked on the dress!)
Now we need to add the doll and start working our way up! Usually I rip the legs off. But this was a higher quality doll and the legs couldn’t be pulled off without ruining them for the future. SO I decided to leave the legs on. I wrapped them with plastic wrap. The bad part about leaving the legs on is that when you push the legs in it kind of disrupts the cake a bit. Do it when the fondant is fresh so it has a bit of a stretch to it. I waited too long and it cracked the fondant. I had to do some repair work…
Back to the design, next on the out/up is the outer skirt. It’s the same purple, but it’s more simple. So I rolled it out and wrapped it around the base. Before I started wrapping I made sure to add clear vanilla to the base fondant so that the outer skirt would stick! Cutting it at the bottom and straight edges in the front. Don’t worry about the rough edges, we’ll cover them later.
Next up? The sleeves. Her dress has sheer sleeves. Since I can’t get completely sheer I did roll it out as thin as I could, see… You can see the writing through the fondant. Cut it down to strips, about the width of the arm. Paint it with clear vanilla and carefully wrap it around her arms. Trim the edges under the arm!
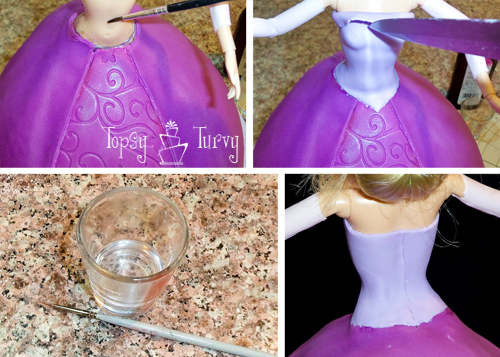
Now for the bodice. Paint her body with clear vanilla. I should mention why we’re using clear vanilla, or vanilla at all! Vanilla is mostly alchol and so it dampens the fondant and makes it sticky, but it also evaporates quickly so it dries quickly too! If you use regular vanilla the brown could dye or show up if you get it on any of the fondant that shows!. The clear vanilla won’t leave any marks!
Now using a sharp knife trim the bodice into shape! Remember you can do any princess you want, so use the colors and bodice shape of the princess your trying to make.
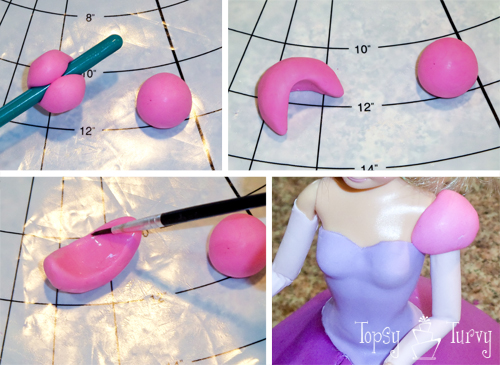
Her puffy sleeves. I started with 2 fondant balls to make sure they are equal and match. Then I started shaping them! Add the vanilla and add it to our princess! Now we have the base design complete. You could leave it here for a decent cake, but to take it over the top it’s time to start working on the details. That’s what really makes the cake.
Stripes for her puffy sleeves
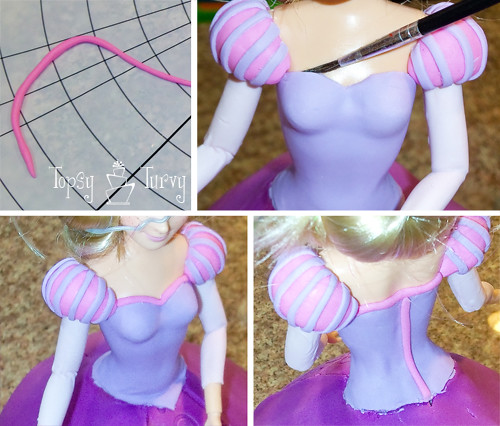
The pink trip details around the bodice neckline an cover the seam line in the back.
Cover the seam where the bodice and skirt meet… And now time to add the criss crossing of the ribbon onto the bodice. I rolled out the pink really thin, and then using a pizza cutter cut it really narrow. This way I didn’t have to try to roll it evenly into such a small snake! I painted the bodice with clear vanilla (see, you can’t even see it!). Now one strip at a time start cutting and building the criss crossing!
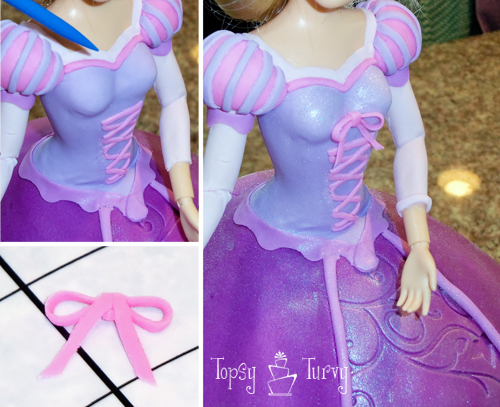
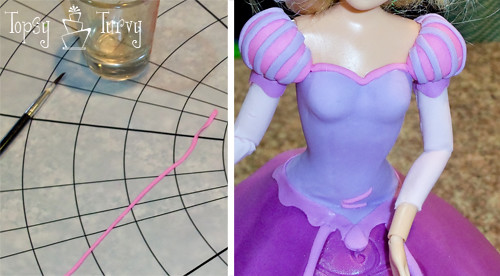
And for the final details: I added a bit of white around the neckline, added some purple between the puffy sleeves and “sheer” sleeves, some detail at the ends of the sleeves, the edges of the outer skirt, the base of the dress AND the bow at the top of the criss cross lace up front!
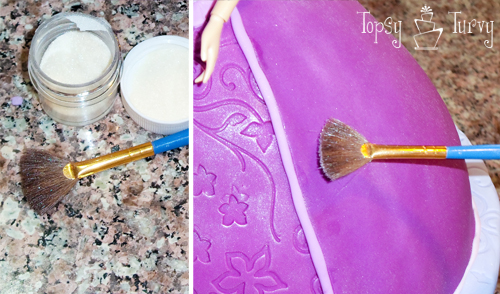
Her skirt is all shiny, so using a brush (not one you EVER use with paint or make up or anything, JUST for food!!! Anyway, use the brush and edible glitter, or luster dust! I brushed it all over the skirt, bodice, etc… It adds that final shine/glow to the dress.
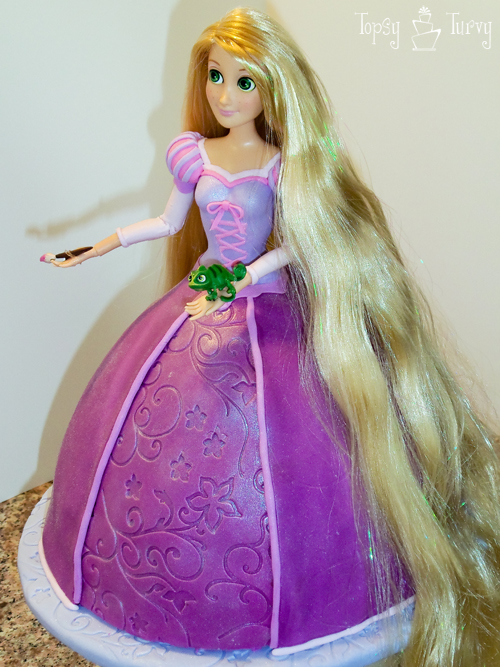
Undo her hair, add her tiny gecko and paint brush and Presto! She’s done and gorgeous!
And she’s done!


Beverly @ Flamingotoes.com
This is sooo cute Ashlee! I love these cakes – they are amazing!
Ashlee
Thank you so much! I really enjoy creating cakes! It is so much fun!
Ginger Snyder
I’ve been baking for years. But it’s not like riding a bicycle. If you get out of practice, you’re going to forget certain important aspects. Thank you Ashlee for this tutorial. Without it, I probably wouldn’t venture into this ambitous beautiful work of art again. I made a Barbie for my daughter years ago. But this Rapunzel for my granddaughter is going to be way better thanks to you. Thanks for not hiding your genius.
Ashlee
you are so kind! thank you so much. good luck and have FUN!
Kim
Everyone was blown away by this cake. No one thought it was a cake, especially the 5 year old who tried to grab it and stick her finger in it! You did an amazing job, and my husband was super impressed by the bodice as was my mom. They thought the doll came like that and it was molded plastic or something.
Really great work Ashlee. You are a true artist!
Ashlee
Thanks for the chance to do it! I’m so glad she liked it! I was a bit worried how the bodice would turn out, but I ended up really pleased with it!
lisa
I can’t believe how talented you are.. hop e you are making money.. the bodice.. was amazing… I would like to know how to make the dr. seuss pops hats.. for myson’s dr. seuss day at school.
lrcf
Ashlee
Sometimes. Not always. I tend to do most of my cakes for family and friends or barter. But in the end I really enjoy doing them. For the cake pops- I rolled the cake/frosting mixture into a ball, then rolled them into a tube. Then dipped the whole thing in white and let it dry. Then dipped each end in red, letting them dry on end. And once that cooled pipping more white around for a brim. Then stick them on sticks~! Good luck!
Amanda Lockhart
From TCB – you cake this cake look so easy! Truely amazing!
Ashlee
Thank you so much! I hope I make it look easy, the point is to make it look doable! I’m glad you like them!
Mallory Hummer
From TCB – I never though I could do a cake like this. Very cool! Maybe one day when I have kids I can try it. 🙂 Thanks for the tutorial!
Ashlee
You can totally do it! It’s all doable when you know the steps!
Ani
Wow, that’s phenomenal. I don’t think I would have the patience for that. I am learning, but wow. Thanks for sharing your artistry.
Ashlee
thank you so much! It was a really fun cake to do. But really not as hard as it might look, just very time consuming!
Corynne
Ashlee – Amazing!! I came to your site today to specifically get your email so I could ask if you had a tutorial for the Princess Tiana cake which I have had a pic of in my “inspiration” file. My daughter is having a Princess party for her fifth bday this summer and I want to do that cake for her. This helps alot. I have done a lot of cakes but I am a buttercream girl and I have never done fondant. Any tips for that you have to do Tiana I would love as well. You are a true artist and have inspired me to “up” my skills this year!
Ashlee
Thank you so much! What a wonderful complement! My advice with Tiana, cover the skirt with the green, cut out long petals for the next layer of the skirt, do the bodice next. for the draped part of the skirt make sure you roll it out and use it right away so it’s fresh and won’t crack. Then cover the mess at the waist! Voila! I hope that helps!
Jessica
Hi I love this and want to do it just wondering where you got the impression mat from I live in Australia and can’t find one cheap enough
Ashlee
that one I used for the skirt is from Wilton. My favorites are FMM impression mats. I get all my stuff from online. I’m sure you have someone close to you who can ship cheaper than the UK or USA companies I use!
Marcy
Hi Ashlee,
I just want to say THANK YOU.
Thank you for sharing your TALENT and not being greedy! I mean your actions speak for themselves, you are giving and beautiful!
I am 36 weeks pregnant and planning to make this doll cake for my 4 year old. Your tutorial, takes so much stress of my shoulders!
THANK YOU ONCE MORE. MAY YOUR HANDS BE BLESSED w all that they touch!
Ashlee
your so so sweet! I know that some people like to protect their work, but I just want other women to enjoy making cakes for their children as much as I do! for me it’s all about fun! If it’s not fun than why do we do it? I love sharing and helping and answering questions. Let me know if I can help in any way.
Marcy
Hi Ashlee,
Actually I do have a question(s).
How big of a circle, do I need to roll the fondant so that it covers the whole cake? I have the wilton circle plastic mat, but can’t get it right. I usually start w 1lb of the pre made wilton fondant, is that the correct amount too?
So, how big the circle and what should be the diameter of the circle?
Ashlee
Ummm I don’t recall, I just roll out a huge circle and lay it on! Sorry that’s really no help. It’s not as big as the circle mat that’s for sure. I like to keep my fondant about 1/4″ thick for laying over cakes. But I NEVER use Wilton Fondant, I always use Satin Ice Fondant, I’ve heard good things about Duff’s fondant too, but have never tried it. I always start with more fondant than I’ll need for the circle though, I don’t work with lbs I work with handfuls. And I would start with about 2 baseballs worth of fondant for a basic cake size. Of course there will be excess but better too much than too little.
Lisa
I am trying out my own Rapunzel cake on a much smaller scale, of course. I am using the Wilton cake pan w/ 1 box of Betty Crocker cake mix and I cannot get the cake batter to bake high enough. So when I insert the doll in the skirt it’s like 2-3 inches too short. any suggestions?
Ashlee
Why smaller? That’s the same pan and doll size I use! I would always suggest taking the legs off, all barbie legs are too long for the cake pan, they do that so you’ll buy their doll picks and NOT use barbie dolls. Also I don’t like using box cake mix for cakes because the cakes are simply too weak to hold up against carving, doll legs, the weight of fondant, etc.. But if it’s your only option try 1 1/2 boxes to get as much height as you can. If you HAVE to keep the legs on like I did for this one don’t forget to ANGLE the legs. Start at the center and push the toes to the outer edge (I like to push towards the back so if they stick out a bit it’s not as big of a deal). If it’s still a bit too short use some fondant to “build” up the skirt a bit before adding the extra layers.
I hope that helps a bit!
Katie
In a pinch, you can also bake a round cake the same or slightly larger diameter than the base of the skirt and add it to the bottom like a layer cake. It will give the cake enough height to cover Barbie’s legs. 🙂
Ashlee
Yup, I’ve done that with these other tutorials – Elsa, Anna and Merida, but since Rapunzel is younger I didn’t want to make her too tall, and her skirt is usually ankle length, I tried to figure out how to lift it up… maybe next time!
Lori
Absolutely beautiful!! And so amazing that you took the time out to explain how you did it, thank you!!
Ashlee
Thanks! I’m so glad you like it! Let me know if you try it, or another princess based on it!
Christal
Thanks for the great tutorial. My first doll cake with fondant was well received. I used your tutorial and two others that were very similar. I made many mistakes and had to cover them up! Lol. It was fun. I think I could really get into this!
Ashlee
Thanks! I’d love to see a picture, either email or add it to my facebook page. I’m so glad that my tutorial helped you in some way.
Natalie
What an amazing cake!!! So much so, i thought i would copy it for my daugters 5th Birthday on Saturday!! She made my heart melt when she saw it and said ‘mummy you are the bestest mummy in the whole world and make the best cakes!!!!’
Thank you so much for the detailed way in which you did this tutorial, i never thought i could do Rapunzel but i proved myself wrong, if only i could post a pic so you could see what your tutorial produced from me!!!!
Thank you so much again!
Natalie.xx
Ashlee
I’m so happy it worked out for you! I’d love to see a picture! Feel free to link it up, or just email me a picture of it! imtopsyturvy@aol.com
Carlos
Could you tell me the coloring you used for the skirt and bodice ?
Thanks
Carlos
Ashlee
you know I don’t really remember. I own about 20 gel colors and usually use a mixture to get the coloring I want. I just took a doll’s dress and started adding pink’s and purples here and there until I was happy with the results! Sorry to not be more help! But def go with powder or gel coloring, not the liquid food coloring.
Carlos
Thanks for the write up, mine was not as perfect but definitely presentable, my girls loved it.
Carlos
Ashlee
It turned out great! you did a fantastic job! I’m so glad it worked out!
Lisa
I am following your great tutorial but struggling loads to get the shape of the second layer on the skirt. How on earth do you get the shape right? I end up with loads of folds and no way a snug fit around the waist. Thanks
Ashlee
I rolled out a super large piece of fondant, way bigger than I needed, added the clear vanilla to the under skirt only where I wanted the fondant to stick. Then I laid the HUGE piece around the skirt, kind of like wrapping a fat ice cream cone? It should overlap on the top and bottom. Then taking a sharp knife I carefully cut off the excess from the waist, bottom and of course cut the portion in the front I wanted gone. Does that help at all??? I hope I’m not to late!
Lisa
Thanks for your prompt reply – not too late at all! Fab, I will give it a go, thank you. Loving your cakes by the way – they are fantastic! Thanks for your help.
Ashlee
I hope it was helpful and your party went well!
Peggy
Hi Ashlee,
Love this cake, I have a customer who wants me to make one for her 4 yr old daughter but is not keen with the hair on the doll. Did you have any issues with the hair from the real doll on the cake at all? Did the hair come out of the doll on to the cake? I’m not real good at making fondant figures and would just love to do this cake with the actual doll. About how long from start to finish did this take you?
Thanks for posting this, excellent job!
Sincerely,
Peggy
Ashlee
Since I used fondant, not buttercream I had NO problems with the hair sticking to the cake! While I was making it I had the hair rapped up in a bun, when they cut it they can do the same, but honestly just pulling out the doll for cutting is easiest! Because I kept stopping to take pictures it took longer than normal. I’d say a few hours… depends on how familiar you are with fondant. Feel free to ask any questions you may have!
kara
THis is FANTASTIC Thanks for sharing 🙂
Ashlee
Thank you so much! It was a fun cake to make, and fun to share with people! My favorite has been when people MAKE the cake from the tutorial and send me pictures!