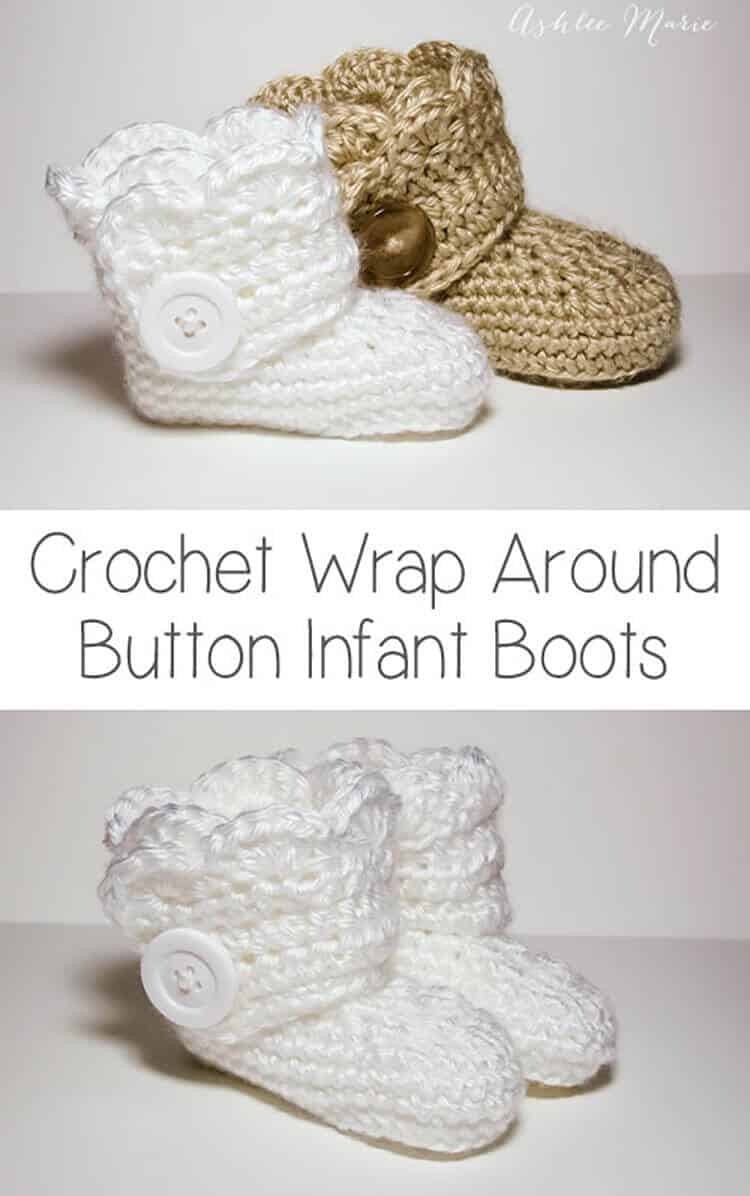
This is an easy to follow pattern to make wrap around infant booties – both for boys and girls.
Okay, after some confusion I’m separating out the patterns. Here is the one for the INFANT size! I realized after making a second set of these that I have two G hooks and they are different sizes???
So for the larger Baby sized shoes I used a G6 – 4mm for these infant shoes I used G6 – 4.25! So if your looking for an infant size 1 (or 0-3 month) boot your in the right place! For a larger (closer to size 4) shoe go to the crochet wrap around button baby boots!
Buy BOTH the Ad-Free pattern pdf’s for both the Baby AND Infant sized discounted here!
The pictures are still the same as before, for the larger size, I’ll try to substitute out smaller pictures when I make another pair!
Buy the Ad-Free pattern pdf for just the infant size here!
Infant wrap around boots
Crochet materials:
caron simply soft yarn
large buttons
G6- 4.25 mm hook (To go up a size use a larger hook, or a larger pattern, to go down a size use an G-4mm hook)
abbreviation:
ch (chain)
sl st (slip stitch)
sc (single crochet)
hdc (half double crochet)
dc (double crochet)
sc2tog (single crochet 2 together)
dc2tog (double crochet 2 together)
dc3tog (double crochet 3 together)

sole:
ch 11
row 1- sc in 2nd ch, sc 5 times, hdc 3 times, 7hdc in last ch, finish the rest of the round working along the back of the chain, hdc 3 times, sc 5 times, 4sc in the last/first ch, sl st to the first sc (28)
row 2- ch1, sc in same sc, sc 7 times, hdc, 2hdc 3 times, 3hdc (in one stitch), 2 hdc 3 times, hdc, sc 8 times, 2sc 3times, sl st to first sc (39)
shoe:
row 3- ch1, working in back loops, sc in same sc, sc around, sl st to first sc (39)
rows 4-5- ch1, sc in same sc,sc around, sl st to first sc (39)
row 6- ch 1, sc in same sc, sc 9 times, sc2tog, dc2tog, dc, dc3tog, dc, dc2tog, sc2tog, sc around, sl st to first sc (33)
row 7- ch 1, sc in same sc, sc 7 times, sc2tog, dc2tog, dc3tog, dc2tog, sc2tog, sc around, sl st to first sc (27)
row 8- ch 1, sc in same sc, sc 5 times, sc2tog, dc, dc3tog, dc, sc2tog, sc around, sl st to first sc, cut yarn weave in ends. (23)

Boot cuff:
for the right boot sl st in the 7th stitch from the seam, for the left boot sl st in the 11th stitch from the seam
ch 12
row 1- hdc in 3rd ch from hook- ch2 counts as hdc, hdc in next 9 ch, hdc in first sc (the same one you sl st in), hdc 19 times (there will be 3 spaces left), skip 2 spaces, sc in last space. (32) **note – some people had a problem with getting two right or two left feet. remember to not cross over the front, work down the inside, around the back and back up the outside, so you’ll work in opposite directions for each bootie, counterclock wise – looking top down, or “wrong” side out for the right booties and clockwise, or “right” side out for the left bootie**
row 2- ch2 (counts as hdc), turn, hdc in first hdc and around 28 times, ch 1 skip one hdc, hdc in last 2 (31- with a ch1 space)
row 3- ch2 (counts as hdc), turn, hdc, hdc in ch1 space, hdc around (32)
row 4 scallops (girls)- turn, 5dc in second hdc, *skip 1hdc, sc in next hdc, skip 1hdc, 5dc in next hdc*, repeat around (8 shells), sc down the side (I fit 5), continuing around sc across the bottom along the original chain (11), sl st, cut yarn and weave in ends

row 4 simple (boys)- ch1, turn, sc across top (32), down the side (5) and across the bottom chain (11), sl st, cut yarn and weave in ends
And both the boys and girl versions (again these are the larger size)
Don’t forget to add a button where ever you like and your done! I placed mine at the bottom of the 5th hdc over from the front- I might go lower next time… or maybe two smaller buttons?
And one final picture, I thought you might want an inside shot so you can see how it wraps a bit… I’m still so very much in love with these boots.


Briana
I think that these are just adorable. 🙂 I’m going to try and make these for my niece. But, I was wondering if you have a pattern for adults? Thanks.
Ashlee
I don’t have an adult pattern. And I won’t be making one. I just do this for fun, and only create patterns for items I want, and I have not interest in an adult size, I’m so sorry! If I end up getting a book deal I’ll TOTALLY create one for that 😉
nichole
I’ve tried to make this pattern and when I got to the dc2tog parts I started to realize that part doesn’t looks straight it is off to the side is it suppose to be like this? I also got confused on the part where you said to backstich did you mean that for that just one row or the rest of the pattern?
Ashlee
working in the back loop is just for one row, is your seam still off on the side? I once had a reader finish off after the sole and restart the next row from the center of the heel, this would, of course, make the decreases off to one side. if you follow the pattern the decreases will be centered on top of the sole increases.
Ashley
I had found this on Pinterest and finally got the courage to make them yesterday! I will have to buy some buttons, but thank you for this awesome tutorial!My pending arrival will have warm feet when he gets here:) You can see a picture of it on my blog http://diyelizagrace.blogspot.com/2012/12/yarn-work.html
Ashlee
nicely done! thanks for the link back
Yessennia
Im doing these booties for my 7month baby girl. im just stuck on the sole part. can you help me please.?
what does this mean?
2hdc 3 times, 3hdc, 2 hdc 3 times, 2sc 3times
and what about this one?
*2hdc, 1hdc* 7 times
im having trouble on the sole patern.
Ashlee
if the number is before the stitch it’s the number of times you do that in a single stitch
if the number is after the stitch it’s the number of times you repeat it across the last row
Ashlee
I added a diagram of the sole, hopefully that will make it more clear (also they might be too small for your 7 month old, you might want to try the larger size) the BABY size
Caryn
Ohhh!! Got it now… thanks!!
Ashlee
your welcome!
Shell Crites
I was wondering if you have a tutorial for this pattern? I’ve tried this pattern at least 50x (stopped counting after that lol) I understand what your doing but for some reason I can’t get it it 🙁 I guess I’m a dink when it comes to reading patterns but when I watch someone do it I get it every time and I would LOVE to have these for my daughter (it’s hard finding boots to fit her…long skinny feet and legs) anyways Thank you for sharing these, hopefully I’m not being to picky 😀
Ashlee
what do you mean? this is a tutorial and pattern? there are tons of pictures. If you mean a video? no, I don’t do videos. sometimes you just need to keep going, sometimes it doesn’t look right, but sometimes you just need to push through a few rows. if you have a specific question, a row or stitch I’m happy to answer
Jessica
I may have done something wrong… When I get to where we start reducing stitches my boot twists. I’ve gone thru to row 8 and my whole shoe seems off center. The reductions aren’t in the front as pictured, they are off to the side… My numbers are correct tho. Any suggestions? Love this pattern btw!!!
Ashlee
is the seam still on the side? how off centered are we talking about here? as long as the center decrease is directly above the center increase of the sole you should be just fine. it twists slightly while your crocheting, but will work itself out by the end.
Angel
Hey! I looked everywhere for a pattern to make these and i’m so excited to try I want to make pairs for friends babies i’m slightly new at crocheting so we’ll see how they turn out haha. Have you thought about making a video tutorial? I always seem to learn better from watching it be done.
Ashlee
sorry, video’s are not my specialty, maybe in the future, but at this time I don’t have the equipment it would take.
Brittany
to other Thank you so much for having this pattern for free I absolutely love it. I just finished one for my daughter still have to do the right one but it was simple and your pattern was easy to read. And the stuff that I would have questions about I found in your reply to other people’s questions it was very helpful that you answered everyone thanks again 🙂
Ashlee
your so welcome! Thanks for taking the time to leave such a nice comment!
jessica
It did twist. They look great tho!! Thanks so much for sharing this pattern!
Ashlee
your welcome!
Mallory
I love this infant pattern!!! I am now looking for the older size pattern…..can anyone tell me where to find it?
Ashlee
the link is in the first paragraph of the post http://ashleemarie.com/crochet-wrap-button-baby-boots-girls-boys/
Jennifer Crow
These have to be the cutest booties EVER!! Thank you so much for the pattern! You rock! 🙂
Ashlee
your so welcome!
Donna
I love these! I am working on crocheted Easter animals for the local pediatric ward and I don’t want to leave the babies out. These are awesome!!!
Ashlee
I’m so glad you like them, and how wonderful of you to make handmade items for the pediatric ward!
Rhi
Hello there, this is such an adorable bootie! I am pregnant with twins and know that they will be smaller than the average newborn. Could you give me an idea as to how to make these even a tad smaller for a premie/newborn? I’m not very good at adjusting patterns but would really love to make a smaller set. Thank you so much for this free pattern!!
Ashlee
try going down a hook size, make the soles. if you still think it’s too big decide if it’s too wide, too long, etc.. and from there we can make a few other changes for you. Let me know and I can help!
alicia
hi there i am wanting to make these for my two girls. my oldest is 3 years old and a toddler size 8/9 and my little one i can just follow the pattern printed here….adorable by the way…
my question is do you have any size chart for making them bigger? something i can use as a guide to make the slipper fit my oldest….
Ashlee
there is the baby pattern, that is larger than the infant one. but I don’t have anything bigger than that. If you go up a hook size that does make it quite a bit larger, if you go up a second hook size you’d want to also go up a yarn weight.
Amanda
These are SO cute! I’m just a beginner but REALLY want to make these! I’m due with my 2nd baby (1st little girl!) on Feb 24th and we live in a part of Canada that gets freezing cold winters so I hope I can manage these!! I searched my house high and low last night for my “G” hook but couldn’t find it!! Hoping I can find one for sale in our tiny little town!! If not, would it make a huge difference to use a “H” ? I’m wanting them to be the newborn size. Thanks for your help and thanks for free patterns!!
Ashlee
a hook size change makes a HUGE difference, esp on small things. my advice is to make the sole and see what you think before finishing the rest.
Estrella
Thanks for this pattern! I had to find a gift for a baby boy and your directions and pictures came very very handy. In the end the baby already had like a ton of baby shoes but making them myself meant so much for the parents 🙂
Ashlee
My babies weren’t given a lot of shoes, but my sisters babies have more than me!!! Handmade is always so much fun!
paulygirl
Thank you SO much for offering this pattern for free and with great pics too! I’m a foster mom who takes in infants only, and am currently waiting for my next baby to come. We only take one at a time, so when that baby leaves I have some extra time in between and I love to make cutie things for them to wear! I so much appreciate you offering it at no cost, and I can’t wait to make a bunch! God Bless You!
Ashlee
you are so welcome! What an amazing and yet difficult job you have. I hope you enjoy my patterns for the babies you take in.
Ranjitha
Hi Ashley,
Thank you sooooo much for the free pattern. I loved your booties. And I feel disappointed too when I’ve to pay for a pattern I love. I have made the booties for my cousin’s baby and planning to make infant booties for a friend who’s expecting soon 🙂 Thank you very much again!
Ashlee
you are so welcome. I enjoy doing it, and it makes me happy when people enjoy them!
Tawnya
Just finished making the boys version of these boots (well I need to add the buttons still, but otherwise done). They are adorable. I have a 2 week old & have found that none of the socks that we have will stay on, so I wanted to make something that would. I’m hoping these boots are the solution. Thanks so much for sharing this pattern & especially for free! I found it very easy to follow & love the way they turned out. I used a F hook & they turned out about 3 & 1/2 long (I often have to use a smaller hook, so that’s why I tried that), I think they’re a bit big for my little guy, but they should last longer that way I guess. Thanks again.
Ashlee
you can always go down another hook size, or yarn size to try smaller! Good luck, and congrats.