This is an easy to follow pattern to make wrap around infant booties – both for boys and girls.
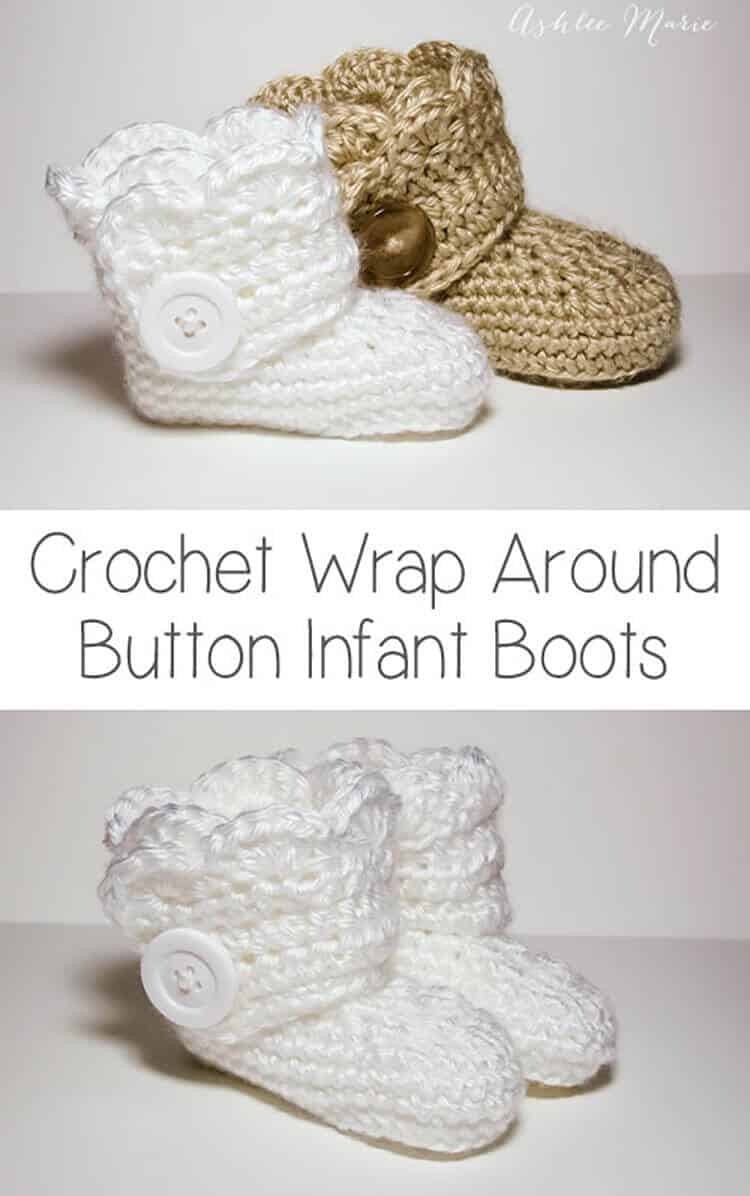
Okay, after some confusion I’m separating out the patterns. Here is the one for the INFANT size! I realized after making a second set of these that I have two G hooks and they are different sizes???
So for the larger Baby sized shoes I used a G6 – 4mm for these infant shoes I used G6 – 4.25! So if your looking for an infant size 1 (or 0-3 month) boot your in the right place! For a larger (closer to size 4) shoe go to the crochet wrap around button baby boots!
Buy BOTH the Ad-Free pattern pdf’s for both the Baby AND Infant sized discounted here!
The pictures are still the same as before, for the larger size, I’ll try to substitute out smaller pictures when I make another pair!
Buy the Ad-Free pattern pdf for just the infant size here!
Infant wrap around boots
Crochet materials:
caron simply soft yarn
large buttons
G6- 4.25 mm hook (To go up a size use a larger hook, or a larger pattern, to go down a size use an G-4mm hook)
abbreviation:
ch (chain)
sl st (slip stitch)
sc (single crochet)
hdc (half double crochet)
dc (double crochet)
sc2tog (single crochet 2 together)
dc2tog (double crochet 2 together)
dc3tog (double crochet 3 together)

sole:
ch 11
row 1- sc in 2nd ch, sc 5 times, hdc 3 times, 7hdc in last ch, finish the rest of the round working along the back of the chain, hdc 3 times, sc 5 times, 4sc in the last/first ch, sl st to the first sc (28)
row 2- ch1, sc in same sc, sc 7 times, hdc, 2hdc 3 times, 3hdc (in one stitch), 2 hdc 3 times, hdc, sc 8 times, 2sc 3times, sl st to first sc (39)
shoe:
row 3- ch1, working in back loops, sc in same sc, sc around, sl st to first sc (39)
rows 4-5- ch1, sc in same sc,sc around, sl st to first sc (39)
row 6- ch 1, sc in same sc, sc 9 times, sc2tog, dc2tog, dc, dc3tog, dc, dc2tog, sc2tog, sc around, sl st to first sc (33)
row 7- ch 1, sc in same sc, sc 7 times, sc2tog, dc2tog, dc3tog, dc2tog, sc2tog, sc around, sl st to first sc (27)
row 8- ch 1, sc in same sc, sc 5 times, sc2tog, dc, dc3tog, dc, sc2tog, sc around, sl st to first sc, cut yarn weave in ends. (23)

Boot cuff:
for the right boot sl st in the 7th stitch from the seam, for the left boot sl st in the 11th stitch from the seam
ch 12
row 1- hdc in 3rd ch from hook- ch2 counts as hdc, hdc in next 9 ch, hdc in first sc (the same one you sl st in), hdc 19 times (there will be 3 spaces left), skip 2 spaces, sc in last space. (32) **note – some people had a problem with getting two right or two left feet. remember to not cross over the front, work down the inside, around the back and back up the outside, so you’ll work in opposite directions for each bootie, counterclock wise – looking top down, or “wrong” side out for the right booties and clockwise, or “right” side out for the left bootie**
row 2- ch2 (counts as hdc), turn, hdc in first hdc and around 28 times, ch 1 skip one hdc, hdc in last 2 (31- with a ch1 space)
row 3- ch2 (counts as hdc), turn, hdc, hdc in ch1 space, hdc around (32)
row 4 scallops (girls)- turn, 5dc in second hdc, *skip 1hdc, sc in next hdc, skip 1hdc, 5dc in next hdc*, repeat around (8 shells), sc down the side (I fit 5), continuing around sc across the bottom along the original chain (11), sl st, cut yarn and weave in ends

row 4 simple (boys)- ch1, turn, sc across top (32), down the side (5) and across the bottom chain (11), sl st, cut yarn and weave in ends
And both the boys and girl versions (again these are the larger size)
Don’t forget to add a button where ever you like and your done! I placed mine at the bottom of the 5th hdc over from the front- I might go lower next time… or maybe two smaller buttons?
And one final picture, I thought you might want an inside shot so you can see how it wraps a bit… I’m still so very much in love with these boots.


Rachel
Thank you so much for this pattern! I have been trying to find one for months! You are awesome for sharing this for free.
Ashlee
you are so welcome. I hope you enjoy making it. I had a blast designing them.
Tiana
Having some trouble with the toe area, specifically row 6 starting at sc2tog. Instead of pulling the tip of the bootie together it just all ends up on one side. How many ch do I skip between sc2tog and dc2tog?
Ashlee
there are no skips, if there was I would say “skip the next stitch”. if you look at the stitch diagram you can see that where you start the decreases is where the toes start, and the center decrease is over the center of the front of the toes.
Jessie
Hi there, I so very much love this pattern. I am kind of a beginner, this is my first deviation from hats/scarves/blankets. I feel like I followed the pattern to the letter, however, I used regular worsted weight acrylic yarn (red heart super saver) and a size H hook. I didn’t have a G hook. My finished product is cute, except that when you lie the cuff around nicely, the button hole is on the back of the heel instead of the side of the foot! I’m so sad, I don’t know how to fix it or what to do different. Do you have any idea what the problem is? Also, the top of the shoe isn’t as nice and neat as yours, I had lots of trouble with the dc3tog, I couldn’t find a video anywhere for that one!
Thanks for any light you can shed on my problem, and again, LOVE the pattern!
Jessie
Ashlee
I believe when you came down the chain of the cuff you went the wrong direction, instead of continuing down the side, around the back and up the other side, you instead went across the front THEN down the side, around the back and up the other side, so the opening is offset instead of the front. Just a guess
Tawnya
I think I just need to make the cuff shorter, the rest of the boot fits pretty well, so if I go down another hook size it will be too small. Unless I just do a smaller hook size just for that part. Thanks.
Ashlee
feel free to make whatever changes you need to get the look you want.
Jessie
I figured out the problem! What I did was when I chained 12 for the cuff, and hdc’ed down the chain, I went the wrong direction around the shoe. This created a cuff that folded over in the wrong direction, making it appear to be too long – and then the opening for the foot was on the side of the shoe rather than in the middle. I bought a G hook, and started over completely, fixing this mistake. It turned out perfect! The smaller hook helped a lot with the top of the shoe too. 🙂
Thanks again for the pattern!
Ashlee
your so welcome, sorry it’s taking me so long to get back to responding to comments, I get so many I set aside one day a month to play catch up!
Vera
May I have it translated on russian how to make a booties, please.
Ashlee
I only speak english
Elisabeth
Thank you so much for sharing this pattern. I am very new to crocheting and have been looking for patterns for my 7 m.o. daughter, and LOVED this pattern as soon as I saw it. I was even more grateful that it was free, since I am still “experimenting” with my crochet ability. And for being new and self taught, I could follow along pretty well with only a few hiccups, and I am so excited to make some more for her (and maybe some her friends that will be arriving soon!). I’ll be posting on my blog with links back to this site, since this is so great. Thank you, thank you!
Ashlee
your welcome, I’m so glad you enjoyed the pattern.
Claire kelly
Hi, I just wanted to say thank you for posting this wonderful pattern for the boots. My cousin is expecting later this month and I have crocheted her a pair of them in a lovely mink colour pure new wool so they look like they are suitable for boy or girl. I live in Northern Ireland and our crochet terminology is different to the US. I just wanted to say that I copied your pattern and then retyped it in British terminology so that I could share it with some of the ladies in my crochet group. I would be delighted to send it to you so that you could have it available to any other guests who might like it. I am just not sure how to get it to you as I am not a tech expert. I can either save it in Word or pdf. If you want to contact me then I would happily email it to you or follow instructions how to get it to you
Kind regards and again many thanks, Claire K
Ashlee
I’d love it, thank you, you can email me a word or pdf imtopsyturvy@aol.com
Marlene Newell
I hope you are still checking for comments on this project. I’m making these booties for the first time for a friend having her first baby and am having trouble following the pattern. I check my stitch count through 4 and 5 and I am right on. But row 6 does not work for me — If I do ch1, sc in same sc, then 9 sc and then start the decreases, the toe portion is off-center. As I count them, only 13 stitches are accounted for in the decreases in a row that starts with 39 stitches, leaving 26 stitches for single crochets, 13 on each side. In your photo, it looks like there are 13 stitches on the side, which is what seems like it should be. Since other people have successfully completed these, I’m sure I’m missing something. A second question, do you at some point start working on the outside of the bootie instead on the inside? If you do, when do you make the transition.
Ashlee
I’n not sure what you mean by working on the outside of the bootie instead of the inside? the pattern is written working on the outside, outside of the sole, outside of teh shoe, your never working on the inside until you switch from working in rounds to working in rows for the cuffs.
also remember your already on one side when you start each row, the first sc and the next 9 take you to the 10th stitch, which will be over the 2nd hdc from row 2, the perfect place to start the decreases. I maybe the mistake you made was maybe finishing off after the sole and restarting in the center of the heel, but if your following directions I never say to finish off, or start over at the heel. I make the entire sole and shoe in one. I only finish off and restart for the cuffs.
row 6- ch 1,
sc in same sc, (1)
sc 9 times, (9)
sc2tog, (1)
dc2tog, (1)
dc, (1)
dc3tog, (1- this is the CENTER)
dc, (1)
dc2tog, (1)
sc2tog, (1)
sc around, (you go down the side AROUND THE HEEL and end up back where you started on the side- 16)
sl st to first sc (33)
Laetitia
Hello, sorry I speak french, je voulais savoir si des personnes on réussi a faire le modele, si oui s’il était possible d’avoir des explications en français, le modele me plait mais je debute tout juste au crochet, je ne connais pas encore les points, un tuto vidéo serai le bien venue pour moi lol
Merci a vous
Ashlee
sorry, I don’t have a video, if I ever make one I’ll let you know.
Leona W
Awesome pattern thanks so much!
Ashlee
your so welcome, I’m so glad you like it.
Danielle
These are so adorable I had to make a pair for a baby shower! I love them 🙂 Thanks for the pattern, I posted a link back to this page with my photos:
http://thewayicrochet.blogspot.ca/2013/02/crochet-baby-ugg-booties.html
Ashlee
very cute and nicely done, I love those large wooden buttons.
amandamarie
I would like to say like all the other comments on here, a big thank you for posting your pattern, I am always crocheting baby gifts for anyone I know having a baby and its so nice to have such an easy readable pattern, I am blown away by the amount of comments and questions you have on this site….well done you!!
Ashlee
thank! the amount of comments on this pattern (and the baby size as well) I find crazy as well! I’m glad you like the pattern.
Shala
You are so awesome! I am so in love with these. Freaking everyone in my family is pregnant or just had a baby and these are adorable. I’ve skimmed through your blog and decided we should be best friends. (I really hope that’s not weird. Maybe I should have saved that for, oh, 10 – 20 comments down the road?) Anywho, thanks so much for this pattern. Super easy to follow, especially with the pictures. I’m amazed at the dedication you have to put together a blog as in depth as this. I only have one kid and often can’t find the time to pick my nose.
Thanks again!
Ashlee
not TOO weird… And the fact that you said “pick your nose” you won me over a bit 😉
Shala
Ha ha, glad you liked that.
Ashlee
what can I say, I’m easy 😉
Lauren
I’m newish to crocheting, and I know all of the basics and have even moved on to more difficult patterns, but there is one thing confusing me, because by the time I get to row 7 mine is all curved and horrible looking. When you say 2hdc 3 times, do you mean 2 hdc in the same stitch 3 times? Something is not lining up in mine at all. When I make the sole it curves and is obviously made for the right foot.
Ashlee
2hdc 3 times is 2 hdc in each of the next 3 stitches. if you look at the stitch diagram you can see that the booties are indeed symetrical, and not right or left footed. it’s totally normal for crochet this small, curved and tight to curl. you can block the soles before moving on, but I dont bother, I just make the whole thing then block it.
Myha
I absolutely LOVE these booties! 🙂 I can’t wait to actually make a pair. After seeing someone post their FO on Reddit, I immediately picked up a bit of leftover Caron Simply Soft yarn and made a trial bootie.
It was pretty cute but it didn’t look as good as yours, so I frogged it and tried again. Same thing happened and it wasn’t until my third try that I figured out that it was my tension that was causing the bootie to be super tiny and left-footed. I think that’s one of the problems that an earlier commenter also had, so people should make note of their tension if they start producing only left-footed booties!
Anyway, I just wanted to say thank you and keep up the great work! 🙂 This pattern was very detailed and stylish. Thanks for providing it for free, too!
Ashlee
you can go up a hook size if your tension is a problem, but it’s natural for rounds like this to curl and curve. if it bothers you you can block it, but I just put it on the babies feet and it worked itself out!
glad you like it!
Corrina
Hi- can I buy these booties somewhere
I’m in love with them!
Ashlee
I don’t sell my designs, I can’t stand making something more than once or twice. BUT I allow people to make and sell items from my patterns. So try Etsy, I know a few sellers use my designs there! like these! https://www.etsy.com/listing/98981263/crochet-baby-booties
Martina
These are the coolest, easiest and most fabulous booties out there!! I LOVE this pattern. It hooks up really easily and is the perfect project for a quick plane flight 😉
I particularly love that the upscaled version is in a separate pattern sheet – much less confusion for this ‘bear or little brain’.
Thanks so much for posting it, Ashlee.
Martina
‘bear OF little brain’, that is…
Ashlee
HA! i got it!
Ashlee
you are SO welcome! I tried them in the same pattern and it just didn’t work… way too confusing! I’m so so SO happy to recieve happy comments! Thank you
Gabrielle
Hi! I love this pattern and obviously.. i want to create it for an adult. I know you won’t do it as i read you ansers in the comments.
I would like to know if you’d be offended if i tried to adapt yours. Of course l’d share my version with you ! You can write an email to me at gdgermain @ gmail.com 🙂
THANK you for this wounderfull pattern. Can’t wait to try it!
Ashlee
not at ALL! I think you could easily adapt it, with a good footie base, then use the same idea for the cuff! easy peasy (but it makes my feet twitch just thinking about yarn on my FEET *shudder*) let me know how it goes!
Hanna A.
Thank you so much for this pattern! I tried it a while ago, but at that time it was too hard for me since I had just picked up crocheting again. Today I wanted to give it another try. Now I just finished my second boot. Thank you for the little drawing of the sole and all your advise along the instructions. So much fun! I also read a bit through your blog. You are very talented and inspiring! Blessings to you and your family!
Ashlee
I’m so glad you came back and tried it again! and that you were able to get it this time. AWESOME! I love hearing that. Way to go!