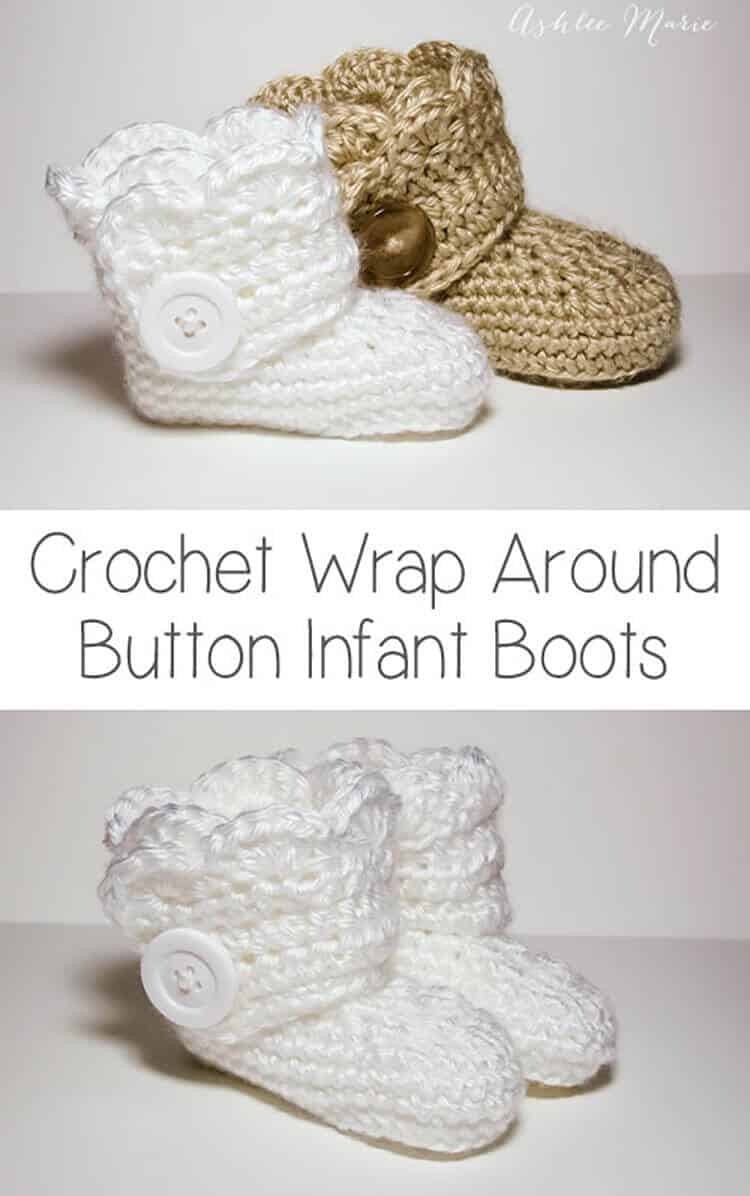
This is an easy to follow pattern to make wrap around infant booties – both for boys and girls.
Okay, after some confusion I’m separating out the patterns. Here is the one for the INFANT size! I realized after making a second set of these that I have two G hooks and they are different sizes???
So for the larger Baby sized shoes I used a G6 – 4mm for these infant shoes I used G6 – 4.25! So if your looking for an infant size 1 (or 0-3 month) boot your in the right place! For a larger (closer to size 4) shoe go to the crochet wrap around button baby boots!
Buy BOTH the Ad-Free pattern pdf’s for both the Baby AND Infant sized discounted here!
The pictures are still the same as before, for the larger size, I’ll try to substitute out smaller pictures when I make another pair!
Buy the Ad-Free pattern pdf for just the infant size here!
Infant wrap around boots
Crochet materials:
caron simply soft yarn
large buttons
G6- 4.25 mm hook (To go up a size use a larger hook, or a larger pattern, to go down a size use an G-4mm hook)
abbreviation:
ch (chain)
sl st (slip stitch)
sc (single crochet)
hdc (half double crochet)
dc (double crochet)
sc2tog (single crochet 2 together)
dc2tog (double crochet 2 together)
dc3tog (double crochet 3 together)

sole:
ch 11
row 1- sc in 2nd ch, sc 5 times, hdc 3 times, 7hdc in last ch, finish the rest of the round working along the back of the chain, hdc 3 times, sc 5 times, 4sc in the last/first ch, sl st to the first sc (28)
row 2- ch1, sc in same sc, sc 7 times, hdc, 2hdc 3 times, 3hdc (in one stitch), 2 hdc 3 times, hdc, sc 8 times, 2sc 3times, sl st to first sc (39)
shoe:
row 3- ch1, working in back loops, sc in same sc, sc around, sl st to first sc (39)
rows 4-5- ch1, sc in same sc,sc around, sl st to first sc (39)
row 6- ch 1, sc in same sc, sc 9 times, sc2tog, dc2tog, dc, dc3tog, dc, dc2tog, sc2tog, sc around, sl st to first sc (33)
row 7- ch 1, sc in same sc, sc 7 times, sc2tog, dc2tog, dc3tog, dc2tog, sc2tog, sc around, sl st to first sc (27)
row 8- ch 1, sc in same sc, sc 5 times, sc2tog, dc, dc3tog, dc, sc2tog, sc around, sl st to first sc, cut yarn weave in ends. (23)

Boot cuff:
for the right boot sl st in the 7th stitch from the seam, for the left boot sl st in the 11th stitch from the seam
ch 12
row 1- hdc in 3rd ch from hook- ch2 counts as hdc, hdc in next 9 ch, hdc in first sc (the same one you sl st in), hdc 19 times (there will be 3 spaces left), skip 2 spaces, sc in last space. (32) **note – some people had a problem with getting two right or two left feet. remember to not cross over the front, work down the inside, around the back and back up the outside, so you’ll work in opposite directions for each bootie, counterclock wise – looking top down, or “wrong” side out for the right booties and clockwise, or “right” side out for the left bootie**
row 2- ch2 (counts as hdc), turn, hdc in first hdc and around 28 times, ch 1 skip one hdc, hdc in last 2 (31- with a ch1 space)
row 3- ch2 (counts as hdc), turn, hdc, hdc in ch1 space, hdc around (32)
row 4 scallops (girls)- turn, 5dc in second hdc, *skip 1hdc, sc in next hdc, skip 1hdc, 5dc in next hdc*, repeat around (8 shells), sc down the side (I fit 5), continuing around sc across the bottom along the original chain (11), sl st, cut yarn and weave in ends

row 4 simple (boys)- ch1, turn, sc across top (32), down the side (5) and across the bottom chain (11), sl st, cut yarn and weave in ends
And both the boys and girl versions (again these are the larger size)
Don’t forget to add a button where ever you like and your done! I placed mine at the bottom of the 5th hdc over from the front- I might go lower next time… or maybe two smaller buttons?
And one final picture, I thought you might want an inside shot so you can see how it wraps a bit… I’m still so very much in love with these boots.


dawnhouston
i need your help with your pattern row one and 2 crochet wrap around button
Ashlee
I believe we’ve been facebooking, right? Sorry I couldn’t answer your questions better.
Kim
Love the pattern. I’ve been trying it with various yarns and they all give a different look and size bootie, which I love. I didn’t have any issues with the pattern and found it easy to follow, but I’m wondering if you have any tricks or tips for how you get your seam to look so great? My seam often has small gaps and doesn’t look taut and symmetrical like yours. Any suggestions?
Ashlee
I’m SO glad! For every person that has a question or complains, or gives up I feel a bit like maybe I should quite sharing patterns. So the sweet comments like yours, that let me know I’m not a complete failure at pattern writing, it gives me a boost to keep trying!
As for your seam… I really don’t know, I think it comes down to the way we crochet, tight, loose, etc… I always take my personal crocheting into my thought process as I read other patterns, I often change parts that don’t work with my style, so if there is a better way to close each row try that. you MIGHT be sl st in the chain on accident rather than the top of the sc? after you sl st, put it taunt before you ch and then sc… I hope something I just rambled about helps!
Steph
I made these over the weekend for my daughter whom I am expecting in December. They are super cute and were easy to make. I made one mistake and had to start over on the cuff the first time (I crocheted the wrong direction so my cuff went around the back–whoops! But in no time I had my two booties finished, added a button to each and they’re done! Thank you so much for sharing your pattern! I hope to make my baby girls more booties soon!
Ashlee
I couldn’t think of a better way to explain the cuff’s, but it is totally easy to get that one wrong the first time! Glad it was an easy fix for you and your welcome!
Loretta
Thank you so much for posting this pattern. I have made 3 pairs in past 2 days and I love them! Very well explained and posted. Keep up the good work!
Ashlee
I’m SO glad to hear that you were able to make them, love them, and make them so easily and fast! I’m back to crocheting the past few days and I’m working on a new pattern!
Steph
I thought I posted before with my reply. But here is my blog: http://mypersonalblogger-steph.blogspot.com, still a work in progress. But I did take a picture of my booties I made following your pattern and linked them back to your blog! Thanks again!!
Ashlee
they look GREAT! And congrats on the upcoming baby!
Amigurumi Torino
Wow, this booties are super cute! Just what I was looking for my friend’s newborn. Months ago I looked for a pattern for baby boots and I couldn’t understand a thing (I was barely a beginner), but with your tutorial I think I’ll be able to crochet them. You have also given me entertainment for a looong night at the airport 🙂
Ashlee
your so welcome! I hope you enjoy making them as much as I did!
Belen
Great pattern! Just one bit of information, more or less how much yarn does it need?
Ashlee
ummmm I have no idea. I made quite a few pairs and didn’t come close to using an entire skein. Certainly not enough yarn that I felt it was necessary to measure- I’m so sorry! I’m still super new to sharing the patterns I make up! I’ve never bothered with how much yarn or gauge or any of it, so I’m trying! I’ll keep better track next time!
Sara
These are great! I had to search the internet for booties that are modern and practical, and here theynare!!
Mine actually came out looking just like the picture! Woo hoo! Although somehow I ended up with two right feet! It’s not like they take forever, so I’ll just make another one and save the extra for the next baby that comes along. This pattern is so cute, thank you! I want the adult pattern. They look comfortable!
Ashlee
for the left bootie you just start the cuff a few stitches over. Remember when you come down the ch with the HDC’s continue to hdc around the side and back and other side, don’t hdc across the front.
Megan
I can’t get it to work for me 🙁 so disappointed with myself :/ lol Mine just keeps coming out like a twisted peanut 🙁 Idk what I’m doing wrong. In row 2 it says chain 1 sc in the same sc then sc 7 times so is that a total of 8 sc before the first hdc?
Ashlee
yup, you sc in the same sc that you just sl st in the row before, and yes that adds up to 8 sc. just keep going, mine twists a bit too (you might just be crocheting tighter than I do) just keep going and once your done block it (pull and twist it into shape.)
Ashlee
I added a diagram of the sole, hopefully that will make the sole more clear, and you can see how symmetrical it’s supposed to be, even if it twists keep going!
Megan
On the row where it begins to decrease I have 9 sc before the decreases but 17 after the decreases. Is that right? Because I’m sure that is why mine look so twisted up.
Ashlee
yep, that’s right. The seam is up the side so you have the 9 sc on one side, then the decreases, then 9 sc down the side and 8 sc around the heel!
Samantha
hello, first off I just love this pattern it’s simple to follow and these are to adorable. you’ve done a great job explaining on what to do and the pictures help out a lot also. But I do have a question. I’m making these for a friend who’s baby is due in Jan. however she wants a matching set for her older daughter. She said that her daughter is a size 7. Now I tried and tried and tried and finally I gave in and have to ask. HOW can I turn these in to size 7 lol. I get the bottom of the sole just about where I need it, but it ends up being around 80 to 82 stitches. Then going on from there I fail miserably each time. Can you please give me some advice on what I can do or how to match this pattern to that size I need. Example since it’s a bigger size once I sc around in the back stitch do I need to add a few more rows of sc around. Then if so how do I decrease once I get to that point with out them looking horrible. Any help or advice would be appreciated thank you.
Ashlee
no idea! I’ve never made anything larger than baby size! Honestly I’m not into crochet booties in larger sizes… I only create patterns with my model close at hand. So I’d start the sole size, measuring it against the daughter. Then the sides and decreases the same way, I took apart and re put together my booties a few dozen times til I got it right! Have fun!
Stacie
Thank-you so much for this pattern I love it! your directions are so easy to follow and I love the stitch count at the end so helpful! one question though….my finished boot cuff, for the girls boot on one of my boots the “wrong side” is facing out and for the other boot the “right side” is facing out….is that how they are supposed to be or did I mess something up?
Ashlee
each row of the cuff is a different direction, “right” “wrong” “right” or “wrong” “right” “wrong” they are opposite, you did that right~!
Annie
Thanks for the free pattern Ashlee, I had too many stitches on the 2nd row. Do I count the slip stitch as a stitch? I’m a beginner so I’m sure it’s my mistake and nothing to do with the accuracy of your pattern. I finished it out anyway – I think I had 2 extra stitches all the way up. They still look lovely 🙂 Thanks again, Annie
Ashlee
you don’t count the sl st as a stitch. Your welcome
Mallory
I am OBSESSED with these!!! Would you ever consider selling a pair to somebody?! Like…me?!
Ashlee
Nope, sorry! i tried having a store, I hated every second of it. I like creating and I share my patterns so others can do the same. There are people on etsy using my pattern to sell items, or boots similar to mine. https://www.etsy.com/search?q=baby%20boots&view_type=gallery&ship_to=ZZ&min=0&max=0
Kaylynn
I am attempting this for the third time now and I am having trouble on row 6. I’m assuming that the dc3tg should be in the middle front of the pitied but everyone it isn’t for me. I’m sure I’m making some stitch count mistake but I can’t get it to line up. Any suggestions? Have you ever had this problem?
Ashlee
Are you sure it isn’t in the middle? As your crocheting the booties tend to curl a little bit, nothing blocking won’t take care of. mark the center stitches of the previous rows to make sure it isn’t centered. It doesn’t look centered as your making it but once your finished and block it it worked out fine for me.
Nevi
HI, Im really stuck on rows 6, 7 and 8. I always end up with big gaps at the front of the shoe!
What am I doing wrong??
Ashlee
I need more details to help, just saying your stuck on three rows is a bit broad, can you narrow it down for me? WHAT exactly are you having trouble understanding? Or is the problem just that you have gaps? if that’s the only issue try crocheting those decreased a bit tighter, or even using a smaller hook for those stitches (but not for the whole round)
Tiffany Kelly
Hiya!! This question may have been answered already, so sorry to be redundant, but when I’m ch1 in row 4&5 of the sole, is that counted as the first sc that I sl st into when I’m all done? Thanks!!!!
Ashlee
the ch is not counted as the first sc. You only count a ch as a stitch when the pattern specifically says so, like “ch 1 (this counts as the first sc here and throughout” Only in that case would it ever count. in this patterns case it does NOT count.
Samantha
Thanks, I have been trying think I’m just gonna have to wing it a bit and hope I can get it some what close. Thank you again though and again I really do love these.
Ashlee
your welcome. Let me know if you have any questions about the pattern.
Kimberly Lopez
Thank you so much for this pattern! I was looking for something like this but most places charge for the pattern. I love that you posted this for free! So easy to work up and just adorable!
Ashlee
you are SO welcome! I enjoy doing it!
sara
I got one boy boot done… and instead of doing a matching boot, I decided to try the girl boot! 🙂 I’ll match them up later! 🙂
Just a quick question.. somehow my seam always ends up on the side of the shoe, instead of at the very back. Maybe 3 stitches from the very back. All the stitch numbers add up, I’m just not joining at the very back of the shoe. It’s not a big deal until the round where you slip stitch 7 sc from the seam! instead of using my seam, I just folded the shoe and did it from the back.
But I’d love for my seam to be in the right spot! LOL any idea what I’m doing wrong?!
Ashlee
the seam is designed to be on the side, that’s where mine is, and when I say to count 7 over I mean from the side, that’s why it says 7 over then 11 over, if the seam was centered I’d say count 10 from the left or 10 from the right for the different starts of the cuffs. The seam is on the side cause when your making the sole it’s easier to write it doing one side, then the toes, the other side, then the heel, it’s hard to create the soles from the center of the heel and keep it that way. So the only thing you did wrong was counting only 4 rather than 7.