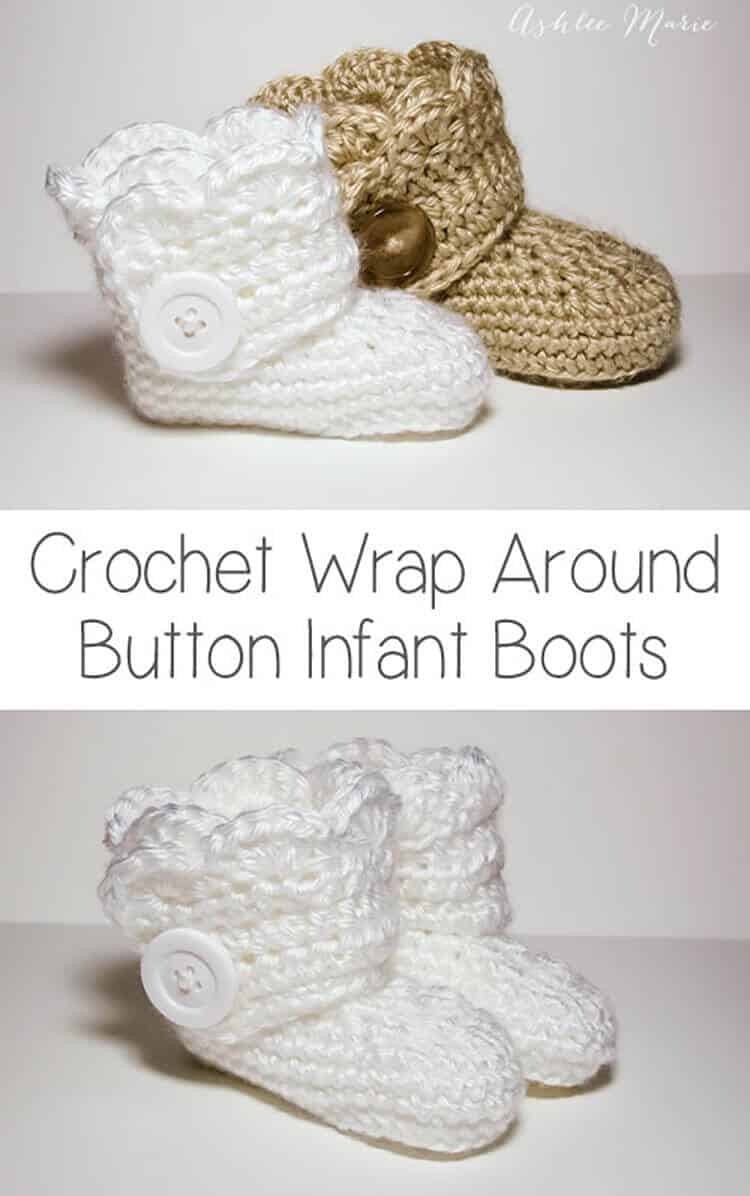
This is an easy to follow pattern to make wrap around infant booties – both for boys and girls.
Okay, after some confusion I’m separating out the patterns. Here is the one for the INFANT size! I realized after making a second set of these that I have two G hooks and they are different sizes???
So for the larger Baby sized shoes I used a G6 – 4mm for these infant shoes I used G6 – 4.25! So if your looking for an infant size 1 (or 0-3 month) boot your in the right place! For a larger (closer to size 4) shoe go to the crochet wrap around button baby boots!
Buy BOTH the Ad-Free pattern pdf’s for both the Baby AND Infant sized discounted here!
The pictures are still the same as before, for the larger size, I’ll try to substitute out smaller pictures when I make another pair!
Buy the Ad-Free pattern pdf for just the infant size here!
Infant wrap around boots
Crochet materials:
caron simply soft yarn
large buttons
G6- 4.25 mm hook (To go up a size use a larger hook, or a larger pattern, to go down a size use an G-4mm hook)
abbreviation:
ch (chain)
sl st (slip stitch)
sc (single crochet)
hdc (half double crochet)
dc (double crochet)
sc2tog (single crochet 2 together)
dc2tog (double crochet 2 together)
dc3tog (double crochet 3 together)

sole:
ch 11
row 1- sc in 2nd ch, sc 5 times, hdc 3 times, 7hdc in last ch, finish the rest of the round working along the back of the chain, hdc 3 times, sc 5 times, 4sc in the last/first ch, sl st to the first sc (28)
row 2- ch1, sc in same sc, sc 7 times, hdc, 2hdc 3 times, 3hdc (in one stitch), 2 hdc 3 times, hdc, sc 8 times, 2sc 3times, sl st to first sc (39)
shoe:
row 3- ch1, working in back loops, sc in same sc, sc around, sl st to first sc (39)
rows 4-5- ch1, sc in same sc,sc around, sl st to first sc (39)
row 6- ch 1, sc in same sc, sc 9 times, sc2tog, dc2tog, dc, dc3tog, dc, dc2tog, sc2tog, sc around, sl st to first sc (33)
row 7- ch 1, sc in same sc, sc 7 times, sc2tog, dc2tog, dc3tog, dc2tog, sc2tog, sc around, sl st to first sc (27)
row 8- ch 1, sc in same sc, sc 5 times, sc2tog, dc, dc3tog, dc, sc2tog, sc around, sl st to first sc, cut yarn weave in ends. (23)

Boot cuff:
for the right boot sl st in the 7th stitch from the seam, for the left boot sl st in the 11th stitch from the seam
ch 12
row 1- hdc in 3rd ch from hook- ch2 counts as hdc, hdc in next 9 ch, hdc in first sc (the same one you sl st in), hdc 19 times (there will be 3 spaces left), skip 2 spaces, sc in last space. (32) **note – some people had a problem with getting two right or two left feet. remember to not cross over the front, work down the inside, around the back and back up the outside, so you’ll work in opposite directions for each bootie, counterclock wise – looking top down, or “wrong” side out for the right booties and clockwise, or “right” side out for the left bootie**
row 2- ch2 (counts as hdc), turn, hdc in first hdc and around 28 times, ch 1 skip one hdc, hdc in last 2 (31- with a ch1 space)
row 3- ch2 (counts as hdc), turn, hdc, hdc in ch1 space, hdc around (32)
row 4 scallops (girls)- turn, 5dc in second hdc, *skip 1hdc, sc in next hdc, skip 1hdc, 5dc in next hdc*, repeat around (8 shells), sc down the side (I fit 5), continuing around sc across the bottom along the original chain (11), sl st, cut yarn and weave in ends

row 4 simple (boys)- ch1, turn, sc across top (32), down the side (5) and across the bottom chain (11), sl st, cut yarn and weave in ends
And both the boys and girl versions (again these are the larger size)
Don’t forget to add a button where ever you like and your done! I placed mine at the bottom of the 5th hdc over from the front- I might go lower next time… or maybe two smaller buttons?
And one final picture, I thought you might want an inside shot so you can see how it wraps a bit… I’m still so very much in love with these boots.


Kamryn
I have to many stitches, and the opening in my bootie before adding the cuff isn’t as closed as yours was.
Ashlee
I’m sorry, but over email and comments it’s hard to really help. Which row does your count get off? And can you tell me EXACTLY what your doing?
abcrew
I have been trying to find a pattern for these for almost a year now. Up until now I’ve only found people on Etsy selling the completed booties, which I never would buy since I know how to crochet myself. They are so cute and I am sooo grateful that you are offering the pattern for free. Now my neighbor can get these for her baby as a gift instead of something else.
Ashlee
your so welcome! I hope you enjoy the pattern!
Dawn
Good morning! I just wanted to say THANK YOU!!! I just started crocheting the end of february beginning of march and whizzed right along making ADORABLE creations! I believe this is the *only* shoe/boot pattern I will ever do! I haven’t done them as boots *yet*, but I will!! I’ve been making them into cutsie little shoes!
and https://www.facebook.com/photo.php?fbid=10150723149918233&set=a.10150668769828233.389900.504183232&type=3&theater
I’m currently finishing up another Mickey set(with your shoe design), then I’m onto a Minnie set a little later! =D Can’t wait to have them in pink… I’m wondering if there’s a way to add mini “high heel” to make it look more like Minnie’s shoe… hmmmm *::gears going::* Mind if I play around with your pattern a bit to try?? =)
Ashlee
how fun! I’d finish the shoe and then sl st into the heel base and sc around the heel and then across the base, the build it up, decreasing every row.
AmKrum
adorable!! thank you!!
Ashlee
thanks so much! And your so welcome!
Elaine
THANK YOU!!! I love this pattern!! It’s the first real bootie that I’ve liked and made. The only thing is… you got an adult version? 🙂 I want some for me, lol! This is gorgeous! Again, thank you! Great job!
Ashlee
HA! I get that question a lot, but personally I’m not a fan of anything on my feet, let alone crochet texture (I have texture issues)
Nevi
Hi, these are so cute! Just a quick question what are the dimensions of the final bootie (size 1), just the length of the sole of the finished bootie would be great. The baby im crocheting for has long, thin feet and just want to check that they will fit!
Ashlee
ummmmm I actually just gave the infant booties to the gal I made them for! So I don’t have them to measure. They might actually be bigger than a size one, it all depends on how tight or loose you stitch. BUT my babies have narrow feet so I tend to create long narrow shoes. What you want to do it crochet the sole, then hold it up to the babies foot, if you need to make adjustments do it then, BEFORE you do the rest!
mayu elizarraraz
Hello I love this boots.. I have a baby girl of three months and I going to start this today…. I new at this but I like that way you explain it…
Ashlee
thank you so so SO much! I get so many questions it’s so sweet and totally makes my day when someone comments just to day they like it! I hope the boots work out easily for you!
Amy
I LOVE this pattern. It is so adorable! Thank you so much for posting the pictures, it helps a ton! I have a quick question because I am also a newbe crocheter. When you start Row 3 in the back stitches, is that just for that row or continued through the whole project? Also before that, are you working in the front of the stitch or through whole chain? I hope that question makes sense? My little baby nephew is going to be so styling! Thank you thank you thank you!
Ashlee
I’m sorry it’s taken me so long to answer your question! I’m WAY behind on comments! Row 3 is worked in back stitches to help create a sharper corner for the bottom of the booties, but that’s the ONLY row worked in back stitches. Your second question is unclear. before row three your working in the top of the stitches like normal.
J. G. Burdette
They are so adorable. I love them. I’ve searched high and low for something like this!
Ashlee
Thanks so much! I hope you get to make them and enjoy them! They were really fun to make!
Bonnie
Thank you so much for this pattern, and for making it available for free! I’m fairly new to reading crochet patterns, but found yours easy to interpret! Thanks again for sharing 🙂
Ashlee
your so welcome! And thanks for commenting and sharing your appreciation! So much of the time it’s just complaining and correcting so I really really REALLY appreciate comments like yours just saying thanks!
Angie
I’m having trouble with this pattern after row-8. I have 27 sets instead of 23. I can’t figure out what I’m doing wrong… HELP!
Ashlee
Are you sure you didn’t miss a row???? row 7 should end with 27 stitches, row 8 should end with 23, so unless you didn’t do any of the decreases I’m thinking you just missed a row!
Angie
Not sure what I was doing wrong but I’ve figured it out and the pattern is working beautifully! So excited. Thanks again!
Ashlee
AH, I’m catching up on comments and I should have noticed you commented twice! I’m glad you got it all figured out!
Rosey
Love this pattern and am currently making a pair for my new baby due in september 🙂
quick question – is it done in american or english crochet terms as I know they differ slightly?
Ashlee
American! (sorry I’m so behind on responding to comments, I hope you already figured it out!)
cindy
thank you for this great pattern. My booties turned out nicely!
Ik was wondering if you could tell me how you make a sc? Cause yours are perfectly straight above eachother. Mine arent….. Maybee you could email me? Thank you!
Ashlee
um… put your hook into the stitch, yo, pull back through, yo and pull through the two stitches on the hook. everyone’s personal style is a bit different, once you find yours you can change patterns as you work to accommodate what you do! I change patterns ALL THE TIME!
Kellie Wishart
I have searched high and low for a bootie pattern like this, thank-you muchly much!!! I have completed a pair and found your instructions easy to follow. I don’t know how but I seem to have crocheted one of the cuffs on inside out? Any ideas what I’ve done wrong or is that how they’re meant to be? You can only really tell with the scalloped edge, one has the pretty side outside (the 7 stchs away from seam), the other has the pretty side inside (the 11 stchs away).
Am I just being pedantic?
Ashlee
that’s just the way it is, I was trying to make it as easy as possible for people following the pattern, but if it bothers you you could always finish off the row before then start at the other end for the finishing round.
Rhonda Crawley
I love these booties, Im a beginner crocheter and am having a little trouble with your pattern (have started over 9 times so far lol) when you say sc 5 ect is that all in one chain or 5 in a row? thank you for any help you can give me
Ashlee
when the number is first, like 2sc, that means 2 sc in one stitch. when the number is after the stitch, sc 5 times, that means sc in the next 5 stitches. if it’s a number first and after, 2sc 5 times, that’s 2 sc in each of the next 5 stitches
Brandi
I love these booties. They are very similar to my converse style ones. I love the flap with the button. Thanks for the pattern I can’t wait ti makes these!! Awesome!
Ashlee
I also have a converse shoe pattern, but with thread instead of yarn. I hope you like these booties!
litta
I see in row 3 , what is different between 1hdc and hdc?
Ashlee
I’m missing your question? What row says 1hdc??? (and there wouldn’t be a difference between 1hdc and hdc, but I’m just not seeing it!)
Kate
These are absolutely adorable!! I love them!! Do you by any chance have a pattern for an adult sized version of these?
Ashlee
I do not, sorry.
Mamadof6
Oh my, you’re so very smart and very talented! I’m going to make for my 1st great grandbaby girl!! It has been a blessing since I’ve been crocheting. Thank u for this adorable pattern, and i copied it from my phone, no computer.
Ashlee
thank you so much! and congrats on your first grandbaby girl! I hope it’s legible on the phone!