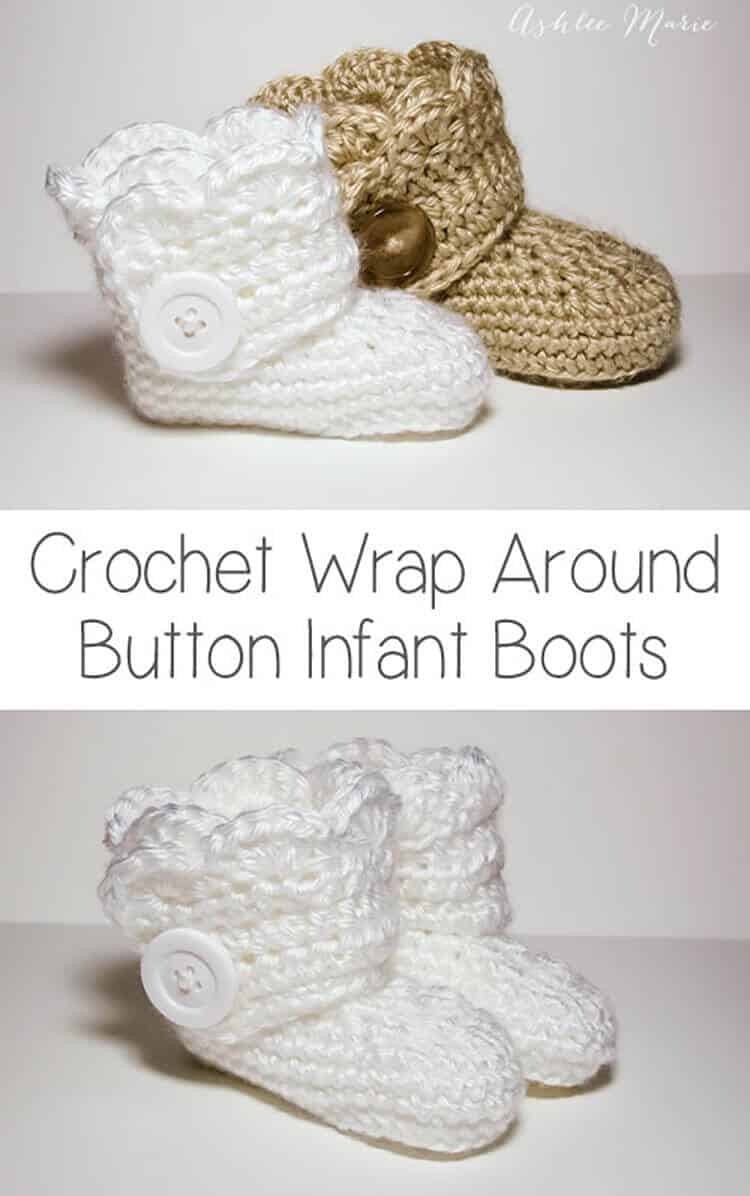
This is an easy to follow pattern to make wrap around infant booties – both for boys and girls.
Okay, after some confusion I’m separating out the patterns. Here is the one for the INFANT size! I realized after making a second set of these that I have two G hooks and they are different sizes???
So for the larger Baby sized shoes I used a G6 – 4mm for these infant shoes I used G6 – 4.25! So if your looking for an infant size 1 (or 0-3 month) boot your in the right place! For a larger (closer to size 4) shoe go to the crochet wrap around button baby boots!
Buy BOTH the Ad-Free pattern pdf’s for both the Baby AND Infant sized discounted here!
The pictures are still the same as before, for the larger size, I’ll try to substitute out smaller pictures when I make another pair!
Buy the Ad-Free pattern pdf for just the infant size here!
Infant wrap around boots
Crochet materials:
caron simply soft yarn
large buttons
G6- 4.25 mm hook (To go up a size use a larger hook, or a larger pattern, to go down a size use an G-4mm hook)
abbreviation:
ch (chain)
sl st (slip stitch)
sc (single crochet)
hdc (half double crochet)
dc (double crochet)
sc2tog (single crochet 2 together)
dc2tog (double crochet 2 together)
dc3tog (double crochet 3 together)

sole:
ch 11
row 1- sc in 2nd ch, sc 5 times, hdc 3 times, 7hdc in last ch, finish the rest of the round working along the back of the chain, hdc 3 times, sc 5 times, 4sc in the last/first ch, sl st to the first sc (28)
row 2- ch1, sc in same sc, sc 7 times, hdc, 2hdc 3 times, 3hdc (in one stitch), 2 hdc 3 times, hdc, sc 8 times, 2sc 3times, sl st to first sc (39)
shoe:
row 3- ch1, working in back loops, sc in same sc, sc around, sl st to first sc (39)
rows 4-5- ch1, sc in same sc,sc around, sl st to first sc (39)
row 6- ch 1, sc in same sc, sc 9 times, sc2tog, dc2tog, dc, dc3tog, dc, dc2tog, sc2tog, sc around, sl st to first sc (33)
row 7- ch 1, sc in same sc, sc 7 times, sc2tog, dc2tog, dc3tog, dc2tog, sc2tog, sc around, sl st to first sc (27)
row 8- ch 1, sc in same sc, sc 5 times, sc2tog, dc, dc3tog, dc, sc2tog, sc around, sl st to first sc, cut yarn weave in ends. (23)

Boot cuff:
for the right boot sl st in the 7th stitch from the seam, for the left boot sl st in the 11th stitch from the seam
ch 12
row 1- hdc in 3rd ch from hook- ch2 counts as hdc, hdc in next 9 ch, hdc in first sc (the same one you sl st in), hdc 19 times (there will be 3 spaces left), skip 2 spaces, sc in last space. (32) **note – some people had a problem with getting two right or two left feet. remember to not cross over the front, work down the inside, around the back and back up the outside, so you’ll work in opposite directions for each bootie, counterclock wise – looking top down, or “wrong” side out for the right booties and clockwise, or “right” side out for the left bootie**
row 2- ch2 (counts as hdc), turn, hdc in first hdc and around 28 times, ch 1 skip one hdc, hdc in last 2 (31- with a ch1 space)
row 3- ch2 (counts as hdc), turn, hdc, hdc in ch1 space, hdc around (32)
row 4 scallops (girls)- turn, 5dc in second hdc, *skip 1hdc, sc in next hdc, skip 1hdc, 5dc in next hdc*, repeat around (8 shells), sc down the side (I fit 5), continuing around sc across the bottom along the original chain (11), sl st, cut yarn and weave in ends

row 4 simple (boys)- ch1, turn, sc across top (32), down the side (5) and across the bottom chain (11), sl st, cut yarn and weave in ends
And both the boys and girl versions (again these are the larger size)
Don’t forget to add a button where ever you like and your done! I placed mine at the bottom of the 5th hdc over from the front- I might go lower next time… or maybe two smaller buttons?
And one final picture, I thought you might want an inside shot so you can see how it wraps a bit… I’m still so very much in love with these boots.


Joanne
No, not misreading anything 🙂
Row 1 you have 28 stitches
row 2, count your increases, you do not have 11, you have 9 so, there should be 37 total. You have 39 written. Adding the remaining 2 stitches cause the shoe to curve in an unnatural way, and becomes a lefty shoe. Didnt mean to judge your pattern in any way. I love these booties. I am a full time crocheter, i do not have time to think of patterns, so i look for patterns i like. Out of que for me. Too bad 🙁
Ashlee
I’m sorry to say that you are indeed misreading something, I’m not sure what though.
let’s count it out:
row 2- ch1,
sc in same sc, (1)
sc 7 times, (7)
1hdc, (1)
2hdc 3 times, (6) 3 increases
3hdc, (3) 2 increases
2hdc 3 times, (6) 3 increases
1hdc, (1)
sc 8 times, (8)
2sc 3times, (6) 3 increases
sl st to first sc
(1+7=8+1=9+6=15+3=18+6=24+1=25+8=33+6=39)
there are 11 increases total
where are you only getting 9 increases, obviously I’m writing something wrong and I’d like to fix it to make my patterns more legible?
I should add that I often change a pattern I’m reading to fit my style better, if you like it better with only 37 increases then by all means do that. We all crochet at different tightness/looseness and all patterns are open to change. but that doesn’t mean that it’s written wrong, just not what you want. I understand that adding a gauge to my pattern would greatly help full time crocheters like yourself better, but I’m not in any way full time, I’m a mother of 5 children with special needs who crochets, knits and blogs on the side as my break in the evenings. I make all these items for myself and myself alone. I don’t make any money on my patterns or my blog and while I’m happy to share and happy to answer questions I am in no way claiming to be an expert pattern maker, that’s why I don’t sell them, I’m not confident enough for that. I’m just sharing what worked of me and my style of crocheting. Feel free to change it for your own use however you’d like but my pattern is not wrong, it’s the pattern that perfectly fits my son’s feet. I’m very upfront in the fact that he has long, huge fat feet and these booties won’t fit everyone’s children. I’m not making them to be a specific size, just sharing what I created for my own use.
Christine
Ashlee your patterns are very well written with very legible instructions. You are a very busy woman looking after 5 children and still seem to find the time to share your talents with us and “free” as well. I don’t think you should be wasting any more of your time on someone who obviously does not appreciate your pattern or the time you have put into them. You have done nothing but write and re-write this pattern for this lady and still doesn’t appear to understand. The spare time that you do have when you have it shouldn’t be wasted on someone who does not appreciate your work. She has done nothing but question your pattern. I totally agree with you on asking her to create her own style or whichever works for her. Thank you so very much for everything you have done and continue to do. Biggest fan!
Christine
Ashlee
ha! Thank you so much for this comment. It made my day, just a few days ago someone wrote a huge long comment on how I’m not writing in the standard format that’s why so many people don’t understand and I need to fix every pattern I write. Thats the main reason I don’t change, because I feel insecure with my pattern writing. So re reading your comment as I’m catching up on reponding was perfect timing!
Cindy
Ashlee – I know it has been a while since you wrote this pattern and had to suffer through such ungrateful comments. I am shocked at the back and forth of some people. You wrote this pattern and shared it out of the kindness of your heart. There are some people that need to be right regardless of what you say or how many ways you try to explain things. You handled this situation like a lady or prefers to stay on the higher road as I would have had a problem doing that. Thumbs up to you. I am just finding this pattern so I do not know if you are still sharing but, if you aren’t I pray it wasn’t because of that person – never allow any one to rob you of your power, your self worth and self-confidence. Always hold your head high as even though this is the first time I have ever had any contact with you, you truly have a good and loving heart. Respectfully and warmly, Cindy F.
Ashlee
Thank you so much Cindy! It can get discouraging, and yes sometimes maddening, but I just take a break from comments when I need to and come back refreshed. Since my baby is no longer a baby I’m not feeling quite as inspired to make crochet patterns, but when I AM inspired again I’ll for sure be sharing no matter what. Thank you again for your sweet words of encouragement!
Jo
These are just about the cutest things I’ve ever seen! I’m a self taught crocheter and not always the best at it but your pattern was so easy to follow! I’ve already made 3 pairs (with no one to give them to…so sad). Thank you for posting these!!
Ashlee
Thank you so much! After numerous complaints I’m a bit beaten down right now, your sweet comment came at just the right time! I’m so glad you like them!
jodee
A good place to give your thoughtful talent to is any facility that loves babies as much as you do! cancer wards, hospital, maternity ward, chelters for women and children, etc…..Lots of babies have little to nothing when they go home…..Just some ideas…
Ashlee
Great suggestions! thank you!
Joanne
OK. I see what i did wrong. 3hdc I did 1hdc in the next 3 stitches. My mistake I apologize.
Ashlee
I’m glad we got to the bottom of the problem. Do you have a suggestion for a better way for me to write it so someone else doesn’t have the same problem. I really do want to become a better pattern writer. Sorry for the confusion and thanks for trying to help.
Maryann
Just wanted to say what an awesome pattern this is and THANK YOU for offering it for free instead of so many etsy-ers who would charge like $5 for it! I made these as part of a set I’m making for my babe due in July as well as 2 cousins who are due around the same time I am. I used lily sugar & cream yarn and they came out perfect. I did use a size f hook to account for the slightly thicker yarn.
Again, thanks, and a link back has been shared via Facebook 🙂
Ashlee
you are SO welcome, and thank you so much for your comment. so often people only post when they have a question or complaint and hearing the success stories and appreciation is incredible! I could kiss you! So thank you for taking the time to let me know!
Jo
So, since my last post I’ve been thinking about these boots a lot! I was wondering if you have thought about felting them? I’ve only ever made one thing felted but I think they would be so cute felted! Or do you think they would be too itchy?? They would have to be made a lot bigger, of course, and I’m not really sure how to go about doing that….
Wondering your thoughts?
Ashlee
Personally I don’t really “get” felting, so I’ve never learned how, and I wouldn’t know if this project is something that could be or not. BUT that said if it CAN be felted (I’m not sure on the requirements for it) then I’d say go for it! It’s always fun to experiment and try something new! At some point I’m sure I WILL try felting, just to try it, but I just haven’t been that motivated yet, and there is always something else I’d like to learn more! Like right now, knitting intarsia in the round… it’s kicking by butt, but I’m loving learning it!
Yvonne
I have been crocheting for 34 years. I cannot crochet without a pattern and am self taught. But I have to tell you, as many websites as I have been on and as much work as I have seen done, yours is SPECTACULAR! Your creations are beautiful. Thank you so much for sharing and for the creativity you have and are willing to share. Many creators in the art of crochet do not allow people to re-create, which is a shame. Thank you for your generosity and again sharing your creativity! Hugs!!!
Ashlee
why thank you so much! I really REALLY appreciate that! The main reason I blog and share is so that others CAN recreate it themselves! I love it when people make a cake or a crochet or knit piece from one of my tutorials or patterns so thank you so much for commenting, you just totally made my weekend!
lauren
Loove this pattern!! I used the little pattern & altered it a bit for my dd11m.. she’s a little fatty so I can NEVER find boots to fit her!! Bottom of her foot is 4″ & her calves are 7″ around. I added a row to the sole & added a row to the top of the shoe, made the strap & added scallops to the side & bottom
Ashlee
Glad you were able to adjust it to fit your needs! I do that all the time with patterns! Glad it wasn’t too hard and that your sweet little hobbit (like mine) has shoes now!
Yvonne
I made them today and they are just beautiful. I read a previous blog and I too had a bit of trouble with it being “askew”, However, once the bootie’s were finished and I stuffed it with a paper towel to shape it, it turned out just fine! There is nothing “wrong” with your pattern. 🙂 I also made a newborn sunhat and I did the brim with the shell stitch to match, too cute! I am glad I made your weekend. Your work and generosity need praising. You are very talented. BE PROUD! Hugs.
Ashlee
Thanks great! I’m glad it worked out so well for you! Thanks so much and I bet the hat looks adorable too!
Hector Mauricio
NICE 🙂
Angela
Thank You! I was having problems with row 2 also. I tore it out and reworked it 3 times before I looked at the comments. I think the problem is that the pattern seems to read that the 3 hdc are worked in separate stitches – not all in one at the toe. It was a little confusing to me also.
Thanks for this pattern! I have been looking everywhere for one just like this that I didn’t have to pay a bunch of money for. And thank you for making it free!
Well…off to correct and finish making these darn cute little booties!
Ashlee
I write hdc 3 times, for that and 3hdc for one stitch… that’s how I’ve always read it, but I’m always open to advice for being a better writer. thanks
Angela
In other patterns that I have seen, they usually write it as 3 hdc in next stitch. Hope that helps.
Ashlee
I added the line, thanks.
MrsCharisma
I DID IT! LOL! 🙂
I’d left a message on Ravelry because I couldn’t figure it out. But my bootie came out really pretty! I did have an issue after row 8. It didn’t look “closed” like your pic, so I added some more dc2tog and dc3tog and what not to close it up 🙂
Thanks!!!
Ashlee
I wonder why it wasn’t looking as closed? glad you took the initiative and fixed it. I do that all the time with patterns, change it a bit to fit my style, or stitches! I hope they are the right size now and not to big anymore!
melissa
Have you ever consider doing a tutorial on these booties because I am a beginner to crocheting and reading patterns can be tricky for me much easier for me to watch someone do it but I am learning… mostly just from watching videos online. I have started these boots and would love to be able to use as a baby shower gift so fingers crossed they turn out I love them!
Ashlee
well this post is a tutorial, there is a picture every few rows to help you along. If you have a trouble at some point just let me know what row and I’ll see if I can help you out! I tried a few videos but no one watches them so I don’t do them any more, esp for something that changes every row. This video would take about an hour!
Vikki
Thank you so much for this pattern! The pics were such a help, for me the pictures help the words make sense. So as a first time bootie maker, thank you thank you!
Ashlee
Your so welcome! It’s nice to get a compliment that the pattern worked for you! I’m so so SO glad!
allison
So when you say:
row 1- sc in 2nd ch, sc 5 times, hdc 3 times, 7hdc in last ch, finish the rest of the round working along the back of the chain, hdc 3 times, sc 5 times, 4sc in the last/first ch, sl st to the first sc (28)
Does that mean sc 5 times in one stitch or sc in the next 5 stitches? Or hdc 3 times, does that mean 3 in one stitch or one in the next 3 stitches?
Ashlee
when the number is after the stitch: hdc 3 times, it’s in the next 3 stitches
when the number is BEOFRE the stitch: 7hdc it’s in the SAME stitch
make sense?
Ashlee
I added a diagram of the sole, hopefully that will make it clearer
Mel
Thank you so much for this tutorial! I hadn’t made anything but granny rugs before this and after a few attempts, this tute is easy as pie. I’ve made a few sets for my own bub to be and a few for gifts. 🙂
Ashlee
I’m so glad! People comment a lot when they don’t get something (which is fine) but it’s really REALLY refreshing to hear the positive outcomes as well!
Stacie
I got all the way to the boot cuff and I can’t figure out where the seam is to count the 7 or 11 from. Is it in the back or the front? Please help me!:)
Ashlee
the seam is the seam from the bootie, where you sl st, and ch to move up to the next row, that’s the seam…
Avy
Thank you! I wasn’t sure what you meant by seam either. Love the pattern!
Ashlee
your welcome!
Kamryn
I’m fairly new to crocheting and have made other projects (hats and mary janes mostly) but really wanted to tackle these booties. I kept having difficulty with my stitch counts when I would sc in first sc when starting a new round…the only way I could fix it and still have the proper count is to sl st to complete one round, and sc in the next stitch over before starting my 7, 9, etc sc stitches. That’s probably my own error since other people have made these with no problems.
I have a question about this step:
row 1- hdc in 3rd ch from hook- ch2 counts as hdc, hdc in next 9 ch, hdc in first sc (the same one you sl st in), hdc 19 times (there will be 3 spaces left), skip 2 spaces, sc in last space. (32)
The skip two spaces, sc in last space really threw me off. Is there a way to include pictures of that step? Or, in a perfect world, would you ever make a video tutorial? After two full days of attempting to make these, and pulling yarn apart I think 12 or 13 times, I have to semi-bastardized versions of these adorable booties. Thank you so much for your generosity in sharing the pattern for free!
Ashlee
kay I’m not understanding your first problem, you have too few or too many stitches?
in the second part the hdc row is sticking up about 1/2 inch and the skip 2 stitches and sc in the last space folds it down and closes the cuff a bit.
Erika
Thank you for this pattern! My friend found a pair of booties on Etsy that she loved and wanted me to try to figure out how to make, but these look very similar so I am going to give them a shot!
Ashlee
Great! I hope you have fun and enjoy making them!
Sara Morrell
Hi, I absolutely love this pattern and am kids a beginner with crochet so it’s not too surprising that I’m having trouble. I’ve only done a few simple things out of a book I have and moving on to patterns from the Internet is a bit confusing. On row one when it reads 7hdc in last chain, I was confused if I was supposed to keep entering my hook into the same loop (the last in the row?) to make a curving line on hdc… Well, I did this and ended up with a hole where the picture shows it should be connected… If possible could you help me out with what I did wrong? Sorry for being troublesome it’s just I would be really interested in making these for a friend who had a baby on Easter. As I said I am somewhat beginner, would you suggest I practice with another project and come back to this later? Thank you for free patterns 🙂
Ashlee
yes all in the same ch at the end. It will create a hole from all the in and out, but as you keep working it will pull it self back out, just continue to work down the back and that will help pull it closed again.
Katherine
Thank you so, so much for sharing. I’ve made 3 pairs of these now. I’m addicted.
https://crochetlatte.com/2012/04/24/315/
Ashlee
I’m so glad you like them! It’s time for me to make another pair for my baby as he’s outgrown the first 2 sets!