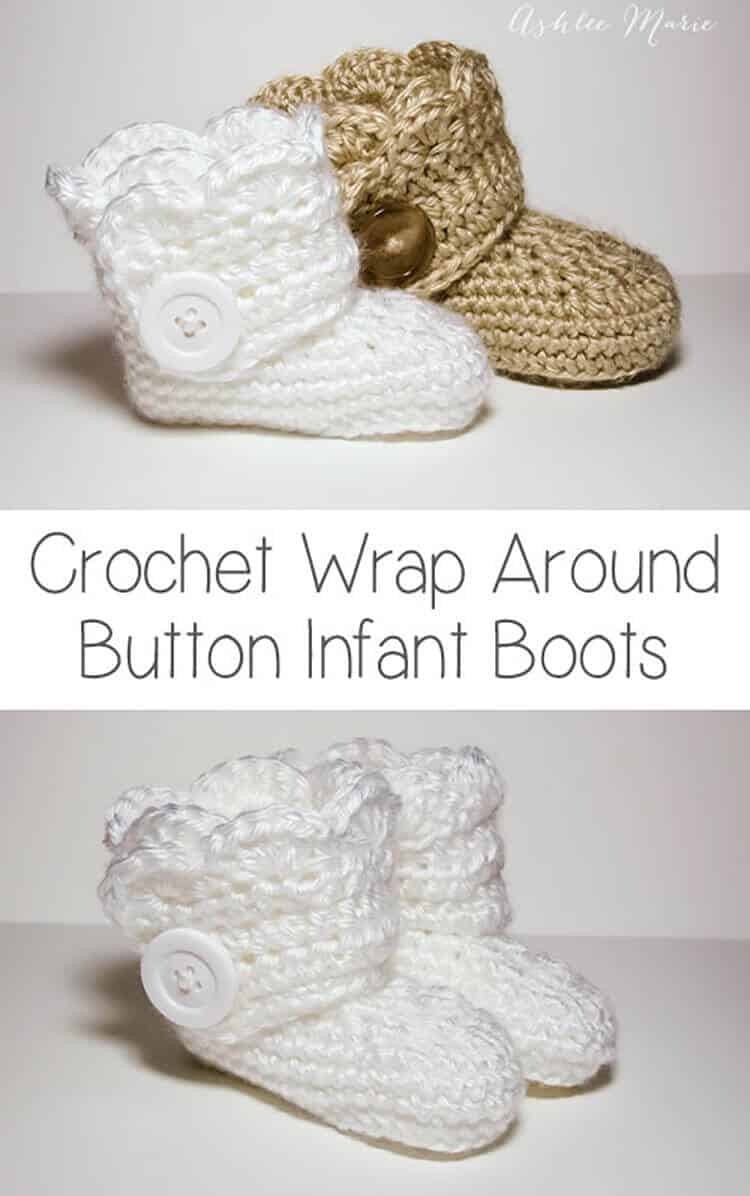
This is an easy to follow pattern to make wrap around infant booties – both for boys and girls.
Okay, after some confusion I’m separating out the patterns. Here is the one for the INFANT size! I realized after making a second set of these that I have two G hooks and they are different sizes???
So for the larger Baby sized shoes I used a G6 – 4mm for these infant shoes I used G6 – 4.25! So if your looking for an infant size 1 (or 0-3 month) boot your in the right place! For a larger (closer to size 4) shoe go to the crochet wrap around button baby boots!
Buy BOTH the Ad-Free pattern pdf’s for both the Baby AND Infant sized discounted here!
The pictures are still the same as before, for the larger size, I’ll try to substitute out smaller pictures when I make another pair!
Buy the Ad-Free pattern pdf for just the infant size here!
Infant wrap around boots
Crochet materials:
caron simply soft yarn
large buttons
G6- 4.25 mm hook (To go up a size use a larger hook, or a larger pattern, to go down a size use an G-4mm hook)
abbreviation:
ch (chain)
sl st (slip stitch)
sc (single crochet)
hdc (half double crochet)
dc (double crochet)
sc2tog (single crochet 2 together)
dc2tog (double crochet 2 together)
dc3tog (double crochet 3 together)

sole:
ch 11
row 1- sc in 2nd ch, sc 5 times, hdc 3 times, 7hdc in last ch, finish the rest of the round working along the back of the chain, hdc 3 times, sc 5 times, 4sc in the last/first ch, sl st to the first sc (28)
row 2- ch1, sc in same sc, sc 7 times, hdc, 2hdc 3 times, 3hdc (in one stitch), 2 hdc 3 times, hdc, sc 8 times, 2sc 3times, sl st to first sc (39)
shoe:
row 3- ch1, working in back loops, sc in same sc, sc around, sl st to first sc (39)
rows 4-5- ch1, sc in same sc,sc around, sl st to first sc (39)
row 6- ch 1, sc in same sc, sc 9 times, sc2tog, dc2tog, dc, dc3tog, dc, dc2tog, sc2tog, sc around, sl st to first sc (33)
row 7- ch 1, sc in same sc, sc 7 times, sc2tog, dc2tog, dc3tog, dc2tog, sc2tog, sc around, sl st to first sc (27)
row 8- ch 1, sc in same sc, sc 5 times, sc2tog, dc, dc3tog, dc, sc2tog, sc around, sl st to first sc, cut yarn weave in ends. (23)

Boot cuff:
for the right boot sl st in the 7th stitch from the seam, for the left boot sl st in the 11th stitch from the seam
ch 12
row 1- hdc in 3rd ch from hook- ch2 counts as hdc, hdc in next 9 ch, hdc in first sc (the same one you sl st in), hdc 19 times (there will be 3 spaces left), skip 2 spaces, sc in last space. (32) **note – some people had a problem with getting two right or two left feet. remember to not cross over the front, work down the inside, around the back and back up the outside, so you’ll work in opposite directions for each bootie, counterclock wise – looking top down, or “wrong” side out for the right booties and clockwise, or “right” side out for the left bootie**
row 2- ch2 (counts as hdc), turn, hdc in first hdc and around 28 times, ch 1 skip one hdc, hdc in last 2 (31- with a ch1 space)
row 3- ch2 (counts as hdc), turn, hdc, hdc in ch1 space, hdc around (32)
row 4 scallops (girls)- turn, 5dc in second hdc, *skip 1hdc, sc in next hdc, skip 1hdc, 5dc in next hdc*, repeat around (8 shells), sc down the side (I fit 5), continuing around sc across the bottom along the original chain (11), sl st, cut yarn and weave in ends

row 4 simple (boys)- ch1, turn, sc across top (32), down the side (5) and across the bottom chain (11), sl st, cut yarn and weave in ends
And both the boys and girl versions (again these are the larger size)
Don’t forget to add a button where ever you like and your done! I placed mine at the bottom of the 5th hdc over from the front- I might go lower next time… or maybe two smaller buttons?
And one final picture, I thought you might want an inside shot so you can see how it wraps a bit… I’m still so very much in love with these boots.


Sara
I am thrilled beyond thrilled, to see this tutorial! I have been searching for a good one, and am so excited about yours!! I’m going to start a pair today! 😀 Thanks!!
Ashlee
Thank you so much! Thats why I decided to make them, and why I give them away for free. I hate when I find a pattern that I love that I have to pay for! So I figure it out~!! I’m glad you like them!
Rebeca K
Thank you so much for the free tutorial. I hate finding something I like and then finding out I have to pay. Thank you for taking the time to write these out for us too.
Ashlee
your very welcome.
Terri Halstead
I made the booties and they are adorable, but I keep getting a right boot and never a left boot I don’t get what I am doing wrong. Do you have a video of yourself on youtube making this booty? If you do it would help me out a ton. Thankyou for the pattern. My son and his wife are expecting triplets and she adores these booties and I would love to make them with a left and a right bootie. Thanks
Ashlee
I don’t have a video, when your doing the other cuff you start further over, ch, and then work down the chain, around the side, back and up the other side, DON’T work across the front,then around. it will be inside/outside/inside for one cuff and outside/inside/outside for the other.
Jean
I can’t figure out how to make the left bootie either. Are you saying that they won’t match when done? I can’t get it to be right, wrong, right, wrong like the right bootie, it ends up opposite, when doing the last row the finished edge is inside not outside. Are they suppose to be different? I’m also left handed so not sure if that is the problem for me. TY The right bootie is very cute.
Ashlee
nope, the cuffs each go in different directions. I can’t think of another way to do it, you start on opposite sides, work your way around oppositly (down the ch, around the inside, back then inside then back again. So right side/wrong side/right side and the opposited on the other cuff. No one ever noticed when my little boy was wearing his, only those of us working so closely notice!
Kim Thomas
I have unraveled two booties because I have the same problem! So glad to know it’s not just me.
Ashlee
not just you, probably the most common problem people have, I tried to make these as simple as possible. I couldn’t think of a better, less confusing way to create the two cuffs opposite other than to start in the front, chain, and work your way around each side. I hope you finally got them to work after reading the comments!
Kim
I cannot seem to get print button to work to print out pattern. keep getting url msg. can you email me the pattern at kim.ousley@yahoo.com? Thanks!
Ashlee
I know, I’m working with the plug in guys trying to get it fixed! Sorry for the inconvenience.
Samantha
Can you put a pattern up for a size 5 toddler? I am new to crochet and can’t figure out how to make them bigger.
Ashlee
This is the infant patter, come over to the baby pattern, it made a size 4 for me, so make the sole and see what size your getting (everyne crochets different so if you crochet looser you might get a size 5) or try going up a hook size!
Norma Wright
The booties were tremendously easy. However, I felt that in order to change from right to left you have to add the sole by doing a sc into the front stitch of the previous row…Do you have another way of doing it?
I also made one pair with a smaller hook for my newborn great granddaughter and put two buttons on them, one straight across and the other closer to the sole,
Thank you for the pattern. Love them..
zoey
what size needle did u use? please, wanted to crochet them 4 my baby sister being born in may
Ashlee
ummmm? what? do you mean hook? the hook size is right in the pattern G6- 4.25 mm hook. or am I missing something, is there something else you want?
Laura
At the beginning of the pattern you say size G 4.25 and here in the comments you say G6 -4.25 I am confused Please explain. Is this American sizing and the big boy bootie you say size G4 Is this a typo in the pattern??
Thank you
Ashlee
For some reason I have 2 G6 hooks. One is 4mm and one is 4.25mm. I used the 4.25mm for this pattern, but if you want a slightly smaller size you can use the 4mm. I have NO idea why I have 2 g6 that are different sizes, I’ve picked up hooks all over the place, but all in the USA. I use the mm sizing because I know just saying G6 is different everywhere.
Ashlee
I’m completely confused by your comment…. there is no right or left to the sole, the sole is completely symmetrical. and I make them exactly how they are written, I don’t know what you mean by “doing a sc in to the front stitch of the previous row”.
I’m glad you like the pattern though.
Cheryl
When I crochet the sole, it clearly looks like a left boot to me so I made this one be the left. When I tried the right one, the sole still looks like a left boot to me. Mine is not symmetrical. I haven’t given up yet…
Ashlee
if you look at the graph you can see that they ARE symmetrical, when you crochet in a round it’s TOTALLY normal to twist and go wonky, you just have to block the shoe and it will be fine. I’m thinking about doing a post on bocking these booties I get so many questions about it. or you can just finish making them, put them on the babies feet and let them wear it, they’ll totally work themselves out.
nancy
mine looked like that too but after it was all done it looked o.k. just try to pull and stretch them and they will take the right shape.
Ashlee
you can either block them (get them wet, stuff with paper towels, pull into shape and let dry) OR just put them on the baby and they fix themselves while they are being worn!
Ashleigh
So when I first made the bootie, it was twisted and looked like how people are describing it. I noticed that when I did the dc3tog it wasn’t lining up on the front of the bootie so I tried adding a stitch for rows 6-8. For example, row 6 I did 10 sc, row 7 I did 8 sc and row 8 I did 6 sc before starting the decreasing stitches. This way, every time I did a dc3tog it was completely centered in the front of the bootie. After I increased by 1 stitch for those rows, the bootie came out facing forward. I’m not sure if that helps those that are having the curving problem, but now my booties are completely symmetrical. Super cute pattern!
Ashlee
The pattern is written to be completely symmetrical, but because your working in the round it tends to twist (esp if you crochet tight it will be even more twisted) they simply need to be blocked before moving on. And of course we all have our own normal style and sometimes we each have our own way of starting the row that if your don’t start it the same way as I do then you might need to add another stitch (and take one off) like your mentioning. I’m SO glad you found a way to make it work for you, I do that with patterns all the time!
Marianne Hayward
I have tried this pattern and I have trouble as well and have undone it twice now. Maybe the pattern doesn’t work for me (and I see for others as well), because in the diagram you have only chained 10, while in the instructions you say to chain 11. It doesn’t add up.
Ashlee
you chain 11, then sc in the second chain, which leaves 9. In the diagram there are 11, the 11th one is up next to the first sc, it’s there for height. If you are working hdc or dc’s you’d do it in the 3rd chain from the hook, it’s STANDARD in any pattern, you need those extra chains for the height of the stitches.
Dot Smith
I know exactly what you mean by “two” lefties … but since I did my sole in black, I picked up on this right away. You have to turn over one of the “soles” some way and work on the “opposite” side to get a left sole and a right sole. I am doing mine in camouflage and they are darling. Made a newborn bib and hat to match. This is really an absolute darling “set.”
Happy Crocheting … and thanks Ashlee for an awesome “free” pattern.
Ashlee
actually they are symmetrical, it’s normal when you work in the round to have your work twist a little, you simply need to block your work. but I’m glad you found a way it worked for you. I’m glad you enjoy the pattern.
afka
Mine ended up being curved like a foot would be for me. Maybe that’s what is happening with other people? That’s why I am having a hard time figuring out how to do left and right!
Ashlee
it’s totally normal for in the round patterns to get twisted and turn, you just need to finish the shoe part of the bootie and then you can block it (or finish it then block it, or just let it be all twisted and let the baby wear it like I did, it works itself out). I PROMISE mine looked the same way, I just pulled and tugged it into place for pictures so you can see what it WILL look like.
Cheryl
What I ended up doing with mine, was turn the sole over so it curved the opposite way so they look like a left and a right. I made the soles of mine a different color from the rest of the boot so they were more noticeable when both soles curved the same way. I will try blocking the soles the next time. I will have to read how to block. I haven’t done that a lot.
I still love the pattern. I’ve tried other boot patterns and none come out as good as these.
Ashlee
I’m planning on doing a post on blocking because I get so many quesions about it, hopefully it will help for your next booties!
erika
Hi, I didn’t realize that the sole was symmetrical until just now, so I would sc into the back half of the loop on one shoe then into the front half of the stitch on the other.
Ashlee
so you made one boot inside out? I’m still not quite understanding what your saying (I guess that’s what it feels like to read my pattern for you, huh?) You can totally change the pattern to fit your style, I often change patterns I read. But I did write it exactly the way I created it, so one boot has the seam on the inside heel and one boot the seam is on the outside of the heel. I felt creating them this way would be easier, he cuffs are also opposite, one is right side/wrong side/right side and the other is wrong side/right side/wrong side. feel free to do it your own way, but know I can’t really help if you deviate too much.
Donna
I don’t know what I’m doing wrong but I’ve attempted this 3 times and just can’t get it to look like the pictures by the point of starting the cuff :0(
Ashlee
you can send me pictures ashlee@imtopsyturvy.com, there are so many other things it could be just saying its off at the cuff, isn’t very helpful.
Viola
I really enjoy making these but I can never make two the same…..I don’t know what I do wrong but I am going to work at it because I give my hand work away all the time.I will be a great grand ma in the next month or so…..so now you know why I am working so hard to make them perfect……Vi
Ashlee
I’m sorry your having trouble matching them up! what exactly are you having difficulty with? I’d love to help
Pam
Adorable booties! I have need to make several for a plethora of little ones due soon. Thank you so much for the pattern. I’m sure the moms will like them.
Ashlee
Thanks so much! I hope they love them as much as I do!
Shannon
Is it safe to assume there isn’t a row 6? It goes from 5 to 7 and I just want to make sure I’m not missing anything. LOVE the pattern!
Ashlee
Fixed it!!! Thanks for the heads up!
Angie
Just an FYI – your stitch count starting with Row 1 is wrong. Should be 28, not 26, then row 2 & 3 should be 39, not 37.
Ashlee
Fixed! Thanks for the heads up, I worked on the main pattern for weeks, double checking it and all that, then threw together the infant version in a day, so there were bound to be problems- Grrr
Aamn
These boots are wonderful…I was looking for something like this for a friend’s twin babies (girl n boy) and I got it…m so happy to find this, can’t express…thanks a ton:-)
Ashlee
you are so so welcome! I hope you and she love them!
YarnSkeink
Absolutely adorable! Had no trouble following your pattern and my little booties look just like yours in the pictures you provide. Good work!
Hope you don’t mind but I posted pics of my booties with links back to this page and mentions of you on my blog: http://yarnskeink.blogspot.com/. So glad I found your instructions! : )
Nancy
Ashlee
Thank you SO much! I know it’s common to only comment when people have a problem with the pattern, it makes sense to ask when you don’t understand something but I really really REALLY appreciate the positive ones! I love that you posted pictures! I have no problem with that, the thing I love most about what I do is when someone is inspired and recreates it! I’m tickled that you liked them and hope your friend is happy with the results! I love making the booties foot shaped, even little guys have wider balls and narrow heels…
And I love that knit house that you found, I would LOVE to do that for all the houses we’ve lived in (10) since we’ve been married, but I doubt I’ll get around to all of that! Super cute though!
Angie
Glad I could help. Thank you for the great pattern. I made a pair for a co-worker’s niece and everyone at work just loved them. You pattern was very easy to follow and turned out beautiful. 🙂
Ashlee
I’m glad! Since I’m still new to pattern making I always worry when I put a pattern out there, I worked for weeks on the larger pattern, but threw the infant one together so thanks for catching my problem for me so quickly!
Lise
Im a newbie and still figuring out patterns… I don’t quite understand when you start the cuff… “Right boot… Sl st in the 7 stitches from seam” which direction? Sl st in each stitch? Confused…
Ashlee
nope, you’ve already cut your yarn from the bootie, we’re starting with a brand new strand and you need to sl st it to the work to get started, so depending on what side your starting with you count from the OLD SEAM around towards the front of the bootie to get the right place to start the cuff.
Adrianna
I understand this but which direction do we go towards the tip of the bootie? If you are looking down at the bootie do you count counter-clockwise or clockwise?
Ashlee
Clockwise
Kayla
My grandma tried to make the wrap around booties for my daughter and we cant figure out the cuff part. It looked like it was just hanging there. Where do you count the 8 stitches from?
Ashlee
it’s hard to help without a better explanation of where you went wrong? just hanging there? The point of the wrap is to have a portion hanging off to wrap around. And when you say count 8 stitches, what part are you talking about? could you tell me which row your having a hard time with? I thought it might be where to attach the yarn to start the cuff, but that’s at 7 and 11 stitches from the old seam not 8 so I’m confused too! I’m sorry I coudn’t be more help? Maybe send me a picture or give me a row number.
Brooke
Thank you so much for the pattern! I have a friend with a baby due in June, so I altered the pattern since booties in June would be too hot! So I ended before I started the cuff and just made slippers, and added ruffles 🙂 I added a picture of them to my blog, with a link back to this pattern of yours! The post is at http://babblingbrookesjewelry.blogspot.com/2012/02/fun-with-yarn.html.
Just one question tho, I did the one, and the sole curves a bit, which I love, but I can’t get it to curve the other way. Do the soles of yours curve too? I know it’s not a big deal, it’s not really really curved like a real shoe, so it doesn’t matter if baby wears two right foot slippers, but just wondering what yours did 🙂
Thank you again!
Ashlee
depending on how tight or loose you crochet a little twisting and curving in natural. they are designed to be larger at the ball of the foot than the heel, but notice they are symmetrical stitch wise, so while they might twist and turn as you make them a bit they are designed to fit either foot and as the baby’s wear them they naturally adjust and fit just fine.
Ashlee
I added a diagram of the sole, so you can see that while it twists a bit they are indeed symmetrical and made for both left and right feet! I hope that helps
Jenn
This pattern is awesome! Thank you for sharing it. I am making a bunch of these and donating them to our local pregnancy center.
I do have one silly question (I know it is a preference thing in many cases) but I was wondering if you you count your ch ups as a stitch – i.e. you ch at the beginning and then begin your stitching in the next stitch or not count them and begin your stitching in the same stitch you sl in? I hope this makes sense – if not I can clarify… These will work either way I was just wondering how you did it.
Thanks!
Ashlee
I don’t in this pattern. I do sometimes. It just depends, when I do I’ll say “ch1 (this counts as first sc)” but in this pattern, no. In fact for sc’s I usually never count the ch1 as a stitch. BUT in the cuff you’ll see that I DO count the ch2’s as hdc’s…
azwana
Hi…
i’m from Malaysia. so happy to see a very very good pattern like this. thank you very much to you. can’t wait to try one.
Ashlee
I’m so glad, I hope the pattern is clear enough, I know international crocheting varies a bit.
Melissa AKA Froggy
Hey there – I’m new to crocheting and I tried my first attempt at making booties from your pattern yesterday. I didn’t do too terribly bad but they weren’t near as nice as yours. I do have a few questions about the pattern – this was the first pattern I’ve ever followed and I’m not so sure I’m fully understanding a few of the steps.
What do you mean by “sc in same sc”?
What do you mean “work in back stitches” – is that a type of stitch?
Lastly, how the heck do I make a left shoe? LOL
Ashlee
happy to help, we were all beginners once, not sure I’d have taken on these when I first started so kudos!
sc in same sc- I’m assuming your referring to the beginning of the rows, you JUST sl st into an sc at the end of the last row, then you did a ch 1, now your going to SC in the SAME SC that you just did the sl st into. As in don’t move to the next sc or you’ll be missing a stitch
work in back stitches should say back loops http://www.stitchdiva.com/tutorials/crochet/crochet-in-the-front-or-back-loops-of-a-stitch
at the beginning of the cuff section it says “Boot cuff: for the right boot sl st in the 7 stitches from the seam, for the left boot sl st in the 11 stitches from the seam” after that you work the cuff the same, although the “right” and “wrong” sides are different for each cuff
Joanne
Hi there! Love these booties. But I would double check your pattern. Sole _ Row 1 , you have 28 stitches. Row 2, you would need 30 stitches to complete the row. Maybe row 1 is chain 13 not 11. Going to work on these. They are lovely
Ashlee
nope it’s right, I think your miss-reading something (everyone writes patterns in a different style so my style might just not read very easily to you), why do you think you need 30 stitches to complete row 2? I’m still reading and counting the 28 needed to complete the row. for my baby bootie pattern you start with 13, but for this infant version you start with 11
megan tibbs
shut the front door. i have been searching everywhere for the perfect baby gift for friends. thank you for saving me from becoming an alcoholic as a result of stress. i LOVE these booties and made one the second i found this pattern from you. i might make enough of them to make a little house out of so i can live in it and be surrounded by soft cuteness. oh my heavens. you. are. amazing. and awesome, and i wish we could be best friends. that is all.
Ashlee
aw thanks!!!!! I love such positive comments and I appreciate it. I often think I’d be best friends with some of the bloggers I read! Then I meet them IRL and we often are! I would LOVE to be best friends in our house of baby bootie cuteness!
Joanne
Ok, So I kind of figured out where the pattern went wrong. The stitch count you had previously was the correct one before you changed it. I believe in row 2, you might have put in extra stitches. Here is what I came up with row 2
Row 1 = 28 st
Row 2 – Ch1. 1 sc in same st. sc 6 times, 1HDC, 2HDC 3 times, HDC 3 times, 2HDC 3times, 1 HDC, sc 7 times, 2 sc 3 times = 37 st
Row 3-5 = 37st
Row 6 = 31st
Row 7 = 25st
Row 8 = 21st
I have not done the cuff yet. For whatever reason, The boot looked curved and twisted, which was what one woman was talking about here 🙂 Super Cute, will post pics on Ravelry. Hope this helps you a bit!
Ashlee
No I’m sorry, but my pattern is written just right.
row2 looks like this
row 2- ch1, sc in same sc, sc 7 times, 1hdc, 2hdc 3 times, 3hdc, 2 hdc 3 times, 1hdc, sc 8 times, 2sc 3times, sl st to first sc (39)
you have the toe WAY off, there is 1hdc, then 2hdc three times, then THREE HDC in ONE stitch, the center of the toe, then 2hdc three times again, 1hdc again, then the sc down the side and then the increase along the heel.
having your toe so off could account for your boot being twisted and stuff when working in rounds like this the pattern is symmetrical and if you just tug and pull it a bit they work out just fine and works for both the right and left foot.
Sarah
I absolutely love this pattern! My first bootie took a little longer than expected, but practice makes perfect! I didn’t have any needles/thread/buttons lying around so I created “buttons” out of a different yarn onto the bootie. These were my first try in creating something other than the crotchet basics (beanies, & basic scarfs) so I had a little trouble in making a right bootie. I followed the directions as I did with the first but I was making two left feet booties! Haha I ended up turning it inside out to make a right bootie but the bottom didn’t end up looking the same as the first. Could you please help a newbie at this? I’d love to make lots more but I want to figure this out first.
Thank you so much and you are so kind to put this up for all to create for free! 🙂 I truly appreciate it
Ashlee
your welcome! I’m glad you liked it. The right bootie is made by starting the cuff on the other side, but after that the instructions are the same. You work one starting on the outside facing in and the other starting from the inside facing out. The picture just above the cuff is a good guide. And where to start each cuff is written right into the instructions. good luck next time!
Cyndi
Oh so excited to find this pattern~!! 2 new grandbabies in a week’s time has me crocheting lots of hats.. now I finally have a snazzy pair of “boots” to match them.. Thank you so much!!
Ashlee
Congrats!!!! new babies in the family are the BEST!
Rachel
I love this pattern but I have a question. The first 3 rows of the cuff are done in HDCs but for row 4 it says it do the stitches in the DCs of the previous rows. And your button placement says DCs. Is this a typo in the last part or the first?
And by the way, thanks so much for the pattern 🙂
Ashlee
it was a typo from when I rewrote the pattern from the baby version to the infant version, I fixed it! Thanks so much!
Wendy
Heya! This is such a cute pattern, I can’t wait to get started on it! Just have a question about the yarn – what weight/ply yarn did you use? Thanks!
Ashlee
I used caron simply soft, but any of the baby soft yarn (like red heart soft baby steps)will work. you don’t want it to be at all scratchy and you want to be able to wash it. It’s a medium weight yarn.