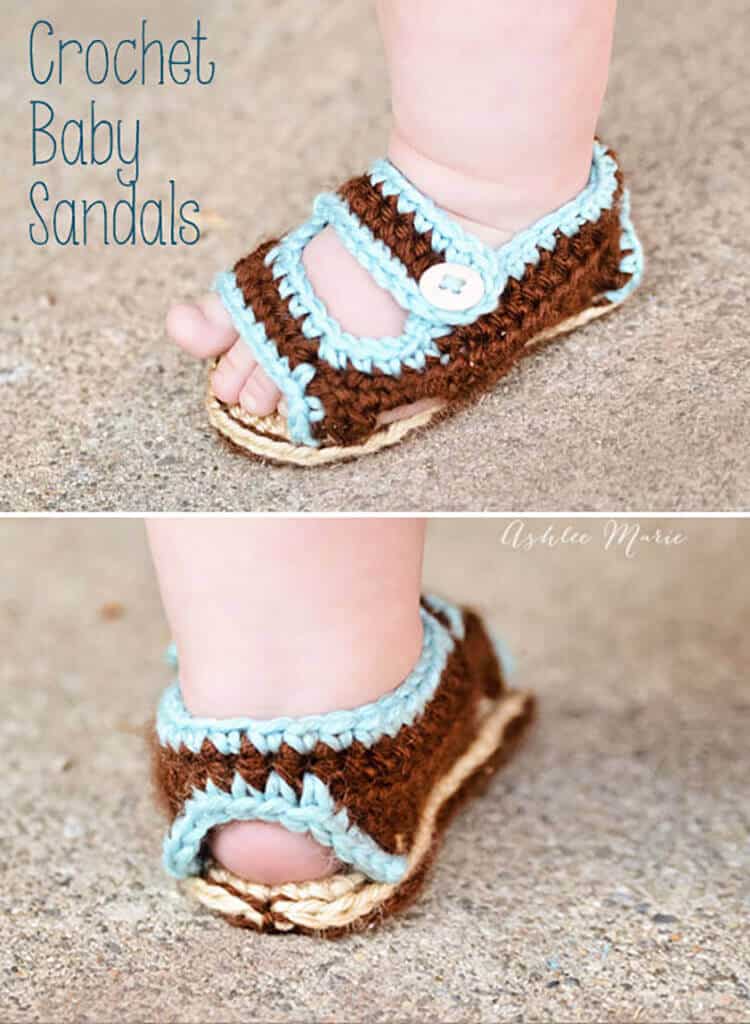
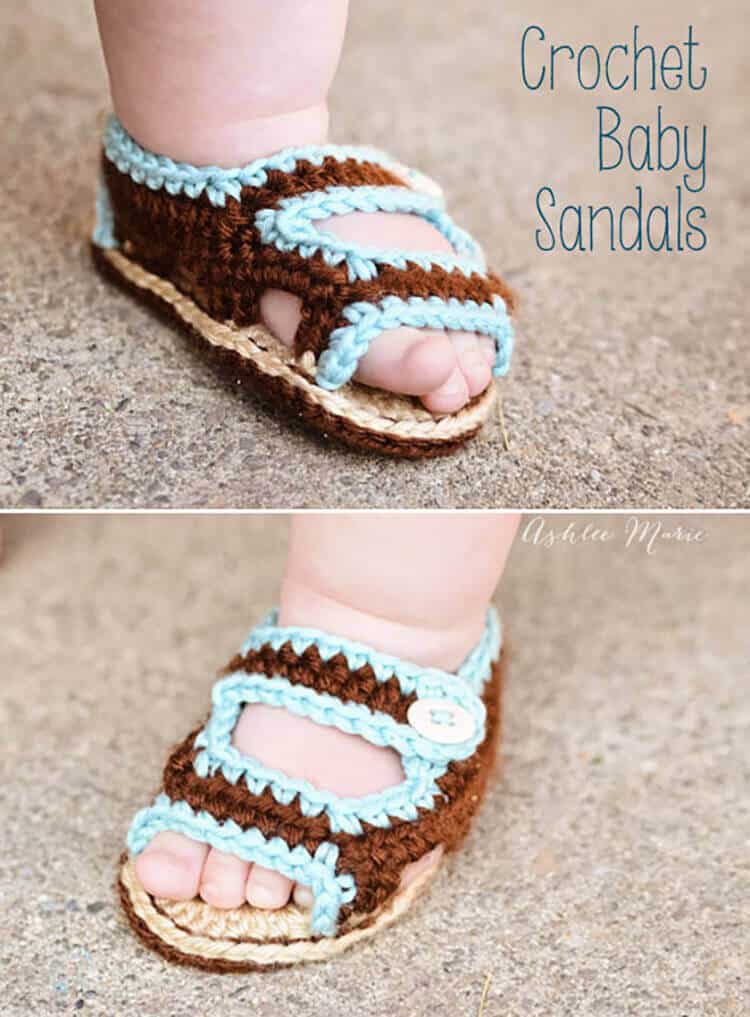
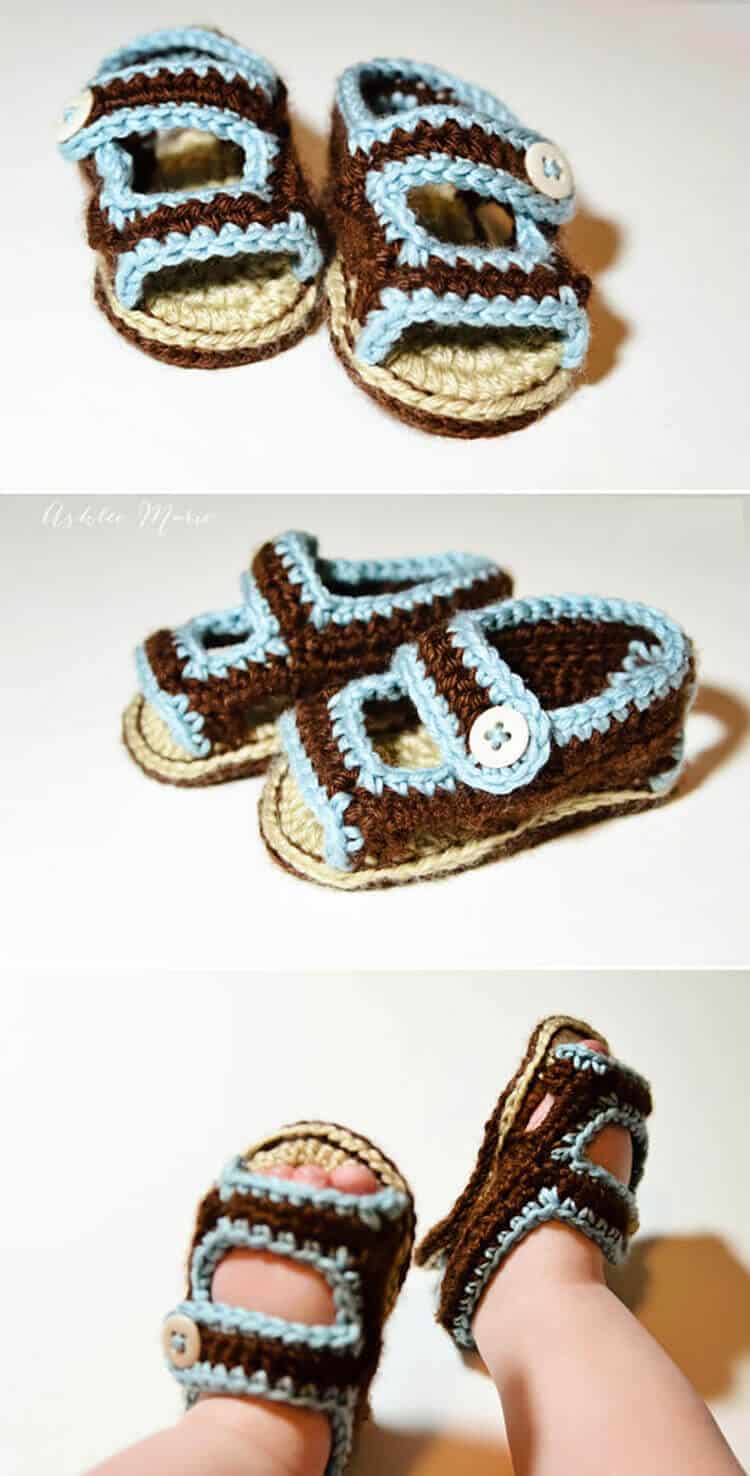
Adorable and easy to make crochet baby sandals pattern. With double soles and contrasting colors they look just like adult sandals.
I’m so excited about these crochet baby sandals! I’ve been wanting to make some for awhile, there are lots of cute patterns out there, but they are all so expensive, so I played around and made my own.
I matched them to the ones I BOUGHT the older boys for the summer. loved making these and I’m totally going to make a few different styles as well!
Maybe even another size!?! Any requests? I love these sweet fat ankles and those cute chubby toes! Don’t you wish you had these toes kicking you all night long? I love it.
He’s not a fan… yet, he doesn’t like to stand in them, but I adore them! And I’m sure he’ll get used to them!!! He keeps kicking them off, but they sure are cute! I love the heel as well! I’m just so tickled with how they turned out!
Buy the Ad-Free pattern pdf here!
Baby sandals:
materials:
Lion Brand Baby Soft Yarn in 2 colors
Lion Brand Martha Stewart Extra Soft Wool Blend for trim
small buttons
G6- 4.25 mm hook (To go down a size use a G-4mm, to go down a second size use a f-3.75mm hook)
abbreviation:
ch (chain)
sl st (slip stitch)
sc (single crochet)
hdc (half double crochet)
dc (double crochet)
sc2tog (single crochet 2 together)
sc3tog (single crochet 3 together)
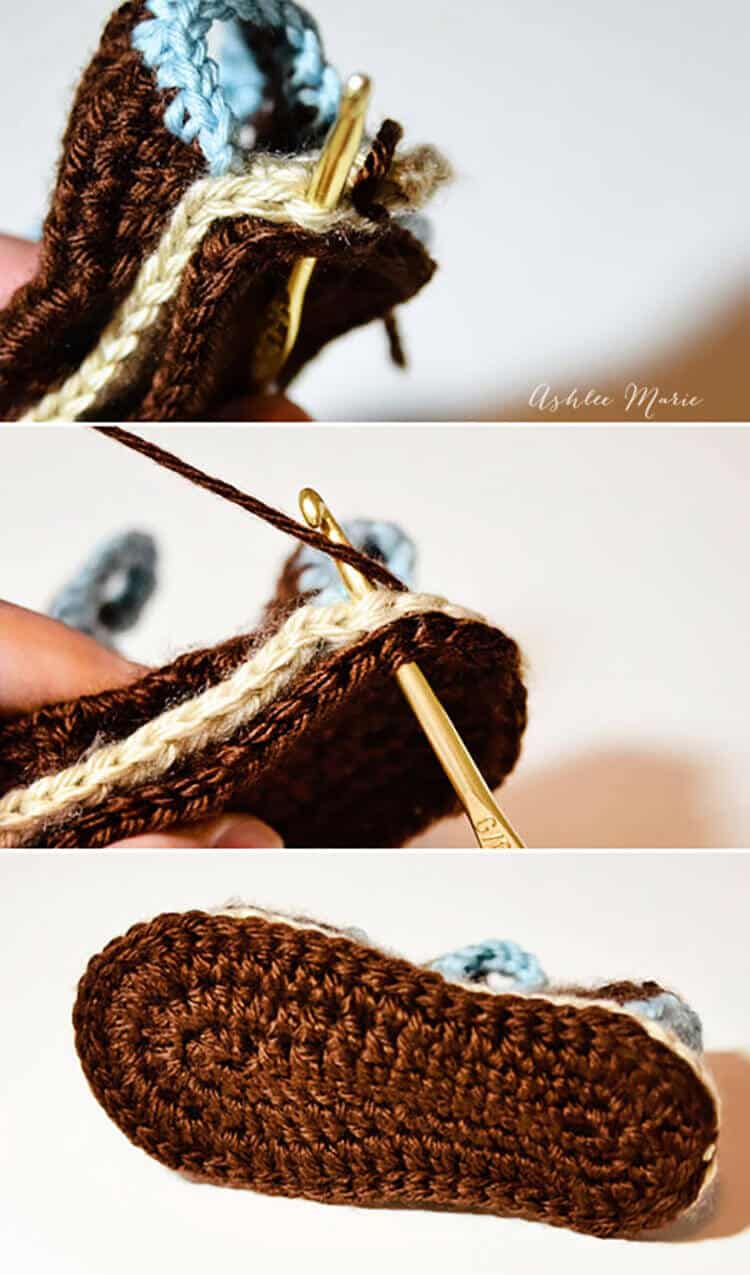
first sole (color you want under their feet/top side:
in the first color
ch 12
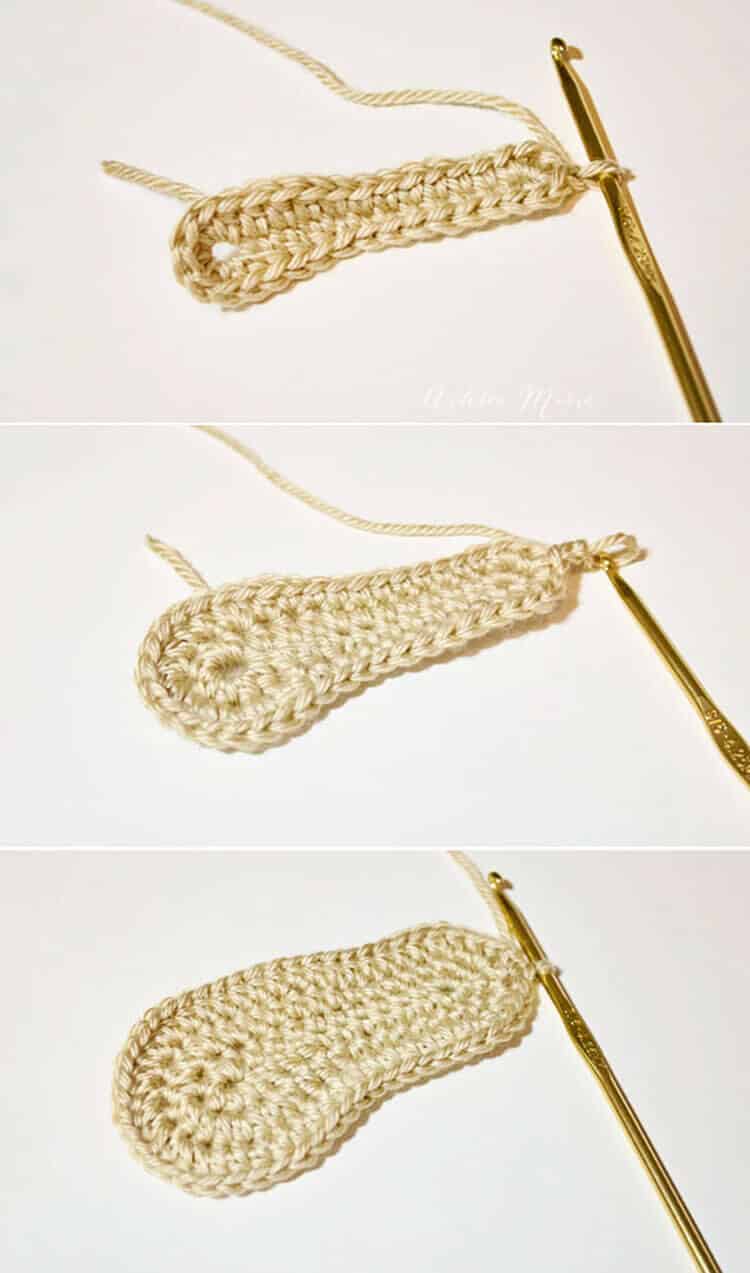
row 1- 3sc in 2nd ch, sc 6 times, hdc 3 times, 7hdc in last ch, finish the rest of the round working along the back of the chain, hdc 3 times, sc 6 times, 2sc in the last/first ch, sl st to the first sc (30)
row 2- ch1, sc in same sc, 2sc, sc 6 times, hdc 4 times, 2hdc 3 times, 3hdc, 2 hdc 3 times, hdc 4 times, sc 6 times, 2sc, sc in SAME stitch as the first sc, sl st to first sc (41)
row 3- ch2, 2hdc in same sc, hdc, 2hdc, hdc 14 times, 2hdc 7 times, hdc 14 times, 2hdc, hdc, 2hdc, sl st to first hdc (52) finish off
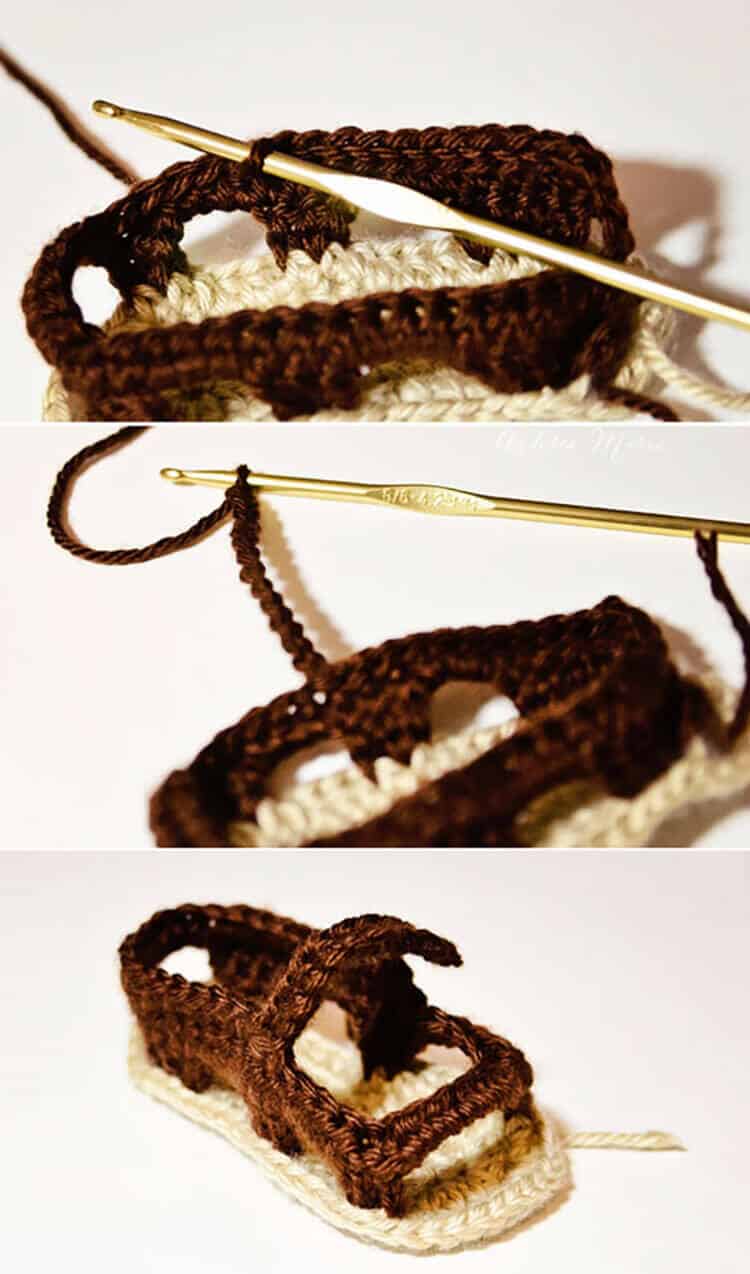
Now the key to getting these to look like sandals (with an edge of the sole sticking out) work in the POSTS rather than the top of the stitches. See where the toothpick is? Pick up 2 stitches in the POST, this will leave that EDGE around the shoes.
shoe:
in a second color
count over 5 stitches and sl st in the POST
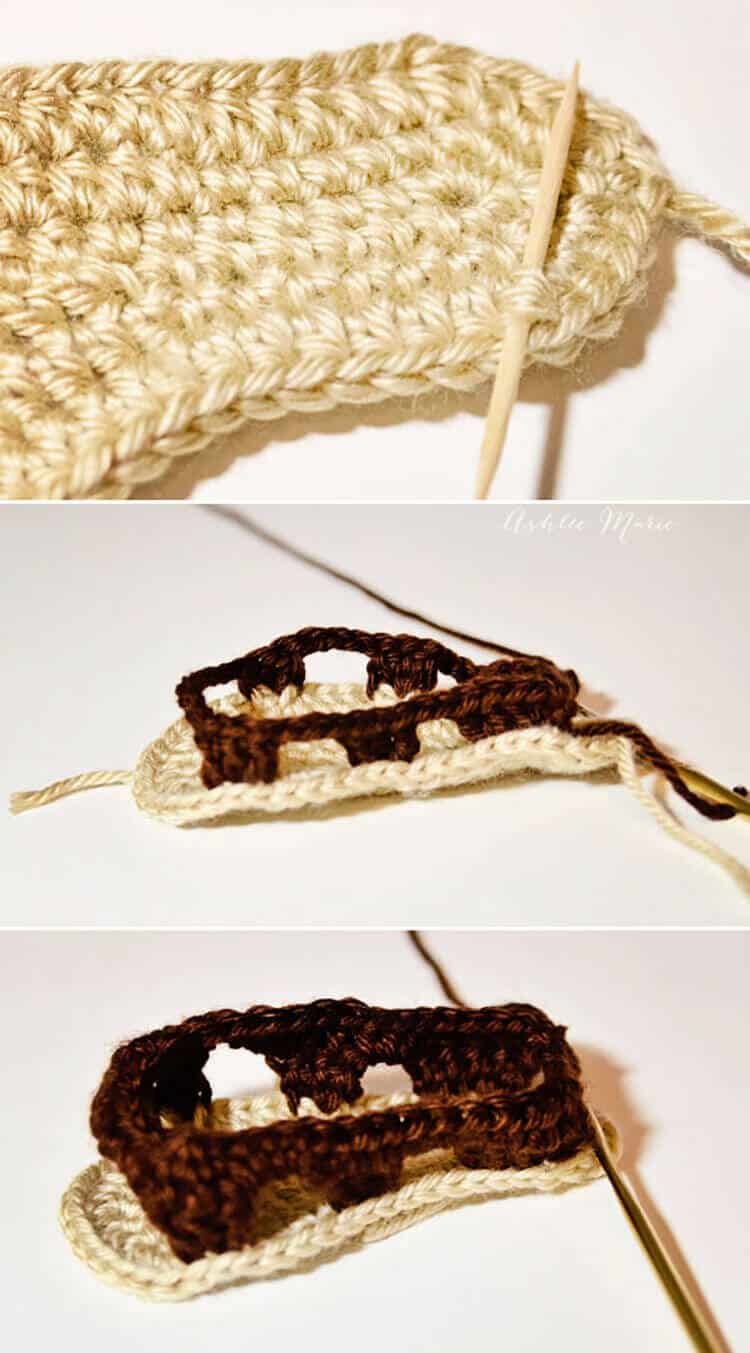
row 1- ch3, 2dc in the same post, dc, 2dc, ch3, skip 5 posts, 2dc in next post, dc, ch3, skip 4 posts, 2dc in next post, dc, ch6, skip 12 posts, dc in next post, 2dc, ch3, skip 4 posts, dc in next post, 2dc, ch3, skip 5 posts, 2dc in next post, dc, 2dc
row 2- ch2, turn, hdc in the next 15 stitches/ch, sc3tog (this includes the last 2 dc on the right side of the shoe AND the first ch across the toes), 4hdc in ch across the toes, sc3tog (this includes the last ch from across the toes and the first 2 dc on the left side of the shoe), hdc in the next 15 stitches (you should be at the end), ch4, sl st in first hdc, finish off
left shoe
(counting from the sl st in row 2) sl st in the 11th stitch on the RIGHT side
ch13
row 3- hdc in 5th ch (creating a button hole), hdc in next 7 ch, sc3tog (this includes the last ch and first 2hdc in from row 2 after the sl st), hdc 20 times (this includes 4 across the ch 4), finish off
right shoe
(counting from the sl st in row 2) sl st in the 15th stitch on the LEFT side (counting the ch4 as 4 stitches)
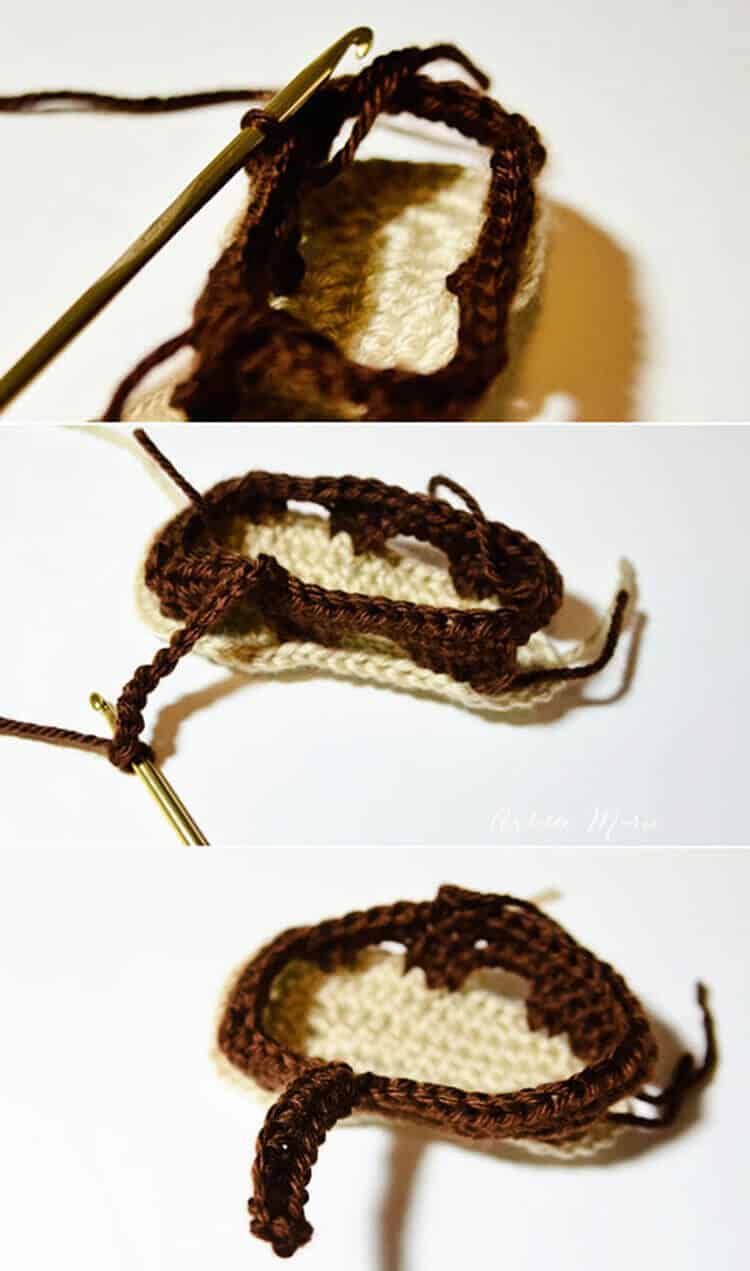
ch13
row 3- hdc in 5th ch (creating a button hole), hdc in next 7 ch, sc3tog (this includes the last ch and first 2hdc in from row 2 after the sl st), hdc 20 times (this includes 4 across the ch 4), finish off
Trim:
in the first color again, or third contrasting color
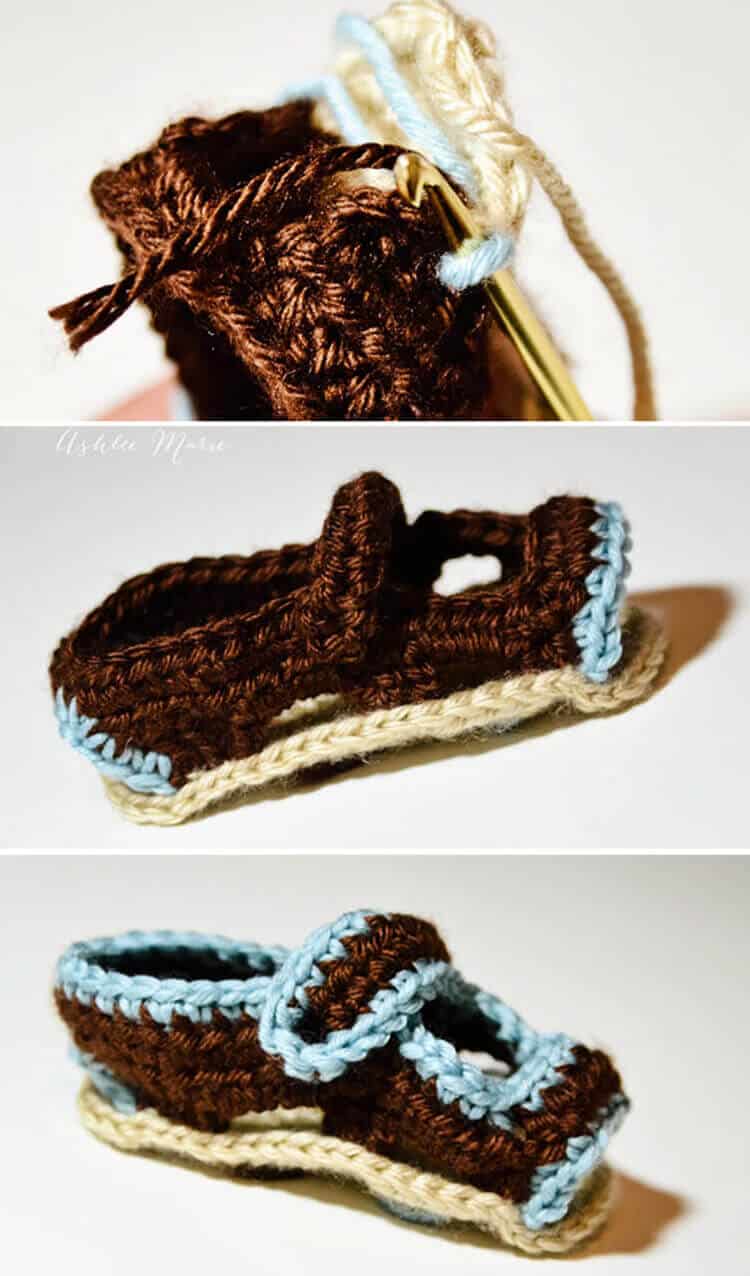
sc across the edge of the toe and along the heel, weave the ends through the sole.
sc around the top of the shoe, using sc2tog in the corners, and 5 sc in the button hold ch, sl st and finish off
pull all the ends through to the bottom of the sole.
second sole:
in the second color again or the contract color
ch 12
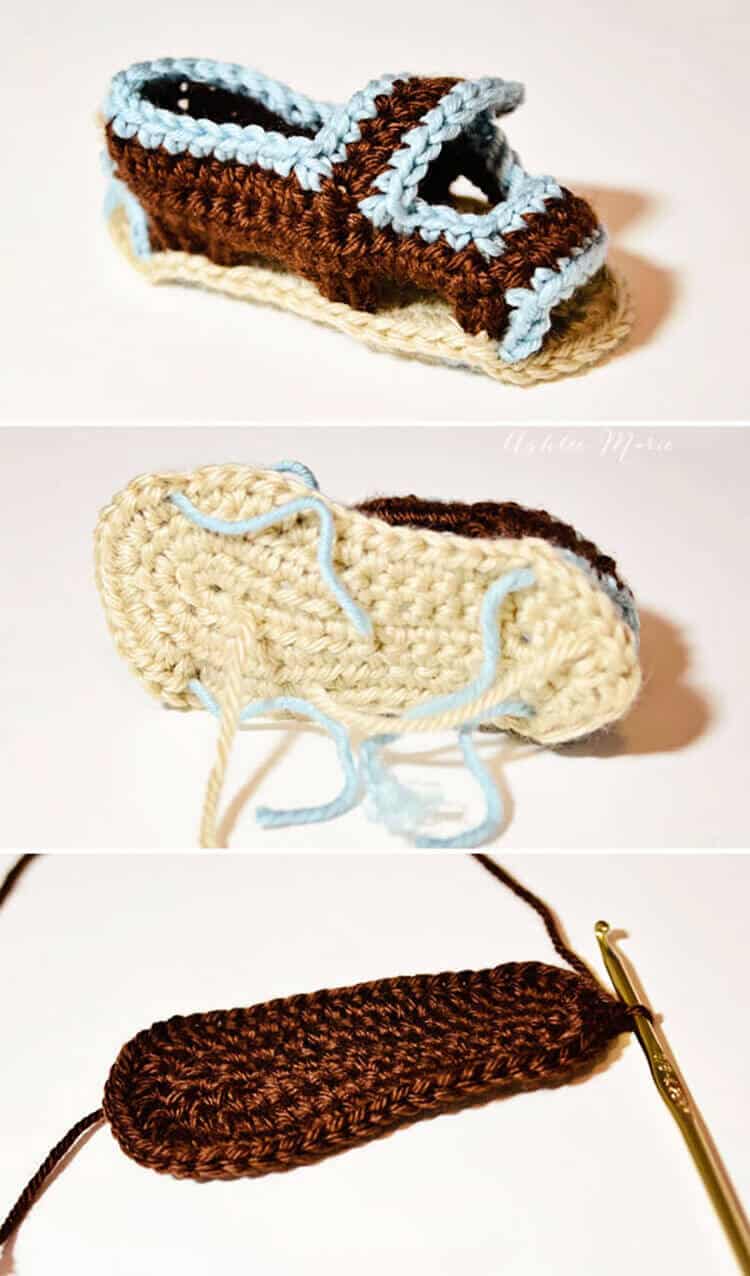
row 1- 3sc in 2nd ch, sc 6 times, hdc 3 times, 7hdc in last ch, finish the rest of the round working along the back of the chain, hdc 3 times, sc 6 times, 2sc in the last/first ch, sl st to the first sc (30)
row 2- ch1, sc in same sc, 2sc, sc 6 times, hdc 4 times, 2hdc 3 times, 3hdc, 2 hdc 3 times, hdc 4 times, sc 6 times, 2sc, sc in SAME stitch as the first sc, sl st to first sc (41)
row 3- ch2, 2hdc in same sc, hdc, 2hdc, hdc 14 times, 2hdc 7 times, hdc 14 times, 2hdc, hdc, 2hdc, sl st to first hdc (52)
DON’T FINISH OFF
place against the first sole, matching up the 2 soles
sl st the two soles together all the way around,
this will create a thicker stronger sole as well as add a contrast trim around the edge
Seriously? Could they be any cuter???? I considered not having the top strap button, but be permanent, but then it’s trickier to get them on, and I love buttons…
Remember my baby is a hobbit and has HUGE, FAT feet, so if these don’t fit your baby there are places to tighten up the pattern, smaller hooks, less chains, etc..


Christine
Omg! Love these. They are so cute!
Ashlee
awww thanks so much!!!! I totally love how they turned out and can’t wait to make another style!
Kayla
How does the little one walk without slipping? Do you put anything on the bottom of the sole?
Ashlee
I made this when my baby was sitting, not walking. And honestly I made it to be cute, not practical.
Laury Lybrand
Someone on a different page mentioned puff paint to put traction designs on the bottom of baby slippers. I haven’t tried it yet, but others swear by it. Hope that helps.
Ashlee
Thanks for sharing, hopefully it helps someone out!
Sara
I used to make sandles and such for my grandbabies when they were growing up and used puffy paint on the bottoms so they were slip resistant.
Ashlee
yup, that totally works! thank you!
Ginger Davila
It is very simple to make cutesie baby shoes and booties, like these, non-slip. Once the sandal or shoe is complete just add some puffy paint to the bottoms. When they are littlest I merely add several dots all over the bottoms but as they grow and get more agile I actually do wavy lines along the bottom for more traction and stay power. And you buy paint to either match the color of the ‘sole’ or contrasting colors to compliment, which ever is more fun for you! 🙂
Ashlee
thanks for sharing!
Donna Miller
Great idea! I’m definitely going to try this.. Thanks
Carmen Rouleau
I’ve read off spreading caulking or spra what you use to connect your evesdrough
So many things to make it non slippery go ask safari
erin Mooney
I have tried many many times to crochet things. I am left handed so it difficult to learn from book an for people to help me. is there anyway I can buy a pair…
Ashlee
I only make the patterns, I don’t sell any products, a lot of people use my patterns to sell items on etsy.
Andrea Jaume
If you go to YouTube and in the search at the top enter crochet tutorials for left-handed folks. You will find all kinds of tutorials to help you learn. I recommend Meladora at . She has a whole series of tutorials for left-handed folks. She also does them in slow motion so you can really see what is going on. Hope that helps 🙂
Ashlee
thanks for sharing! It’s always nice to find good tutorials!
Lissi
Try to look at the book pages through a mirror. Or take pictures and mirror them and print them 🙂
Ashlee
that’s a great suggestion, thanks!
Irene Jones
Hi Ashlee, I have a picture of a pair of baby sandals I would love to make…..If I send you the pic do you think you
could make a pattern for me? I would be happy to pay you for your work.
Thanks so much,
Irene
PS these are for my Great Granddaughter and I need a 3 – 6 mo size if you would prefer to make them I would
purchase them….
I will try to attach a photo now but I am not good at this…lol
Ashlee
I have designed all my patterns with my baby boy as my model, he’s now almost 2, I really only do a pattern here and there, not professionally. I’d try one of the larger crochet pattern maker, the ones that do a lot of baby booties, I have no idea about sizing, or anything, I wouldn’t know where to begin without a model.
sue jasmin
Can’t figure them pout just get a circle no length whats up with me?
Ashlee
did you start with the chain? that’s all I can think of, is that you missed starting with the Ch 12
November
Can u do ones in the hello kitty size?
Ashlee
these are my only sandals. Someone created a collage with a bunch of paid patterns from etsy but linked to my free pattern. Sorry to say the hello kitty ones aren’t mine, youd have to buy the pattern on etsy from whoever made it
jeanne
I am so impressed. You did this up so well that anyone can make the sandals. Love them and I know the perfect baby to make them for! thanks, jeanne
Ashlee
thank you so much! It’s so nice to hear, I get so many problems or questions that I get discouraged, but I love hearing when people love and enjoy the patterns!
jeanne
Please don’t get discouraged…trust your instincts…believe in yourself ! ALWAYS!!!
As long as you keep creating such fantastic patterns…I guess you’ll have to “deal” with those of us who aren’t as advanced as you! That’s another positive!!! Best always, Jeanne
Ashlee
Thanks! I try not to, and I don’t mind answering a few questions, I’m not a professional so I know they aren’t perfect, but over and over and over again it get’s tiring. so thanks again for your sweet words.
Aury
Hi..what a great pattern.!!! Want to make it..only thing is that..how do you start.!? I make the loop arounf the hook, then how many loops in the starting chaine.!? Ireally love it and want to make it..just misunderstand the begginin.. :/ Thanks for your help and your patterns.!! Great job.!! Thanks a lot for sharing <3
Ashlee
right where the pattern starts is has the ch:
first sole (color you want under their feet/top side:
in the first color
ch 12
Susan
Me too
Ashlee
Thanks so much!
linda bateman
How can i make these in a size 10 child ?
Ashlee
I only made the one size of these, but if you can figure out how to make the sole larger (I few more rounds) then use the same idea of the base of these and grow from there? Sorry, I enjoyed making things for my baby, but I don’t have any plans to make these in other sizes.
claudia
Wow just love them.
Ashlee
awww thanks, I love them too, those cute little toes, love them
rae
I love these!! can’t wait to try them!!
Ashlee
thanks!!! I hope you love them as much as I do!
Kara
Love these! They are so so cute.
Ashlee
Thank you so much!!! it took some trial and err but I totally love the end result!
Gwen @ Gwenny Penny
I love the buttons, too 🙂 This is such an adorable project, Ashlee. I love these sandals!
Ashlee
Thanks!!! those were the last of my matching buttons so it’s time to buy more, I love button shopping!
Brittany
I have made one of your other patterns and absolutely loved it I am very excited to try this one. 🙂 Never stop creating!
Ashlee
you just totally made my day! thank you so much! I’ll have some more for you soon!
Amber
Very cute! I love your choice in colors.
Ashlee
Thanks so much! my boys sandals are the same blue with black and grey, but I just love the brown!
Ariana
Love them! I will be giving them a try. I would love to try thong sandals or gladiator sandals and different sizes too. THank you for sharing! 🙂
Ashlee
I personally can’t STAND things between my toes, so I’m not sure I could ever torture my baby with thongs, as cute as it would be… but I’ll add it to the request list!
Michelle
Ashlee,
These are darling! I love the little baby feet in the picture too. I sure wish I had taken the time to learn to crochet when my Grandma taught the rest of my cousins when we were younger, ugh. Thanks for sharing 🙂
Ashlee
I agree, those baby feet are delicious!!!! 😉 I taught myself from reading crochet books and it was totally worth it! we all learn in different ways! It’s never too late!
Allyson
Those are adorable! Thank you so much for sharing! My ‘baby’ is 12 months and I’m wondering if this size will fit him. How old is your little one?
Ashlee
My little guy is only 8 months old with HUGE feet! It’s always such a guessing game! I’d make a sole, see if it worked before moving on. Once you know if the sole is too big or small you can go from there.
Laurie
I love these , can I buy a pair from you for a new unknown baby boy or girl. Please contact me if interested I can’t crochet and these are the cutest for my soon to be baby Brice or nephew of my brothers wife ( he is a Navy Seal) and has been gone and will be back just before birth Thanks laurie
Ashlee
I don’t sell my creations anymore. but I know a lot of people take my free patterns and sell items from them on etsy, you could try there. I had a store but I hated the pressure of it, and I hate making more than one of any item. There are a lot of other sandals for sale there too, just make sure to actually buy a sandal and not a pattern!
Angela Rowlands
Absolutely gorgeous sandals. My 18month grandaughter will look great in girly colours!!!!
Ashlee
Thanks so much!!! If you make them send me a picture!
Shannon Adams
I love these shoes they are amazing!! Im in the process of making them and I have a question. Is there a right and a left sole? If so I can only make the right one. I dont know how to make the left sole. Do I just flip it over and the bottom becomes the top? Any suggestions would be greatly appreciated!
Ashlee
nope, the soles are symmetrical, no right or left. they have the toes and the heels and even stitches down the side.
dj
your patterns are always wonderful and easy….thank you for sharing the freebies…
Ashlee
thank you so much for that! I love getting sweet comments like yours! So often it’s complaining about something, so thank you for being so sweet!
Emily D
I’m confused when reading your directions.
row 2- ch1, sc in same sc, 2sc, sc 6 times, hdc 4 times, 2hdc 3 times, 3hdc, 2 hdc 3 times, hdc 4 times, sc 6 times, 2sc, sc in SAME stitch as the first sc, sl st to first sc (41)
specifically…..
2sc, sc 6 times
wouldn’t this just be single chain 8 times? or does 2sc mean something else?
2hdc 3 times, 3hdc,
wouldnt this just be make 9 hdc’s? What’s a 3hdc and how is it different than a 2hdc? Does it mean do a hdc 3 times?
Sorry I’m new to crochet and still learning how to read patterns.
Ashlee
if the number is before the stitch, 2sc, it means 2 sc in one stitch, if the number is after the stitch, sc 6 times, then you do 1 sc in the next 6 stitches, if there is a number before and after the stitch, 2hdc 3 times then it’s 2 hdc in EACH of the next three stitches- so you’ll go from 3 stitches to 6 stitches, it’s an increase
Dana
I LOVE these! So precious! Thank you for sharing your pattern with us. What size are they designed for? My little guy has big chubby feet. I would hate to get started and find out that his feet were too small. Thank you again!
Ashlee
ummmm fat 8 month old baby feet size? I truly have no idea. I’d suggest making one sole (they whip up really fast) and seeing if it fits his, from there it’s easy to resize a bit. And when you start the top just keep trying it on, you can add or take away stitches from the straps to make it fit really well!
Ashlee
I just bought him some size 4 shoes, and they are a tad bit big, so these sandals are probably a chubbed out size 3!
Skylar
Hi, just wondering if you had printable versions of your patterns? I just don’t want to mess up any instructions by copy/pasting around the pictures (since I’m clueless) I am in love with them! (I’ve repinned a bunch) and I can’t crochet or knit but my aunt does. She doesn’t have a computer so I was also wondering if I could have permission to print them for her to make for my baby? They are just too cute! Thanks
Ashlee
I don’t, I’m sorry, It’s on the list of things to do for the blog, on a very LONG list- GRRRR what I do when I get a pattern from another blog I copy and past the page in word, then delete the stuff I don’t need and then print!!! i’m sorry this response is so late, I’ve been without a computer for 1 1/2 months now and finally catching up! Of course you can print out the pattern, I’ll bump up the printable pattern on the to do list!
Aafke
I love it these sandals look so good!!!
These sandals are a nice gift for every mom or dad to be!
Ashlee
Thanks so much! I love them, and hope my readers do to!
Brenda
Love, love, love them!! thanks for sharing with us!
Ashlee
Eeek! Thank you!!! I wish baby boy loved them, he keeps taking them off- grrr!
Lori
I love these and have tried several times to make them and I am having some problems.
Ashlee
kay- what problems? I’ll try to help however I can!
mary
alright, I have only been crocheting for about 2 weeks..but these are totally going on my TO DO LIST..Thanks for the pattern.
Ashlee
your so welcome! I hope you try them and love them! they are a bit tricky, but fun!