One of the reasons I wanted to get a silhouette was so I could use it with fondant. Now the silhouette machine isn’t approved by the FDA to use with food. But I have NO doubt it will be soon. It’s fantastic. And because it’s the silhouette you get all the same benefits. Use your own font’s, images, create your own images, etc…

For this trial cake I used the brightest colors I had on hand so you could see it better. To begin with you want to use a different blade that what comes with the normal silhouette. I bought this blade and kit from Linda McClure. Just getting the blade is worthwhile, but she also has great instructions, tips, tricks, etc… Including a recipe for making your own gumpaste (which I haven’t tried yet, but it looks easy enough).
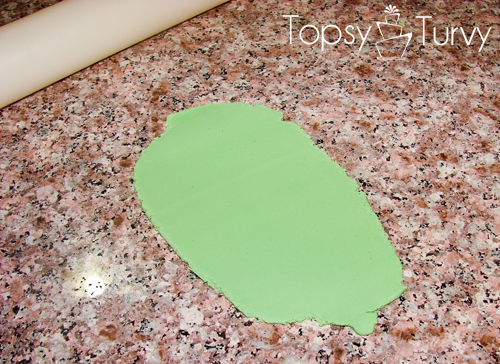
I ended up having to remix my fondant so it changes colors halfway through the tutorial. I didn’t want to bother with gumpaste this time. So I used my fondant and added some gumpaste powder to give it strength. This is important because it will allow you to roll out the fondant super thin and stay strong. It does make it very tough, so don’t add TOO much.
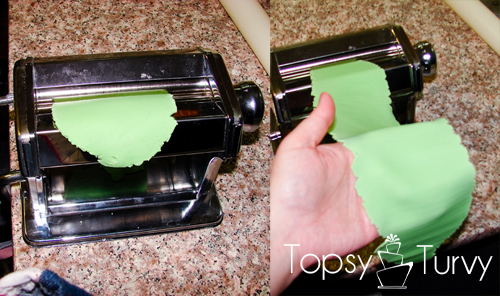
I rolled it out the best I could then I used my pasta maker to roll it out even more. I didn’t go to the thinest, but the second thinnest I could get it.
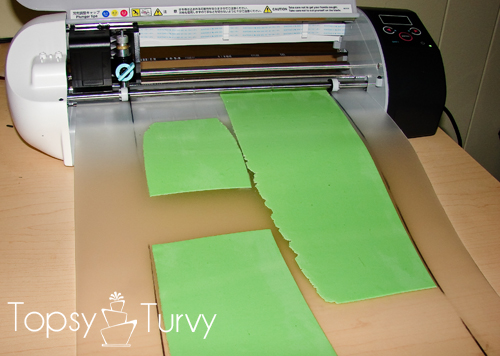
Linda shares what she uses for a mat, and how she makes/creates it too. I’m assuming you could use a cricut cake mat, but I just followed her great instructions. It took some trial and error to get large enough sheets the right size to work with.
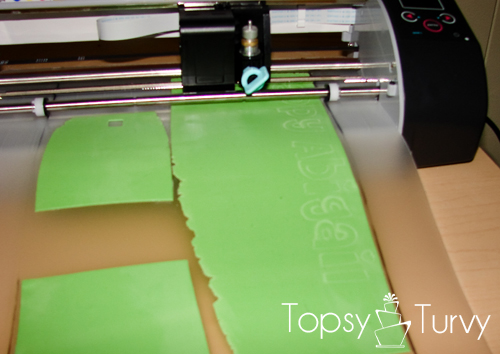
It also took quite a bit of trial and error to get the cutting just right. Lucky the silhouette software has a great test cut feature! First I had to adjust the blade itself correctly, THEN I had to adjust the thickness in the silhouette software. Linda teaches you using her favorite software, but I personally enjoyed using the silhouette software.
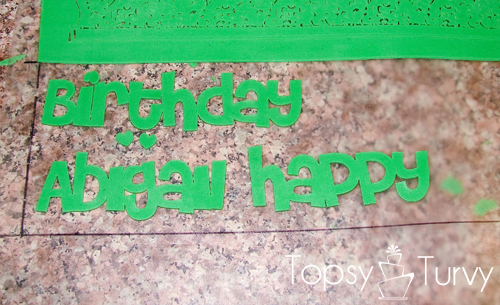
Here you can see that the font and writing worked great, but if you look JUST above it the more detailed design I wanted didn’t work out too well. it was TOO detailed for the soft fondant. It might’ve worked with gumpaste, but honestly I think I needed to make the design simpler.
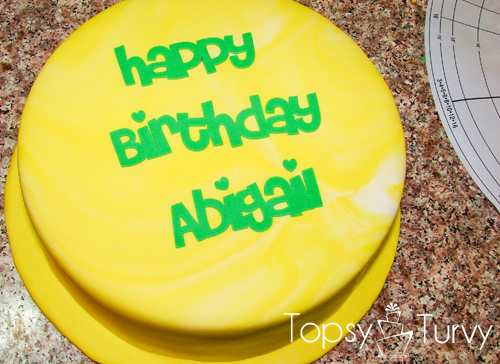
I just used clear vanilla to attach the writing. I ended up going with flowers instead of the detailed grass/flowers I wanted. Anyway, it was a great trial run, and I can’t wait to play with it some more!
I BOUGHT my very silhouette kit from Dessert Designs. I am in no way affiliated with them, and they don’t even know I wrote this post. I just think she has a great product (the special blade) and good ideas and instructions.


Chelsea
Hey Ashlee!
Thank you so much for your tutorial and your above comments! I’ve been playing all weekend with my cameo trying to get it to work with gumpaste. I’m having a problem with it not sticking/sliding around on the cutting mat as soon as the machine starts to cut. I’ve tried using both a lot of shortening and a teensy bit of shortening and everything in between but it keeps getting pushed around. Do you have any advice? What do you do to help your fondant/gumpaste stick?
Ashlee
huh… I don’t have a cameo, but the original SD, but can’t imagine they are any different. Are you using the special blade??? A cutting mat rather than the cameo mat? is it thin enough? those are the three things I would play with first, as for the amount of shortening, I rub it between my hands then on the mat, then lay down the fondant, then run my hand over the top as well, with whats left on my hands, sometimes adding a bit more to the top just to keep it from drying out. let me know if any of those things work and I’ll keep thinking of what else it could be.
Mia
I’m having the same problem 🙁
Jessica, were you able to solve the problem?
I’m using commercial moulding paste which is the equivalent of gum paste. I have tried using the mat that Linda McClure included in the package, the Cameo mat as well as card stock as the mat moves as soon as the blade starts even though it is under the rollers (they are locked down) and then the paste tears as well 🙁
Ashlee
I’m so sorry, I’ve only tried it a few times and I didn’t have those issues at all. So all I can do is make guesses. Do you remember to move the black rubber rollers off to the side? I’d try asking Linda… she probably has more answers than me. I’ve never worked with moulding paste, but I think its a lot stiffer and that might be causing the problems, as well as the paste could be too thick maybe?
Kate
I tried clicking your link to buy the special blade you recommend but it is not working. Could you direct me to the correct site? Thanks!
Ashlee
http://www.deseretdesigns.com/custom.html they updated it for the cameo now… I’ll update the link, thanks for letting me know!
Ruth
I’m so glad someone has this information on their blog so thanks!
Is the blade the cricut cake blade put into the silhouette housing? If so it’d be a lot cheaper to purchase. Linda posts about it here http://creativedesignsforcakes.blogspot.co.nz/2010/10/perfect-cut.html
Also, did you find any more success in cutting more intricate designs? Keen to know!
Ashlee
I bought the kit from her, her housing and her blade, I don’t know any more than that. My computer started having issues, and I ended up having major problems with the silhouette, so I didn’t try again for awhile. I now have the cameo and haven’t tried it again. thanks for the reminder, I’ll try again!
Pierrette
Hi,
Just found your tutorial in Pinterest, it is really a great tutorial. Thank you for making it.
I’m just wondering about the possibility of using your Silhouette for paper after you’ve used it for gumpaste or fondant. Does it leave any trace that would appear on the paper? I’m just thinking of the shortening used to help make the fondant or gum paste rollable, that wouldn’t be good for paper. Is this a situation that once you’ve used it for this you no longer use it for paper or if you can go back and forth between the two.
Thanks for your time.
Ashlee
I go back and forth all the time, but I use a different blade for each, that’s the only part that touches the fondant anyway.
Rhonda
Great job. Love it!
How do I use my own images with the silhouette? I tried using pictures and clip art and it won’t work for me. I want something very specific. Do you know how I can do it?
Thanks, Rhonda
Ashlee
what are you trying to do? print and cut? or just cut a shape? When you go to the silhouette studio click “open” then change it to “all files” then open your image, size it to where you want it (it works best to have it black and white so I always create a black shape in photoshop first) then click the tab for “trace” then “select trace area” create a box around your image, then “trace outer edge” and voila! If you have white or empty spots you” want to change the trace settings so that everything you want cut out is the bright yellow then click “trace” instead of “trace outer edge”. does that help?
Josi
Wow, great job,
Never thought a Silhouette could do that. I didn’t know they had a blade for fondant. Or are you using the cricut blade?
I have a Cricut cake and use it for paper too I just change the blades
Thanks
Ashlee
Nope, it needs to be a special blade holder or it will be too low on the gumpaste/fondant and ruin it. I’ts not made by silhouette, but by the off company I link to that sells the blade.
Avinesh Luckan
hi Ashlee
Awesome write up. I am beginning my journey to build my own cake empire, lol, and would like to enquire on how the Silhouette machine is going. I am interested in the Silhouette Cameo unit which looks promising especially due to the fact that I want to do speciality cakes.
Many thanks in advance…Avi
Ashlee
Um, I don’t use it very often, It usually takes a couple passes and since I do so many different styles of cakes it’s rare that one comes up where I use this. I used it for the Peter Pan shadows cake, and was SO happy with it!
Shannon
I am having SUCH a horrible time with this machine I want to throw it out the window of my craft room. You say “trial and error”.. How much exactly?? I am trying to be optimistic and I am SO glad I can do all this by hand anyway, it would just free up time for me for it to work right.. thoughts? Advise? Suggestions? I also got Linda’s kit and figuring out the blade settings is exhausting and expensive. I’ve tried using the sugar sheets after the fondant didn’t work. I am just a mess. Any suggestions would be wonderful..
Ashlee
I got it on my third try. I still have accidents every once in a while. I don’t use the premade sheets, I just add some gumpaste powder to my fondant to strengthen it then use it. That way if it doesn’t work I just re knead it, roll it out again and try again. using my pasta roller to get it thin enough is KEY, I could never roll it out by hand thin and even enough. I thought her video was great but I’ve never been able to get it as small and detailed as her designs, I stick with much simpler stuff and it’s usually okay. I am so sorry your having a hard time. I rarely do a cake design that needs this done, so I don’t do it often enough to have very much to say. I used it for my peter pan cake, and… I can’t think of another time I used it!
Shannon
Well I am certainly happy that I know how to do all that fancy stuff with an exacto blade and time that’s for sure!!
Ashlee
I personally can’t wait to get my hands on the new Cricut Explore this month! I have HIGH hopes it will work better, I’ll do a review with the gumpaste and let you all know!
Desiree
are you using Linda’s recipe or another brand? Im having the same issues! 🙁 the only things i havent tried are using the $1 store mats (im using cardstock like Linda says) and i havent tried her recipe either. im going to this weekend and HOPE it works!
Ashlee
I’m not using a recipe, just the satin ice fondant with gumtex, gumpaste or sometimes a fondant gumpaste mix. I got the $1 store mats, I never use the cardstock. I’ve bee happy with them.
Desiree
Hey Ashlee, what brand of fondant do u use?
Ashlee
i use satin ice, the wilton is crap and the duff is too soft. Although I hear wilton is coming out with a new recipe, we’ll see!
Amberoo
Which Silhouette additional program do you use to create your own designs? I’ve been meaning to buy one, but from what I remember there are a couple options. I tried to find where I read it on Linda’s blog, and can’t find it for the life of me.
Ashlee
I just use the program it came with, I don’t use anything else. I know they have a more advanced one that costs money but I’ve never needed anything other than what I already own. Of course I own photoshop so I create the shapes there first then bring them over to get the cutting outline.
mona
hi im so happy coz i found ur tutorial on pintrest
im from egypt by the way and i have silhouette sd
but im afraid from is it safe enough to use it for something to eat
and if the cartridge doesnt touch the fondant or gumpaste
i wait for ur replay thnx anyway
Ashlee
that’s why I bought the special blade/cartridge, the regular blade/cartridge isn’t food safe and would def touch and cause problems
Janie
I was curious if you could share at what setting you where able to figure out the best to use. I have tried and tried and just can’t get the correct setting and can’t find it on any of Linda’s videos or the book. TIA
Ashlee
you have to buy her videos. I can’t legally give away much more than this review. honestly I NEVER got it to work as well as linda does, it takes me a few dozen tries to get a few to work right. Thus I only use it when the cake totally calls for it, and rarely.
Adele
Can you tell me whether you have to replace the whole kit from Lynda everytime you need a new blade?
Ashlee
I’ve never had to replace the blade so I don’t know! good question. I seriously have only used this a few times
Katia
Great tips! Thank you so much! Do you know if after 4 years that you first posted about it, does silhouette have a blade to cut fondant?
Jessica Remington
No, just Linda sells the blade kit and a great DVD set as well to explain it all to you. Using gumpaste is best/easiest. Rolling it in a kitchenaid roller to the thinnest setting is best as well. I put mine on a piece of cardstock and tape it onto the mat that comes with the machine.
Ashlee
yup this is the only place to get the blade, it’s great AND I’ve never had to replace it, since fondant/gumpaste is so soft the blade doesn’t get damaged!!!
Ashlee
Nope! They don’t, this is still the only blade out there for this.
Jessica Remington
My mom is Linda McClure…she is the one who came up with this idea via the Cricut (and presented it to PC and set the ball in motion) and she uses the Silhouette now, which she loves SO much more.
Her Gumpaste recipe is amazing. She no longer uses MTC, either…she uses the Silhouette program and her new DVD series that goes along with the blades shows you how she does it. 🙂
You can cut very intricate images and I love it. Check out her facebook page for our bakery (The Bakery Cottage) to see a few things she’s done.
Hope you’ve tried the print and cut…SO MUCH FUN!
P.S. Your cakes are great!
Ashlee
hope you guys have seen some sales of my links! I don’t use it very often, I’ve never had the success with the blade she does, It always ends up ruining more than half so it takes forever to get a few successses, but every once in a while I give it a try again, for the right cake it’s worth the effort (my peter pan cake for example). and I don’t have an edible printer so I ‘ve never tried that option.
Rebecca
Hi do you know if the blades work with the new cameo silhouette 2 ?
Ashlee
I haven’t tried them, but as far as I know they haven’t changed the size of the blade cartridges so they should.
Marsha Baboolal
Hi, which silhouette machine do u have .thanks it a good tutorial
Ashlee
I was using the SD but any will work
Carla
Hi, has anyone tried the Sugarveil fondant with their Silhouette? If si did you need the special blade?
Thanks!
Ashlee
i haven’t, I’ve tried working with sugar veil and I didn’t love it. It’s more rubbery, not sure it would cut as smoothly or if it would just get caught in the knife. And yes I wouldn’t try it without this food safe extra deep blade.
somia
Hi Ashlee im so glad i read your post on this!
Would the blade from Silhouette CAMEO® 3 [ Crafter Bundle! ] http://www.silhouettemalaysia.com/index.php?route=product/product&path=72&product_id=208
work? or must i get the blade as you mentioned here http://www.deseretdesigns.com/custom.html ?
Love From Malaysia!
Ashlee
I haven’t used the silhouette cameo – I switched to cricut – but I would assume you’d still need the special blade – it was more about how high the blade holder sits, leaving room for the fondant thickness you’ll need – I don’t know if the cameo can get thick enough, but again I don’t have to so I can’t say for certain.
Irina Melamud
Anyone try to use ScanNcut to cut gumpaste?
Ashlee
nope
Adriana
Hi, Ashlee,
I really want to buy the blade but I don’t have paypal,
Do you have another way to buy it?
Please let me know.
Thanks
Adriana
Ashlee
I don’t have anything to do with the site, just sharing where I got it, I’d email the seller and ask them