• Skip to primary navigation
  • Skip to main content
  • Skip to primary sidebar
  • Skip to footer

Ashlee Marie - real fun with real food

  • Recipes
    • Main Dish
    • Desserts
    • Breakfast
    • Sides
    • Bread
    • Soups & Salads
    • Drinks
    • Food Tutorials
  • Cakes
    • Cake Recipes
    • Cake Tutorials
    • Carved Cakes
    • Wedding Cakes
    • Smash Cakes
    • Party Cakes
    • How to Video Series
  • Parties
    • Complete Parties
    • Party Cakes
    • Party Food
    • Party Crafts & Decorations
    • Printables
    • Invitations
  • Holidays
    • Valentines
    • St. Patricks Day
    • Easter
    • Cinco De Mayo
    • Mothers Day
    • 4th of July
    • Halloween
    • Thanksgiving
    • Christmas
  • Travel
    • Culinary Travel – Cooking Schools
    • Family Travel
    • Disney
    • Universal Studios
    • Blogger Trips
  • Videos
    • Recipe Videos
    • Short Videos
    • Kitchen Tip Videos
    • Video equipment links
  • Crafts
    • How to & Craft Tutorials
    • Crochet & Knit Patterns
    • Decorations
    • Photoshop
    • Sewing Projects
  • Shop
    • Video equipment links
    • Baking and Kitchen equipment
Home » Cakes » cake tutorial

Ice cream cone birthday cake

Published: September 28, 2011 | Updated: November 12, 2019 | By Ashlee

  • Facebook
  • Twitter
  • Yummly

The full party post is TOMORROW! So don’t forget to come check it out. I’m so excited to show it all off! I’ve been planning this party for so long and it went great! But Wednesday is cake day, so I thought it was a great day to show you my cake and HOW I made it!

Ice-Cream-cone-cake

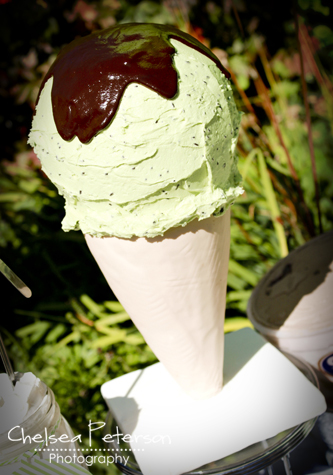
Do you LOVE it? Yes, the Ice cream cone is the cake! The ice cream is actually the cake with mint buttercream icing, and the cone is Rice Crispy treat with fondant!  Want to see how I put it together?  You got it!

Ice-Cream-cone-cake-base-tools

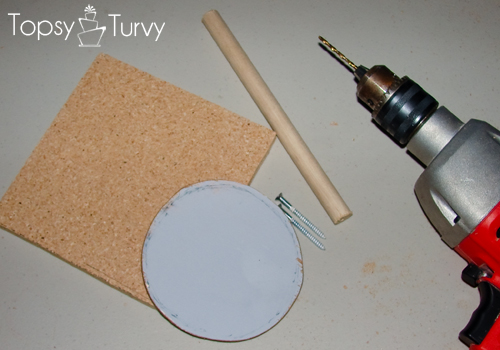
First I had to build a base to hold the cone.  I used 3/4 inch thick MDF board for the base, a 6 1/2 inch square.  I used a 3/4 inch dowel for the center (not sure how long, ekkk!) and I cut a 4 1/2 inch circle out of a 1/8 inch thick board for the top.  Then I drilled holes in the center of the square and circle as well as the ends of the dowel.

Ice-Cream-cone-cake-base

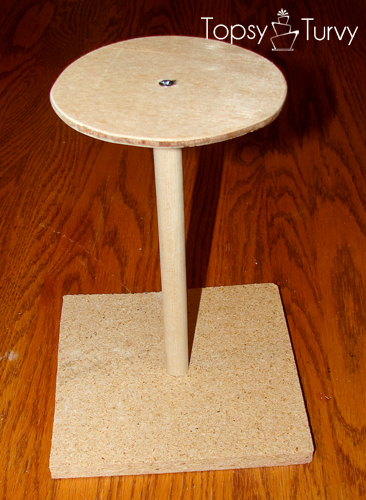
Then I used screws to drill it all together! (it looks crooked but it’s just the picture, it’s straight, I promise!

Ice-Cream-cone-cake-base-foil

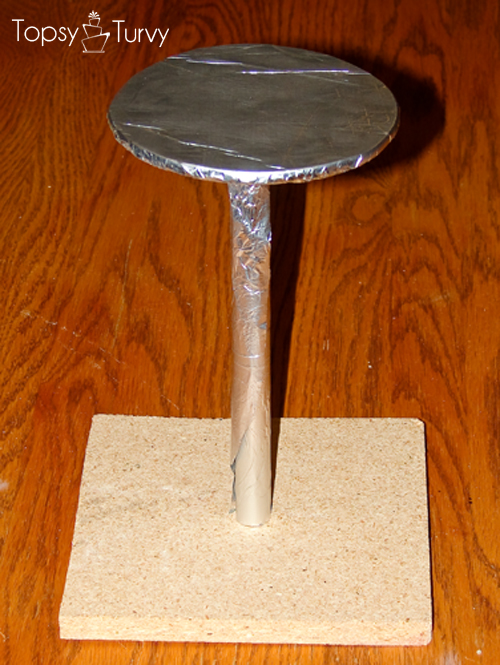
Because I am putting food on this I covered it all with foil…

Ice-Cream-cone-cake-rice-crispies

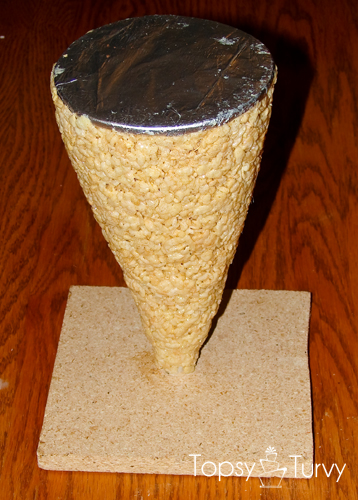
Now the fun part! I made a batch of rice crispy treats, then shaped it around the base I made!  I used parchment paper to press it into the right shape without getting it all over my hands!

Ice-Cream-cone-cake-ganache

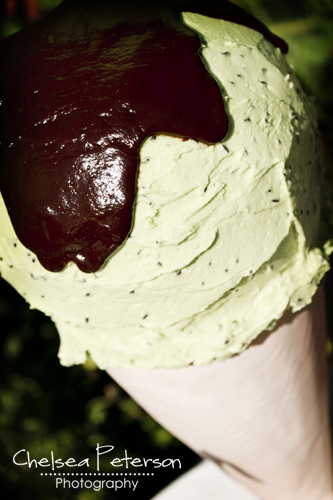
Once it’s cool I covered it with ganache that had cooled to spreading consistency.  I also covered a round cake (that I cut the bottom off to match the 4 1/2 inch base top).  Once it cooled completely and had hardened a bit I used more parchement paper to smooth the rough edges.

Here is where I forgot to take a picture!  I rolled out some tan fondant into an oval and wrapped it around the cone, then added some slight lines to make it look a  bit like the lines in a sugar cone.  Then I added the cake on top, frosted it with mint buttercream (mixed with some chocolate sprinkles) and topped it with some warm ganache!

ice-cream-cone-cake-close-up

[riview showtitle=always id=64 name=parties tags=ice-cream-parlor size=150x150 lightbox=0]

Related Posts:

  • Fondant Roses Tutorial
    Fondant Roses Tutorial
  • Frozen Birthday Party
    Frozen Birthday Party
  • Topsy Turvy Cake tutorial
    Topsy Turvy Cake tutorial

JOIN MY NEWSLETTER!

Become an insider and receive this FREE Maple Icing Recipe (not seen on the blog!)

You have Successfully Subscribed!

Privacy Policy: We hate spam and promise to keep your email address safe. You'll receive email updates through AshleeMarie.com. You can unsubscribe at anytime.

  • Facebook
  • Twitter
  • Yummly
ashlee marie

About Ashlee

With the right tips and tricks, I believe YOU can make, bake, or create anything. This is what I love to do - make some awesome, teach you how, and give you that boost of culinary confidence you need to rock your own kitchen! Read more...

youtube facebook instagram twitter pinterest email rss

Reader Interactions

Comments

    Leave a Reply Cancel reply

    Your email address will not be published. Required fields are marked *

    Recipe Rating


  1. Amy

    September 28, 2011 at 8:39 am

    Ok Ashlee- this is INCREDIBLE!!! I mean, this is amazing! I love it! Way to go you amazingly talented lady!
    xoxo,
    Amy

    Reply
    • Ashlee

      September 28, 2011 at 9:55 am

      Thanks Amy! It was so so SO much fun to make! And tasted great too!

  2. Brooke @ The Crafting Chicks

    September 28, 2011 at 9:21 pm

    This is AMAZING!!!! You have done it again with your crazy cake making skills. 🙂 Happy birthday to you indeed! 🙂

    Reply
    • Ashlee

      September 28, 2011 at 9:34 pm

      Thank you so much! It was a really fun cake to design. Esp fun when I do cakes for my family (and self). The whole party was a blast! Hope you enjoy it as well!

  3. Allison {A Glimpse Inside}

    September 28, 2011 at 10:22 pm

    That is so super cute!!!! I would LOVE a cake like this!! It even looks like it is one of my favorite ice cream flavors. Fabulous job!!

    Reply
    • Ashlee

      September 28, 2011 at 10:45 pm

      Thanks so much! My fav flavor is Mint… My second flavor is chocolate… thus my color scheme for the party! It was a blast to design and create!

  4. Kara

    September 28, 2011 at 10:37 pm

    Holey moley Ashlee, this looks so awesome! I was bummed I missed your birthday party. I was canning bucketloads of pears. Not nearly as fun. 🙁

    Reply
    • Ashlee

      September 28, 2011 at 10:49 pm

      Sorry you missed it too! Canning is… not quite as much fun. But I bet it was nice to get so much done though~

  5. Jerri

    October 6, 2011 at 6:58 am

    What a cute idea! Looks great!

    Reply
    • Ashlee

      October 7, 2011 at 1:17 am

      Thanks! It was fun to come up with, love finding that perfect design for a cake!

  6. Christine {Pure Joy Events}

    February 1, 2012 at 10:33 am

    Great tutorial! Would love for you to link it up to our Party Tutorial Contest:

    Reply
    • Ashlee

      February 3, 2012 at 4:58 pm

      thanks so much! I will!

Primary Sidebar

about ashlee marie
youtube facebook instagram twitter pinterest email rss

You have Successfully Subscribed!

Privacy Policy: We hate spam and promise to keep your email address safe. You'll receive email updates through AshleeMarie.com. You can unsubscribe at anytime.

Popular Posts

Homemade deep-fried monte cristo sandwich
homemade choco taco
one pot loaded baked potato soup
tamatoa cake - moana - disney
I love these candied strawberries, like a candied apple, a glorious crunch with a ripe strawberry center!

Footer

SEEN ON

as seen on
  • TV and Media
  • Privacy Policy

COPYRIGHT © 2007–2023 Ashlee Marie - Real Fun with Real Food

ashlee marie lets make some awesome
  • Recipes
    • Main Dish
    • Desserts
    • Breakfast
    • Sides
    • Bread
    • Soups & Salads
    • Drinks
    • Food Tutorials
    • Back
  • Cakes
    • Cake Recipes
    • Cake Tutorials
    • Carved Cakes
    • Wedding Cakes
    • Smash Cakes
    • Party Cakes
    • How to Video Series
    • Back
  • Parties
    • Complete Parties
    • Party Cakes
    • Party Food
    • Party Crafts & Decorations
    • Printables
    • Invitations
    • Back
  • Holidays
    • Valentines
    • St. Patricks Day
    • Easter
    • Cinco De Mayo
    • Mothers Day
    • 4th of July
    • Halloween
    • Thanksgiving
    • Christmas
    • Back
  • Travel
    • Culinary Travel – Cooking Schools
    • Family Travel
    • Disney
    • Universal Studios
    • Blogger Trips
    • Back
  • Videos
    • Recipe Videos
    • Short Videos
    • Kitchen Tip Videos
    • Video equipment links
    • Back
  • Crafts
    • How to & Craft Tutorials
    • Crochet & Knit Patterns
    • Decorations
    • Photoshop
    • Sewing Projects
    • Back
  • Shop
    • Video equipment links
    • Baking and Kitchen equipment
    • Back