It’s the beginning of a wonderful season- a season of great Food! Great dinners, treats, soups, etc… I love baking and the cooler weather lends itself nicely to great food! The beginning? Homemade andes mints (or any other flavor you like!).

Aren’t they pretty? And the best part you can do it in any color and flavor. Start with high quality chocolate and use whatever extra flavoring you’d like and this creates a terrific treat! Whatever you do DON’T skimp on the quality of the candy melts. I prefer working with Merkens, Guittards and Callebaut, they taste great and they melt well. You can use dark, semi sweet or milk chocolate and then make sure your colored chocolate are the basic vanilla.
So this was actually one of the VERY first video’s I filmed, BUT I never shared it cause it just didn’t really fit SPRING or SUMMER the way it fit’s into Holiday goodies! So this is pre kitchen makeover completed, but I thought it was still worth sharing! Enjoy!
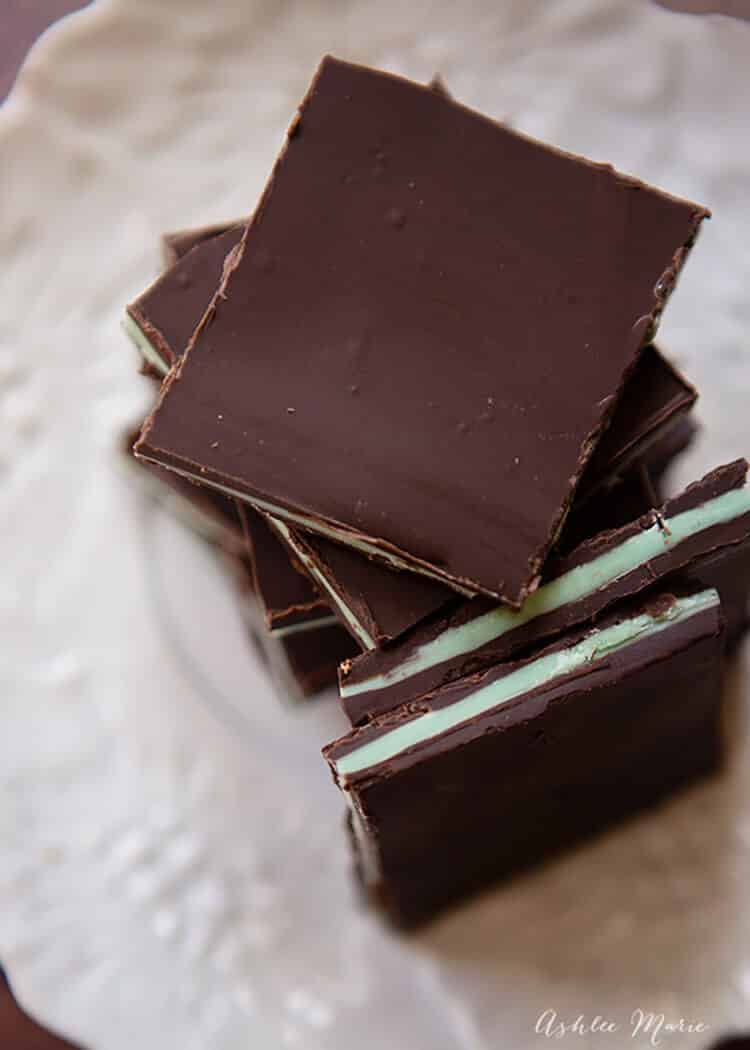
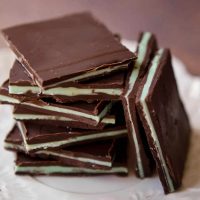
Homemade Andes mints- this week’s treat
Ingredients
- Jelly Roll pan
- wax paper
- 10-11 oz chocolate wafers I like Guittard and Callebaut
- 10-11 oz green white chocolate I like Merckens and Guittard for this
- 10-11 oz chocolate wafers I like Guittard and Callebaut
- candy oil- peppermint is my go to
Instructions
- Melting the Chocolate:
- Get 3 oven safe bowls.
- Put the chocolate for each layer in three different bowls.
- Put them all in the oven on Warm for 20 mins.
- Then turn off the oven and pull out the first layer (leave the other two bowls in the oven to keep warm).
- Cut the wax paper to fit the length of the pan as well as come up the sides a bit. take some of the melted chocolate in each corner to hold the wax paper in place. Make sure your wax paper is pulled tight across, we don't want any bubbles, bumps or wrinkles in the paper, it will show in the chocolate.
- Stir the bowl of chocolate until it's smooth and add 7 drops of oil based candy flavoring to the bowl.
- Now QUICKLY pour the chocolate around the pan. then starting on the outer edges smooth it with your spatula.
- Then grab the side of the pan and shake/knock it on the table. After a bit of shaking/knocking the chocolate will smooth itself out.
- The key to the next layer is to know when to pour it on! If you pour to soon you'll risk mixing the layers together, they'll still taste great, but not be as pretty. AND if you wait too long the layers won't stick together!
- When the whole layer goes from glossy to matte you're read!
- Grab your colored candy melts out of the oven, add your oils (7 drops) and stir it smooth
- Then spread it over the chocolate layer, and shake it smooth and let it cool until it's matte
- Pull out the last bowl, add the 7 drops of oil and stir it smooth.
- pour it on, spread it out and shake it smooth
- like spreading if you cut to soon you'll mix your layers, if you wait too long you'll shatter the chocolate! Once it's matte take a Sharp knife and cut it!
- I like to cute the rounded edges off (and my husband likes to eat those small edges) and then cut the rest into 2 1/4 inch squares
Video
Nutrition
Neighbor gifts and goodie plate recipes


Sherri
I love andies! Ooouuu I just may have to try these. I am bookmarking your ‘recipe’! 😉 Great tutorial and I’ve never melted chocolate like you do….but LOVE that it’s EASY.
Ashlee
Real chocolate you have to be careful with, of course, but this way would work great. I also like to use a double broiler, but for these smaller batches the oven works great. PLUS these are chocolate flavored candy melts, not normal chocolate, so they melt well almost anywhere! They would be hard to burn so even you microwave works!
Stephanie
These look fantastic! My hubby would love them! (So would I!)
Ashlee
My whole family loved them! I try to keep my more “adult” candy for myself, but my kids LOVED them! Next time we’re going to try some fun flavors that the kid’s pick out!
jamielyn
mmm these look delicious and perfect for the holidays!
Ashlee
They really are! Of course anything peppermint is perfect in my book!
Courtney
Quick question for you! Can you put these in a little plastic gift bag or will they get all soft and look bad? Are they better given on a plate? Thanks!!
Ashlee
I’ve been thinking about this. I know you can give them away in gift boxes, all stacked nicely together, without issues. Since they are candy melts and not pure chocolate I think they would work in a bag just fine!
Tammy @ Not Just Paper and Glue
These looks so yummy! Great recipe and tips 😉
Ashlee
Thanks! I hope you try them and like them!
Cheryl
Mmmm. Will have to make these – I love me some mints! Thanks for linking to Craftastic Monday:)
Ashlee
I know, right???? Mint is probably my 3rd favorite food, behind chocolate and coconut!
Bonnie
Thanks for sharing this yummy treat. Andes are my favorite. And…your tutorial was excellently done. I linked to this post on my blog. 😀
http://somewhereincraftland.blogspot.com/2010/11/fun-holiday-treats-and-visiting.html
Ashlee
Thank you so much! I always love it when people think enough of something to link up! I hope you try them out!
kelley
These look so good and easy. Andes mints are one of my favorite candies and these are perfect for the holidays!
Ashlee
Also you can cut them MUCH smaller if you want, I guess my bites are a tad on the large size compared to andes mints!
Kassi
I LOVE Andes mints!!! This makes it seem so simple to make them… I had no idea! Thanks for sharing!
Ashlee
they are SUPER easy!!! I hope you try them and love them as much as I do!
ourlifeinaclick
These look amazing and very impressive to tell people you made your own Andes!! Thanks for the tutorial!
-heather
Ashlee
Thanks! I hop you try them out and like them.
Ann
What size jelly pan did you use and where did you find the candy flavoring? I cant seem to find them anywhere. Thanks
Ashlee
Ummmm Normal size??? It’s the largest in a set, like 12×17… Anyone else? Is that right?
Julie
I am speechless! I love Andes mints and I am so excited I found your recipe, I can’t wait to try it!!
Ashlee
They are AMAZING! let me know what you think when you make them!
Nike@ChooseToThrive
Ooooo! Love! Where in Utah do you get your candy melts?
Ashlee
Actually I got them from the woman who taught the class at our church. She sells them out of her house. I’ll try to remember to get her number! I need some more supplies anyway! Gygi’s on 300 E in Salt Lake has some, but they only have the pre-flavored colors, NASTY. But you could get the chocolate and whites and dye the white yourself!
Michelle
These look amazing! I am totally going to try these!
Ashlee
Yes you TOTALLY need to! When your ready to get out and about again we need to have a GNO so Kara and I can squeeze that sweet baby of yours a bit!
Lisa
Yay! EVERYONE ♥’s Andes mints….I am going to give them a whirl! xo♥
Ashlee
They are DELISH!
Megan
Delicious! I want them NOW! I used to use Guittard Melt N Molds but haven’t stocked up in awhile, so maybe I need to try Merkens. I will NEVER buy Wilton or cheaper brands anymore. For those that mess up, just break it up into chunks and they will still be eaten. My family dives in before ever really paying attention to shapes, designs and colors when I make chocolate.
Ashlee
Isn’t that the truth!! You get what you pay for when it comes to chocolates! Totally worth getting the good stuff. You have to cut them while they are still soft if you want squares. If you don’t mind broken ones then shattering it when it’s cool works just as well. Like you said, who really cares about the shape!
Erin
I love the recipe. Can you recommend a good place to buy flavor oils. I am in the middle of making cherry chocolate caramel popcorn when I realized that I have never flavored chocolate before. Your recipe answered the how. I just don’t know where I can buy the flavored oils. Thanks.
Ashlee
Ummmm I find them everywhere. Michaels and Joanns should have the Wilton brand, it’s candy flavoring, not icing flavoring. Any specialty cake/bakery supply shop will have some. And any online candy making places will have it. My favorite is
*LyndiLou*
Found you through Pinterest and I’m SO glad I did. This tutorial looks AWESOME!!! Andes mints are the best and I’m just floored at the idea of making them myself. YAY!!! Thanks so much for sharing. 😀
Ashlee
Thanks! They are SUPER easy! Next time I make them I’m going to add crushed candy cane or peppermints to the middle layer for some texture! Mmmmm
Aaryn
Can you please redo this in recipe form? I like to check to see if I have the ingredients first. I dont really like that I would have to read the whole thing to figure out the ingredients. Thanks.
Ashlee
10 oz chocolate- melted
10 oz vanilla melts- any color- melted
10 oz chocolate- melted
jelly roll pan
parchment paper
candy oil- any flavor you want- 5-7 drops mixed in each layer of chocolate
cover the bottom of the jelly roll pan with parchment paper. pour it into the jelly roll pan, shake smooth. wait until it get’s dull and pour the next layer, repeat. When the top layer is dull cut the chocolate- if you wait too long it will break instead of cutting smooth!
pour first
REBZ
Hi they look amazing. How long will they keep in an air tight container?
I am going to make them for Christmas
Ashlee
Ummm since ours get’s eaten so fast that’s hard to guess 😉 they’ll actually stay good for quite some time. since your not adding anything to the chocolate melts but the oil flavors they’ll stay good as long as the chocolate does. a year or more if you don’t let them get to hot or too cold.