• Skip to primary navigation
  • Skip to main content
  • Skip to primary sidebar
  • Skip to footer

Ashlee Marie - real fun with real food

  • Recipes
    • Main Dish
    • Desserts
    • Breakfast
    • Sides
    • Bread
    • Soups & Salads
    • Drinks
    • Food Tutorials
  • Cakes
    • Cake Recipes
    • Cake Tutorials
    • Carved Cakes
    • Wedding Cakes
    • Smash Cakes
    • Party Cakes
    • How to Video Series
  • Parties
    • Complete Parties
    • Party Cakes
    • Party Food
    • Party Crafts & Decorations
    • Printables
    • Invitations
  • Holidays
    • Valentines
    • St. Patricks Day
    • Easter
    • Cinco De Mayo
    • Mothers Day
    • 4th of July
    • Halloween
    • Thanksgiving
    • Christmas
  • Travel
    • Culinary Travel – Cooking Schools
    • Family Travel
    • Disney
    • Universal Studios
    • Blogger Trips
  • Videos
    • Recipe Videos
    • Short Videos
    • Kitchen Tip Videos
    • Video equipment links
  • Crafts
    • How to & Craft Tutorials
    • Crochet & Knit Patterns
    • Decorations
    • Furniture
    • Photoshop
    • Remodel
    • Sewing Projects
  • Shop
    • Video equipment links
    • Baking and Kitchen equipment
  • Navigation Menu: Social Icons

Home » Holidays » Homemade Andes mints

Homemade Andes mints

By Ashlee Marie 150 Comments

  • Facebook
  • Twitter
  • Yummly
Jump to Recipe

It’s the beginning of a wonderful season- a season of great Food! Great dinners, treats, soups, etc… I love baking and the cooler weather lends itself nicely to great food! The beginning? Homemade andes mints (or any other flavor you like!).

these homemade andes mints are so easy to make and delicious

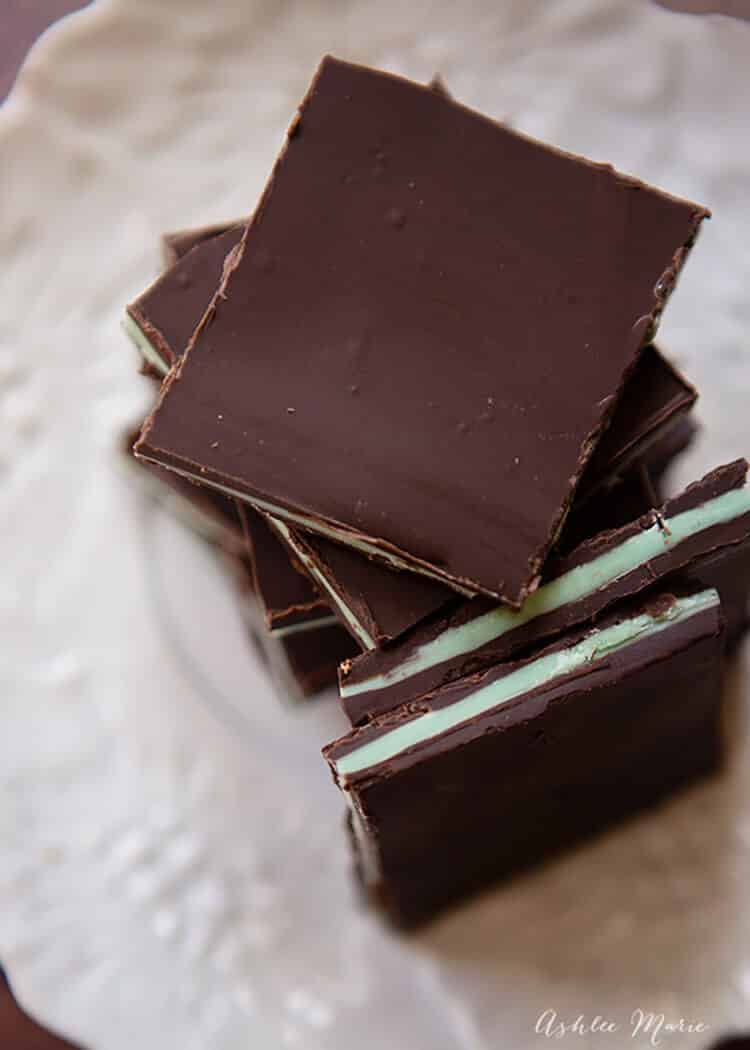
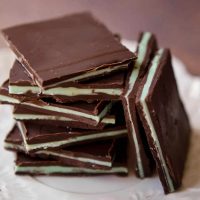
Aren’t they pretty? And the best part you can do it in any color and flavor. Start with high quality chocolate and use whatever extra flavoring you’d like and this creates a terrific treat! Whatever you do DON’T skimp on the quality of the candy melts. I prefer working with Merkens, Guittards and Callebaut, they taste great and they melt well. You can use dark, semi sweet or milk chocolate and then make sure your colored chocolate are the basic vanilla.

So this was actually one of the VERY first video’s I filmed, BUT I never shared it cause it just didn’t really fit SPRING or SUMMER the way it fit’s into Holiday goodies! So this is pre kitchen makeover completed, but I thought it was still worth sharing! Enjoy!

homemade andes mints are easy and everyone loves them

Delicious and easy to make Andes mints that everyone loves

Homemade Andes mints- this week’s treat

it's easy to make your own andes mints - layers of chocolate with peppermint are crazy easy to recreate and a fun holiday treat
4.1 from 30 votes
Print Pin Rate
Prep Time: 20 minutes
Cook Time: 30 minutes
set time: 30 minutes
Total Time: 50 minutes
Servings: 60 mints
Calories: 66kcal
Author: Ashlee Marie

Ingredients

  • Jelly Roll pan
  • wax paper
  • 10-11 oz chocolate wafers I like Guittard and Callebaut
  • 10-11 oz green white chocolate I like Merckens and Guittard for this
  • 10-11 oz chocolate wafers I like Guittard and Callebaut
  • candy oil- peppermint is my go to
US Customary - Metric

Instructions

  • Melting the Chocolate:
  • Get 3 oven safe bowls.
  • Put the chocolate for each layer in three different bowls.
  • Put them all in the oven on Warm for 20 mins.
  • Then turn off the oven and pull out the first layer (leave the other two bowls in the oven to keep warm).
  • Cut the wax paper to fit the length of the pan as well as come up the sides a bit. take some of the melted chocolate in each corner to hold the wax paper in place. Make sure your wax paper is pulled tight across, we don't want any bubbles, bumps or wrinkles in the paper, it will show in the chocolate.
  • Stir the bowl of chocolate until it's smooth and add 7 drops of oil based candy flavoring to the bowl.
  • Now QUICKLY pour the chocolate around the pan. then starting on the outer edges smooth it with your spatula.
  • Then grab the side of the pan and shake/knock it on the table. After a bit of shaking/knocking the chocolate will smooth itself out.
  • The key to the next layer is to know when to pour it on! If you pour to soon you'll risk mixing the layers together, they'll still taste great, but not be as pretty. AND if you wait too long the layers won't stick together!
  • When the whole layer goes from glossy to matte you're read!
  • Grab your colored candy melts out of the oven, add your oils (7 drops) and stir it smooth
  • Then spread it over the chocolate layer, and shake it smooth and let it cool until it's matte
  • Pull out the last bowl, add the 7 drops of oil and stir it smooth.
  • pour it on, spread it out and shake it smooth
  • like spreading if you cut to soon you'll mix your layers, if you wait too long you'll shatter the chocolate! Once it's matte take a Sharp knife and cut it!
  • I like to cute the rounded edges off (and my husband likes to eat those small edges) and then cut the rest into 2 1/4 inch squares

Video

Nutrition

Calories: 66kcal | Carbohydrates: 9g | Protein: 0g | Fat: 2g | Saturated Fat: 1g | Cholesterol: 1mg | Sodium: 69mg | Potassium: 33mg | Fiber: 0g | Sugar: 5g | Vitamin A: 0IU | Vitamin C: 0mg | Calcium: 12mg | Iron: 0.4mg
Did you make this recipe?Mention @ashleemariecakes or tag #makesomeawesome and I'll share your image in my Instagram stories!

Neighbor gifts and goodie plate recipes

  • Caramel Popcorn Balls

    Caramel Popcorn Balls

  • Buttery Homemade Caramel

    Buttery Homemade Caramel

  • Coconut Macaroons

    Coconut Macaroons

  • Peanut Butter Fudge Recipe

    Peanut Butter Fudge Recipe

  • Sandies - Mexican wedding cookies

    Sandies - Mexican wedding cookies

  • English Toffee Recipe

    English Toffee Recipe

  • Chocolate no bake Peanut Butter Bars

    Chocolate no bake Peanut Butter Bars

  • Brown Sugar Shortbread Cookies

    Brown Sugar Shortbread Cookies

  • How to make Vanilla Sugar with video

    How to make Vanilla Sugar with video

  • Hot Fudge Chocolate Sauce

    Hot Fudge Chocolate Sauce

  • Buttery Caramel Sauce Recipe

    Buttery Caramel Sauce Recipe

  • Microwave Chocolate Fudge Recipe

    Microwave Chocolate Fudge Recipe

  • Mini Caramel Popcorn Ball pops

    Mini Caramel Popcorn Ball pops

  • Caramel Brownies Recipe

    Caramel Brownies Recipe

  • Homemade Andes mints

    Homemade Andes mints

  • Sugar Cookies

    Sugar Cookies

  • Oreo

    Oreo "truffle" Balls

  • Author
  • Recent Posts
Ashlee Marie
Follow me
Ashlee Marie
With the right tips and tricks, I believe YOU can make, bake, or create anything. This is what I love to do - make some awesome, teach you how, and give you that boost of culinary confidence you need to rock your own kitchen!
Ashlee Marie
Follow me
Latest posts by Ashlee Marie (see all)
  • The Perfect Steak using Sous Vide - February 2, 2021
  • Pistachio cheesecake with coconut macaroon crust - November 19, 2020
  • 21 Amazing Chocolate chip cookie recipes - November 19, 2020

More From Ashlee Marie!

JOIN MY NEWSLETTER!

Become an insider and receive this FREE Maple Icing Recipe (not seen on the blog!)

You have Successfully Subscribed!

Privacy Policy: We hate spam and promise to keep your email address safe. You'll receive email updates through AshleeMarie.com. You can unsubscribe at anytime.

  • Facebook
  • Twitter
  • Yummly

Filed Under: christmas, desserts, Food Tutorials, Holidays, recipe videos, Recipes, short videos, Videos

Previous Post: « Sweet 16 Birthday cake!
Next Post: Puffy Paint tutorial »

Reader Interactions

Comments

  1. Whatever DeeDee Wants

    November 11, 2010 at 1:59 pm

    Yum! Yours look so nice and pretty. I am afraid mine wouldn’t look as good 🙂

    Reply
    • Ashlee

      November 11, 2010 at 5:45 pm

      It’s really quite easy! Not really hard at all. Warm, spread, shake… Repeat. And even if it’s not perfectly smooth you end up cutting them up and it’s hard to tell!

      Reply
  2. hairyshoefairy

    November 11, 2010 at 2:25 pm

    Ooh! I love those! I’ll definitely be giving them a try this year.

    Reply
    • Ashlee

      November 11, 2010 at 5:46 pm

      They are great! And they not only make a great addition to a goodie plate they are also great melted in hot chocolate!

      Reply
  3. Kara

    November 11, 2010 at 2:55 pm

    I love chocolate mint, so these sound awesome! How the heck do you cut the lines so straight?

    Reply
    • Ashlee

      November 11, 2010 at 5:46 pm

      I’m just THAT good…. JK. I used a T Square! Works great!

      Reply
  4. Mandi

    November 11, 2010 at 2:57 pm

    Ooh those look so good! The hubs loves mint. 🙂

    Reply
    • Ashlee

      November 11, 2010 at 5:46 pm

      Who doesn’t!!! Mint and coconut, my favorite flavors (although not together!)

      Reply
      • Mindy

        November 17, 2010 at 7:16 am

        @Ashlee, I’m with you on that–nothing better than mint and chocolate or coconut and chocolate! I can’t wait to try this recipe! http://im-in-the-loop.blogspot.com/

      • Ashlee

        November 18, 2010 at 1:46 am

        Ohhhh I also like Peanut butter and Chocolate! I hope you get to try the mints soon!

  5. Michelle L.

    November 11, 2010 at 5:40 pm

    Wow, those look a-mazing!

    Reply
    • Ashlee

      November 11, 2010 at 5:47 pm

      Thanks! They taste even better!

      Reply
  6. allyall

    November 11, 2010 at 5:47 pm

    I would eat the whole pan. Dangerous! But a great tutorial!

    Reply
    • Ashlee

      November 11, 2010 at 7:14 pm

      Your nursing, you can get away with it. My problem is I still eat like I’m nursing but I’m not!

      Reply
  7. Jenn T.

    November 11, 2010 at 10:24 pm

    Those look wonderful! Thanks for the recipe!

    Reply
    • Ashlee

      November 12, 2010 at 1:23 am

      I hope you enjoy them! They are great!

      Reply
    • Ashlee

      November 16, 2010 at 5:20 pm

      I’m so glad you like them! I really love finding a fun quick and tasty recipe!

      Reply
  8. Charlotte

    November 12, 2010 at 7:02 am

    Those look really good, I am totally trying this out. I always called those pans brownie pans, too. I had to call my mother and ask her what a jelly roll pan was the first time I came across it in a recipe.

    Reply
    • Ashlee

      November 16, 2010 at 5:21 pm

      I’m so glad I wasn’t the only one! But I still aways use them for brownies. I’ve never made a jelly roll. I should probably try at some point for fun!

      Reply
  9. Christy

    November 13, 2010 at 7:36 pm

    Oh my! I’m so trying this…like, yesterday!

    Reply
    • Ashlee

      November 16, 2010 at 5:23 pm

      Let me know when you try them what you think!

      Reply
  10. Chelsea

    November 13, 2010 at 9:16 pm

    I given you an award! Check it out at my blog, The Crafter’s Anonymous Club.

    Reply
    • Ashlee

      November 16, 2010 at 5:25 pm

      Thank you so much! That is so SO sweet of you!

      Reply
  11. Nicole

    November 14, 2010 at 5:51 pm

    I had so much enjoyment snatching piece after piece out of your baggie this weekend. So tasty. I’ll have to give them a try.

    Reply
    • Ashlee

      November 16, 2010 at 5:25 pm

      It was fun sharing a ride! SO much better to road trip than to drive myself! Glad you could make it at the last min!

      Reply
      • Kaaro

        September 11, 2016 at 9:31 pm

        Hi Ansley. I love your videos on YouTube ???????

  12. Birgit K.

    November 15, 2010 at 8:39 am

    Oh yummy! They look really great!

    Reply
    • Ashlee

      November 16, 2010 at 5:26 pm

      They ARE really good. The better quality chocolate the more melt in the mouth delicious they become!

      Reply
  13. Onica @ The Peasant Housewife

    November 15, 2010 at 9:59 am

    I am pretty darn impressed on how straight of lines you got! Those look delicious.

    Reply
    • Ashlee

      November 16, 2010 at 5:26 pm

      Thanks! The trick is to use a T-square!

      Reply
  14. Katie @ This Chick Cooks

    November 15, 2010 at 10:11 am

    Yum! I think it might be too dangerous for me to make these- I know I’d want to eat all of them.

    Reply
    • Ashlee

      November 16, 2010 at 5:26 pm

      Luckily for me my kiddo’s found them and ate most of them for me!

      Reply
  15. Allison

    November 15, 2010 at 12:03 pm

    Hi Ashlee! I have been a follower for a while and have been participating in Topsy Turvey–will you consider putting these mints in my new Tuesday Link Party? Won’t you share it over on Vintage Pollyanna on my Tell Me Tuesday link party? http://vintagepollyanna.blogspot.com/2010/11/join-me-on-tuesdays-for-new-link-party.html

    Reply
    • Ashlee

      November 16, 2010 at 5:41 pm

      Sure! I’d love to link up! You have a new linky tool, different than I’ve seen before. Do you like it?

      Reply
  16. The Paper Princess

    November 15, 2010 at 12:09 pm

    I LOVE these! Putting them in the file so I can give these a whirl!

    Ramona
    http://create-with-joy.blogspot.com

    Reply
    • Ashlee

      November 18, 2010 at 1:45 am

      They are quick, easy and tastes great! I hope you get around to making some!

      Reply
  17. Lori S.

    November 15, 2010 at 1:54 pm

    Those look DIVINE! I may have to give that recipe a try. It was great to meet you and put a real life face to a blog on Saturday at Boot Camp!

    Reply
    • Ashlee

      November 16, 2010 at 5:44 pm

      It was SUCH a treat for me! I still think of my blog as this tiny thing that nobody but my friends (whom I bribe) to look at! It was so much fun to meet In PERSON someone who “knows” me! I hope you weren’t TOO overwhelmed Sat. Lots of the choices (wordpress or blogger, etsy or not, more of this or that, changing names, domain, etc….) come about naturally as you find your path. Just make sure your having FUN and that’s it’s enjoyable, not one more “chore” in our busy lives and you’ll find the right answers for you!

      Reply
  18. T

    November 15, 2010 at 3:03 pm

    I know, I know… I will turn in my woman card after this confession – but I don’t like milk chocolate… or dark chocolate… you think white chocolate would work? a nice raspberry filling in the middle??? oh, shoot – all these yummy blog recipes on a day I’m trying to work off my Bloggy Boot Camp overindulgence is maybe not my best plan…

    Reply
    • Ashlee

      November 16, 2010 at 5:46 pm

      No biggie, your not the only one. You don’t have to go with the chocolate flavored ones, you can pick any of the colored (or not colored- white) ones you want and the favors are compltely determined by which oils you use! So white chocolate and raspberry are totally acceptable!

      Reply
  19. Christina

    November 15, 2010 at 4:39 pm

    Looks awesome! I can’t wait to try making these!

    Reply
    • Ashlee

      November 16, 2010 at 5:46 pm

      Let me know when you do! They really are fun and delicious!

      Reply
  20. Gail Jacobson

    November 15, 2010 at 5:49 pm

    I’m inspired!

    Reply
    • Ashlee

      November 16, 2010 at 5:46 pm

      I’m so glad! Now get baking/cooking/melting!

      Reply
  21. Jessica

    November 15, 2010 at 6:34 pm

    Oh my! I love mint! I wish I could reach through the screen and take a handful of those. Yummy!

    justenoughstyle.blogspot.com

    Reply
    • Ashlee

      November 16, 2010 at 5:47 pm

      I agree. mine are all gone now and just looking at the pictures is making me hungry for them! Good thing I have stuff for another batch or two!

      Reply
  22. Katy

    November 15, 2010 at 9:22 pm

    These look delicious! I did a small feature on my blog, feel free to grab a button!
    http://thecraftymamablog.blogspot.com/2010/11/weekend-highlights_15.html

    Reply
    • Ashlee

      November 16, 2010 at 5:48 pm

      Thank you so much! I’m so glad you liked them, and I am up there with so many other wonderful crafts from this last week! I’m tickled!

      Reply
  23. Madigan at madiganmade

    November 16, 2010 at 4:30 am

    These look great! I love Andes mints.

    Reply
    • Ashlee

      November 16, 2010 at 5:52 pm

      They taste even better! You’ve got to try them!

      Reply
  24. Kristi

    November 16, 2010 at 5:14 am

    Woah, those look perfect! I love Andes Candies. Not only do they taste great, but they remind me of my grandpa who always had a stash of them. Thanks for sharing this. I’m definitely adding these to my candy list this year.

    ~ The Speckled Dog

    Reply
    • Ashlee

      November 16, 2010 at 5:53 pm

      What a fun memory! I always liked andes mints, but never actually bought them, so these are just a treat! I hope they turn out well for you!

      Reply
  25. April

    November 16, 2010 at 6:29 am

    Those look fantastic. I never would thought to make these myself!

    Reply
    • Ashlee

      November 16, 2010 at 5:54 pm

      well I didn’t! I was introduced to this at a church activity! This woman has been coming every year for 5 years teaching the ladies in my neighborhood! But I do like to mix and match my own flavors…

      Reply
  26. the cape on the corner

    November 16, 2010 at 9:33 am

    wow, looks good. what a great gift these would make!

    Reply
    • Ashlee

      November 16, 2010 at 5:59 pm

      That’s what I thought!!!! I do goodie plates every year, but some of these would make a great teachers gift and much less messy!

      Reply
  27. Maggie

    November 16, 2010 at 10:09 am

    This are totally going on my treat list this year… I can’t wait!

    Reply
    • Ashlee

      November 16, 2010 at 5:59 pm

      RIGHT? They are so good, I think I might have to buy even more supplies than the 3 batches I have!

      Reply
  28. Angie

    November 16, 2010 at 10:36 am

    OOOOO YUMMY! I cant wait to try these!!!

    Reply
    • Ashlee

      November 16, 2010 at 6:00 pm

      They are SOOOO good!

      Reply
  29. Allison

    November 17, 2010 at 4:40 am

    Thanks Ashlee for linking up! These look so yummy in my link party!!
    http://vintagepollyanna.blogspot.com/2010/11/tell-me-tuesday-link-party-1.html

    Reply
    • Ashlee

      November 18, 2010 at 2:10 am

      Thanks! And I have to say your button necklace is really fun!

      Reply
  30. Carrie

    November 17, 2010 at 10:16 am

    I really think the best part is that I can make them any size I want. Not tiny like the manufacter!!!

    Thank you 😀

    Reply
    • Ashlee

      November 18, 2010 at 2:07 am

      That’s right! Mine are MUCH bigger. Those tiny ones are completely useless! Like half a bite!

      Reply
  31. Lyndee

    November 17, 2010 at 10:20 am

    I cannot wait to try this!

    Reply
    • Ashlee

      November 18, 2010 at 2:05 am

      Just make sure you get the GOOD candy melts. It makes all the difference!

      Reply
  32. Katrine

    November 17, 2010 at 11:25 am

    Seriously? I am so making these! Thanks for the recipe!

    Reply
    • Ashlee

      November 18, 2010 at 2:05 am

      They are terrific! In fact I’m craving them right now! Every time I get a comment on them I wish I had some of my own again!

      Reply
  33. Sarah

    November 17, 2010 at 4:18 pm

    Ooh, I love Andes mints – I bet they are even better homemade!

    Reply
    • Ashlee

      November 18, 2010 at 2:03 am

      They really are better! Good luck trying them out!

      Reply
  34. Nichelle

    November 18, 2010 at 1:49 am

    Thanks so much for sharing! I found your link at tipjunkie!!! I would love it if you would stop by my blog, http://www.vwbblog.com/! I’m doing a giveaway of a bag I made! I LOVE IT!

    Mucho love!
    -Nichelle

    Reply
    • Ashlee

      November 18, 2010 at 2:02 am

      I LOVE your princess inspired head band flowers! They are GORGEOUS! I am SO going to have to make some sometime soon!

      Reply
  35. Michelle

    November 18, 2010 at 6:40 pm

    Oh my… I NEED to make these! They look sooo good, and yours look perfect!! Thanks for this tutorial!!!

    – Michelle @ Bunch of Craft

    Reply
    • Ashlee

      November 18, 2010 at 9:31 pm

      You DOOO need to make them, I insist!

      Reply
  36. marissa

    November 19, 2010 at 9:44 am

    oh man this looks awesome I definitely am going to try it out!

    Reply
    • Ashlee

      November 19, 2010 at 11:03 pm

      You should. The great thing about them is they don’t have to be mint, you can make them in any flavor you want~

      Reply
  37. Angie

    November 19, 2010 at 3:43 pm

    I love this…so quick and easy even I can handle it! 🙂

    Reply
    • Ashlee

      November 19, 2010 at 11:05 pm

      Exactally! I don’t think you could mess them up worse than just getting the chocolate a little swirly! And even they they still taste amazing.

      Reply
  38. [email protected]

    November 19, 2010 at 7:15 pm

    They look so beautiful and yummy! Great tutorial. I think I could do this one :).

    Reply
    • Ashlee

      November 19, 2010 at 11:14 pm

      thanks! They do turn out really pretty and you can totally do this! There are lots of pictures and instructions, but they really are very easy!

      Reply
  39. Crystal

    November 19, 2010 at 7:19 pm

    Love,love,love this!! I need to make some asap! Thanks for sharing.

    Reply
    • Ashlee

      November 19, 2010 at 11:53 pm

      Yes you do (need to make them right away!). I’m so glad you liked them!

      Reply
  40. christy

    November 19, 2010 at 7:21 pm

    these look like they came from a fancy chocolate shop. chocolate and mint is my fave combination. your tutorial is great too! found you through tatertots…so glad i did.

    Reply
    • Ashlee

      November 19, 2010 at 11:54 pm

      Don’t they (look all fancy and stuff). And so easy, I love pretty and easy and tasty. The perfect combination!

      Reply
  41. Sherri

    November 20, 2010 at 4:54 am

    I love andies! Ooouuu I just may have to try these. I am bookmarking your ‘recipe’! 😉 Great tutorial and I’ve never melted chocolate like you do….but LOVE that it’s EASY.

    Reply
    • Ashlee

      November 29, 2010 at 9:01 pm

      Real chocolate you have to be careful with, of course, but this way would work great. I also like to use a double broiler, but for these smaller batches the oven works great. PLUS these are chocolate flavored candy melts, not normal chocolate, so they melt well almost anywhere! They would be hard to burn so even you microwave works!

      Reply
  42. Stephanie

    November 20, 2010 at 7:54 am

    These look fantastic! My hubby would love them! (So would I!)

    Reply
    • Ashlee

      November 29, 2010 at 9:03 pm

      My whole family loved them! I try to keep my more “adult” candy for myself, but my kids LOVED them! Next time we’re going to try some fun flavors that the kid’s pick out!

      Reply
  43. jamielyn

    November 20, 2010 at 11:06 am

    mmm these look delicious and perfect for the holidays!

    Reply
    • Ashlee

      November 29, 2010 at 9:04 pm

      They really are! Of course anything peppermint is perfect in my book!

      Reply
  44. Courtney

    November 20, 2010 at 6:59 pm

    Quick question for you! Can you put these in a little plastic gift bag or will they get all soft and look bad? Are they better given on a plate? Thanks!!

    Reply
    • Ashlee

      November 29, 2010 at 9:07 pm

      I’ve been thinking about this. I know you can give them away in gift boxes, all stacked nicely together, without issues. Since they are candy melts and not pure chocolate I think they would work in a bag just fine!

      Reply
  45. Tammy @ Not Just Paper and Glue

    November 21, 2010 at 4:58 am

    These looks so yummy! Great recipe and tips 😉

    Reply
    • Ashlee

      November 29, 2010 at 9:07 pm

      Thanks! I hope you try them and like them!

      Reply
  46. Cheryl

    November 21, 2010 at 11:06 am

    Mmmm. Will have to make these – I love me some mints! Thanks for linking to Craftastic Monday:)

    Reply
    • Ashlee

      November 29, 2010 at 9:08 pm

      I know, right???? Mint is probably my 3rd favorite food, behind chocolate and coconut!

      Reply
  47. Bonnie

    November 21, 2010 at 1:34 pm

    Thanks for sharing this yummy treat. Andes are my favorite. And…your tutorial was excellently done. I linked to this post on my blog. 😀

    http://somewhereincraftland.blogspot.com/2010/11/fun-holiday-treats-and-visiting.html

    Reply
    • Ashlee

      December 1, 2010 at 1:19 am

      Thank you so much! I always love it when people think enough of something to link up! I hope you try them out!

      Reply
  48. kelley

    November 21, 2010 at 5:55 pm

    These look so good and easy. Andes mints are one of my favorite candies and these are perfect for the holidays!

    Reply
    • Ashlee

      November 29, 2010 at 9:08 pm

      Also you can cut them MUCH smaller if you want, I guess my bites are a tad on the large size compared to andes mints!

      Reply
  49. Kassi

    November 22, 2010 at 9:29 am

    I LOVE Andes mints!!! This makes it seem so simple to make them… I had no idea! Thanks for sharing!

    Reply
    • Ashlee

      November 29, 2010 at 9:09 pm

      they are SUPER easy!!! I hope you try them and love them as much as I do!

      Reply
  50. ourlifeinaclick

    December 2, 2010 at 8:31 pm

    These look amazing and very impressive to tell people you made your own Andes!! Thanks for the tutorial!

    -heather

    Reply
    • Ashlee

      December 6, 2010 at 7:22 pm

      Thanks! I hop you try them out and like them.

      Reply
  51. Ann

    December 3, 2010 at 8:09 am

    What size jelly pan did you use and where did you find the candy flavoring? I cant seem to find them anywhere. Thanks

    Reply
    • Ashlee

      December 6, 2010 at 7:22 pm

      Ummmm Normal size??? It’s the largest in a set, like 12×17… Anyone else? Is that right?

      Reply
  52. Julie

    December 3, 2010 at 9:37 am

    I am speechless! I love Andes mints and I am so excited I found your recipe, I can’t wait to try it!!

    Reply
    • Ashlee

      December 6, 2010 at 7:18 pm

      They are AMAZING! let me know what you think when you make them!

      Reply
  53. [email protected]

    December 4, 2010 at 8:00 am

    Ooooo! Love! Where in Utah do you get your candy melts?

    Reply
    • Ashlee

      December 6, 2010 at 7:16 pm

      Actually I got them from the woman who taught the class at our church. She sells them out of her house. I’ll try to remember to get her number! I need some more supplies anyway! Gygi’s on 300 E in Salt Lake has some, but they only have the pre-flavored colors, NASTY. But you could get the chocolate and whites and dye the white yourself!

      Reply
  54. Michelle

    December 4, 2010 at 8:58 pm

    These look amazing! I am totally going to try these!

    Reply
    • Ashlee

      December 6, 2010 at 7:14 pm

      Yes you TOTALLY need to! When your ready to get out and about again we need to have a GNO so Kara and I can squeeze that sweet baby of yours a bit!

      Reply
  55. Lisa

    December 5, 2010 at 6:21 pm

    Yay! EVERYONE ♥’s Andes mints….I am going to give them a whirl! xo♥

    Reply
    • Ashlee

      December 6, 2010 at 7:11 pm

      They are DELISH!

      Reply
  56. Megan

    December 15, 2010 at 7:48 am

    Delicious! I want them NOW! I used to use Guittard Melt N Molds but haven’t stocked up in awhile, so maybe I need to try Merkens. I will NEVER buy Wilton or cheaper brands anymore. For those that mess up, just break it up into chunks and they will still be eaten. My family dives in before ever really paying attention to shapes, designs and colors when I make chocolate.

    Reply
    • Ashlee

      December 16, 2010 at 10:31 am

      Isn’t that the truth!! You get what you pay for when it comes to chocolates! Totally worth getting the good stuff. You have to cut them while they are still soft if you want squares. If you don’t mind broken ones then shattering it when it’s cool works just as well. Like you said, who really cares about the shape!

      Reply
  57. Erin

    June 30, 2011 at 4:34 pm

    I love the recipe. Can you recommend a good place to buy flavor oils. I am in the middle of making cherry chocolate caramel popcorn when I realized that I have never flavored chocolate before. Your recipe answered the how. I just don’t know where I can buy the flavored oils. Thanks.

    Reply
    • Ashlee

      July 2, 2011 at 1:16 pm

      Ummmm I find them everywhere. Michaels and Joanns should have the Wilton brand, it’s candy flavoring, not icing flavoring. Any specialty cake/bakery supply shop will have some. And any online candy making places will have it. My favorite is

      Reply
  58. *LyndiLou*

    February 10, 2012 at 10:47 pm

    Found you through Pinterest and I’m SO glad I did. This tutorial looks AWESOME!!! Andes mints are the best and I’m just floored at the idea of making them myself. YAY!!! Thanks so much for sharing. 😀

    Reply
    • Ashlee

      February 18, 2012 at 11:28 am

      Thanks! They are SUPER easy! Next time I make them I’m going to add crushed candy cane or peppermints to the middle layer for some texture! Mmmmm

      Reply
  59. Aaryn

    August 30, 2012 at 11:44 am

    Can you please redo this in recipe form? I like to check to see if I have the ingredients first. I dont really like that I would have to read the whole thing to figure out the ingredients. Thanks.

    Reply
    • Ashlee

      August 30, 2012 at 11:03 pm

      10 oz chocolate- melted
      10 oz vanilla melts- any color- melted
      10 oz chocolate- melted
      jelly roll pan
      parchment paper
      candy oil- any flavor you want- 5-7 drops mixed in each layer of chocolate

      cover the bottom of the jelly roll pan with parchment paper. pour it into the jelly roll pan, shake smooth. wait until it get’s dull and pour the next layer, repeat. When the top layer is dull cut the chocolate- if you wait too long it will break instead of cutting smooth!
      pour first

      Reply
  60. REBZ

    September 25, 2012 at 12:09 pm

    Hi they look amazing. How long will they keep in an air tight container?
    I am going to make them for Christmas

    Reply
    • Ashlee

      September 29, 2012 at 11:04 am

      Ummm since ours get’s eaten so fast that’s hard to guess 😉 they’ll actually stay good for quite some time. since your not adding anything to the chocolate melts but the oil flavors they’ll stay good as long as the chocolate does. a year or more if you don’t let them get to hot or too cold.

      Reply
  61. amanda G

    November 26, 2012 at 6:15 pm

    These look so yummy! I’ve recently discovered the Andes holiday peppermint crunch mints. Do you think crushing candy canes into almost dust, then mixing that with the top and bottom layers would cause any problems?

    Reply
    • Ashlee

      November 26, 2012 at 8:17 pm

      I think it would TOTALLY work, in fact I was planning on trying it myself this year, those are my daughters favorite!

      Reply
  62. Stacey

    December 12, 2012 at 11:47 am

    Where do you get a T Square cutter and also doesn’t the wax paper stick to the bottom of the chocolates?

    Reply
    • Ashlee

      December 20, 2012 at 10:58 am

      I made the T-square from a yard stick… and you just peel the wax right off if it sticks, it’s easy.

      Reply
  63. Jennifer Sikora

    March 2, 2013 at 6:17 pm

    That is my favoritest candy ever! I am so gonna have to make those 🙂

    Thanks for sharing.

    Reply
    • Ashlee

      March 27, 2013 at 12:58 am

      RIGHT!!! I used red vanilla melts with crushed candy canes this year, the kids LOVED it!

      Reply
  64. Laurie Nguyen

    February 2, 2014 at 12:56 am

    Thanks so much for posting this recipe! We love Andes candies in our house, and we can never seem to get enough. We still may not be able to get enough (are there ever truly enough Andes candies? I think not), we will be able to have them whenever we want! YEAH!

    Reply
    • Ashlee

      February 6, 2014 at 2:27 am

      YAY! I usually hide half the batch just for myself to save and enjoy (so I don’t feel like I have to race to get enough before the kids and husband eat it all)

      Reply
  65. Michelle

    April 23, 2014 at 10:49 am

    So, I’m a little embarrassed to admit I JUST found these! But I have a question…Do they end up with a strong mint taste like the candies, or mild like the baking chips? (Or does it just depend on how much flavoring you use?) We use the baking chips to add flavor to boxed brownies (make the mix like the box says and sprinkle the chips over the brownies before you put them in the oven). However, we’ve found more mint flavor comes from the candies, chopped up, than the chips. I’m just curious if these would work for our purposes. (Plus, I wouldn’t have to worry about them being pretty…) 🙂

    Reply
    • Ashlee

      June 23, 2014 at 4:43 am

      It’s totally up to you. You can control the strength of the flavoring by how many drops of the candy flavor you add! So you could totally make sure they had a nice strong flavor (which I like too) then chop them up for baking! I will say that the chips are made out of different chocolate and made to maintain their shape, where these would totally melt in cookies or brownies in the oven. And NOT maintain their shape

      Reply
  66. Leslie

    January 14, 2016 at 8:48 am

    What is the yield for this recipe? What size squares (rectangles) do you cut? I am definitely going to try these next Christmas!

    Reply
    • Ashlee

      February 5, 2016 at 10:19 pm

      it makes a 13×18 jelly roll pan, cut then into any size you want, I do like inch and a half squares

      Reply
  67. Titan Tyler

    December 1, 2016 at 9:00 pm

    What is the difference between Chocolate wafers and Vanilla candy melts other than brown and white? Is chocolate wafers chocolate candy melts????????????????????

    Reply
    • Ashlee

      January 25, 2017 at 10:48 pm

      I use high quality chocolate wafers – like guitards, or Callebaut or Merckens – you get a much better melt – candy melts aren’t chocolate at all, but candy made to melt and seem like chocolate – but not chocolate – so they won’t work as well

      Reply
  68. Stephanie

    December 2, 2016 at 8:53 am

    These look amazing! Could I use vanilla almond bark instead of the candy melts for the middle layer or are they not interchangeable?

    Reply
    • Ashlee

      January 25, 2017 at 10:45 pm

      chocolate wafers – like guitards, or Callebaut or Merckens – you get a much better melt – candy melts or almond bark aren’t chocolate at all- so yeeeeeesssss you can, you’ll need green oil dye (not water based) to get the color and the end result won’t really be authentic – as it won’t be chocolate.

      Reply
  69. Lily Sugathan

    December 21, 2016 at 4:38 pm

    Hello,

    Just made a batch and they are wonderful! One question – should I keep them out, or store in the fridge?

    Reply
    • Ashlee

      January 25, 2017 at 5:47 pm

      personally I keep them out – but either works – they’ll stay set at room temp – but if you like cold chocolate you can refrigerate them, but there is no need

      Reply
  70. Jo

    December 18, 2018 at 11:09 am

    Your video shows you adding a couple of drops of peppermint oil to each layer, but in the recipe you say to add 5-7 drops to each layer. Which one should I do?! I’m making it now!

    Reply
    • Ashlee Marie

      February 3, 2020 at 8:40 am

      5-7, it’s what I add in the video too, it’s just hard to see

      Reply
  71. Kari

    February 19, 2020 at 6:33 pm

    Hi Ashlee;
    I just came across your wonderful recipe. I just love chocolate & mint. It is neck to neck with
    my other favorite…choclate & orange!!! I wonder if after I make your recipe, if I can ajust
    the layers to taste of orange!!! Thank you sooo much for sharing.

    Reply
    • Ashlee Marie

      April 18, 2020 at 7:51 pm

      just use orange chocolate and orange candy oil flavor – easy peasy

      Reply
  72. jen

    January 24, 2021 at 11:31 pm

    Do you think I could use the doterra peppermint oil? (I believe it is food grade) but is it different from candy oil?

    Reply
    • Ashlee Marie

      April 27, 2021 at 8:39 am

      I suggest just using candy oil, I do not know how the do-terra oil would effect the chocolate or if its safe to eat.

      Reply
  73. jen

    January 24, 2021 at 11:39 pm

    Do you think I could use doterra peppermint? (I think it’s food grade). Is it different than candy oil?

    Reply
    • Ashlee Marie

      April 27, 2021 at 8:34 am

      I would not use the doterra oils, they are not make for baking the way candy oils are.

      Reply

Leave a Reply Cancel reply

Your email address will not be published. Required fields are marked *

Recipe Rating


This site uses Akismet to reduce spam. Learn how your comment data is processed.

Primary Sidebar

about Ashlee Marie image
youtube facebook instagram twitter pinterest email rss

You have Successfully Subscribed!

Privacy Policy: We hate spam and promise to keep your email address safe. You'll receive email updates through AshleeMarie.com. You can unsubscribe at anytime.

Popular Posts

Homemade deep-fried monte cristo sandwich
homemade choco taco
one pot loaded baked potato soup
tamatoa cake - moana - disney
I love these candied strawberries, like a candied apple, a glorious crunch with a ripe strawberry center!

Footer

SEEN ON

as seen on
  • TV and Media
  • Privacy Policy

COPYRIGHT © 2007–2022 Ashlee Marie - Real Fun with Real Food

ashlee marie lets make some awesome
  • Recipes
    • Main Dish
    • Desserts
    • Breakfast
    • Sides
    • Bread
    • Soups & Salads
    • Drinks
    • Food Tutorials
    • Back
  • Cakes
    • Cake Recipes
    • Cake Tutorials
    • Carved Cakes
    • Wedding Cakes
    • Smash Cakes
    • Party Cakes
    • How to Video Series
    • Back
  • Parties
    • Complete Parties
    • Party Cakes
    • Party Food
    • Party Crafts & Decorations
    • Printables
    • Invitations
    • Back
  • Holidays
    • Valentines
    • St. Patricks Day
    • Easter
    • Cinco De Mayo
    • Mothers Day
    • 4th of July
    • Halloween
    • Thanksgiving
    • Christmas
    • Back
  • Travel
    • Culinary Travel – Cooking Schools
    • Family Travel
    • Disney
    • Universal Studios
    • Blogger Trips
    • Back
  • Videos
    • Recipe Videos
    • Short Videos
    • Kitchen Tip Videos
    • Video equipment links
    • Back
  • Crafts
    • How to & Craft Tutorials
    • Crochet & Knit Patterns
    • Decorations
    • Furniture
    • Photoshop
    • Remodel
    • Sewing Projects
    • Back
  • Shop
    • Video equipment links
    • Baking and Kitchen equipment
    • Back