The party went SO amazingly well! Really, I’m not sure I’ve thrown a better party ever! It’s fun looking back on the pictures, but at the same time frustrating that I missed so many pictures, or took bad pictures, or learning something new from taking them. It’s funny how much I learn about making parties better from looking at the pictures when it’s over! Whey can’t I see those things without a camera lens? Anyway while the pictures aren’t quite what I’d like it was a great party in the end!
I made these Truffula trees out of feather boas, and had them every few feet around the entire room! I loved them, they are SO soft! I used long rolls of paper for the rolling hills and the truffula tree trunks!
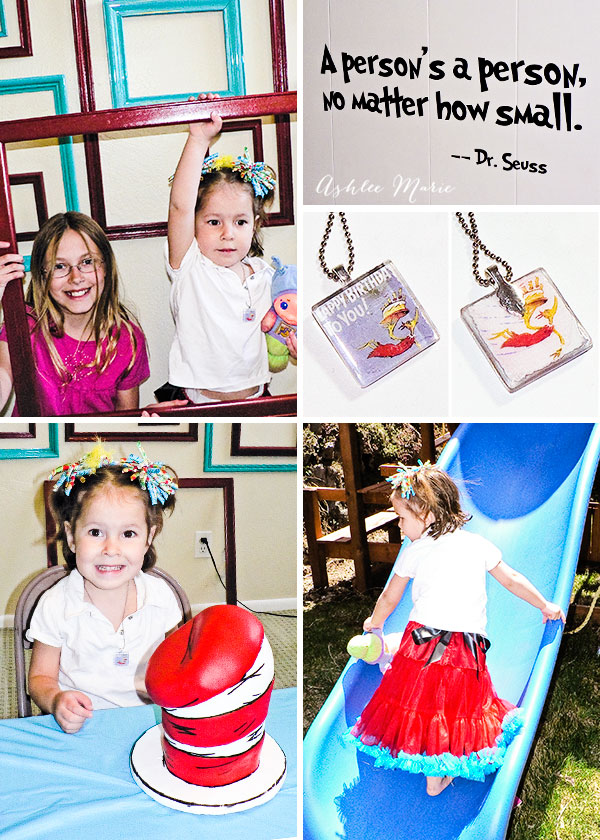
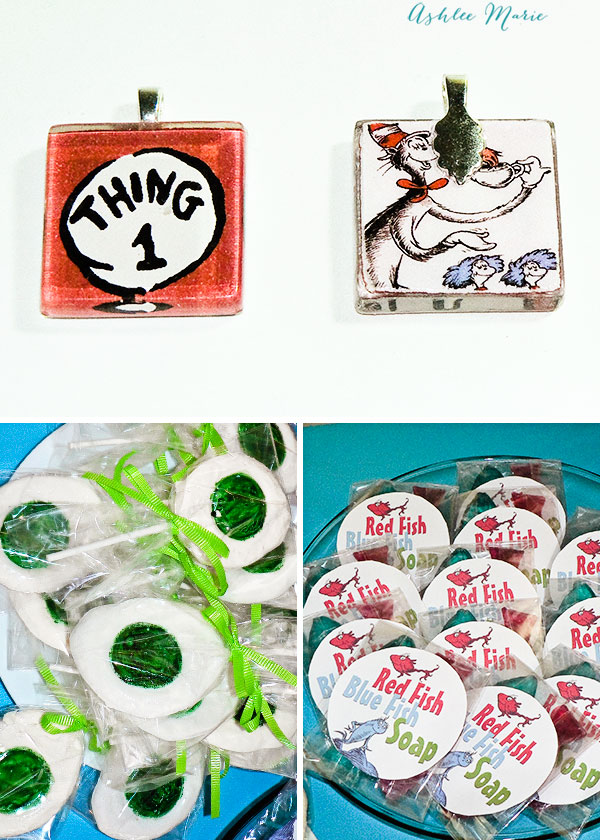
Using the image from Dr. Seuss’s Happy Birthday book I created this special necklace for the birthday girl to go with her new Skirt! She’s been wearing it for days and only takes it off at night (cause I make her) but first thing in the morning she’s asking for her special birthday necklace!
I painted a to of frames and created this fun wall to be a backdrop for pictures of all the guests! They are actually a great red and turquoise, but for some reason the red just doesn’t show up very well at all.
And the final touch? A fun vinyl quote I found on Etsy! Since we’re tearing down that wall anyway this summer we’re just going to leave it up, one of my favorite quotes.
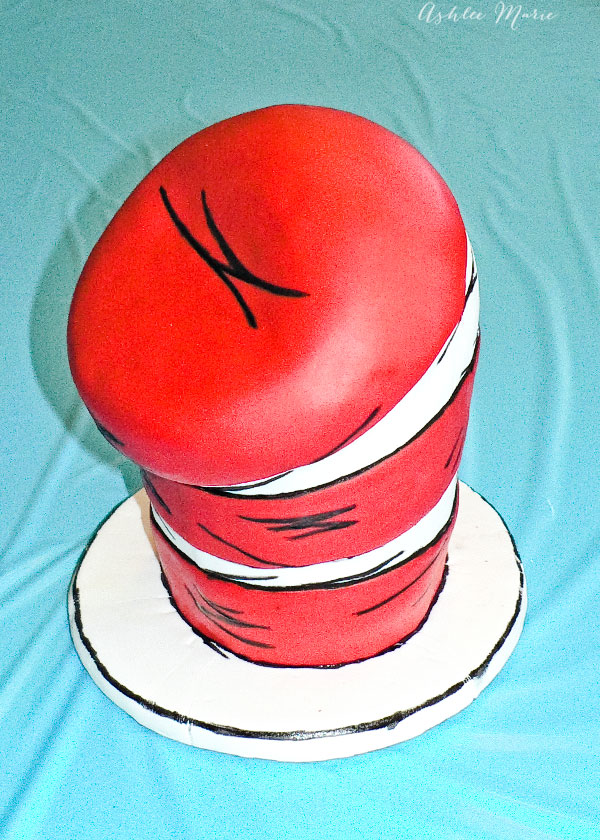
And the big reveal… the cake!!! I LOVE how it turned out! I stacked 8 inch cakes about 12 inches tall and started carving away until I got the shape I wanted! Then I covered three 10 inch cake boards with white fondant, covered the cake with white fondant then added red fondant to the top and in stripes around the sides.
To get the black lines I started with a black edible food marker, but it wasn’t quite dark enough so I took some black gel and mixed it with some clear vanilla and painted the lines on. I like, no LOVE what the black lines add to the cake! They take it from cute to over the top AMAZING! And even more important the birthday girl loved it!
I hand drew the cat in pencil then used a sharpie to make it permanent! I had the hardest time finding a picture of the cat without his hat, so this was kind of made up, I think it worked out really well! For that Hat’s I ordered these 5 inch hats from Amazon and just used tape to have them attach them to the poster. The three year olds at the party all “cheated” and you can see about 15 hat right on top of each other in JUST the right place on the poster! The older kids, who had their eyes covered, didn’t do quite as well…
The Reader and I made a ton of these yarn balls (with these great pom pom makers, I have every size) to represent Horton’s Clovers! We had a game for the older kids attending the party, guess how many clovers! They were clustered like this over the whole basement! I forget now, but I believe it was around 134… AND we added a BEAD to one of the clovers, our little Who Speck, for one lucky winner to find!
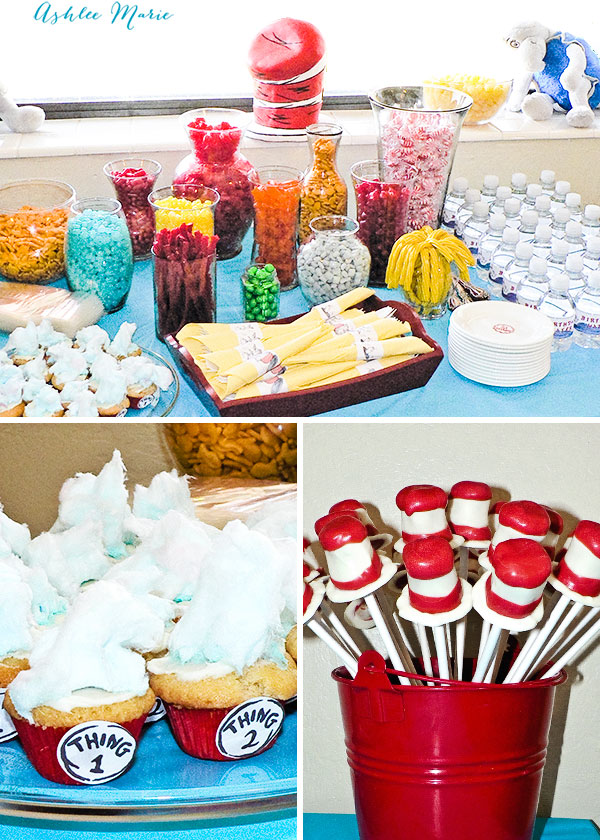
The goodie table! I wanted to create a candy bar with the colors from the party, red, yellow, orange, turquoise and even some green! Red is obviously the easiest color to find, but I was happy with how it turned out. I had bags for each of the party attendees and their parents to grab candy and eat it a the party or take some with them. The kids loved it (the parents probably not so much!). The Yertle the Turtles I found at the local DI!
I made mini cupcakes, and added paper thing 1 and thing 2 circles to the front, along with blue cotton candy to the frosting. The mistake I made was frosting and adding the cotton candy the night before. DON’T DO THAT! Wait as long as you to do that. The frosting crystallized the cotton candy and it hardened and clumped together, not soft and fluffy like you want them to be.
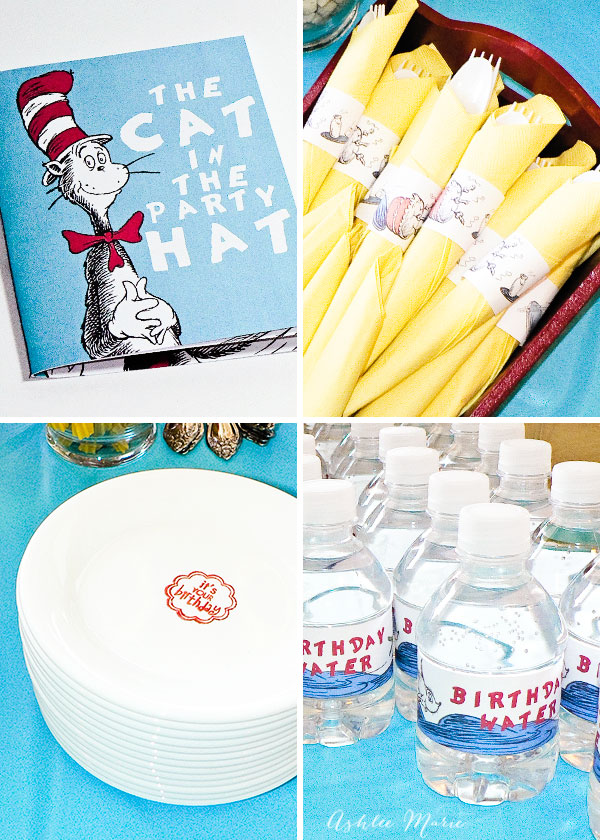
Here’s a reminder of the fun booklet invitations we made for the big day, setting the mood (and the new color on our door wreath as well!)
I created these water bottle wraps with the same image I used on the envelope of the invitations. They were a HUGE hit!
I used food markers and a stamp to create this great plates for eating the cake on! I searched high and low for a Dr. Seuss stamp but didn’t find one! But the red “it’s your birthday” worked fine in the end. Such a fun impact for such an easy craft!
And I used images from the Cat in the Hat book to make these utensil wraps. I wrapped way to many, but it was so fast and easy to do! And added such a nice color to the table as well. I found the wooden tray at DI as well an painted it the same color as the picture frames on the wall.
and the favor and gift table. I also found that totally cute cookie jar at the DI too! Who knew there would be so much Dr. Seuss stuff at the DI! Perfect timing.
Cat in the Hat cake pops! These were a huge hit, and I get more questions about these than anything else from this party, so I recreated them and made a tutorial so you guys can make your own Cat in the hat cake pops (or like me, oreo pops!)
And while I was shopping online for this party I stumbled upon the best sucker mold EVER, fried egg suckers! I made a huge batch of these in white (white food coloring also makes your candy opaque instead of translucent! A trick I use often with my candy making). I used green food gel, mixed with clear vanilla, and painted on the green yolks!
The kids all helped me make these red fish blue fish soap favors for the guests! It was SUCH a fun craft to do, they loved picking the scents and helping me color them, and because it was soap it was super easy to clean up! And the guests loved them too! It’s fun to come up with that perfect favor!
I made these glass tile necklaces to be prizes for all our games, in the end we had enough for every girl that came (sorry boys) so it kind of just worked out!
[riview showtitle=always id=64 tags=dr-seuss size=150x150 lightbox=0]





Shayna @ Texas Monkey
Love all the details! Great party! I did a ladybug party a few weeks ago if you want to check it out. http://texasmonkey.blogspot.com/2010/08/ladybug-themed-birthday-party.html
Would you mind sharing exactly how you did the rim of the hats on the cake pops? I understand what you said but can’t figure out with the stick and all. Also where did you find your egg sucker mold and what did you use to paint the centers? Love those!
Ashlee
I LOVE sharing! I dipped the whole hat into white candy. When it dried I dipped each end into red candy. THEN I set the hat onto parchment paper. I put white candy coating into a frosting bag, cut the tip and pipped candy coating around the base of the hat, and around again until I got the size brim I wanted. I got the egg sucker mold at Candy Mold Central. I use gel food coloring and I used green gel “watered” down with some clear vanilla to create a paint for the green! I’m so glad you liked my party!
Your lady bug party was adorable! It’s hard to get the RED and BLACK with frosting and candy, you did a great job! Looks like everyone had a great time! Did you make all those balloon ladybugs yourself? SO many cute details!
Christina
Okay, these are great, the cake pops!!!! I am doing a Dr. Suess shower and wanted to make them…When did you put the stick into the bottom and how did you dip the whole thing in white if it was not on a stick…I am a little confused! I love them! Great Job!
Ashlee
I dipped them in the white and rolled them around, but didn’t add the stick until they were all done. Once the rim of the hat was dry I picked them off the parchment paper and stuck them on sticks.
Criselle
Wow! Loved all the details….did you do the napkin rings and water bottles yourself? How did you do this? I’m hosting a shower next month and would love to know if you used a program….Loved it all!!! Great job!
Ashlee
I did make them myself. I just measured the size I wanted and used photoshop to create them on a sheet and cut them out and glued them! I used the same idea for my daughters Rainbow Garden Party the next month!
Victoria S.
Splediferous Party! You did a great job with all the Dr. Seuss details, perfect invite, the Thing 1 cupcakes, hat cake pops, fish in a dish, the cake that doesn’t look like a cake (how did you get the shape so perfect?) the favors and the necklaces. Where did you get the square glass covers for the necklaces? I totally want to make some. Thanks for sharing this party on my site, http://www.obSEUSSed.com.
Ashlee
Thanks! It did turn out really well. Of course the Birthday girl ended up getting overwhelmed and hid during the party (aspergers) but the guests and their parents (cousins and close friends) all had a great time! I order all my jewelery making supplies from https://www.etsy.com/shop/SunAndMoonCraftKits
Amy Ro
This party is soooo cute, I wish I had half your details for my boy’s party
I found it via ObSEUSSed =)
Ashlee
Thanks!!! It was such a fun party to put together~ She doesn’t really remember much from the party, but all the guests (mostly family) did and it was fun to enjoy the day with them.
Natalia U.
Saying I think you did a spectacular job on your party planning would be an absolute understatement! I am currently planning a ‘Seuss’ 1st birthday party for my daughter and I would love to pick your brain on where you got your perfect invitations from. I would be forever grateful if you would share!
Ashlee
I made them myself! http://ashleemarie.com/dr-seuss-birthday-party-book-invitation/ It was super fun~!
Judy
Ashlee, I’m planning a baby shower for my daughter and wondered how you did the Red Fish Blue Fish Soap Decals that go inside with the soap favors. I would like to make some of the decals as a favor. They are so cute as well as all your other ideas!! Love your blog!
Ashlee
What a fun baby shower theme! I’m assuming your talking about the round stickers I held the plastic bags closed with? I scanned in the fish from the book, I used photoshop to move them over and used a dr. seuss font I downloaded to do the writing. Printed it onto paper, ran it through my xyron sticker maker, cut them out in circles and stuck them on the bag!
Mandi
I am planning a Dr. Suess party also. I will definitely be making the cake pops. I also want to make the soap. How do I do it, what upplies do I need, and where do I get them?
Ashlee
I got the soap mold from and I bought the glycerin, scents and dyes from michaels! you just melt the glycerin, add the scent and dye, stir, pour it into the mold and let it cool completely!
Heather
I love your cake and cake pop ideas!!!! I make red and blue fish soap, green eggs and ham soap as favors, and bottle cap necklaces that I have on my website. I came across your blog and couldnt help but think the cake pops and your cake were amazing!!! LOVEIT!!
Ashlee
Thanks! I’m glad you liked them. The cake pop’s have been a huge hit, I should’ve done a tutorial on them. I guess I could always remake them… The cake was by FAR my favorite part. Oh and finding that egg sucker mold was pretty cool too. I think I’ll do another Dr. Seuss party in the future, maybe for this next babies 1st birthday or something!
Katherine
It looks great! I’m planning a Dr. Seuss party for my son. How did you do the “pin the cat on the hat”? is there a template i can find somewhere?
Ashlee
I hand drew the cat and I ordered the hats from somewhere online. I don’t remember where now…. I drew the cat in pencil first, then when I was happy with it added the marker, then colored it in!
Sue
I adore the cake! It’s animation come to life~right off the pages of the book! Bravo!
Ashlee
Thank you thank you thank you! One of my all time favorites! It turned out so fun!
Sherri
Hey there! I found your site because I am directing Seussical- I think your creations are amazing!!! Wow!
Just one question, though. Where did you get your clovers? Did you make them? How? We need a ton of them and I would like to do it if we can.
Ashlee
I made them all… My kids loved them, but in the end my husband threw them out…. I just used yarn and a yarn ball maker (you can make your own, but a yarn ball maker is SO much faster). I worked on them at night while watching HULU or netflix
Sherri
So, the yarn maker just makes them into balls? I can’t tell by the picture, it looks like they are sealed in the center, with the yarn sticking out at all angles.
Ashlee Prisbrey
I have about 6 sizes of these pom pom maker they are super easy to use, and turn yarn (I used pink of course) into pom poms… It does take some time, but works great! here is a video tutorial on how to use it https://www.youtube.com/watch?v=d2Ma-hgQIDU
Sherri
You’re so sweet for sending me all the links. Thank you!!
Ashlee
I hope it helps! Always happy to help a fellow theater teacher/director out! My cousin just directed Seussical last year and had a ball! Enjoy!
Mary
Such a cute party. Your cake is adorable! Can I ask how you got the floppy effect on the top?
Ashlee
I hand carved the cake into the shape I wanted! I love how well it turned out!!! I just started with about 10 inches tall and 8 inch rounds and just started carving away until I looked the way I wanted.
Sarah S
I found your site from searching cat in the hat cakes. I plan to make one for my son’s 1st birthday. How did you do the fondant? Did you cover in red, then place white fondant stripes on it? Or did you alternate the stripes? Also, how did you do the black detail? Is it painted on? Thanks in advance for sharing! I’m still new at cakes, and I need all the help I can get!
Ashlee
I covered the cake with white fondant then added the red strips. I actually started the black with an edible food marker, but it didn’t get into the corners good enough so I took some black food gel and painted the rest.
Elle
I would love to know how you made the hat cake. My son LOVE the cat in the hat I for once I will have some time this summer. I would love to make this for his 2nd birthday.
Awesome job on the party! I wish I had your crafting skills!
Ashlee
I stacked 8 inch cakes 8 inches tall then started carving away until the base was around 5 inches and the top was still fat and was the shape I was happy with. Then covered it with white fondant, added red fondant stripes, put the cake on a cardboard circles covered in white fondant. Then I used black food coloring gel with a bit of clear vanilla and painted on the black cartoon lines! I hope that helps!
Sierra @ H is for Homeschooling
I love your pin the hat on the cat activity and am featuring it in my Dr. Seuss Fave Five Friday post tomorrow. I am including a picture and link back to your site so be sure to stop by and check it out and let me know if there is any problem. Thanks!
Sierra
his4homeschooling.blogspot.com
Ashlee
thanks so much! And I love the pinterest pin in disclaimer on the top! I hope you like my dr seuss cake pops that I added a tutorial for this year! What a fun round up!
Kristin Bolling
Will you share how to make your soap and what fish you used?
Ashlee
Gosh that was so many years ago I don’t remember most of it. I just bought a soap making kit from Michaels, and the mold from here http://www.countrykitchensa.com/shop/candy-making-supplies/large-fish-chocolate-candy-mold/39/645/674/625254/
Lindsey
LOVE this party!!! Everything about it. I plan to do this theme for my older sister’s graduation party (from college- she’s obsessed with ALL things Dr. Seuss). My question, is on the cake- did you use any supports in the cake at all, to keep it from collapsing, since it was so tall?? Thanks in advance!
Ashlee
nope. I only carve using very VERY dense cakes so it’s not a problem. I started with 4 layers, if I was going taller than that I would. NEVER a box mix, those are useless and collapse too easily. I like pound cake texture, but moist to. if you want to crate a support what I’d do is stack 4 layers, carve it, then take it apart again, fill and frost the bottom two layers on one board, fill and frost the top two layers on a different board. place dowels into the bottom layers, then place the top two back on. cover it with fondant and decorate.