• Skip to primary navigation
  • Skip to main content
  • Skip to primary sidebar
  • Skip to footer

Ashlee Marie - real fun with real food

  • Recipes
    • Main Dish
    • Desserts
    • Breakfast
    • Sides
    • Bread
    • Soups & Salads
    • Drinks
    • Food Tutorials
  • Cakes
    • Cake Recipes
    • Cake Tutorials
    • Carved Cakes
    • Wedding Cakes
    • Smash Cakes
    • Party Cakes
    • How to Video Series
  • Parties
    • Complete Parties
    • Party Cakes
    • Party Food
    • Party Crafts & Decorations
    • Printables
    • Invitations
  • Holidays
    • Valentines
    • St. Patricks Day
    • Easter
    • Cinco De Mayo
    • Mothers Day
    • 4th of July
    • Halloween
    • Thanksgiving
    • Christmas
  • Travel
    • Culinary Travel – Cooking Schools
    • Family Travel
    • Disney
    • Universal Studios
    • Blogger Trips
  • Videos
    • Recipe Videos
    • Short Videos
    • Kitchen Tip Videos
    • Video equipment links
  • Crafts
    • How to & Craft Tutorials
    • Crochet & Knit Patterns
    • Decorations
    • Photoshop
    • Sewing Projects
  • Shop
    • Video equipment links
    • Baking and Kitchen equipment
Home » Cakes » cake tutorial

Delicate ombre gumpaste ruffles

Published: February 12, 2015 | Updated: November 12, 2019 | By Ashlee

  • Facebook
  • Twitter
  • Yummly

I am so excited to finally be able to share this cake!  Its from a Fall inspiration wedding shoot I did with Chelsea Peterson Photography and was just featured on Utah Bride and Groom.  The whole shoot is so lovely, rustic and charming. It was so fun to set up and turned out just lovely.

exquisite five tier wedding cake salt lake city utah

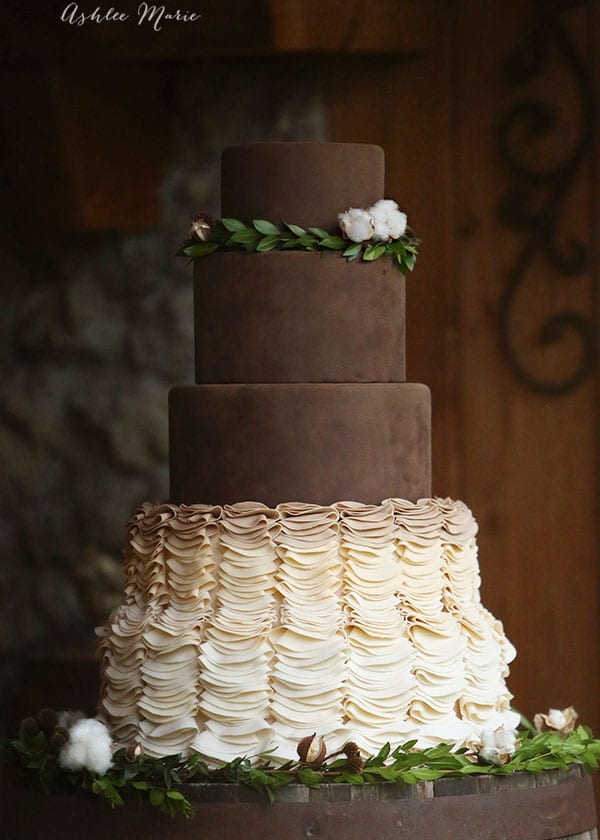
I couldn’t wait to make this cake.  I knew I wanted to make a chocolate cake, staying with the warm tones.  I decided to go with ivory ruffle for the bottom two tiers with a powdery, velvet suede chocolate for the top three tiers.  I wasn’t originally going to do ombre but as I was creating the layers it just came to me and I LOVE how it turned out.

ombre gumpaste ruffles leave a gorgeous soft effect to the bottom tiers of this wedding cake

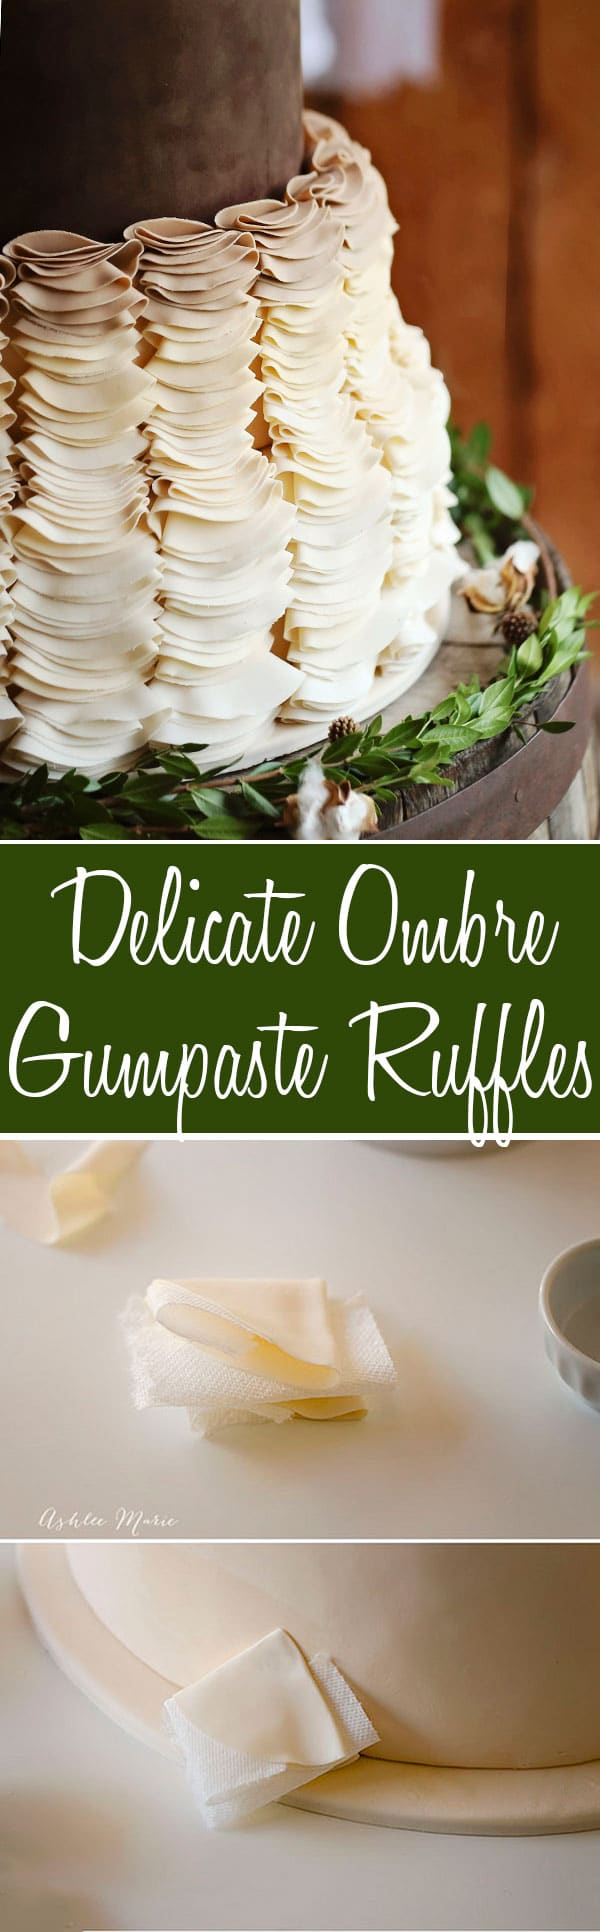
The ruffles are so thin and delicate I love the way it turned out.  It is simple BUT it is time consuming so start these tiers earlier than you think.  Frost your cake with ganache (it keeps your cake from drying out and holds it’s shape great without needing to be refrigerated).  Then cover it with a light ivory fondant.

creating gumpaste ruffles using circles

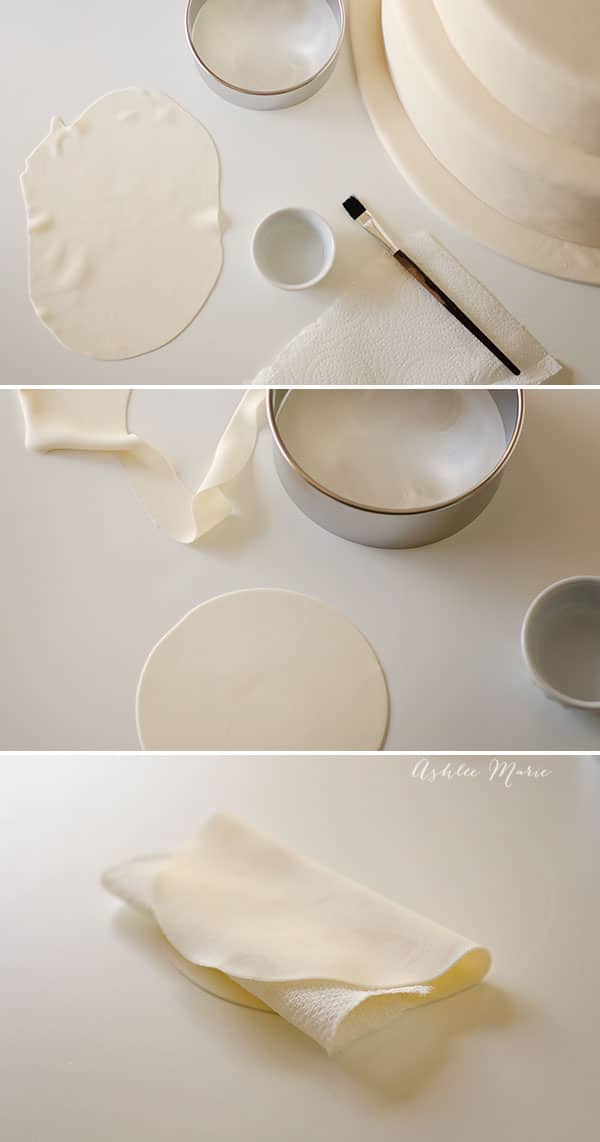
I like to do a 50/50 mix of gumpaste and fondant, so you can still get it thin, but its also not too stiff.  I use a pasta roller to get it as this as possible.  I go down to the thinnest or second thinnest setting then used a 3 1/2 inch circle cutter to cute 1-3 circles at a time (work in small batches, the gumpaste dries quickly).

Dab a SMALL bit of clear vanilla or vodka in the center of the circle.  Fold a small paper towel square and place over half of the circle (but not touching the damp center) and fold the circle in half (but not PERFECTLY in half it will leave it more layer-y looking that way).

folding and layering these gumpaste circles creates and amazing effect on this wedding cake

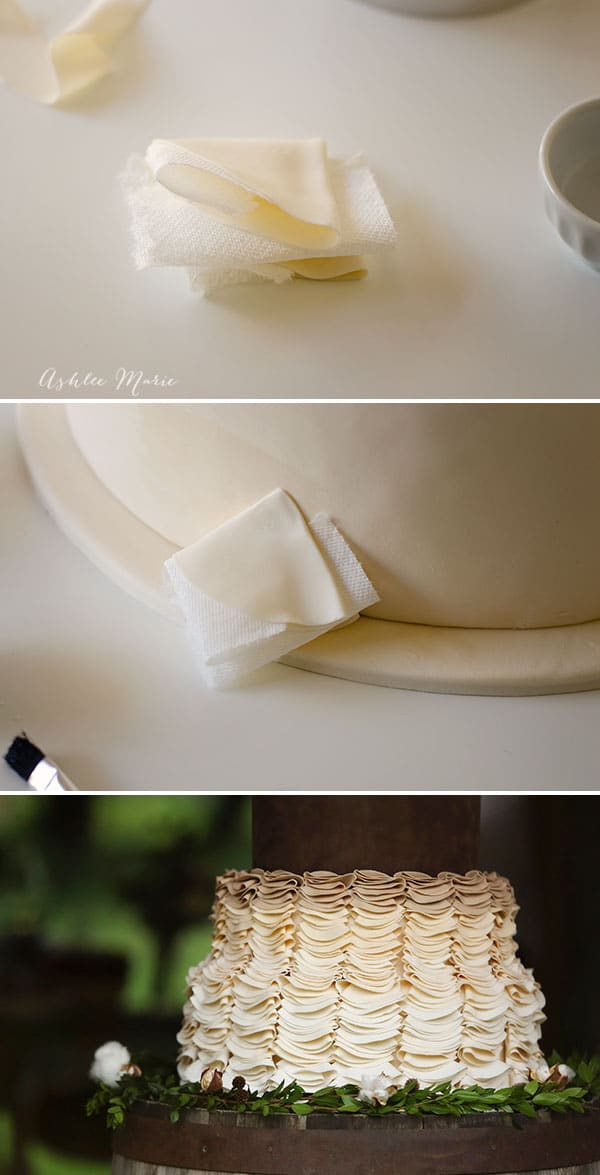
Again dab a SMALL amt of the alcohol (clear vanilla or vodka) in the center of the fold.  Place another small folded paper towel on one side, fold the circle in half again (but again not PERFECTLY in half, slightly off so it creates loose layers).  You now have a 1/4 of a circle with paper towels sticking out of it.  Paint the corner with the alcohol and press it against the cake, hold it for a few seconds so it won’t slide down.  I had the first layer long enough that it brushed over the board.

Work your way around the first tier completely (keeping an eye on your spacing so you end evenly).  Then start the next round!  I also add some paper towels between each round to keep a slight separation.  The closer you do each round the longer it’s going to take, but it looks amazing.

I moved down to a 2 1/2 inch circle when I started on the second, smaller tier.  For the ombre look I added just a BIT of the chocolate fondant every 3 rounds.

the cake is made more lovely with these soft ombre gumpaste ruffles

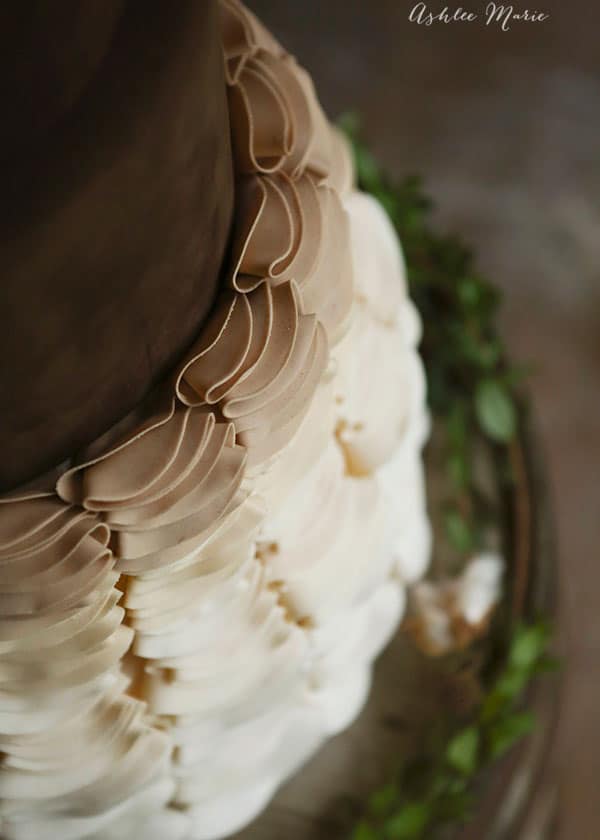
I had the ombre get stronger as I got closer to the top (as you add more chocolate you my need to add more gumpaste to keep it strong).  The lower 12 rounds are VERY close in color, being more subtle.  I love how it turned out.  What do you think? Would you have kept it all ivory? or do you think the ombre was the right choice?

layers of soft velvety chocolate over ombre ruffles creates a stunning cake

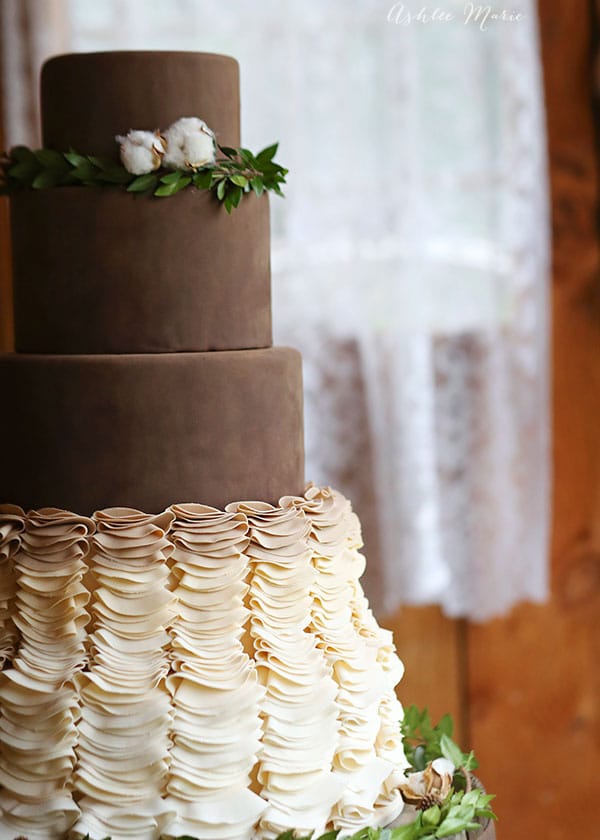
I actually made about 6 gumpaste flowers as well as gumpaste leaves, berries and more.  BUT when I arrived on site I wasn’t feeling it, it was too much and just didn’t look right.  SO I used real branches and added some cotton from the shoot and I LOVE what a simple touch it was.   I love how it adds to the rustic, but still elegant, look to the cake.  What do you think?

a full tutorial for how to make these delicate gumpaste, ombre ruffles

Related Posts:

  • Wedding Cake Trio
    Wedding Cake Trio
  • Family photography - smash cake session
    Family photography - smash cake session
  • Edible Sequins & Gumpaste Flowers Wedding Cake
    Edible Sequins & Gumpaste Flowers Wedding Cake

JOIN MY NEWSLETTER!

Become an insider and receive this FREE Maple Icing Recipe (not seen on the blog!)

You have Successfully Subscribed!

Privacy Policy: We hate spam and promise to keep your email address safe. You'll receive email updates through AshleeMarie.com. You can unsubscribe at anytime.

  • Facebook
  • Twitter
  • Yummly
ashlee marie

About Ashlee

With the right tips and tricks, I believe YOU can make, bake, or create anything. This is what I love to do - make some awesome, teach you how, and give you that boost of culinary confidence you need to rock your own kitchen! Read more...

youtube facebook instagram twitter pinterest email rss

Reader Interactions

Comments

    Leave a Reply Cancel reply

    Your email address will not be published. Required fields are marked *

    Recipe Rating


  1. Kara

    February 12, 2015 at 10:08 pm

    I swear every cake is prettier than the last one. Are you sure you don’t have a magic wand? 🙂

    Reply
    • phyllis

      February 14, 2015 at 11:33 am

      Lol

    • Ashlee

      April 7, 2015 at 9:03 pm

      awwww thank you so much! And it’s not magic, just very very time consuming 😉

  2. Luce

    February 14, 2015 at 6:34 am

    Hi Ashley^Totally agree! The cake is looking great with the ombre effect…it adds to the look…scrumptious!!!
    In an earlier post, you wanted to try the velvety effect with powdered sugar…Have you made the attempt? I would love to see the result. I follow your blog…and I am very happy to see the marvels you create!
    Have a nice day!

    Reply
    • Ashlee

      April 7, 2015 at 9:13 pm

      I haven’t yet, I actually haven’t had time lately to just play with cakes, boo, but I’ll get around to it soon.

  3. Barb Finch

    February 14, 2015 at 12:53 pm

    So very pretty!

    Reply
    • Ashlee

      April 7, 2015 at 9:14 pm

      awww thank you so much!

  4. Rose @ RoseBakes.com

    February 14, 2015 at 1:32 pm

    That’s SO gorgeous Ashlee!!! xx

    Reply
    • Ashlee

      April 7, 2015 at 9:15 pm

      thank you so much Rose!

  5. LB Pilon

    February 14, 2015 at 7:31 pm

    Ashlee, I wouldn’t have changed a thing! It turned out beautifully!!!

    I hope that I can one day decorate as well as you do… jk lol

    Reply
    • Ashlee

      April 7, 2015 at 9:18 pm

      thank you so much! I do love it!

  6. Margie

    February 15, 2015 at 7:21 pm

    Stunning, and I do,like the ombré !

    Reply
  7. Chelsea Peterson

    February 18, 2015 at 12:35 pm

    So amazing as always!!!!

    Reply
    • Ashlee

      April 7, 2015 at 9:25 pm

      Thank you so much for being such a great partner to work with sis!

  8. Jan LeBaron

    February 26, 2015 at 3:11 am

    This cake is just beautiful as are all of your designs!

    Reply
    • Ashlee

      April 7, 2015 at 9:57 pm

      thank you so much Jan! It’s fun creating beauty.

  9. Toniq

    November 12, 2015 at 4:37 pm

    Brilliant! Absolutely LOVE this cake. I want to get married again, just so I can have THIS cake.
    Love your blog. You are amazing!

    Reply
    • Ashlee

      November 15, 2015 at 6:29 pm

      aww thank you so much! I want to get married again to make myself a cake! I didn’t like my own cake!

Primary Sidebar

about ashlee marie
youtube facebook instagram twitter pinterest email rss

You have Successfully Subscribed!

Privacy Policy: We hate spam and promise to keep your email address safe. You'll receive email updates through AshleeMarie.com. You can unsubscribe at anytime.

Popular Posts

Homemade deep-fried monte cristo sandwich
homemade choco taco
one pot loaded baked potato soup
tamatoa cake - moana - disney
I love these candied strawberries, like a candied apple, a glorious crunch with a ripe strawberry center!

Footer

SEEN ON

as seen on
  • TV and Media
  • Privacy Policy

COPYRIGHT © 2007–2023 Ashlee Marie - Real Fun with Real Food

ashlee marie lets make some awesome
  • Recipes
    • Main Dish
    • Desserts
    • Breakfast
    • Sides
    • Bread
    • Soups & Salads
    • Drinks
    • Food Tutorials
    • Back
  • Cakes
    • Cake Recipes
    • Cake Tutorials
    • Carved Cakes
    • Wedding Cakes
    • Smash Cakes
    • Party Cakes
    • How to Video Series
    • Back
  • Parties
    • Complete Parties
    • Party Cakes
    • Party Food
    • Party Crafts & Decorations
    • Printables
    • Invitations
    • Back
  • Holidays
    • Valentines
    • St. Patricks Day
    • Easter
    • Cinco De Mayo
    • Mothers Day
    • 4th of July
    • Halloween
    • Thanksgiving
    • Christmas
    • Back
  • Travel
    • Culinary Travel – Cooking Schools
    • Family Travel
    • Disney
    • Universal Studios
    • Blogger Trips
    • Back
  • Videos
    • Recipe Videos
    • Short Videos
    • Kitchen Tip Videos
    • Video equipment links
    • Back
  • Crafts
    • How to & Craft Tutorials
    • Crochet & Knit Patterns
    • Decorations
    • Photoshop
    • Sewing Projects
    • Back
  • Shop
    • Video equipment links
    • Baking and Kitchen equipment
    • Back