This is an easy to follow pattern to make wrap around infant booties – both for boys and girls.
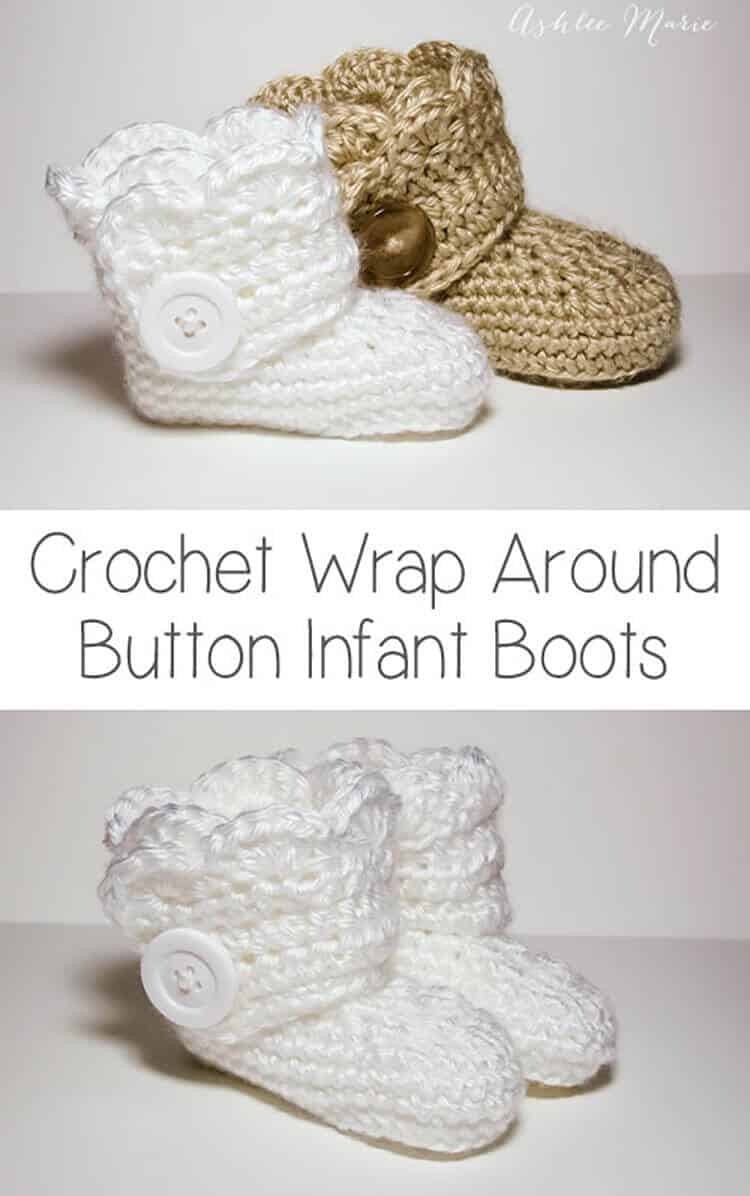
Okay, after some confusion I’m separating out the patterns. Here is the one for the INFANT size! I realized after making a second set of these that I have two G hooks and they are different sizes???
So for the larger Baby sized shoes I used a G6 – 4mm for these infant shoes I used G6 – 4.25! So if your looking for an infant size 1 (or 0-3 month) boot your in the right place! For a larger (closer to size 4) shoe go to the crochet wrap around button baby boots!
Buy BOTH the Ad-Free pattern pdf’s for both the Baby AND Infant sized discounted here!
The pictures are still the same as before, for the larger size, I’ll try to substitute out smaller pictures when I make another pair!
Buy the Ad-Free pattern pdf for just the infant size here!
Infant wrap around boots
Crochet materials:
caron simply soft yarn
large buttons
G6- 4.25 mm hook (To go up a size use a larger hook, or a larger pattern, to go down a size use an G-4mm hook)
abbreviation:
ch (chain)
sl st (slip stitch)
sc (single crochet)
hdc (half double crochet)
dc (double crochet)
sc2tog (single crochet 2 together)
dc2tog (double crochet 2 together)
dc3tog (double crochet 3 together)

sole:
ch 11
row 1- sc in 2nd ch, sc 5 times, hdc 3 times, 7hdc in last ch, finish the rest of the round working along the back of the chain, hdc 3 times, sc 5 times, 4sc in the last/first ch, sl st to the first sc (28)
row 2- ch1, sc in same sc, sc 7 times, hdc, 2hdc 3 times, 3hdc (in one stitch), 2 hdc 3 times, hdc, sc 8 times, 2sc 3times, sl st to first sc (39)
shoe:
row 3- ch1, working in back loops, sc in same sc, sc around, sl st to first sc (39)
rows 4-5- ch1, sc in same sc,sc around, sl st to first sc (39)
row 6- ch 1, sc in same sc, sc 9 times, sc2tog, dc2tog, dc, dc3tog, dc, dc2tog, sc2tog, sc around, sl st to first sc (33)
row 7- ch 1, sc in same sc, sc 7 times, sc2tog, dc2tog, dc3tog, dc2tog, sc2tog, sc around, sl st to first sc (27)
row 8- ch 1, sc in same sc, sc 5 times, sc2tog, dc, dc3tog, dc, sc2tog, sc around, sl st to first sc, cut yarn weave in ends. (23)

Boot cuff:
for the right boot sl st in the 7th stitch from the seam, for the left boot sl st in the 11th stitch from the seam
ch 12
row 1- hdc in 3rd ch from hook- ch2 counts as hdc, hdc in next 9 ch, hdc in first sc (the same one you sl st in), hdc 19 times (there will be 3 spaces left), skip 2 spaces, sc in last space. (32) **note – some people had a problem with getting two right or two left feet. remember to not cross over the front, work down the inside, around the back and back up the outside, so you’ll work in opposite directions for each bootie, counterclock wise – looking top down, or “wrong” side out for the right booties and clockwise, or “right” side out for the left bootie**
row 2- ch2 (counts as hdc), turn, hdc in first hdc and around 28 times, ch 1 skip one hdc, hdc in last 2 (31- with a ch1 space)
row 3- ch2 (counts as hdc), turn, hdc, hdc in ch1 space, hdc around (32)
row 4 scallops (girls)- turn, 5dc in second hdc, *skip 1hdc, sc in next hdc, skip 1hdc, 5dc in next hdc*, repeat around (8 shells), sc down the side (I fit 5), continuing around sc across the bottom along the original chain (11), sl st, cut yarn and weave in ends

row 4 simple (boys)- ch1, turn, sc across top (32), down the side (5) and across the bottom chain (11), sl st, cut yarn and weave in ends
And both the boys and girl versions (again these are the larger size)
Don’t forget to add a button where ever you like and your done! I placed mine at the bottom of the 5th hdc over from the front- I might go lower next time… or maybe two smaller buttons?
And one final picture, I thought you might want an inside shot so you can see how it wraps a bit… I’m still so very much in love with these boots.


Nick
In winter, I don’t leave the house without my Bailey Button’s or my Maylin’s.! Tehy’re always temperature right on the cold days and the super cold days! I love them, all 5 pairs which I now own!
fawzia raza
These booties are so beautiful. Are these for boys too? I want togift these to my niece who is pregnant and due in January. I love the way you have done the tutorial. Thank you for all the trouble to make cochet easy for us.
Ashlee
Yes, the scalloped one is more for girls, and the non scalloped one is for boys
fawzia raza
Thank you for this beautiful booties tutorial. Can I gift them to a newborn boy?
Ashlee
Yes that’s not a problem!
Nicole
On the sole…what do you mean 2 hdc 3 times? Is that 6 hdc? I’m so confused.
Ashlee
if the number is before the stitch name it’s the number of times you are going to do it in ONE stitch space. If the number is AFTER the stitch name it’s the number of times you are going to repeat it across the next stitch spaces. SO 2hdc 3times means you’ll be doing 2hdc in the next 3 stitches
Sheila
Do you have a pattern for adult sizes? I would love to make these for my daugher..
Ashlee
I don’t, only the baby and infant.
Jillian Mitchell
I found your blog this morning and the little boot pattern. A coworker of mine just had a baby girl last week so I made some for her! So excited to give them to her, I love how they turned out! Thanks for the pattern.
Ashlee
I’m so glad you like the pattern and I hope your co worker loves them too!
Lindsay
I LOVE your pattern! I’ve already made four pairs! So excited to see my first niece wear them, once she hurries up with the being born part! Thank you SO much!!
Ashlee
How exciting! congrats on getting a new neice and I’m so glad you liked the pattern.
carolyn
Would you be able to tell me how to make these booties in an adult size 6 women. Thanks
Ashlee
I only have made these two sizes. You could try making your favorite adult bootie pattern and add a cuff in this same style.
Laurie
I still cant understand how to make the “other” boot. Where is the sream? In the back of the boot? I was counting from the front of the boot. The one I did make looks o cute but I’m so stuck now.
Ashlee
the seam is where you’re chaining 2 and working up to the next row.
Laurie
Please tell me why the one boot I made wraps around the back and I can’t get the other boot to wrap around at all. I know it’s something very minor and I feel so stupid! Is there someone I can face-time with or see an actual tutorial? Please! I love these boots so much!
Ashlee
do you want to send me a picture of where it’s going wrong for you? the wraps both start just barely off center, and you need to remember to go down the sides (not across the front) so that they wrap in opposite directions (so one will be right side/wrong side/right side while the other will be wrong side/right side/wrong side) I hope that helps
Tracy
I was so excited to find this pattern! Since I found it like two days ago I have finished three pairs of booties with a little modification, I extended the cuff higher so that I could put on two buttons. Here is the link to what I made. Thank you again for the pattern!!!! I already have a lot of people asking me to make them.
Ashlee
that’s awesome! I love seeing different variations and modifications! glad you liked the pattern and the taller cuff looks great!
Melanie
I love this pattern! I had no trouble with the right or left bootie. The soles were symmetrical and needed no blocking. But then, I have been crocheting for 40 years and have crocheted with everything from crochet thread with tiny metal hooks to strips of fabric with large plastic hooks. These are the cutest and easiest booties I’ve ever made. Love, love, LOVE them! I’m working on some layettes for a set of twin girls to be born in the spring. These booties are a great addition to my gift! Thank you for sharing!
Ashlee
THANK YOU!!!! esp for taking the time to comment, so often I only hear about the problems so I really appreciate it! glad it worked up so easily for you!
Melanie
ed to add…after reading some of the other comments regarding “wrong side out”…I’m a stickler for wanting my “pairs” to be “matchy / matchy”…so what I did was slip stich to where I wanted to begin the cuff for the second bootie, instead of finishing off and re-attaching. Then once I had my strap made and was ready for the shells, I finished off and re attached, working the shell design so it would face the right side. They turned out beautifully!
Ashlee
I’m a little OCD myself, I do that myself, but when writing for others I try to keep it simpler. I know that people picky enough to want it matchy will be advanced enough to know how! Glad you liked the design! thx for leaving such a sweet comment!
Lori Shields
I love these booties! I just made a pair and I had no problem figuring out the left and right! I used a baby blue pearl wool and they are just goreous….thank you so much for sharing!
Ashlee
I’m so glad! thank you so much for taking the time to leave such a sweet comment! I really appreciate it so very much.
colette grimard
i m happy to find your site .ill by aboul to do these boots thanks you very much.
Ashlee
I hope you enjoy them! let me know what you think!
lynette Kingipotiki
I live in New Zealand and would like to thank you for the pattern. I am crocheting them for my grand babies, epecially for this cold cold wheather. thank you again
Ashlee
you are SO welcome! I hope they keep your grandbabies warm!
Marcela
Ashley, thanks a lot for the pattern. My doubt is that I don\t know where to start counting to begin the cuff. Please help me. Thanks
Ashlee
you start counting from the seam, where each row stopped and started, the seam. count towards the front
Tea
I didn’t weave in my ends at this point and counted from my yarn tie-off. 🙂
Alyssa
Hey! I was wondering what ply wool you used. I used 8ply and a 4.5mm hook for my first pair, and they turned out to be preemie size, or maybe smaller. <3 the pattern though! The boots are very cute.:)
Ashlee
I used caron simply soft yarn, so it’s weight catagory 4. If your using the same yarn and it’s coming out too small it means your a very tight crocheter, so you can either make the larger pattern or try a larger hook. Rather than make the full boot just try the soles both ways to decide which one you want to move forward with! Have fun!
Amanda
Hello, I love this pattern! I also am one who does not like to pay for patterns and these will be great for a baby shower I’m throwing coming up. I just have one question, and I read all the other comments and I think I am missing something cause no one else seemed to have a problem LOL. When I get to the cuff, and I finish the first row, it says to skip 2 spaces, sc in last space. I did so, but when I did the next row, I came up short. When I counted the stitches on the first row, I got 30, (10 hdc from the strap, 19 hdc following, and the sc on the end.) But I am supposed to have 32? How do I count the 2 skipped? Do I chain and count it that way? Or am I missing something on the skip 2 spaces…I’m pretty confused. Thanks!
Tea
I ended up with more space between my stitches and where they were supposed to be. I ended up having a stitch a couple more HDC’s to match where I was supposed to be. IDK if this will help you or not, but that is what I did with mine.
Ashlee
it the last row of the show, row 8, you should have ended up with 23, so skipping two stitches would leave you with 21, not 19, so you should have the 10 from the strap, 21 from the shoe and that ch2 at the beginning counts as one to, so 32.
Kate
Hi I was wondering if you have done a YouTube video for these yet? I seem to be not so quick on the uptake as everyone else and cannot for the life of me figure out how to do the cuff. I’ve unravelled about 5 times so far trying to figure it out and I don’t class myself as a slouch when it comes to crochet. :/
Ashlee
not yet, sorry, I’ve been focusing on my recipe/cake channel, but I’m hoping to get ahead soon and get this made asap, I’ll be sure to email when I do.
Tea
Hey, so I found this on youtube and it was really helpful! I was having trouble even making one boot until I watched this video. Idk if you want to add it to your site or not, but I thought I would share it anyway. She shows the sole in the first video. Part 2 is the shoe, and part 3 she shows how to stitch the left wrap-around.
Ashlee
no, I don’t allow people to make videos from my pattern so I won’t be sharing this video