• Skip to primary navigation
  • Skip to main content
  • Skip to primary sidebar
  • Skip to footer

Ashlee Marie - real fun with real food

  • Recipes
    • Main Dish
    • Desserts
    • Breakfast
    • Sides
    • Bread
    • Soups & Salads
    • Drinks
    • Food Tutorials
  • Cakes
    • Cake Recipes
    • Cake Tutorials
    • Carved Cakes
    • Wedding Cakes
    • Smash Cakes
    • Party Cakes
    • How to Video Series
  • Parties
    • Complete Parties
    • Party Cakes
    • Party Food
    • Party Crafts & Decorations
    • Printables
    • Invitations
  • Holidays
    • Valentines
    • St. Patricks Day
    • Easter
    • Cinco De Mayo
    • Mothers Day
    • 4th of July
    • Halloween
    • Thanksgiving
    • Christmas
  • Travel
    • Culinary Travel – Cooking Schools
    • Family Travel
    • Disney
    • Universal Studios
    • Blogger Trips
  • Videos
    • Recipe Videos
    • Short Videos
    • Kitchen Tip Videos
    • Video equipment links
  • Crafts
    • How to & Craft Tutorials
    • Crochet & Knit Patterns
    • Decorations
    • Furniture
    • Photoshop
    • Remodel
    • Sewing Projects
  • Shop
    • Video equipment links
    • Baking and Kitchen equipment
  • Navigation Menu: Social Icons

Home » Cakes » cake tutorial » Creating Ombre Fondant

Creating Ombre Fondant

By Ashlee Marie 16 Comments

  • Facebook
  • Twitter
  • Yummly

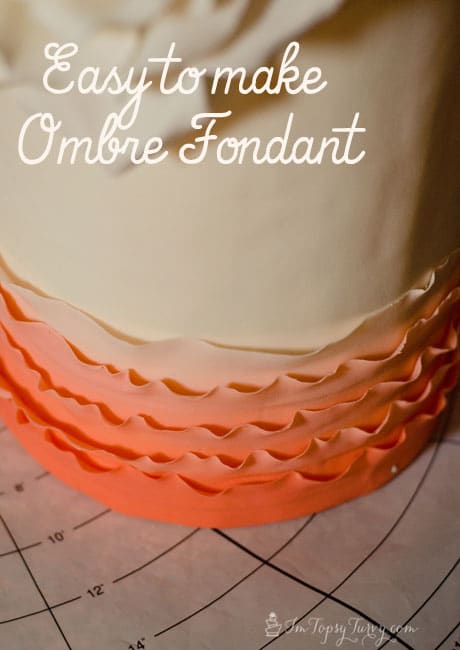
This is just an easy/short tutorial on how to make ombre fondant!  I use this technique all the time to get a wonderful, gradual, color change for a ton of cakes, like this purple cake for Better Homes and Gardens, and the ombre ruffles in the picture below.

How to easily color fondant in an ombre style

Trying to gradually color multiple balls of fondant is tough.  I mean coloring them is easy, but getting the gradual change down can be really hard, and time consuming.  You’ll go too dark one step and not dark enough the next, GAH, it’s frustrating.  So this way is easy.

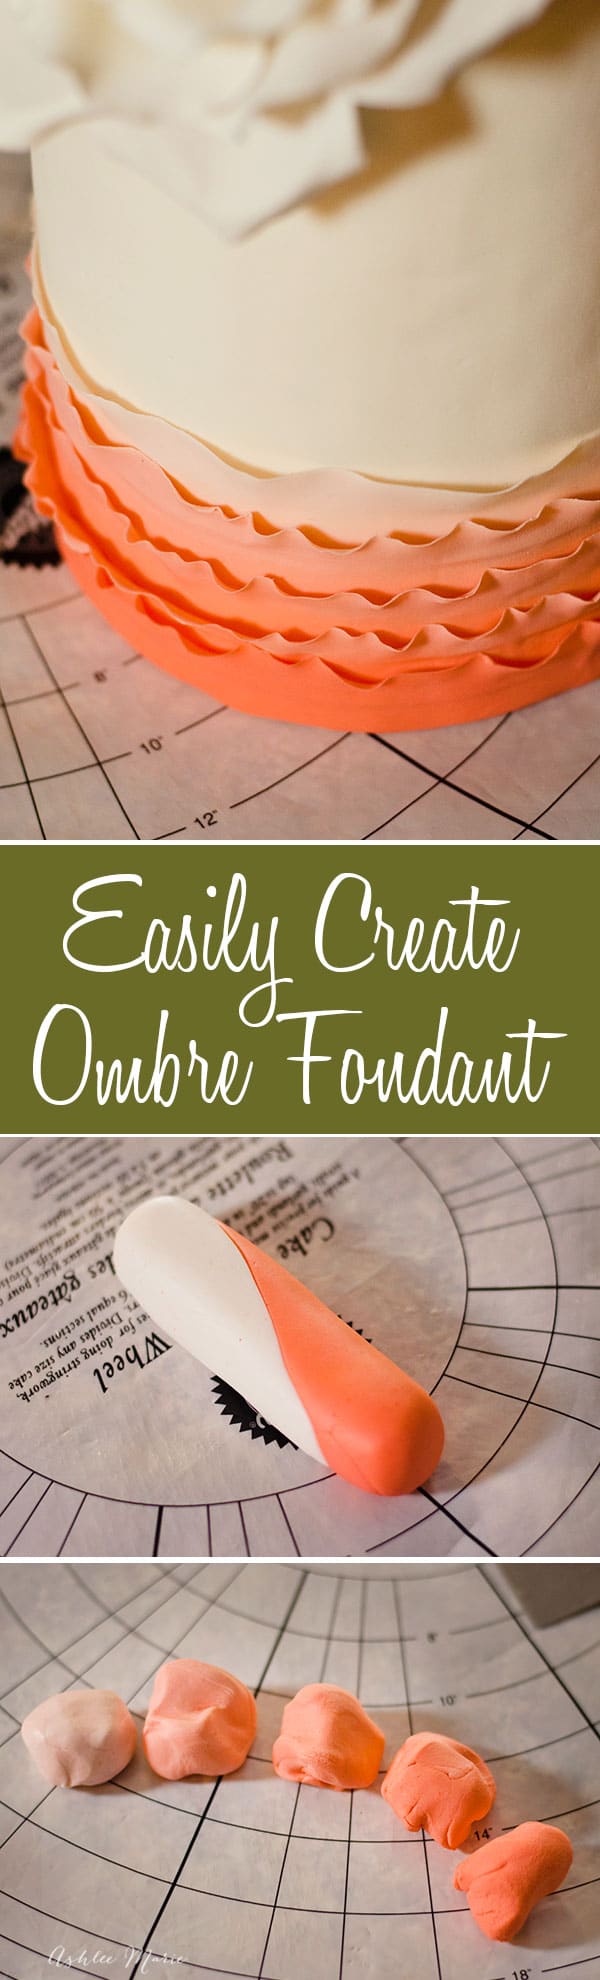
Start by simply mixing your lightest shade and darkest shade, don’t bother with the inbetween yet.  In this case white and orange.

easy-to-color-ombre-fondant

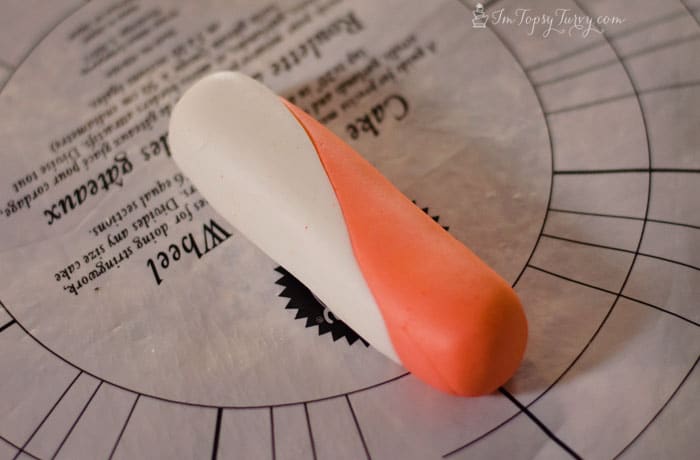
Then placing them next to each other roll them into a log, leaving one end all orange, the other end all white and the inbetween with create a diagonal line, or a nice gradual increase.  DON’T over work it.

easy-to-make-ombre-fondant

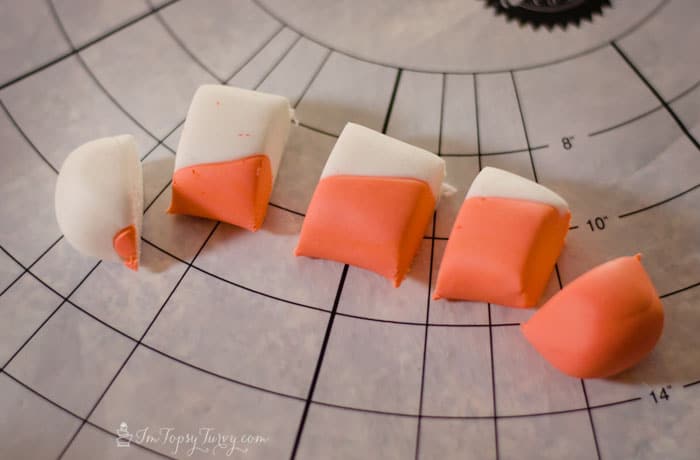
Then cut it in to 5 equal pieces, with your lightest color and darkest color being by themselves (with little or none of the opposite color left on those end blobs).  In this case I left that bit of orange in the big glob of white to add a smidge of color, but if your happy with your light shade you can simply pull that off.

ombre-fondant

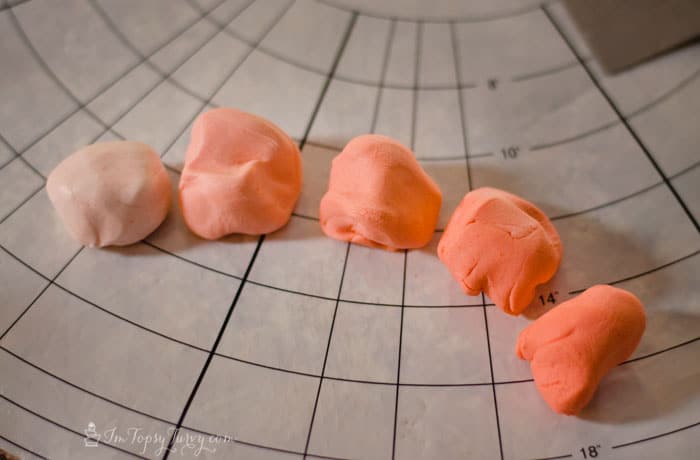
Then knead the colors together!  Voila, way simpler and MUCH faster than trying to achieve this one at a time! You have a great gradual change between each of your blobs, and your ready for decorating!

my easy way for making perfectly even ombre fondant or gumpaste
  • Author
  • Recent Posts
Ashlee Marie
Follow me
Ashlee Marie
With the right tips and tricks, I believe YOU can make, bake, or create anything. This is what I love to do - make some awesome, teach you how, and give you that boost of culinary confidence you need to rock your own kitchen!
Ashlee Marie
Follow me
Latest posts by Ashlee Marie (see all)
  • The Perfect Steak using Sous Vide - February 2, 2021
  • Pistachio cheesecake with coconut macaroon crust - November 19, 2020
  • 21 Amazing Chocolate chip cookie recipes - November 19, 2020

More From Ashlee Marie!

JOIN MY NEWSLETTER!

Become an insider and receive this FREE Maple Icing Recipe (not seen on the blog!)

You have Successfully Subscribed!

Privacy Policy: We hate spam and promise to keep your email address safe. You'll receive email updates through AshleeMarie.com. You can unsubscribe at anytime.

  • Facebook
  • Twitter
  • Yummly

Filed Under: cake tutorial, Cakes

Previous Post: « Free Printable Summer Vacation Countdown Calendar
Next Post: Slaw Burger Recipes »

Reader Interactions

Comments

  1. Carrie

    June 27, 2014 at 4:52 pm

    Wow, I would have never thought of that! Thanks for sharing!

    Reply
    • Ashlee

      July 26, 2014 at 12:46 am

      your so welcome! It’s really so easy!

      Reply
  2. Marie

    June 30, 2014 at 5:34 pm

    This is awesome! It’s so pretty, I want to give it a try.

    Reply
    • Ashlee

      July 26, 2014 at 12:50 am

      Thank you so much! There is so much you can do with ombre, but I do love this ombre ruffle look!

      Reply
  3. KC @ The Real Thing with the Coake Family

    June 30, 2014 at 7:22 pm

    Genius! What a simple way to get the ombre look.

    Reply
    • Ashlee

      July 26, 2014 at 12:52 am

      Thanks! It’s soooo easy, esp when your using more than one gel to get the color you want!

      Reply
  4. Denine, from We Know Stuff

    July 1, 2014 at 9:16 am

    That is just about the coolest thing I have ever seen. 🙂

    I am afraid to go near fondant – I’d probably make a mess of it all. One day, when the kids are tired of me, I’ll go to a cake decorating class!

    Reply
    • Ashlee

      July 26, 2014 at 12:53 am

      Thanks so much! And don’t be afraid, fondant is super fun to work with, and you know I not only teach here in Utah but I also teach online classes!

      Reply
  5. Gail

    February 1, 2017 at 4:45 pm

    Hi, I want to cover a round cake with ombré. Would you give me some advice on how to do this please.
    Thank you in advance.
    Gail

    Reply
    • Ashlee Marie

      January 6, 2020 at 2:29 pm

      In fondant i would do it in ribbons of ruffles, you can’t just get one sheet ombre using fondant colors. if you want the fondant base ombre then use an airbrush gun

      Reply
  6. Samantha Johnson

    April 19, 2017 at 11:25 pm

    How do you get flat ombre when covering a round cake?

    Reply
    • Ashlee

      April 30, 2017 at 12:34 pm

      buttercream is the only way to get that – for fondant you’d have to do something like ruffles to get the ombre effect down the sides of the cake

      Reply
  7. Nanthini

    December 8, 2017 at 7:58 am

    Thanks for your easy method Ashlee. How to mix for big quantity for a 5 tier cake.

    TIA for your response.

    Reply
    • Ashlee Marie

      January 6, 2020 at 2:28 pm

      depends on how thick you want your fondant and what size the tiers are. really only you know how much fondant you need

      Reply
  8. Nicola Dowling

    February 23, 2018 at 10:31 am

    Hi Ashleemarie
    Please help me !
    Rainbow coloured fondant…. any ideas would be greatly appreciated.
    Many thanks
    Nicki

    Reply
    • Ashlee Marie

      January 6, 2020 at 2:28 pm

      I buy all the base colors, then adjust shades from that, so I’d just buy red, yellow and blue and you can make orange, green and purple or buy those too.

      Reply

Leave a Reply Cancel reply

Your email address will not be published. Required fields are marked *

Recipe Rating


This site uses Akismet to reduce spam. Learn how your comment data is processed.

Primary Sidebar

about Ashlee Marie image
youtube facebook instagram twitter pinterest email rss

You have Successfully Subscribed!

Privacy Policy: We hate spam and promise to keep your email address safe. You'll receive email updates through AshleeMarie.com. You can unsubscribe at anytime.

Popular Posts

Homemade deep-fried monte cristo sandwich
homemade choco taco
one pot loaded baked potato soup
tamatoa cake - moana - disney
I love these candied strawberries, like a candied apple, a glorious crunch with a ripe strawberry center!

Footer

SEEN ON

as seen on
  • TV and Media
  • Privacy Policy

COPYRIGHT © 2007–2022 Ashlee Marie - Real Fun with Real Food

ashlee marie lets make some awesome
  • Recipes
    • Main Dish
    • Desserts
    • Breakfast
    • Sides
    • Bread
    • Soups & Salads
    • Drinks
    • Food Tutorials
    • Back
  • Cakes
    • Cake Recipes
    • Cake Tutorials
    • Carved Cakes
    • Wedding Cakes
    • Smash Cakes
    • Party Cakes
    • How to Video Series
    • Back
  • Parties
    • Complete Parties
    • Party Cakes
    • Party Food
    • Party Crafts & Decorations
    • Printables
    • Invitations
    • Back
  • Holidays
    • Valentines
    • St. Patricks Day
    • Easter
    • Cinco De Mayo
    • Mothers Day
    • 4th of July
    • Halloween
    • Thanksgiving
    • Christmas
    • Back
  • Travel
    • Culinary Travel – Cooking Schools
    • Family Travel
    • Disney
    • Universal Studios
    • Blogger Trips
    • Back
  • Videos
    • Recipe Videos
    • Short Videos
    • Kitchen Tip Videos
    • Video equipment links
    • Back
  • Crafts
    • How to & Craft Tutorials
    • Crochet & Knit Patterns
    • Decorations
    • Furniture
    • Photoshop
    • Remodel
    • Sewing Projects
    • Back
  • Shop
    • Video equipment links
    • Baking and Kitchen equipment
    • Back