Sorry this tutorial took me so long to get up! I’m having SO much fun doing So You Think Your Crafty but it is very time consuming and my actual blogging is taking a back seat to my crafting right now! It doesn’t help that we had yet ANOTHER flu go through the family last week! I have never been so sick so often. I think I might be allergic to this dry UT winter! Is that possible? Or maybe I just need to remember to take my vitamins more often…
Anyway… In December the gorgeous and friendly Melissa of I Still Love You hosted a thrift a thon, where she introduced us to a few of her favorite local thrift stores. It was SO much fun and I picked up 2 AMAZING shirts. BUT they were skinny jean shirts. A path I haven’t taken since I was a size 2 (a VERY long time ago). I was NOT planning on EVER attempting Skinny jeans again. But Melissa encouraged me to go try on a pair again. I did and she was right, they were amazing. BUT the jean brand I got had a bit to much stretch in it for me, and add that the the weight I’ve been MAGICALLY losing lately and they started to fall RIGHT off me.
It’s hard for us women to find the perfect jeans. After years of searching I finally found my perfect brand. Old Navy size 10 bootcut jeans long work best for my body! They have the perfect amount of stretch and strength, length and the perfect waists. A few years ago I head a rumor that they were going to be closing with the recession so the next time they had a sale ($10 each) I bought a TON!!! So I can’t be replacing all my jeans with skinny jeans so I thought, I’ll just MAKE my own!
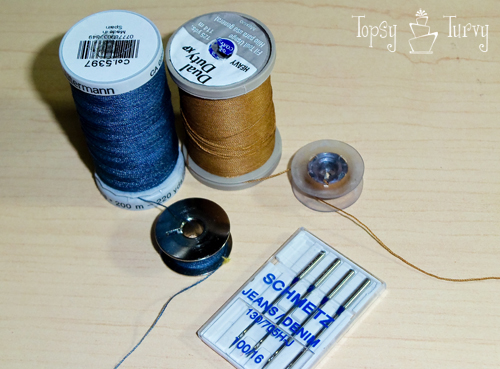
So what do you need. A pair of jeans, denim thread- the same color as the jeans you’ll be changing, and denim needles! If you happen to have a serger that is a plus too.
Note: I did two pairs and missed getting some pictures the first time around so I got them the second. So as your scrolling through the pictures if the jeans look like they are changing colors don’t worry, your not crazy, they ARE! I hope it’s not too confusing!
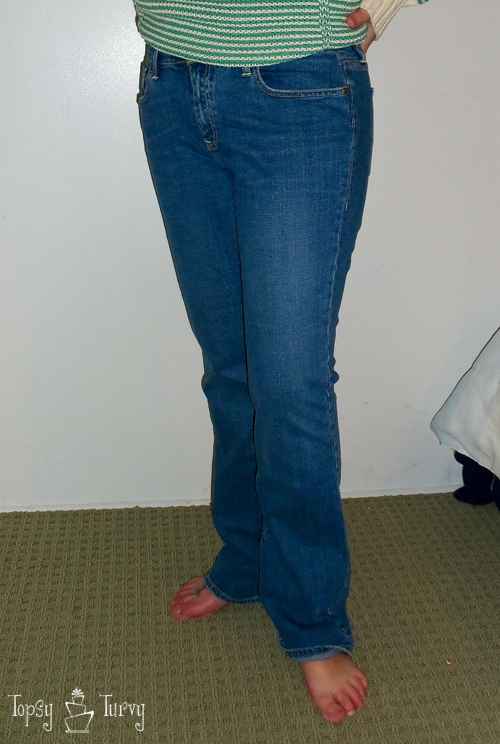
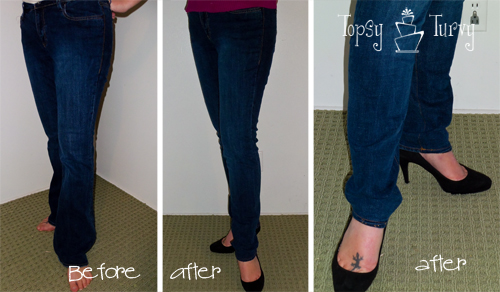
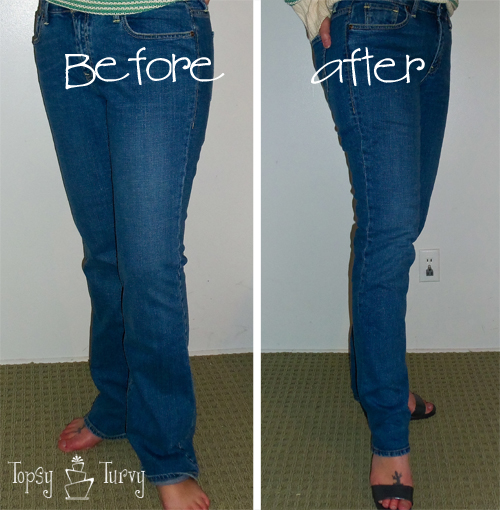
Here’s the before shot (should’ve put on my heels!)
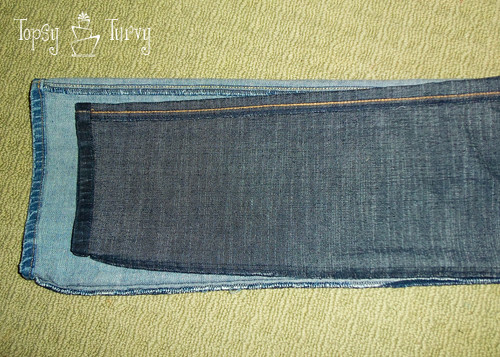
To help decide where to cut I got out the skinny’s I had boughten and laid them (both inside out) on top of each other. You don’t need to have a pair though. You just start at the knees and go down. You can go straight down and go with more of a straight leg look, or angle in a bit and go skinny. Just beware not to go TOO small. You do want to be able to slide the jeans over your feet and heels…

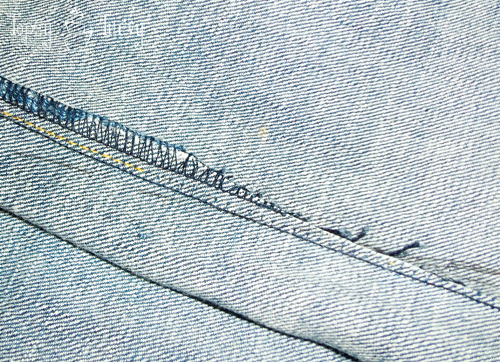
Now study your jeans, the outside is usually just a seam, but the inside theme has an extra detailed stitch running down the side holding the seam’s flat. Sometimes it’s a double/twin stitch. I made sure to use a pair with just a single detailed stitch. My twin needle is much narrower than industrial twin needles so I couldn’t match it up very well. But that was my preference you could always create a double detailed stitch by sewing down the leg twice.
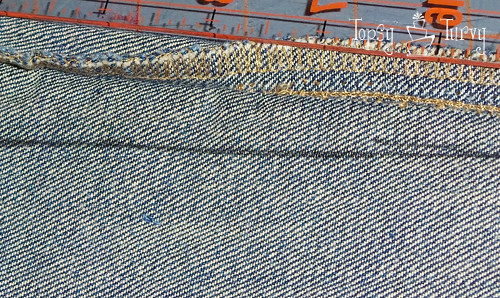
Anyway… You’ll want to take out this detailed stitching so we can trim the sides easily without worrying about the fold. Can you see how it’s opening up as I take out the stitching (right side).
Side note, you’ll also want to take out the stitching holding the hem up. Then unfold it! Man, two pairs and I forgot to take pictures of unfolding the hems! Grrrr
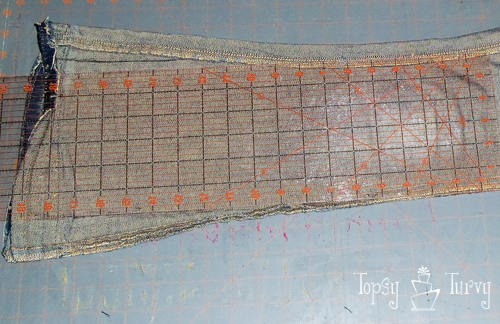
Start with one side (I started with the outside). Now jeans front and back aren’t even. One seam is completely on the edge, and the other seam is a bit interior (if that makes any sense at all). Anyway make sure you cut on the side that’s completely on the endge. I folded my jeans in half and cut through both legs, 4 layers, at once.
Then I grab the other seams and bring them to the edge. Notice the gap on the other side now? NOW it’s safe to cut the other edge/seam.
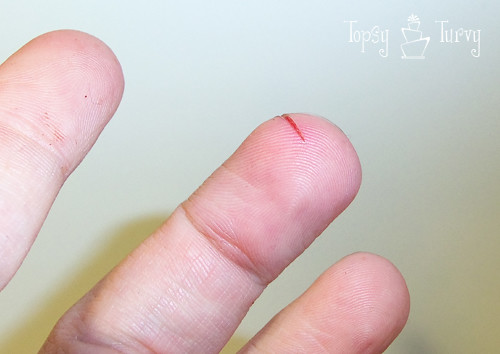
BUT be careful. When you pushing hard (getting through 4 layers of denim) it’s easy to lose control and try to cut your finger off! I got lucky, It cut layers and layers of skin and even into my nail bed, but no further. I’ll have a huge gash for weeks, maybe even a scar for life…
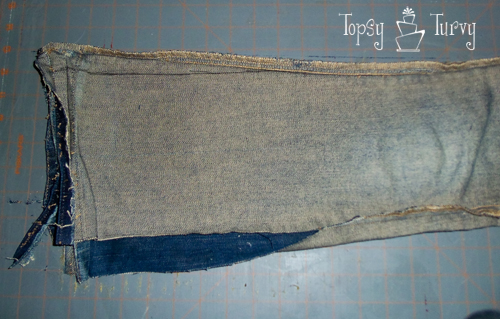
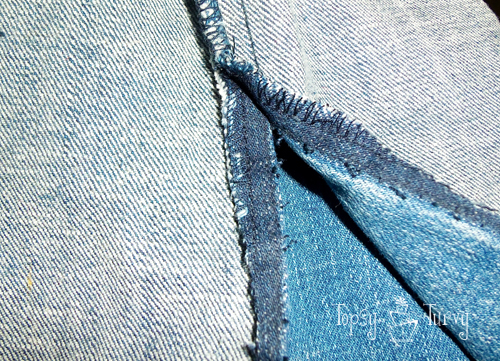
Back to the jeans. We need to start with the inside seams… Here is a close up of where I cut. The inside seam has both layers serged together.
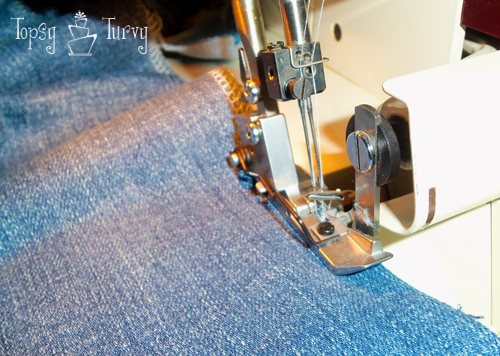
If you HAVE a serger (My first time using one, it’s my Mother in Law’s) this is a great project to use it on. If not you can always use a zig zag. You just want to make sure your holding in the raw edges.
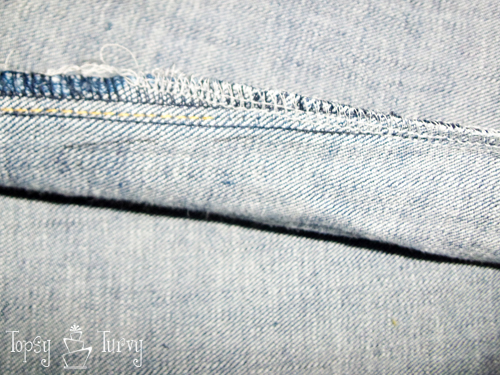
And here is what it looks like serged!
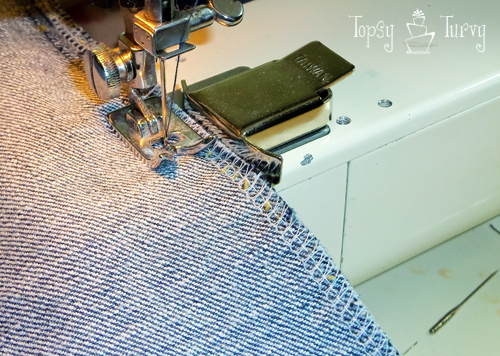
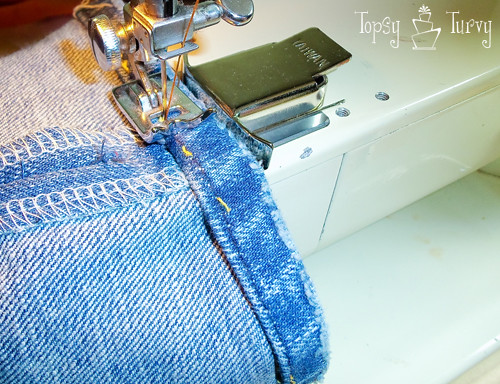
Continuing with the inner seam (very important) we’re now going to sew the two layers together. Make sure you use a nice sturdy denim thread and good denim needle for this.
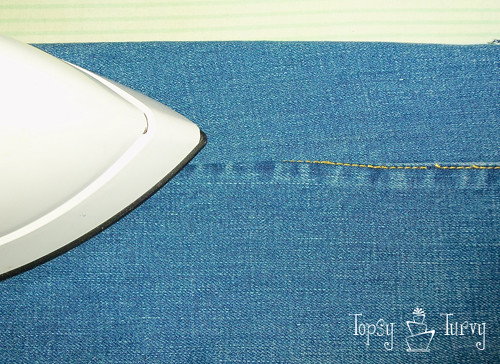
Turning the jeans right side out, iron the seam flat.
This next step is the reason we start with the inside seams. Were going to sew the inside seam down with our orange/yellow thread. If you’ve already sewn the outer seam as well you’ll have these long narrow tubs (the legs) to somehow sew down and that’s really hard to manage with a sewing machine. It’s much easier to do this with an open flat leg!
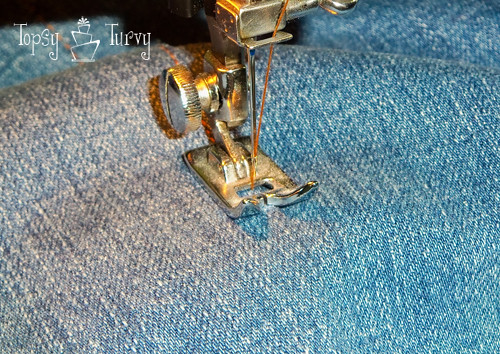
Switch your thread from blue to whatever matches the decorative stitching on the jeans your working on. Mine was a orange-y yellow. This thread color is the post important. The other stitches don’t matter, but this one is not only going to show, but it will also but up against the original thread, so make sure they match. Overlap a bit to where the other thread ends and sew down the inside of the leg!
NOW we can do the outer seam. Notice that these edges aren’t serged together, but surged separately.
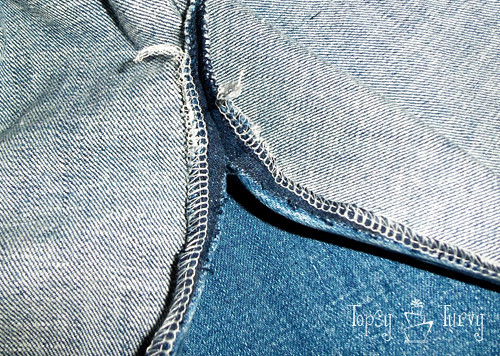
So you either need to serge them or use a zig zag stitch to hold in the raw edges.
And sew down the side (just like before).

Now fold the hem back up (I ironed over the seams, they are THICK…)
Keeping the jeans inside out, and starting with the inside seam sew (with the orange/yellow thread) sew the hem back in place! Turn your jeans back right side out and viola! your done, now grab a pair of heels and rock your new look!
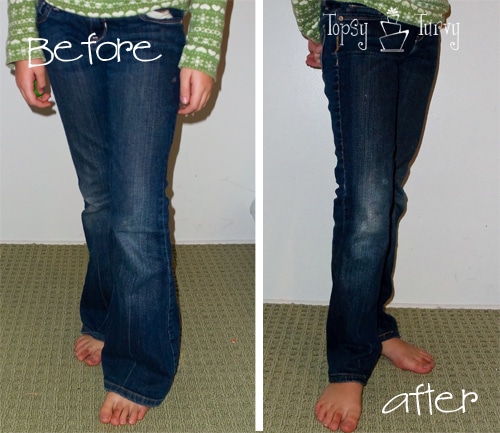
I also grabbed a pair of my daughters jeans and updated them too! They look GREAT on her and she doesn’t end up stepping on her huge wide flared legs anymore! I’m going to do at least 2 more pairs, for myself and maybe my toddlers jeans too. This will work on maternity bootcut jeans too (for any of you interested).


Ashlee
Hey Ashlee, I’m Ashlee! f/my swanky crafts! I just found your sight tonight and am drooling over it! I am excited to start following! I love the skinny jean tutorial, and have a few jeans I need to work on. Thanks!!
My Swanky Crafts
Ashlee
It’s so fun to meet another Ashlee! it’s such a rare spelling (well at least for my age it is- you must be lots younger than me!). If you try the jean tutorial let me know how it goes!
Melissa
Love it!
Your legs look longer & skinnier in your new skinnified jeans. You look fabulous!
Ashlee
Thanks Melissa!!! I’m totally loving them. I’m SOOO glad I took your advice and tried them out! I’ve done about 3 pair for myself already… Next challenge… makeover my maternity Bootcut jeans 😉
Messy Missy
Whoa, you look incredible in those skinny jeans (though I am huge fan of the bootcut myself). I personally believe you should have a warning with this tutorial that skinny jeans are only appropriate for size ____ and lower…..there IS a cutoff point when skinny jeans just begin to look silly on the larger (*ahem* ME) sizes. 😉 It’s only fair warning right? I would love it if you link up to my party, A Marvelous Mess. I will be picking one project to feature on the sidebar of my blog for a week!! Here is the link:
http://www.marvelouslymessy.com/2011/02/marvelous-mess_20.html
Ashlee
HA! Thanks so much, but honestly that’s the think about skinny jeans! I thought they were just for size 4’s but all of my friends who have tried them look AMAZING from size 4’s to size 24. Honestly! Totally worth trying a few pairs. But like all jeans it takes trying a few brands to get the right one for you. So don’t give up after one! What I need now is a good tall boot to wear outside my jeans!
Erica
What a great tutorial! This is so pracical too! We all have tons of old jeans. Thanks for taking the time to post this tutorial! I will definately be trying this!
Ashlee
Great! I hope my instructions are clear enough! I am still loving my jeans. I have a few more I want to do next!
Jess
Thank you, thank you, thank you for posting this! I am constantly in need of skinnier jeans. 🙂 Now I can thrift boot cuts and skinny ’em up!
Ashlee
EXACTLY! I have plenty of jeans to make over, but if I didn’t then a thrift store would be a great way to go!
the cape on the corner
that is awesome! i just bought this shirt that i feel requires skinny jeans…but i’m not so sure they’re for me. this would be perfect, b/c the top would be the cut i like!
Ashlee
That’s exactly what I thought! That’s why I used my own favorite style of jeans when I did it! You should TOTALLY do it. It’s worth it, and looks amazing!
Ashley Jackson
This is awesome! They look so amazing..I have such aspirations to learn how to sew, it just intimidates me so much. I even got a sewing machine for Christmas..it is sitting there:( This is inspiring!!
Would love you to link up to my party too!
http://www.ashleymorganjackson.com/2011/02/inspired-by-you-wednesday-link-party.html
Thanks for sharing! Stoppin by from Blue Cricket’s party!!
Ashlee
Learning to sew is great, even just straight lines can help with so much! Skirts, these jeans, blankets, etc.. pretty easy, shirts, sleeves, and other details??? Totally beyond me…
Camilla
Love this! Such a great idea. And I love your blog! Featuring it today for Whimsical Wednesday. You are awesome!
Ashlee
wow! Thank you so much for the feature! What a wonderful treat! Your map sunburst mirror is SO much fun!
Becky
I am so excited to try out this tutorial to make over my jeans!! Thank you so much for making it!
I featured you on my blog today! You can check out the post here:
http://justbeckause.blogspot.com/2011/02/blog-head-monday.html
Have a great day!
<3Becky
Ashlee
Thanks so much for the feature! What a fun surprise. Let me know what you think when you try it!
Anne
This is awesome !! Thanks so much for the tutorial. Fantastic job!!!
Ashlee
Thank you so much! If you try it let me know how it goes!
jeanna
This is such a great idea. Love the finished product. Great job.
Ashlee
Thanks so much! I need to make over my maternity boot cut jeans now! Thanks!
Rachel
(Found you on the somewhat simple link-up!)
Those look awesome! And don’t be scared of skinnies, you look FANTASTIC in them–they make you look SO tall and thin! I have a pair of great-fitting Silver jeans that have huge ridiculous flares (couldn’t resist, I found them for $7 so I bought em anyway) that I have always felt stupid wearing and I’ve wished they were skinnies or at least straight leg but I’ve been scared to try and alter them–I’m going to give this a try! If it works, I’ll post them and link back to you. If not, you’ll probably never hear from me again as I had in shame 🙂
Rachel
Ashlee
Thanks! Of course with the big ol’ pregnancy I wont be able to wear these anymore! I’m going to have to remake my maternity boot cut jeans now. Good luck! I can’t wait to see them.
Cassity @ Remodelaholic
These look so great, I am hesitant to try the skinny jeans thing- I have- junk in my trunk that needs to be balanced out at the bottom of my leg.
But I think I am going to have to suck it up and try it. Besides I LOVE the look of skinny jeans tucked into boots, and I am afraid I am going to miss the boat on that trend… maybe I already did!
Ashlee
Agreed! I’m making over my maternity jeans next. I still need to get myself a good pair of boots for tucking in! I don’t think it’s passed by yet, at least not in UT, we get a good 5 years here after a trend has passed elsewhere. And congrats on the new baby! What a blessing children are!
Melissa
wow, such a difference that makes! I was scared of skinny jeans, thinking they would just, you know, focus on the wrong bits. But not so! Good work!
Ashlee
Thanks! I was totally scared too, but with the right top and shoes they work GREAT! Go for it!