• Skip to primary navigation
  • Skip to main content
  • Skip to primary sidebar
  • Skip to footer

Ashlee Marie - real fun with real food

  • Recipes
    • Main Dish
    • Desserts
    • Breakfast
    • Sides
    • Bread
    • Soups & Salads
    • Drinks
    • Food Tutorials
  • Cakes
    • Cake Recipes
    • Cake Tutorials
    • Carved Cakes
    • Wedding Cakes
    • Smash Cakes
    • Party Cakes
    • How to Video Series
  • Parties
    • Complete Parties
    • Party Cakes
    • Party Food
    • Party Crafts & Decorations
    • Printables
    • Invitations
  • Holidays
    • Valentines
    • St. Patricks Day
    • Easter
    • Cinco De Mayo
    • Mothers Day
    • 4th of July
    • Halloween
    • Thanksgiving
    • Christmas
  • Travel
    • Culinary Travel – Cooking Schools
    • Family Travel
    • Disney
    • Universal Studios
    • Blogger Trips
  • Videos
    • Recipe Videos
    • Short Videos
    • Kitchen Tip Videos
    • Video equipment links
  • Crafts
    • How to & Craft Tutorials
    • Crochet & Knit Patterns
    • Decorations
    • Photoshop
    • Sewing Projects
  • Shop
    • Video equipment links
    • Baking and Kitchen equipment
Home » How to & Crafts » Crochet & Knit

Sailor’s Knot Crochet Belt

Published: March 25, 2014 | Updated: November 12, 2019 | By Ashlee

  • Facebook
  • Twitter
  • Yummly

Hello Topsy Turvy readers! I am so excited to have the opportunity to share crochet patterns with you each month! I blog over at Love City where I write about things that I love most (my boys, crochet, and motherhood). You can also learn more on my about me page!

For a while now, I have been wanting to share some crochet tutorials that focused on basic stitches. I want to help beginners learn each crochet stitch, pattern by pattern, gradually increasing in difficulty, until they feel like experts! My monthly contribution here on I’m Topsy Turvy seems like the perfect platform for such a series!

sailors-knot-crochet-belt-title

If you have been itching to learn crochet, but feel a little bit intimidated, these tutorials are made just for you! There’s no need to feel overwhelmed by intricate charts and symbols. We are going to make some fabulous projects, one stitch at a time!

crochet-sailor-knot-belt

For any of you crochet experts out there, never fear! These projects are going to be so fun and unique and I know that you will love them!

So let’s get started!

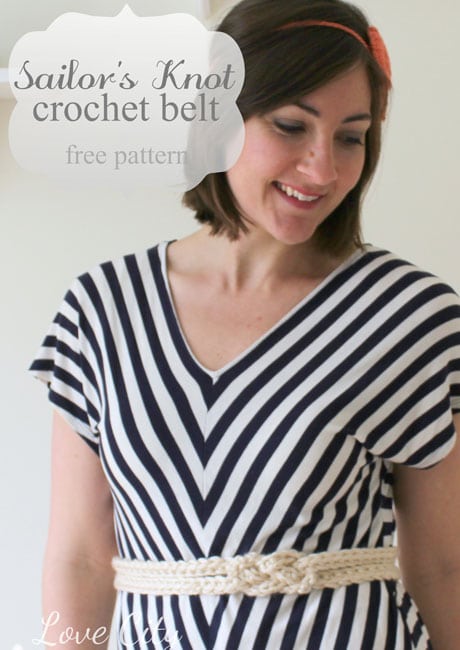
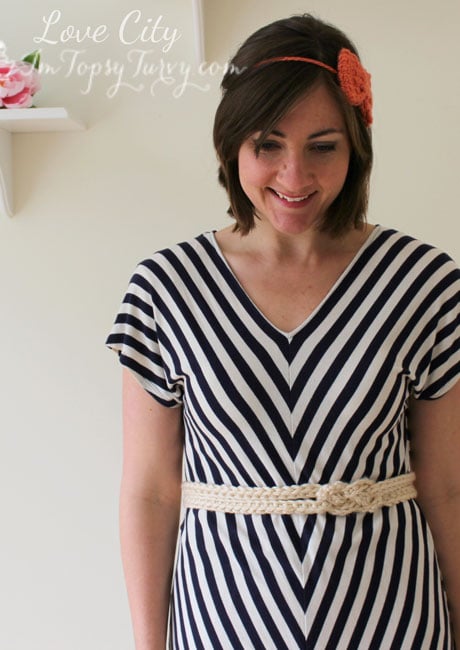
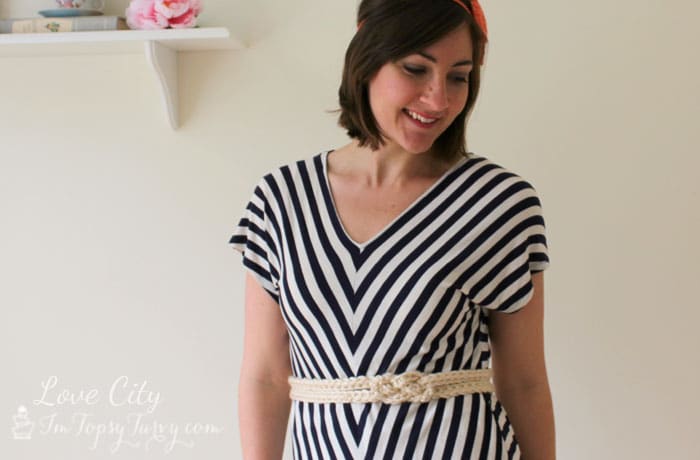
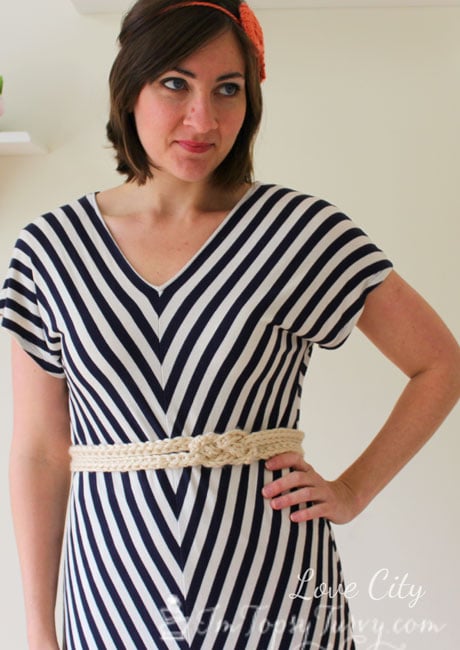
I am loving anything “nautical” right now, so I thought it would be fun to try out my knot tying skills with this sailor’s knot crochet belt!

sailor-knot-crochet-belt

[printfriendly]

Supplies you’ll need:
1 skein bulky or super bulky weight yarn (I used Lion Brand’s Hometown USA in )
Size L crochet hook
Scissors
Large eye sewing needle
Measuring tape
Tape

With this belt, the only stitches you need to know are Chain and Single Crochet.
Chain (ch)- Fasten on with a slip stitch. Yarn over hook and pull through the loop that is on the hook. A chain stitch will create a long, continuous strand of interlocking loops.
Single Crochet (sc)- Place hook into stitch. Yarn over hook and pull back up through stitch. Yarn over hook again and pull hook through the two loops on the hook. One loop should remain on the hook when completed.

Abbreviations to know:
st- stitch
ch- chain
sc- single crochet

Make two:

1. With measuring tape, loosely measure your waist. Add 1/2 to 1 inch to that measurement.

2. Ch until strand matches your measurement from step 1 in length.

sailor-knot-belt-chain-stitch

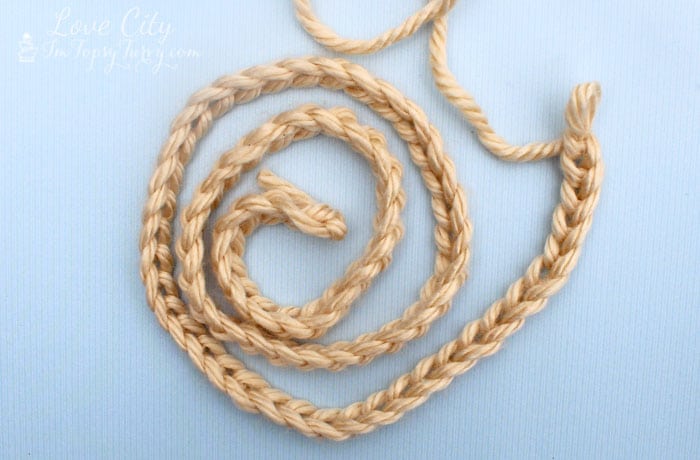
3. Sc in 2nd ch from hook. Sc in each remaining st.

4. Fasten off, leaving a 5 inch tail.

sailors-knot-crochet-belt-single-crochet

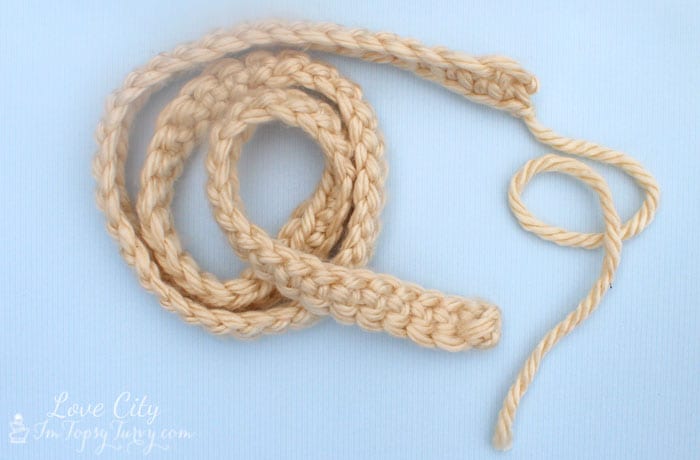
5. On a flat surface, take the end of each strand and tape them down. With one strand, tape the end with no tail. With the other strand, tape the end that has the 5 inch tail.

6. Create your sailor’s knot by following these simple steps:

crochet-sailors-knot-belt-collage

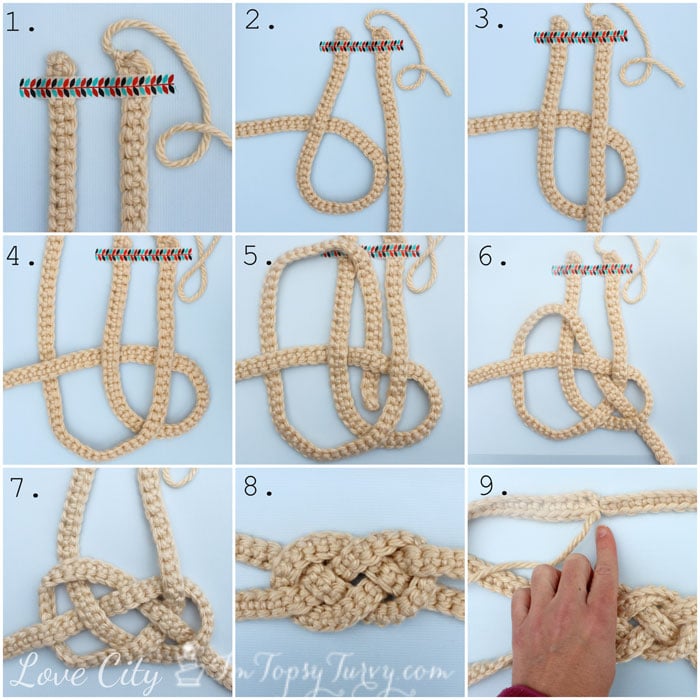
7. Attach the sewing needle to one 5 inch tail and sew to the corresponding tail on the other side (as shown in block 9 above). Do the same with the other two tails. Finish off and weave in loose ends!

8. Put on your belt and admire your handiwork!

sailors-knotted-crochet-belt

If you’re a little stuck, and need more visual instruction on how to tie the sailor’s knot, I made a fun little instructional video for you! Stop by my blog, Love City, today and check it out! I’m also sharing a nautical themed embroidery hoop that sits so cutely in my kid’s bathroom!

I plan on wearing my belt over some of my favorite spring dresses! I’m already dreaming of a beach side, sunset stroll with my sunhat, cute belt, and dress flowing in the breeze.

How will you wear yours? What color will you choose?

More from Love City…

crochet-wrap-sweater-4 mary-jane-baby-bootie-back-view braided-crochet-headband-2

Wrap Sweater  |  Mary Jane Baby Booties  |  Braided Headband

Related Posts:

  • Thread Crochet Baby Converse Pattern free
    Thread Crochet Baby Converse Pattern free
  • Double Loop Crochet Santa Beard Pattern - multiple sizes
    Double Loop Crochet Santa Beard Pattern - multiple sizes
  • Cable Knit Beanie pattern with earflaps- child
    Cable Knit Beanie pattern with earflaps- child

JOIN MY NEWSLETTER!

Become an insider and receive this FREE Maple Icing Recipe (not seen on the blog!)

You have Successfully Subscribed!

Privacy Policy: We hate spam and promise to keep your email address safe. You'll receive email updates through AshleeMarie.com. You can unsubscribe at anytime.

  • Facebook
  • Twitter
  • Yummly
ashlee marie

About Ashlee

With the right tips and tricks, I believe YOU can make, bake, or create anything. This is what I love to do - make some awesome, teach you how, and give you that boost of culinary confidence you need to rock your own kitchen! Read more...

youtube facebook instagram twitter pinterest email rss

Reader Interactions

Comments

    Leave a Reply Cancel reply

    Your email address will not be published. Required fields are marked *

    Recipe Rating


  1. Carrie

    March 25, 2014 at 12:52 pm

    I’ve been waiting ever since the introduction [of the Topsy Turvy Team ( Hey you should call yourselves the TTT 😀 ) ] for your posts! I LOVE anything crochet. And right now I’m in a Celtic knot frenzy so this belt was perfect! Thanks 🙂

    Reply
    • Lindsay

      April 2, 2014 at 11:38 am

      I’m so glad you liked it! I, too, am in a knot frenzy lately! Also, I love your suggestion, “Topsy Turvy Team” is perfect!

  2. Audra @ RealityToDreams

    March 27, 2014 at 12:01 am

    I’ve been wanting to learn how to crochet! LOVE the photos! I need photos, and I’m actually confident I can follow these instructions. Thanks talented ladies!

    Reply
    • Lindsay

      April 2, 2014 at 11:39 am

      I’m so glad to hear you want to start learning crochet! You can do it! Please let me know if you ever have any questions about this tutorial or any future patterns I post here!

  3. Heather

    July 13, 2016 at 8:02 pm

    Does not appear information on how to put the belt on or do it up so you can take it on and off.

    Reply
    • Lindsay, Love City

      August 2, 2016 at 10:51 am

      Heather, step 7 and photo #9 show you how to attach the strands in the back. You will just sew them together and the belt will be slipped on over the head.

  4. Lolly Wavada

    July 13, 2016 at 9:13 pm

    The only thing I don’t understand…once you connect the ends, how do you put the belt on?

    Reply
    • Lindsay, Love City

      August 2, 2016 at 10:51 am

      You can put on the belt by simply slipping it over your head!

  5. Fran

    July 13, 2016 at 10:06 pm

    I haven’t made this yet, but after reading the directions, I can’t figure out how you’d put the belt on. Don’t you end up with a (double) loop without openings or ends? Do you step into it & stre-e-e-e-etch it over your hips?!

    Reply
    • Lindsay, Love City

      August 2, 2016 at 10:53 am

      Yes, you are correct. This belt is one that you will either slip over your hips, or I find it easier to slide it over my head! The yarn allows a little stretch and give. It is more of a “statement” piece than something that will hold up pants! 😉

Primary Sidebar

about ashlee marie
youtube facebook instagram twitter pinterest email rss

You have Successfully Subscribed!

Privacy Policy: We hate spam and promise to keep your email address safe. You'll receive email updates through AshleeMarie.com. You can unsubscribe at anytime.

Popular Posts

Homemade deep-fried monte cristo sandwich
homemade choco taco
one pot loaded baked potato soup
tamatoa cake - moana - disney
I love these candied strawberries, like a candied apple, a glorious crunch with a ripe strawberry center!

Footer

SEEN ON

as seen on
  • TV and Media
  • Privacy Policy

COPYRIGHT © 2007–2023 Ashlee Marie - Real Fun with Real Food

ashlee marie lets make some awesome
  • Recipes
    • Main Dish
    • Desserts
    • Breakfast
    • Sides
    • Bread
    • Soups & Salads
    • Drinks
    • Food Tutorials
    • Back
  • Cakes
    • Cake Recipes
    • Cake Tutorials
    • Carved Cakes
    • Wedding Cakes
    • Smash Cakes
    • Party Cakes
    • How to Video Series
    • Back
  • Parties
    • Complete Parties
    • Party Cakes
    • Party Food
    • Party Crafts & Decorations
    • Printables
    • Invitations
    • Back
  • Holidays
    • Valentines
    • St. Patricks Day
    • Easter
    • Cinco De Mayo
    • Mothers Day
    • 4th of July
    • Halloween
    • Thanksgiving
    • Christmas
    • Back
  • Travel
    • Culinary Travel – Cooking Schools
    • Family Travel
    • Disney
    • Universal Studios
    • Blogger Trips
    • Back
  • Videos
    • Recipe Videos
    • Short Videos
    • Kitchen Tip Videos
    • Video equipment links
    • Back
  • Crafts
    • How to & Craft Tutorials
    • Crochet & Knit Patterns
    • Decorations
    • Photoshop
    • Sewing Projects
    • Back
  • Shop
    • Video equipment links
    • Baking and Kitchen equipment
    • Back