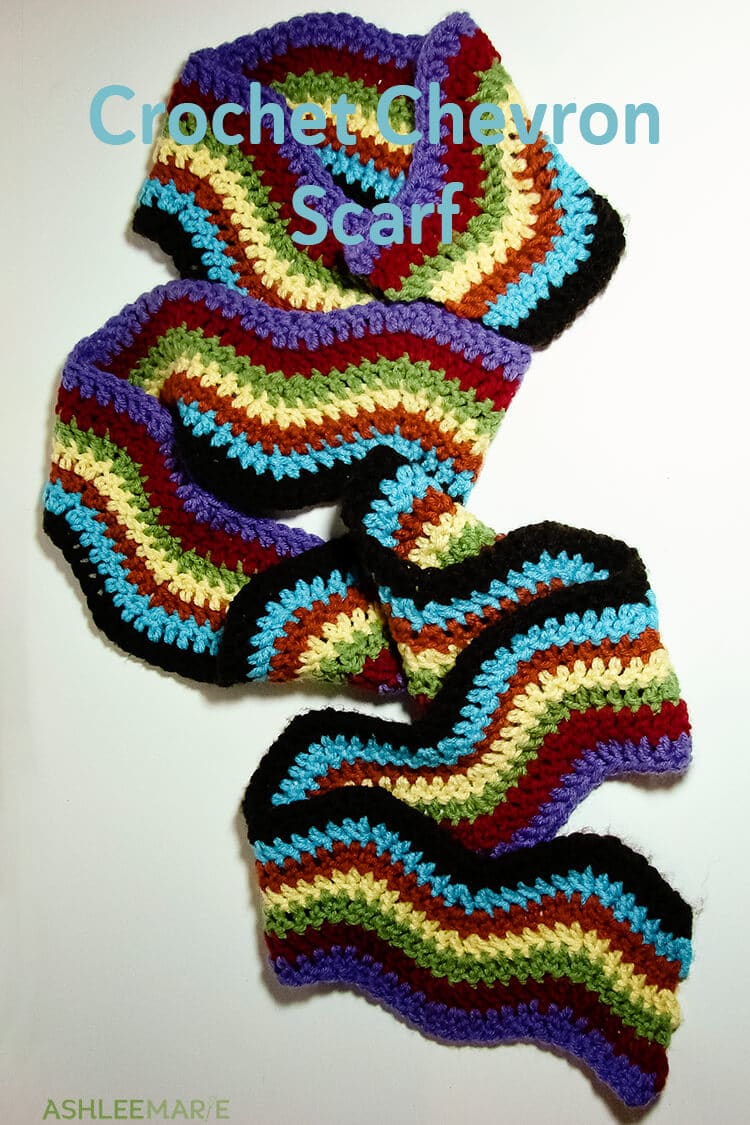
This easy to make chevron scarf just takes a few hours to whip up and is a great way to get rid of scrap yarn.
I love this scarf! I whipped out two the night before my Disco Abba Party and they were a hit!
The crochet chevron patter is super simple and easy to adapt! My parents were given a full size chevron crochet blanket for their wedding that I still remember fondly!
Buy the Ad-Free pattern pdf here!
Rainbow Chevron Crochet Scarf
materials:
medium weight yarn
K- 6.5 mm hook (or any other hook for a tighter or looser scarf!)
abbreviation:
ch (chain)
sl st- (slip stitch)
dc (double crochet)
dc2tog (double crochet 2 together)
ch 212:
Row 1 – dc in 3rd chain from hook (first 2 ch count as first dc here and throughout) dc in next 4 ch, dc2tog in next ch *dc2tog in next ch, dc in next 4 ch, 2dc in next 2 ch, dc in next 4 ch, dc2tog in next ch* repeat between ** across to the last 7 ch, dc in next 4 ch, dc2tog in next 2 ch, finish off and cut yarn with a long tail.
Row 2-7 -change color- sl st in first stitch, ch 2, dc in the same stitch as the sl st, dc in next 4 stitches, dc2tog in next stitch, *dc2tog in next stitch, dc in next 4 stitches, 2dc in next 2 stitches, dc in next 4 stitches, dc2tog in next stitch* repeat between ** across to the last 7 stitches, dc in next 4 stitches, dc2tog in next 2 stitches, finish off and cut yarn with a long tail.
The pattern in pictures, with some other tips and tricks thrown in:
Ch 212
(this is the length of the scarf, you can do any length you like, just in groups of 14 plus 2, for the tutorial I’m showing you 2 chevrons, so 28 + 2 I started with a ch 30)
For Row 1- dc in 3rd ch from hook
For Row 2-7 we’ll be changing color every row- sl st in first stitch, ch 2, dc in same stitch that you just sl st from
(Now EVERY row): dc in next 4 stitches, dc2tog in the next stitch
This is where the repeat starts: *dc2tog in next stitch, 2dc in next 2 stitches,
dc in next 4 stitches, and dc2tog* repeat between ** across the ch or row until you get to last 7 stitches. End with dc2tog, dc in 4 stitches and 2dc in the last stitch finish off every color for every row!
I did the tutorial piece with an I-5.5 hook, but the actual scarf with a K-6.5 hook. You can see the difference. Feel free to use any hook you want to get the look you desire!
Also you can use any yarn you have, mine are all left overs from other projects, with even slightly different brands and weights and feels and it looks just fine.
You can choose to start on the same side every time or go back and forth as if you were working with the same yarn and turning at the ends of the rows.
I did the turning, but wish I had started on the same side every time, I think it would have made the rows more even. See how the green and orange rows look thinner? It’s because these are the “wrong” side while the red, yellow and blue are the “right” side!


Amy
Love it Ash! It’s adorable. I love all the colors- right up my alley. 😉 xoxo
Ashlee
Thanks! I think I need a few more in some other color schemes!
Jonie @ Just Between Friends
Such a fun scarf! I love the colors! I’m so glad that you agreed to be a part of POV!
Ashlee
Thanks so much! I’m SO happy to be a part of the group!
Gwen @ Gwenny Penny
Awesome scarf, Ashlee! I love the chevron zig-zaggy look of it. Great color, too!
Ashlee
Thanks! I’m kind of wishing I’d just done a full scarf in the tutorial colors, looking at the pictures I’m loving how it turned out as well as the rainbow one!
Lorene (just Lu)
I love it! The zigzig is one of my favorite patterns to crochet (you know, the once I actually sat down and did it 🙂 because it is easy to remember and not so easy to mess up 🙂 Great job!
Ashlee
I love it too, and it’s so fast! Not like some of the more complicated patterns!
marni
did you mean on row one dc in third ch from hook AND IN EACH CHAIN TO END?
Ashlee
Nope, that would create a straight line, and we’re going for a chevron (or ripple) effect. I mean just what I said for row one. But thank you for your concern
emily
cozy and cute… perfect combo!
Ashlee
Thanks!!! I love the chevron print, although not on EVERYTHING!
Joann@womaninreallife
I adore this scarf. I need to learn how to crochet! I’m just starting to knit, but that will be next!
Ashlee
Crochet is actually much faster and even easier than knitting in some ways! Good luck.
wendy
what a funky scarf!” I love it
Ashlee
Thanks! It was super fun, I think I want to try it again in a few different colors!
Meridith
I can’t wait to make this scarf! I love finding fun ways to use scraps – what a beautiful project! Thank you!
Ashlee
it’s a really fun one! and super fast, I just broke mine out for the year!
Jackie Ann
Row 2-7 -change color- sl st in first stitch, ch 2, dc in the same stitch as the sl st, dc in next 4 stitches, dc2tog in next stitch, *dc2tog in next stitch, dc in next 4 stitches, 2dc in next to stitches,
At the end of the quote above where it says “2dc in next to stitches” — Do you mean 2dc in next two stitches ? Or do you mean next to stitches like going on to the next stitches? That part is confusing me.
Thanks.
Ashlee
it should say two, I fixed it, thanks!
tamara
are you just weaving in the ends of each color when you are done? I’m not sure why you show them long and left after each round?
Ashlee
I already finished the scarf when I decided to do a tutorial, so I just threw together an example, it’s actually not much longer than you see in the pictures. And for the real scarf I like to do things one at a time, so I did the full scarf first then weaved in all the ends at once, rather than crochet, weave, crochet, weave, I think it goes faster that way. But it’s just personal preference.
Sherri
Doesn’t the chevron pattern usually have the same amounts of “peaks” and “valleys”? Your pattern says;
“Row 1 – dc in 3rd chain from hook (first 2 ch count as first dc here and throughout) dc in next 4 ch, dc2tog in next ch *dc2tog in next ch, dc in next 4 ch, 2dc in next 2 ch, dc in next 4 ch, dc2tog in next ch* repeat between ** across to the last 7 ch, dc in next 4 ch, dc2tog in next 2 ch, finish off and cut yarn with a long tail.”
Which would make it begin and end with dc2tog, more “valleys than peaks. Your pattern also states that you should work 4 dc between the last dc2tog of the repeat and the final one, which would make an odd downward curve. Also, 4 dc and a dc2tog only adds up to 6 stitches not 7, is there something missing?
If I have read this incorrectly please let me know.
Ashlee
I’ve never heard that chevron rule – I just go until it’s long enough – but as you can see the full scarf I made each end is the same – peak or valley – going up on both ends – the way I wrote it it begins with a peak and ends with a valley though – but you can just do it a little longer and end however you want
the dc2tog make ONE stich – the 4 dc make 4, then the 2dc in on sitch make 2 – so 1 plus 4 plus 2 is 7 – on the other side it starts with the 2dc in one, then the 4, then the dc2tog – so again 2 plus 4 plus 1 equals 7 – you can end with whichever set of 7 you want.
gracia
hello miss, i’m gracia from indonesia,, thank you miss for this free pattern,, i love this blog,, and so are you.. fighting for the next creation.. Gbu
Ashlee
you are so welcome
cassie wilday
Ashlee, by any chance can you send me this pattern via email? If I print it myself I have to get all the replies too.It’s too much paper and I am not computer savvy.I would love to do this.
Thank You Cassie
P.S. Most times I can’t spell either.
Ashlee Marie
i offer the ad free pdf printable to buy right in the post
Pat
Hi Ashlee, thank you for the free pattern, which is very 70s!I kindly ask for your permission to try it for my leftover yarns.
Ashlee Marie
the pattern is there for people to use
Liana
Hi Ashlee, I am new to crochet and find this pattern so pretty, I would like to try my hand at it. I’ve looked at your pattern and can’t seem to find the quantity of yarn required…. where can I find that info.
Thanks
Ashlee Marie
I used leftover yarn, random yarn I had left over so it wasn’t full skeins to start with