• Skip to primary navigation
  • Skip to main content
  • Skip to primary sidebar
  • Skip to footer

Ashlee Marie - real fun with real food

  • Recipes
    • Main Dish
    • Desserts
    • Breakfast
    • Sides
    • Bread
    • Soups & Salads
    • Drinks
    • Food Tutorials
  • Cakes
    • Cake Recipes
    • Cake Tutorials
    • Carved Cakes
    • Wedding Cakes
    • Smash Cakes
    • Party Cakes
    • How to Video Series
  • Parties
    • Complete Parties
    • Party Cakes
    • Party Food
    • Party Crafts & Decorations
    • Printables
    • Invitations
  • Holidays
    • Valentines
    • St. Patricks Day
    • Easter
    • Cinco De Mayo
    • Mothers Day
    • 4th of July
    • Halloween
    • Thanksgiving
    • Christmas
  • Travel
    • Culinary Travel – Cooking Schools
    • Family Travel
    • Disney
    • Universal Studios
    • Blogger Trips
  • Videos
    • Recipe Videos
    • Short Videos
    • Kitchen Tip Videos
    • Video equipment links
  • Crafts
    • How to & Craft Tutorials
    • Crochet & Knit Patterns
    • Decorations
    • Photoshop
    • Sewing Projects
  • Shop
    • Video equipment links
    • Baking and Kitchen equipment
Home » How to & Crafts » How To & Craft Tutorial

Paper Mache Jewelry Tray Tutorial

Published: April 10, 2014 | Updated: December 27, 2016 | By Ashlee

  • Facebook
  • Twitter
  • Yummly

Hey!  It’s Missy from Missy Dear again!  For awhile now I’ve been wanting to try this project.  I’ve needed a little tray for my jewelry but hadn’t been able to find something I liked.

paper-mache-jewelry-tray-tutorial

I have an oval casserole dish that was the right shape, but it was too chunky and the sides were a little taller than I’d like.  So I thought, “Hey, I can just use that for a form and make my own.”  So that’s what I did. And I thought I’d make a great little paper mache jewelry tray tutorial for you all to join the fun :).

paper-mache-tray-supplies

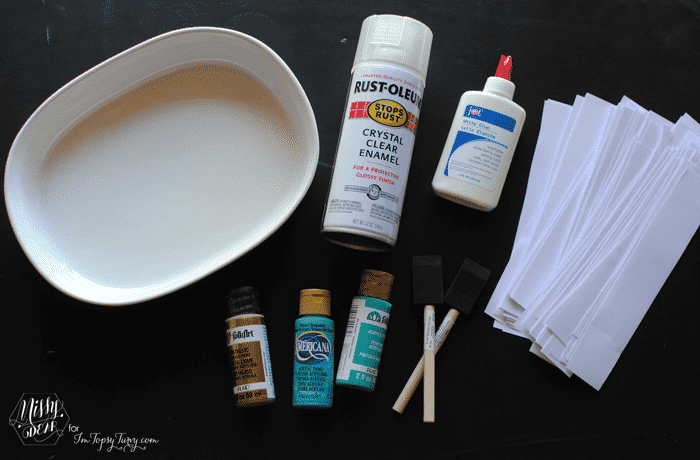
First I gathered up my supplies:
-dish or other object to use as form
-white glue (I got mine at the Dollar store)
-strips of paper (computer paper will give it a little more strength and make it easier to paint than newspaper will)
-craft paint and brushes
-enamel clear coat spray
-plastic wrap (not pictured)

First things first, you need to lay a piece of plastic wrap in whatever you’re using as your form.  This will not only keep your project from permanently gluing itself to the dish, but it will also make getting it out way easier.  Now you’re ready to paper mache.

Paper mache tray process

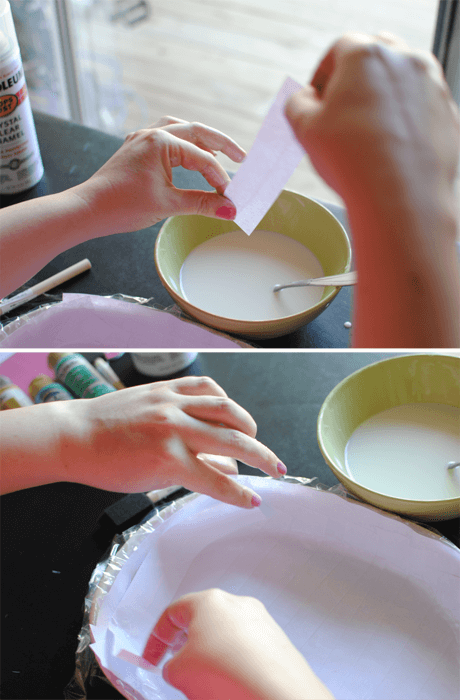
If you’ve never done paper mache before it’s a fairly simple process.  You just coat the strip of paper in a mixture of the white glue and water (I dipped it into a bowl and squeezed off the excess with my fingers).  The paste I made was 3 parts glue to 1 part water.  Once the strip of paper is coated in the paste you just layer it into the dish.

One thing I did that I think really helped is that I alternated the way I laid the strips.  So on the first layer I did them horizontal to the long sides of the dish, on the next layer I did them vertical, and on the third layer I did them diagonal. I repeated each of those layers twice (for a total of 6 layers) then I let it sit for about 2 hours while I took my daughter to T-ball practice (for the record, a bunch of 5 yr olds playing t-ball is pretty adorable).  Once I was home I did about 10-15 more layers, alternating the direction of the strips with each layer.

Now the longest part of the process – the drying.

Paper Mache Tray drying steps

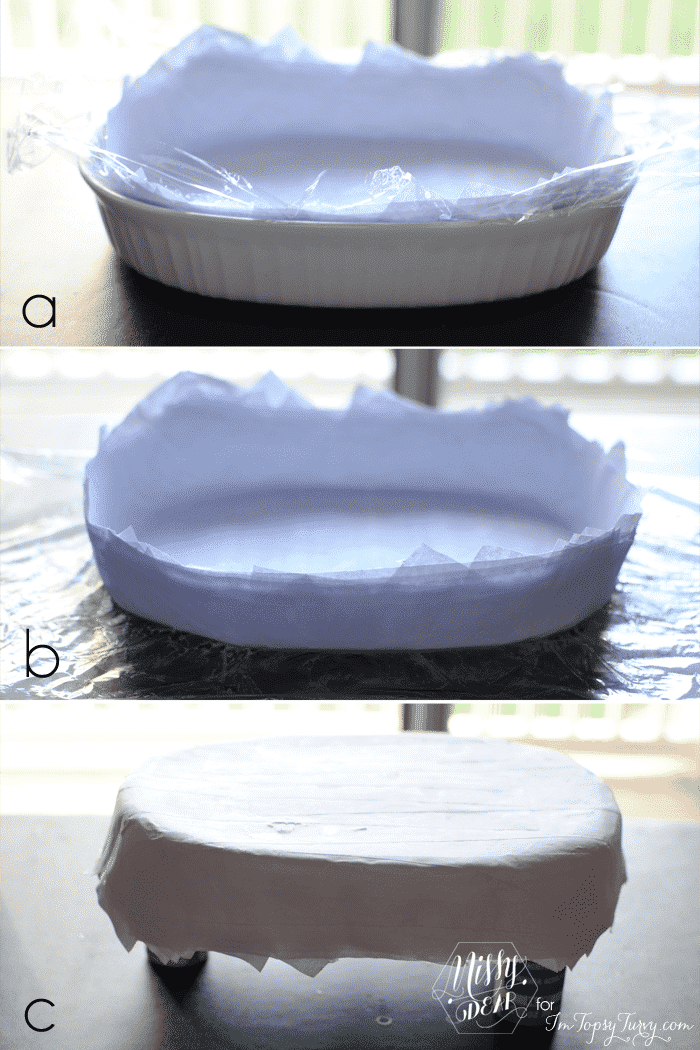
First I let it sit on the form for a few hours (a).  Then I took it out of the form and peeled the plastic wrap off the sides and let it dry for a few more hours (b).  Finally I took if off the plastic, flipped it upside down and “hung” it from some paint bottles to let it dry over night (c).

Here’s another tip I learned the hard way – use an even number of paint bottles.  I only had one on one side and two on the other so it dried with a little warp in it.  I had to leave it the whole next day with something heavy in it to try to get the warp to straighten out, which only helped a little.

Paper Mache Tray painting

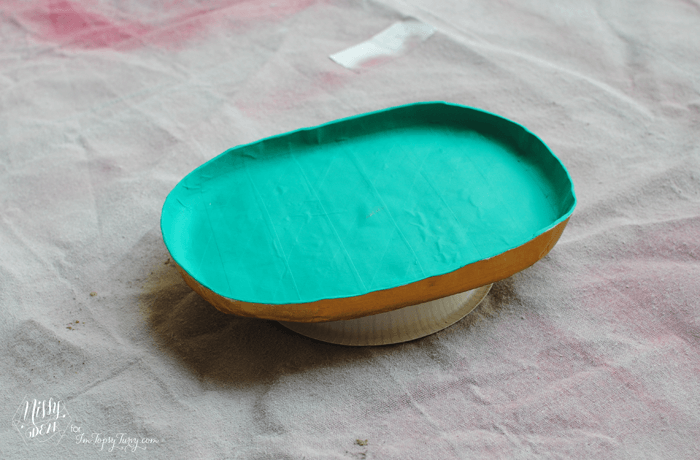
This next step was the one that required the most brute force – trimming the sides.  In wanting the tray to be sturdy enough, I had used a lot of layers.  Which worked great, it is very strong.  However, I had the hardest time trimming it down.  I tried every pair of scissors in the house – including some wire cutters and a little hack saw.  I discovered that my kitchen shears worked the best, but left a pretty jagged edge.  Nothing a little sanding couldn’t fix.

Then just paint, let that dry, then spray with a clear coat.  I chose an enamel clear coat because I was going for that really high gloss look.

paper-mache-jewelry-tray-diy

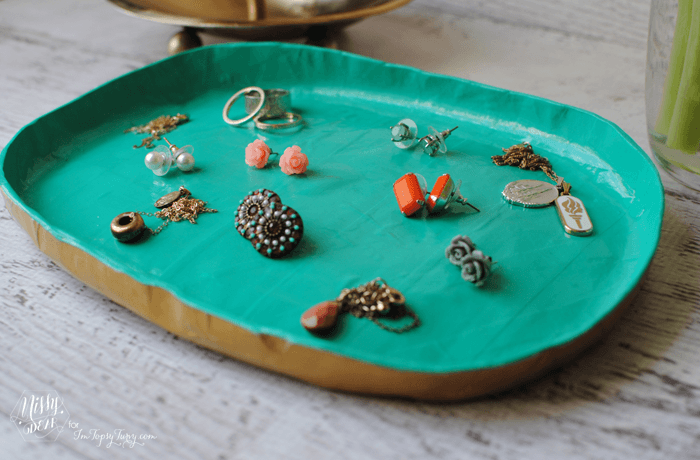
And there you have it, a gorgeous little jewelry tray you made all by yourself.  Maybe now that all my jewelry is laid out where I can see it I might wear it more often.

What do you think?  Is it something you might want to make for yourself too?

paper-mache-tray-tutorial

Well, if you do make one remember to let me know about it!  I really would love to see it.  You can find me pretty much anywhere, but here are some handy dandy links just in case 🙂

 photo sot.png  photo sop.png photo soi.png  photo sof.png photo sot.png

Related Posts:

  • How to create a watermark action in photoshop
    How to create a watermark action in photoshop
  • Canvas Indiana Jones Satchels for the party
    Canvas Indiana Jones Satchels for the party
  • Braided & Beaded Bracelet
    Braided & Beaded Bracelet

JOIN MY NEWSLETTER!

Become an insider and receive this FREE Maple Icing Recipe (not seen on the blog!)

You have Successfully Subscribed!

Privacy Policy: We hate spam and promise to keep your email address safe. You'll receive email updates through AshleeMarie.com. You can unsubscribe at anytime.

  • Facebook
  • Twitter
  • Yummly
ashlee marie

About Ashlee

With the right tips and tricks, I believe YOU can make, bake, or create anything. This is what I love to do - make some awesome, teach you how, and give you that boost of culinary confidence you need to rock your own kitchen! Read more...

youtube facebook instagram twitter pinterest email rss

Reader Interactions

Comments

    Leave a Reply Cancel reply

    Your email address will not be published. Required fields are marked *

    Recipe Rating


  1. Melanie

    April 11, 2014 at 10:11 am

    I totally thought you had used duct tape when I first looked at the picture. Very cool, Missy! I have noticed that having my jewelry out reminds me to wear it more often.

    Reply
  2. Jitendra Shah

    February 13, 2015 at 12:11 am

    Very nicely descripe process

    Reply
  3. Bailie Hemborg

    April 20, 2016 at 4:36 am

    How wonderful, I am thinking of making one to carry all the little odds and ends from the kitchen to the dining room!

    Reply
    • Ashlee

      May 23, 2016 at 11:44 pm

      perfect!

Primary Sidebar

about ashlee marie
youtube facebook instagram twitter pinterest email rss

You have Successfully Subscribed!

Privacy Policy: We hate spam and promise to keep your email address safe. You'll receive email updates through AshleeMarie.com. You can unsubscribe at anytime.

Popular Posts

Homemade deep-fried monte cristo sandwich
homemade choco taco
one pot loaded baked potato soup
tamatoa cake - moana - disney
I love these candied strawberries, like a candied apple, a glorious crunch with a ripe strawberry center!

Footer

SEEN ON

as seen on
  • TV and Media
  • Privacy Policy

COPYRIGHT © 2007–2023 Ashlee Marie - Real Fun with Real Food

ashlee marie lets make some awesome
  • Recipes
    • Main Dish
    • Desserts
    • Breakfast
    • Sides
    • Bread
    • Soups & Salads
    • Drinks
    • Food Tutorials
    • Back
  • Cakes
    • Cake Recipes
    • Cake Tutorials
    • Carved Cakes
    • Wedding Cakes
    • Smash Cakes
    • Party Cakes
    • How to Video Series
    • Back
  • Parties
    • Complete Parties
    • Party Cakes
    • Party Food
    • Party Crafts & Decorations
    • Printables
    • Invitations
    • Back
  • Holidays
    • Valentines
    • St. Patricks Day
    • Easter
    • Cinco De Mayo
    • Mothers Day
    • 4th of July
    • Halloween
    • Thanksgiving
    • Christmas
    • Back
  • Travel
    • Culinary Travel – Cooking Schools
    • Family Travel
    • Disney
    • Universal Studios
    • Blogger Trips
    • Back
  • Videos
    • Recipe Videos
    • Short Videos
    • Kitchen Tip Videos
    • Video equipment links
    • Back
  • Crafts
    • How to & Craft Tutorials
    • Crochet & Knit Patterns
    • Decorations
    • Photoshop
    • Sewing Projects
    • Back
  • Shop
    • Video equipment links
    • Baking and Kitchen equipment
    • Back