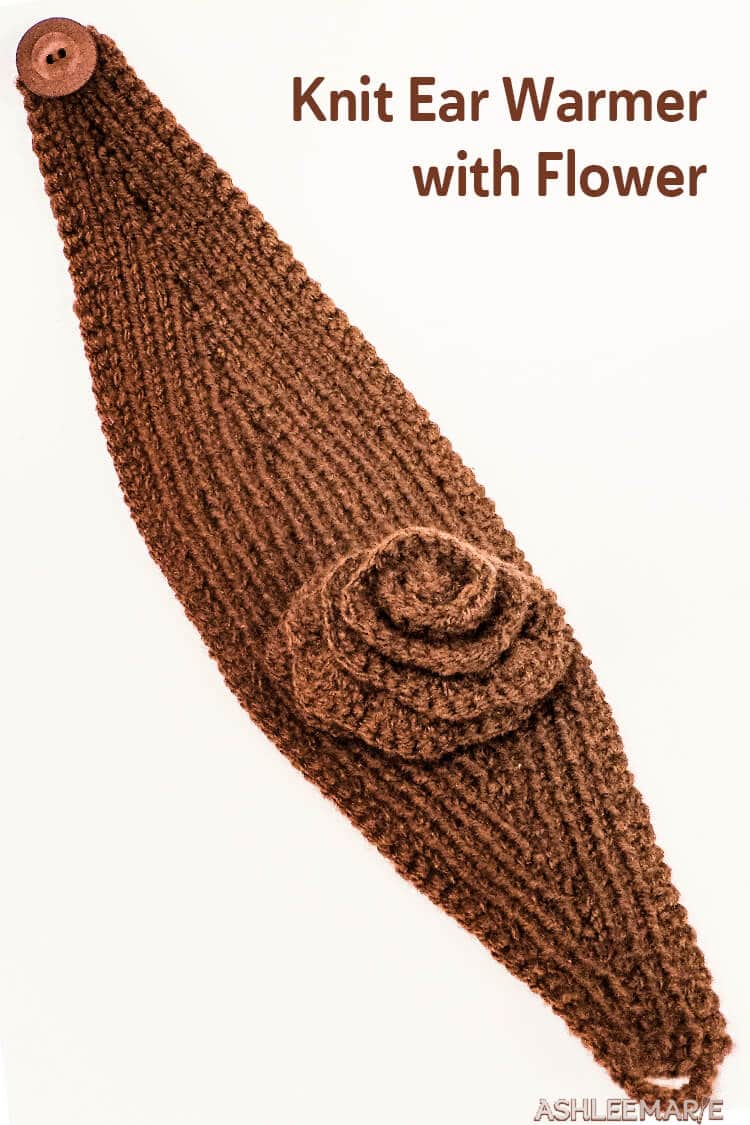
Easy knit pattern to make these ear warmers – perfect for winter. Add a crochet rose for a simple decoration.
Last winter I saw these everywhere. But I just can’t bring myself to pay for one! Not when I know how to knit myself! But finding a pattern was tough.
I knew I could make one up if I wanted to, but it’s easier to start with one. Eventually, after mixing a few different patterns I found what worked for me.
Now remember everyone has a different gauge so if you need to adjust it to fit your gauge then do that! This is more of a guide than a pattern. I’m a more intuitive knitter, changing and “fixing” patterns as I go.
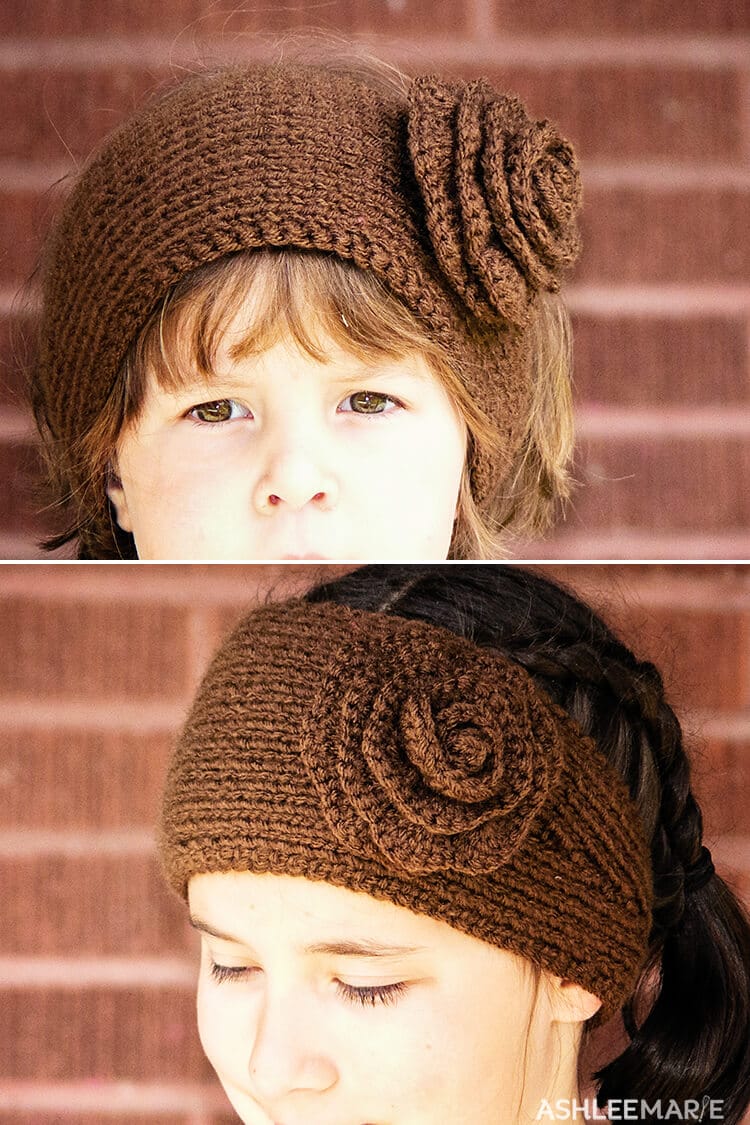
So if something doesn’t make sense to email me and I’ll try to clarify! Hopefully this “guide” will make sense to you and it will click as you work on it! This fit my daughters and me just fine. The knit stretches a bit so it’s kind of one size fits all!
Buy the Ad-Free pattern pdf here!
Headband Earwarmer
Materials:
Size 6 or 8 knitting needles (I went with size 8 needles)
Favorite medium weight yarn (about a skein)
Size J Crochet Hook (optional)*
Button
Gauge:
7 stitches per 2 inches
Finished Size:
22″-24″ long (your preference) and 4″ wide at widest part
We’ll be working a Knit/Purl rib pattern across ever row.
Cast on 7 stitches.
row 1: Knit/purl/knit/purl cont…
row 2: next row purl/knit/purl/ cont…
repeat until you have 4 rows.
Now we’re going to start our increase. Well increase every odd row, and repeat the rib pattern on every even row. Now after every other increase you’ll have two knit’s or two purls in a row. Don’t worry about it. It will be fixed on your next increase. row
Row 5: Repeat your rib pattern until the center stitch. Use your favorite increase here. then repeat the rib pattern
Row 6: rib pattern
Row 7: rib pattern until you get to the center. when you hit the double knit (or purl) in the center pick up the loop between stitches and purl (or knit) to continue the pattern.
Row 8: rib pattern
Repeat 5-8 until the patterns is about 4 inches across. Make sure your repeating a nice knit/purl pattern all the way across (no double stitch in the center- It will be an odd number of stitches on your needle).
Now the decrease will be the same length as the increase so figure out how long you want your headband. When it’s half as long as you want it to be notice how long you’ve been stitching the 4 inch wide center. (in my case about 3 inches) and finish the center by adding the same length again (another 3 inches).
Time to start the decrease.
Row 1 (of decrease): repeat the pattern until you get to the center stitch. Decrease by knitting (or purling) together the center and the next stitch (creating whatever the second stitch is eg. if your center stitch is a knit your middle will be a purl and purl together). Repeat the rib pattern.
Row 2: Rib pattern across (there will be a double knit/purl in the center- even number of stitches)
Row 3: Rib pattern to the center, knit (or purl) the double stitches together.
Row 4: Rib pattern across (back to an odd number of stitches)
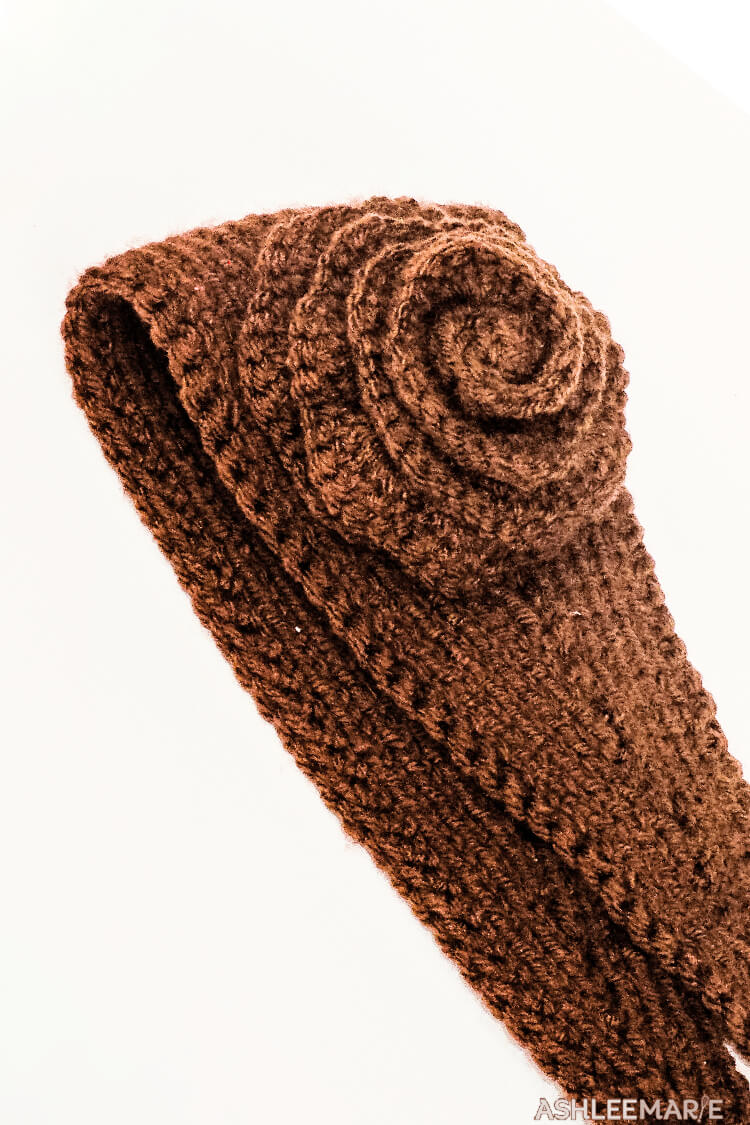
When you get back to 7 stitches bind off leaving one stitch on the needle. At this point I transfered that stitch to a crochet hook and Worked a chain of 6. I’m sure there is a way to do a chain on knitting needle, but the crochet hook is the quickest.
At this point you can attach it with a single crochet to the other side of the bottom edge. OR if you want a more decorative edge you can crocheting around the edge. I used a single crochet around the edge all the way back around the button hole back to where I started the crocheting. Secure the end and weave in the tail!
Add a button to the first side and try it on! Decorate however you’d like. I like this crochet flower!
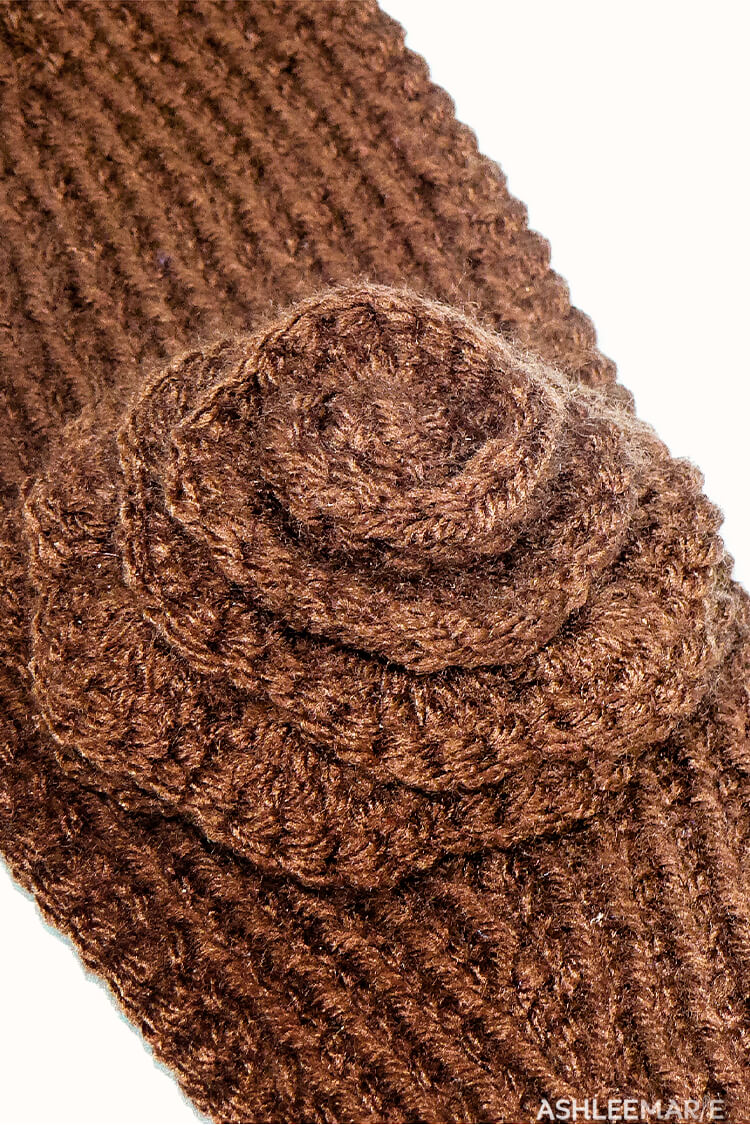
Crochet Flower
J Hook (or whatever your preference to get the size you’d like)
Yarn (same color or other)
This flower can be as tight or as loose as you’d like it, so the size depends on that.
Chain 53
Row 1: DC in 5th Chain from hook *CH 1, skip 1 (DC-CH-DC) in next ch (V stitch made). repeat from * across to end, turn.
Row 2: CH 3 (counts as DC) 5 DC in CH space, *SC in next CH-1 space, 6 DC in next CH-1 space (shell stitch made). Repeat from *, ending in 6 DC in last CH-1 space. Fasten off, but leave a good LONG tail for anchoring the flower. 10 inches or so.
Finishing
Threading the tail onto the needle and weave it into the base of the last stitch. Starting at that end, roll the first shell tighly to form the center bud. Stitch this one tightly. Keep rolling and stitching as you see fit. You can roll loosely or tightly depending on your preference.


Burleigh
Thank you, thank you! I can’t wait to knit this.
Ashlee
you are so welcome! I have like 12 of them for my girls.
Diane Ryan
Hi,
Wonderful to find this pattern….but how do I print it??
Thanks
Ashlee
apparently the “print this” plug in on the blog isn’t working right now, I’m trying to get it fixed. You can copy and paste, or come back in a week and see if I can get it fixed! GAH! hate it when technology messes up!
kristel
Hi Ashlee, I was wondering when you say size 6 or 8 needles do you mean 6mm/8mm or US 6/US 8? Thanks!
Ashlee
US sizes, sorry!
Bing
Thanks for the pattern. Will definitely work on this soon! Just finishing up my scarves
Ashlee
yay! Winter is coming and I’m finally getting excited to yarn craft some more.
Betty Holmes
If I print out this headband pattern, will it take many, many pages (like all the pics, etc.?)
Ashlee
if you click the green “print” box you’ll notice all the pictures disappear, you can also delete section/paragraph you want before printing, it’s a great new plug in I hope makes printing patterns easier!
Breanna
I need help!
I am new to knitting so I am sorry if this is a dumb question. I have figured out how to do the increase, but now I am having a hard time with the decrease. Can you lay it out for me in Row 1: k,p,k…..
Thank you so much!
Breanna
I think I figured it out 🙂
Ashlee
glad you figured it out!
Danielle
Thanks for posting this! It was a lot of fun to make, so I made 2 already. 🙂 I used a different pattern for the flower, but they look so cute!
Ashlee
I’m so glad you like them! And I think different flowers all look great with this wrap!
WildRiverHeart
Hi! Just wanted to thank you for a great and simple pattern! I tried the headband on both size 6 and size 8 needles. It goes a lot better on the 8 just so you know! When I used the 6s, it didn’t widen fast enough to really cover the ears and also the increase/decrease just looks sloppier. The size 8s work wonderfully – smooth and seamless pattern!!!
I have found some other flat decorative shapes to add on such as birds, stars, leaves, etc.
Thanks again and happy knitting 🙂
Ashlee
That’s good to know! Everyone knit’s so differently it’s hard to guess what some people will like! I’m glad you tried both and found what worked for you.
Patricia D
Ashlee, thanks a ton for posting this. I think it’s great how you meticulously answer everyone with patience and kindness! I’ve been looking for a pattern like this, even bought one on etsy (it was line by line and very tedious). I like to look and knit by intuition, not so much line by line.
One question, your instructions at the middle of the headband. What is done when you get to the middle again? For some reason, (I’m a very experienced knitter.. doh!) I can’t figure this one out! Always a challenge to me.. at any age!
Thanks for your enthusiasm and graciousness.
Pat at the NJ Shore where it’s gonna snow like nutz!
Ashlee
once I’m done with the increases I keep kitting the k/p/k or p/k/p across until it fits halfway around my head. Then I count how many rows I did from the last increase row to the center, let’s say 13.. so then I do 13 more rows (or how ever many it took you to get to that point) so I know that I have a large enough center so when I do my decreases on the other side I won’t fall short or too big on the other end. does that help?
Christen
Just wanted to thank you for this pattern! I made six of these for Christmas gifts, and I’m finally getting around to making one for myself! The gifts were a big hit, as these sell in Alaska boutiques for $25 and up.
Ashlee
you are so welcome! I hope you had fun making so many!
PEACHES
I’m totally enjoying your pages, the energy and creativity of your parties and patterns.May you continue bringing much happiness into the lives of your family and others
Please tell your mother she looks young enough to be a sister to you! Excellent GENES!
Ashlee
Thank you so much! And I’ll tell her, usually I get that my dad looks young, so she’ll be tickled
Joan
Thank you for this pattern, and for the fabulous flower which looks perfect on this headband/earwarmer.
What pretty models you have for your patterns. Are they your daughters? Lovely lassies!
Ashlee
thank you so much! I agree, they are beautiful! I love this flower and use it often!
Erene
Hi, Ashlee!
I have a question. On knitting your headband. 1st. what type of increase did you use? Would YO work?
And on #5. You mention to repeat Rib Pattern. Do you mean. Repeat 1 and 2?
when getting to the the middle. is that where I would have two stitches left. and I would knit the knit stitches and purl the purl stitches?
#6 rib pattern. Is this repeating 1 and 2?
I’m not understanding # 7. when hitting the double knit or purl. pick up the loop between the stitches
Please help me to understand this better. Thank you.
Rhea
I love the pattern for the headband, it says it is free on Ravelry but when I try to download the pattern it sends me to the paypal page and says it is $1.00 How do you download the pattern? Thank you for sharing this cute pattern.
Ashlee
it’s free, just stay on my site. if you want a pdf/download I have a $1 convenience charge (helps pay a portion of the email fees)
Maureen Jones
Hi
Just found this ear warmer pattern, as an avid knitter I’m going to try it
I do have a Question, are you using US size needles?
Please let me know.
Thanks.
Maureen in Victoria B C
Ashlee
yes US needles, good luck and have fun!
Ada
Just found this via a Google search – what a great “recipe” for the headband! A friend of mine just learned that her mom has cancer and will be undergoing chemo. We’re 2000 miles apart and I want to do something for her mom, at which point she enthusiastically told me that her mom wants a bunch of headbands that can be adjusted as her hair thins – so this is THE perfect answer! I’m thinking I’ll make a bunch of the base headbands and then vary the decoration in some way. And then I realized that if her hair loss gets to the point she wants a complete hat, I could take these headbands, pick up stitches along one long edge and work up to complete a hat that would have an adjustable brim. What’s also fun about this is that I mostly knit with some crochet and she crochets exclusively (but is too sick to make anything for herself), so this can be something of a tribute to her crochet talents. Thanks SO much!
Ashlee
you are so welcome! I hope the chemo works for your friends mother, how sweet of you to help where you can
Miki
Hope you still get comments on this page. Its been in my queue for years. i was just about to get started when i realized it was child sized. What mods would you suggest to fit it on a small but adult sized head?
Ashlee Marie
the pattern itself tells you how to make it whatever size you want – Repeat 5-8 until it’s about 4 inches wide then repeat with no increases until you’re happy with the length – then do the decreases. no hard fast pattern here.