So on twitter yesterday we were talking about watermarks and I mentioned I created an action in photoshop for how I do my watermark so I can quickly add my water mark to a batch of images. In fact I LOVE creating actions, I have actions for everything so I can easily edit batches of pictures. I have 2 for watermarks, one for an embossed watermark and a plain white one. I still haven’t decided which one I like better! I also have actions for resizing (to the width I like to us in my blog, also saving the pictures in web quality in a separate folder (so that they load easier). And another half dozen actions for various things I do often with lots of pictures! Actually I’ve been known to throw together an action when I’m doing the same thing to just a handful of images as a one time batch and then deleting it! I don’t use it for any image editing, like color correction, brightening or cropping, that I do individually.
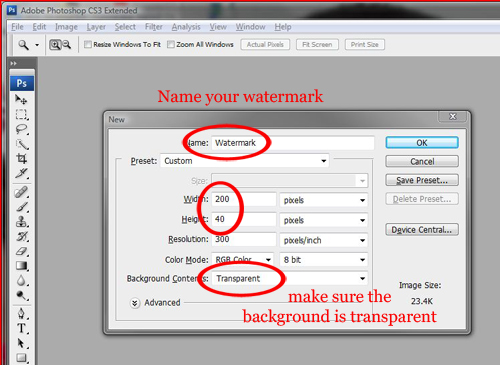
1. I start with creating an image I’m going to use for my watermark. you can use anything, but for this tutorial I’m just going to use the word watermark. You need to open a new image. The first big question is what SIZE do you want your watermark, some people like it large and some like it small it’s up to you. I will be working with an image that’s 400 pixels wide and want you to see the watermark easily so I’m using 200 pixels wide. Name your image and make sure the background is transparent! Click okay!
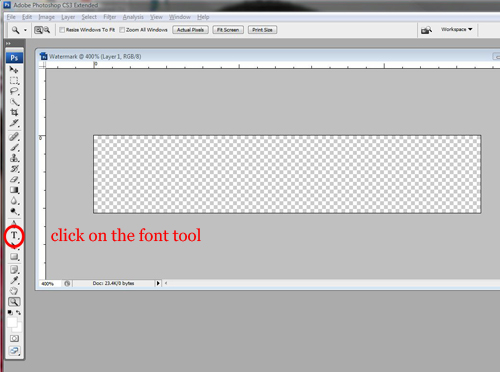
2. Here is my new image! Next create your watermark. Again, I’m using a word today, so I start with the font tool.
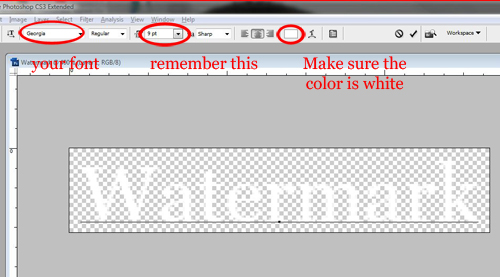
3. I went with an easy to read one for today, but you can use any font you want. Also make sure the color is white if your considering embossing. If not you can go with any color you want, but I’d still suggest white, it shows up on picture better and will match any image. The font size is totally up to you, but you’ll want to remember it later if you want to create an embossed watermark.
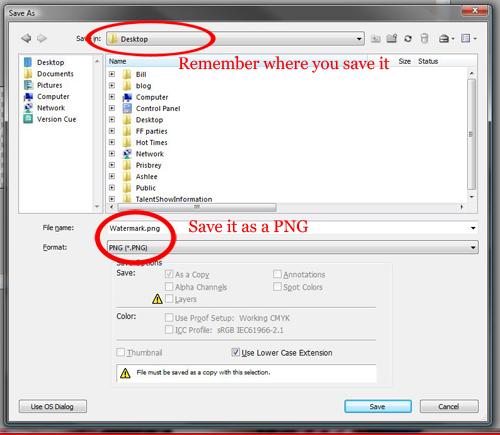
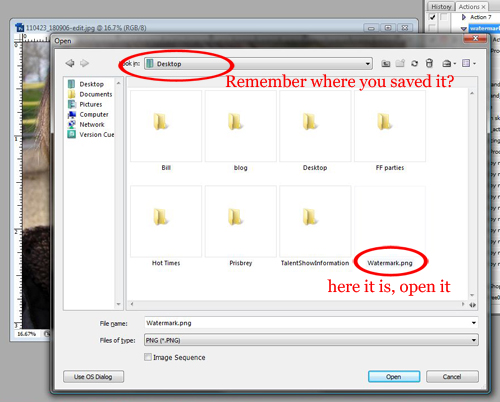
4. Now save it! Make sure you save it as a PNG, if you accidentally save it as a JPEG you’ll have a white background. A PNG keeps the background transparent. The other important thing is to remember to save it someplace permanent. The action won’t work if you move your image to another folder later. And CLOSE.
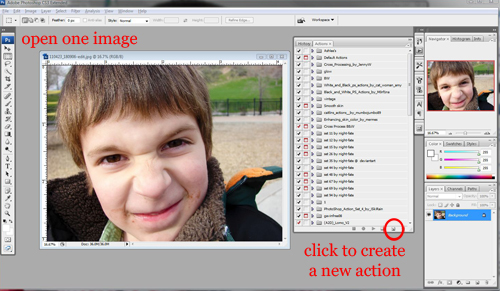
5. Now while the goal is to be able to easily play our action for one or MULTIPLE images we only want one picture pulled up while we create this action. Too many other open picture can create problems. So open ONE. I chose this one from the park last week of my expressive little boy! LOVE his sweet face!
Make sure it’s the width you regularly use for your blog (again when I’m working with pictures for my blog I always use my resizing action first, if you do it AFTER adding your watermark it will also resize the watermark!). Now is when we start our action! Click on the action tab, then on the bottom click on “create a new action”!
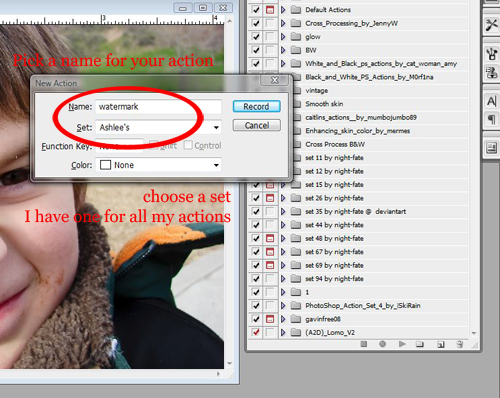
6. Name your action and place it in a set. If you don’t have a personal set for your own actions then create a new set first, THEN add a new action! Press Record.
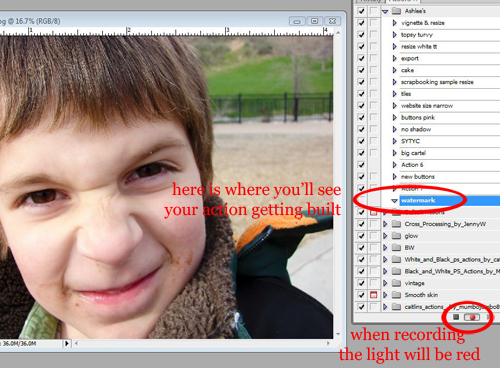
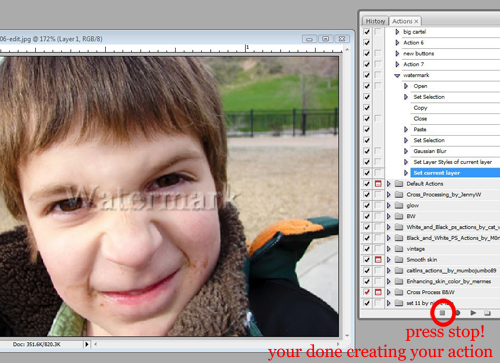
7. The dot will turn red letting you know it’s recording (if you ever need to stop just click the square on the left side, you can restart recording anytime). You’ll be able to see your action build as you start working on your image. What you’ll do to this image is creating your watermark while recording so you’ll be able to PLAY this action and photoshop will follow exactly what you recorded for all future images! It saves SO much time.
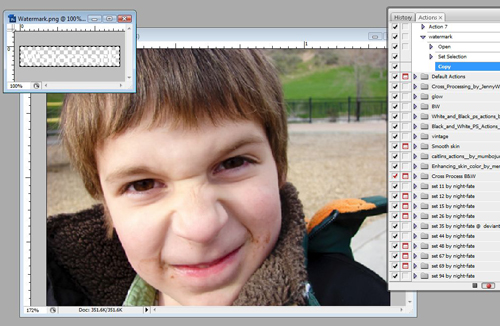
8. Now we want to open our watermark PNG. So open the folder where you saved it, click the PNG (you might have also saved a PSD so make sure) and open it.
9. This is important: do NOT click back and forth from your watermark image and the picture, EVERYTHING you do is recorded so you don’t want to constantly be “change to previous image” it will seriously mess up playing the action later!. So working ONLY with the image you just opened “select all” (Ctrl-A) then “copy” (Ctrl-C) and CLOSE the watermark PNG. Again, very important, this will automatically take you back to the picture and won’t create any of those messy “change to previous image” lines in our action.
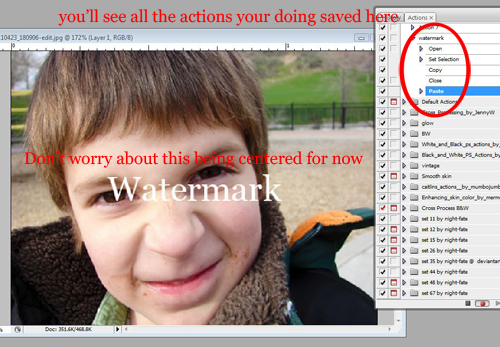
10. Now “paste” (Ctrl-V). Your watermark image SHOULD show up right in the middle of your picture. Don’t worry about that right now, moving your water mark is an action that doesn’t work (I’ve been trying to figure out a way to make it always in the bottom corner, but haven’t been able to get it to work, maybe in a newer version of photoshop), so we’ll worry about moving it later. Right now we just want to work with things that CAN be done to multiple pictures easily. And you’ll be able to see the “open image”, “set selection”, “copy”, “close” and “paste” growing on the action tab! Yeah it’s working!
Now if all you want is a white you can click “stop” (the square left of our red circle) and skip down to where I talk about using the action as a batch. Scroll down to number 16… If you want to learn to emboss your watermark keep going!
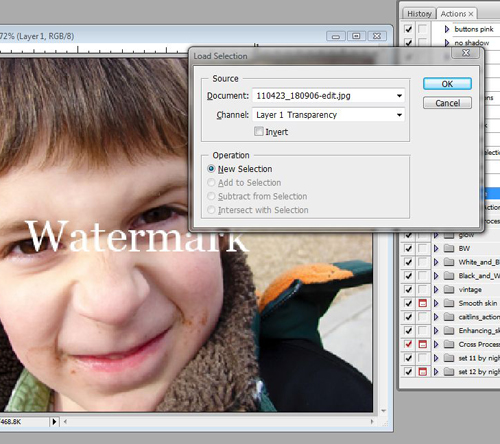
11. Now this is just how I learned to do it, if you have another way you like better that’s JUST fine, there are tons of ways to get this effect, so do what you’re comfortable with! First we want to select JUST the letters (as the exact letters, NOT the rectangle around the watermark or the full image… go up to “select” then “load selection” and press “OK”! Now you should have a dotted lines around the letters!
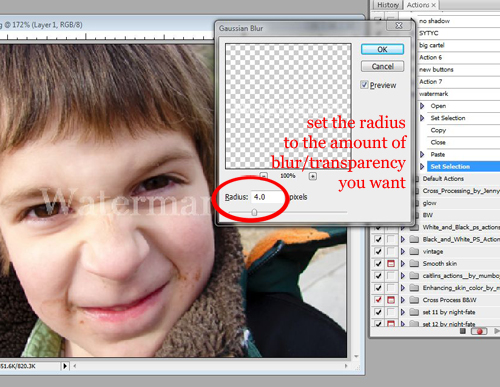
12. Next up fading the letters using a blur. Go to “filter” then “blur” then “Gaussian blur”. This is where the size of your font (watermark) comes in handy. The radius you choose could be totally different from mine. My font was 9 and my radius is 4.0. The larger the letters the larger the radius will need to be. If you have “preview” checked you’ll be able to see the watermark changing on the image itself. See how faded the word “watermark” is on my picture? This is totally about your preference, and now much you want your embossed image to show up. When your happy click “OK”
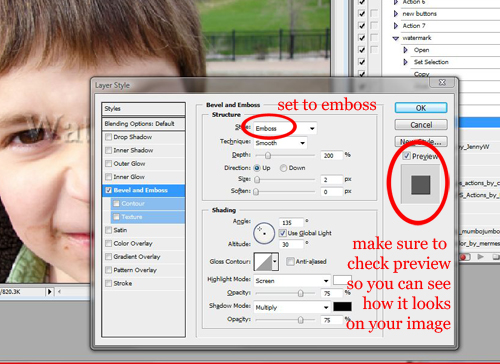
13. Now we’re going to emboss the image. Click “Layer” then “layer style” then “bevel and emboss”. It will bring up this screen. Again you want the preview box checked so you can see how it’s effecting the watermark and how it looks on your picture. Under the “style” drop down menu choose “emboss”. The rest, the depth, size and shading angle is all up to you! play with it a bit checking the preview and when your happy with it click “OK”
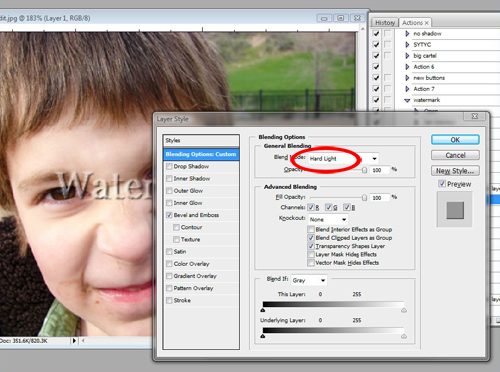
14. And finally blending options. Honestly after going over this again I’m not sure what the point of this one is, like I said before it’s just how I learned to do it. So if you like the change it makes go for it. “Layer” then “layer style” then “blending options”. When you have this menu change the “blend mode” drop down menu to “hard light”
15. And now we’re done with our action so click “stop recording”!!! Now on to test our action!
16. I closed the picture I created the action on and opened a group of images (using the same one you guys have already seen to try to stay consistent?) Anyway if you just want to use an action on one picture just click on the “action” tab, then highlight your new action and press “play” (the triangle on the RIGHT side of our recording dot).
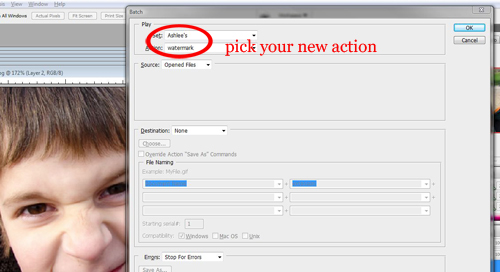
BUT if you want to use your action on a group it’s super easy. Click on “file” then “automate” then “batch”. You’ll get this screen, pick your set, then your title and press okay!
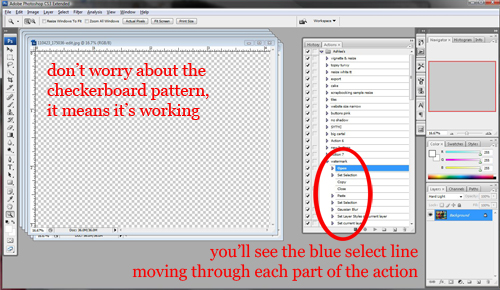
17. Depending on how many images you have open this could go really quick or really slow (I’ve done up to 250 at one time, it took about 20 mins). Anyway while it’s working it’s way through your pictures you’ll see a checkerboard pattern instead of the images, that’s okay, it means it’s working. you’ll also see in the action tab the highlighted area going down as it works on your action.
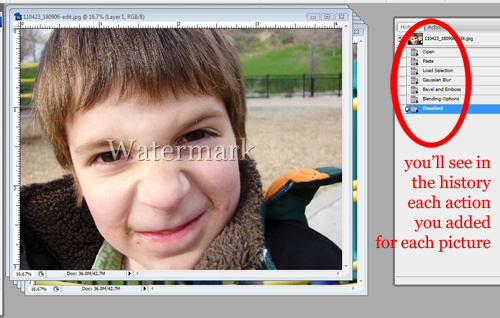
18. If it’s all been done right each picture should have your watermark right in the center of them, AND if you look at their history tab’s they should all have the exact actions you created listed!
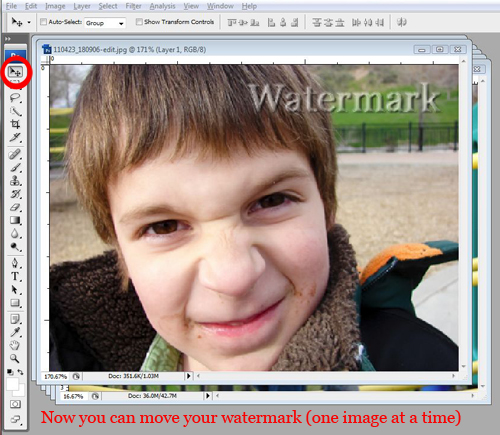
19. Finally now is when I go through and move the watermarks around. I do this one picture at a time to make sure the image isn’t covering anything TOO important! Click on the “move tool” (Shift-V) and move it around (oh, make sure the right LAYER is highlighted, sorry, I totally cropped that off!). After I’m done with one image I minimize it and work my way through the rest. THEN I use yet another action to save them all into a folder on my desktop as a web image (so they load easier and faster). I have a folder JUST for images for my blog so they don’t get mixed in with my original images. Kind of an organizing freak when it comes to my pictures on my computer! I also rename the images in the folder before I upload. I like to keep all original images named by date and time so they always stay in the correct order- like I said, kind of a freak about it!
AND we’re done! You can use the same idea to create actions for just about anything! Including cool effects for your pictures. Once you figure out how it’s easy as pie! I’m an action nut and I hope this was clear enough that it helps someone out!






Sara @ Mom Endeavors
Brilliant! Thanks so much for putting that together! Now, I need photoshop for my mac! 🙂
Ashlee
If you have it for a Mac, the shortcut key’s will be slightly different, instead of CTRL A it’s… something else, I don’t have my husbands mac in front of me or I could tell you what I thought it was. ALT-A or maybe apple-A??? Gah!
Katy Lunsford
Can you recommend a program for watermarks if you don’t have Photoshop? Thank you.
Ashlee
Mmmm I don’t. I’m using the full photoshop, but elements also has action features (at least I’ve been told it does) before I had photoshop I used about 5 other photo editing software’s and none of them had the capabilities. One of the things I have LOVED about photoshop, Lightroom also has great batch editing, and while I have it, I haven’t played around with it yet!
Jamielyn
ahh yay THANK YOU!
Ashlee
I hope it helps in some small way. I literally have about a dozen actions at any one given time that i use!
somedaycrafts
Great tutorial. I am highlighting at the party at somedaycrafts.blogspot.com on Wed. For some reason, there is a huge blank spot on top of this post.
Ashlee
I know, I’m having MAJOR issues with my free WP template right now. The sidebars are a HUGE mess and have pushed the posts WAY down, it is just MADDENING. I spent hours last night working with my sidebars to no avail!
jen @ SewHappyGeek
Wow, thanks so much for this, it came along at just the right time for me! Very good explanations. Gonna play with this tomorrow!
Ashlee
I’m so glad! Let me know if it works for you! I always wonder if I’m making any sense at all! Or if it’s just mumbo Jumbo!
Sophia
Thanks so much for a fabulous, thorough tutorial! I use Paint Shop Pro X2 where these are called “Scripts” instead of actions, but the process is pretty much the same. (Interestingly enough, I can choose to have it place my watermark in the lefthand corner as part of my script in PSPX2.)
You have saved me HOURS of time – thanks a bunch!!
Ashlee
I’m SURE there is a way to place it just right in photoshop, but I don’t always want it in the same corner, so I don’t mind personalizing it for each picture right now! I’m so glad it works for you!
Cheryl Golangco
You can also try FASTSTONE PHOTO RESIZER. It allows you to put watermarks without all the fuss. It should be easy to use once you download it 🙂 You can watermark more than a hundred photos in just a minute or so.
Ashlee
Thanks!
Cambrie
Thank you so much for this tutorial. I’ve been trying to figure this out forever…and you made it seem so simple. THANK YOU!!!!
Ashlee
I’m so glad, I always worry when I do a tutorial that it doesn’t make sense or isn’t clear enough. So I’m glad it worked for you!
Emily
This saved me HOURS!!! Woo hoo! Bless you. And bless Google Search which brought me to your site. 🙂
Ashlee
Oh I’m so glad! When I write a tutorial I’m always nervous it only makes sense to me! I’m glad it worked out for you!
Jordan (Wayward Girls' Crafts)
Hm. . . . I’ll have to try this in my image editor (at least to make the watermark). Thanks!
Ashlee
I know there are ways to do this with other programs too. I just shared the way I know how to do it! Let me know if it works for you on your program
Stephanie
Thanks for sharing this! I am new to your site. Do you have tutorials on what is a good size for images on your blog so it can load fast?
Ashlee
I don’t. I usually do tutorials on stuff like this when people ask a question… I size mine around 500 or 600 px wide to fit inside my blog space well. I go by width not height so it’s more uniform… I also use the “save for web” action in my photoshop so it resizes it down to 72px resolution. That way it loads faster and the quality is good enough for the web, but not so good that people could print them out for any reason or enlarge them… Mostly for fast loading but also for image protection.
Heather
Awesome! Now all I need is Photoshop… lol Someday. 🙂
Ashlee
I started with cheaper or even free software and worked my way up… I haven’t had photoshop that long, but since that’s what I use that’s the tutorials I do. I believe there are similar ways to make this work with other software as well. Although I think the actions is specific to photoshop!
Christina C
Thanks so much for putting this together! FYI, in CS4 the action recorded my “move” command and I was able to have it put the watermark in the top corner in all future batches!
Ashlee
AWESOME!!!! My sister just got CS5 so I’ll have to go over and play with it. Honestly I kind of like placing it in different places, finding that perfect corner, but at times (when I’m doing large batches) I really wish I didn’t have to!
NR
Great post. I also found instructions on how to automatically place your watermark in the right place if you want to place it in a particular corner: https://photography.tutsplus.com/articles/quick-tip-automated-watermarking-with-photoshop–photo-2499
Between these two you should be good to go!
Ashlee
I know how, but I don’t always want my watermark in the same corner, so I like placing it myself.
Samir Sachdeva
Thank you so very much. It is really appreciated. An excellent and simple guide detailing each step very simply even for the novice. Works wonderfully well.
Thanks