Croissants tend to scare people but they are actually really easy to make at home, they just take a bit of time, but are worth it when you break into one

I have been making homemade croissants for years. I remember the first time I made then, about 7 years ago, I was so worried that they simply wouldn’t work.
I mean they seem SO complicated! But in truth they are really SO easy, but a bit messy. There is simply a lot of waiting! Do a few steps, wait, do a few steps wait…. etc… But when you break one open they are SO worth it!
You can make them any size you want. Small, Medium, Large, EX Large, it’s all in how you cut the triangles. For this meal I made them smaller, there is already so much food and fitting it all on a plate is rough so smaller is better.

BUT if I was making them for lunch or breakfast I’d DEF make them larger. I got about 28 small ones, you can get about 18 medium, etc…. In your mixing bowl add milk, yeast and sugar together and let proof about 5 mins until the yeast is dissolved.
Add the flour, salt and 2 Tbsp softened butter to the warm milk mixture. Mix with a dough hook until it’s combined, then mix 2-3 more mix until it’s smooth (if you don’t have a bosch you can knead by hand about 5 mins)
Let the dough sit (covered) for 1 hour (or until doubled in size.
knock the dough down, knead lightly in the bowl and refrigerate for 30-45 mins.
Then make a 9×6 pat of butter, than you then refrigerate while the dough is chilling.
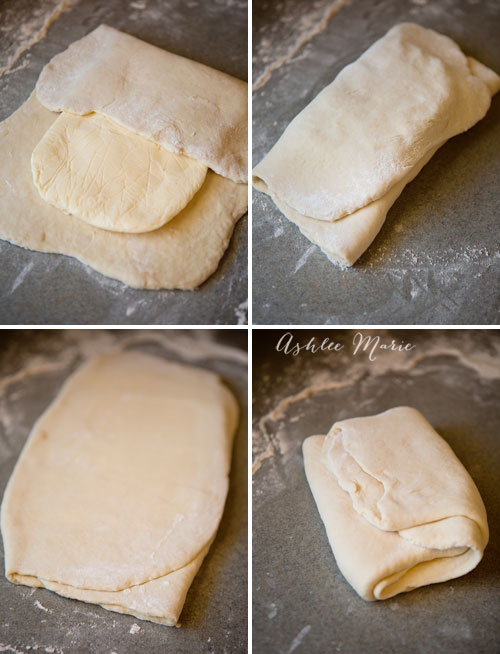
Then roll out the dough on a lightly floured surface to a 15 x 8 inch rectangle. Take the rectangle of butter and place over 2/3 of the dough leaving a 1 inch border on 3 of the side and about 5 inches on the other.
Fold over the excess 5 inches of dough then fold over the buttered side like you were folding a business letter. Seal the edges and rotate 1/4 turn.
Roll out the dough/butter into a 18×8 rectangle, fold into thirds again and roll out and then fold again.Wrap in plastic wrap and refrigerate 30 mins.

Then repeat the process – Roll out the dough/butter, fold, roll, fold again. Wrap in plastic wrap and refrigerate for 1 hour or over night (at this point the dough can also be frozen, let thaw completely before proceeding.).
Now we’re going to roll it out one last time! I started to roll it out before remembering to just roll out 1/2 of the dough at a time. I cut it so you could see a cross section of the dough/butter/dough/butter, etc… isn’t it pretty!
SO you’ve divided the dough in half, roll out into a 12×12 square and let stand for 5 mins. Cut it in half and mark one side every 3 inches, then make the other side in between.
Cut from one mark to the other across, get rid of the excess dough. I had 14 small triangles. Obviously if you want larger croissants simply change the measurements.
Starting at the short end roll the dough to the tip, leaving the tip underneath. Place on a baking sheet at least 2 inches apart curving the ends to create the croissant shape. (You can refrigerate or freeze the shapes at this point.).
Cover with a plastic wrap sprayed with pam, or some other non stick spray, and let rise until increased by almost half, 1-1 1/2 hours.
repeat with the rest of the dough
Beat and egg and brush each croissant lightly (VERY lightly you don’t want them to shrink). Bake at 375 for 20-25 mins.

And your done! The egg is what gives the outside the lovely golden crust so don’t skip that part. They are a huge it at any meal, snack or breakfast. My kids just DEVOUR these!
When you break them apart you’ll see all those buttery, flakey layers and be so proud of yourself! Now it’s time to play!
I love to put chocolate in mine, what would you fill a croissant with! Cheese? meat? or get fancy? you can always make extra large one’s to simply slice and serve sandwich style as well!

Connect with Ashlee Marie Online!
There isn’t much better than good carbs! And there are more rolls and breads in my Thanksgiving recipe digital cookbook.

To watch me make these croissants start with the laminated dough video below then the croissant video in the recipe card!
You can find all my cooking show style recipe videos on YouTube, or my short recipe videos on Facebook Watch, or my Facebook Page, or right here on our website with their corresponding recipes.

Homemade Croissants
Ingredients
Dough
- 1 C whole milk warmed
- 2 1/2 tsp active dry yeast
- 1 Tbsp granulated sugar
- 2 3/4 C all-purpose flour
- 1 tsp salt
- 2 Tbsp butter softened and cut into small chunks
Butter block
- 1 1/2 C butter cold
- 3 Tbsp all-purpose flour
Topping
- 1 lrg egg slightly beaten
Instructions
- In your mixing bowl add milk, yeast and sugar together and let proof about 10 mins until the yeast is dissolved.
- Add the flour, salt and 2 Tbsp softened butter to the warm milk mixture. Mix with a dough hook until it’s combined, then mix 2-3 more mix until it’s smooth (if you don’t have a bosch you can knead by hand about 5 mins)
- Let the dough sit (covered) for 1 hour (or until doubled in size.
- With your hands, on the counter (or in your Bosch) mix the cold butter and 3 Tbsp flour until it is smooth and without lumps. Work quickly to keep the butter cold.
- Place the butter on plastic wrap and shape it into a 9×6 in rectangle. Wrap and refrigerate the butter 30 mins
- knock the dough down, knead lightly in the bowl and refrigerate for 30-45 mins.
- Roll out the dough onto a lightly floured surface to a 15 x 8 inch rectangle.
- Take the rectangle of butter and place over 2/3 of the dough leaving a 1/2 inch border on 3 of the side and about 5 inches on the other. Fold over the excess 5 inches of dough then fold over the buttered side like you were folding a business letter. Seal the edges and rotate 1/4 turn.
- Roll out the dough/butter into a 18×8 inch rectangle, fold into thirds again, wrap in plastic wrap and refrigerate 30 mins (first turn)
- Repeat rolling out, folding, wrapping and refrigerating 2 more times (2nd and 3rd turns)
- Roll out the dough one more time, roll into thirds again, wrap in plastic wrap and refrigerate, this time for an hour or overnight (4th turn) (at this point the dough can also be frozen, let thaw completely before proceeding.).
- Roll out dough into a rectangle about 10 x 15 inches (it will be about 1/4 inch thick)
- Cut down the center, creating two 5 x 15 inch rectangles
- Mark the inside about every 3 3/4-4 inches (you’ll get 5 marks)
- Mark in the CENTER of those marks on the other side (so there will be 4 marks)
- Cut from the mark on one side to the marks on the other side, you’ll get about 14 triangles
- Cut a half inch mark in the center of the fat end.
- Tug a bit to pull the fat side apart and then stretch the point down (but be careful not to rip the layers)
- Starting at the fat end roll up leaving the tip underneath and curling the end in.
- Place on a baking sheet and cover with plastic wrap sprayed with non stick spray, like pam or bakers joy, and let rise until increased by almost half, 1 1/2-3 hours.
- Brush each croissant lightly with the egg. Bake at 375 for 20-25 mins.
Video
Nutrition

")


Mom Photographer
Those with chocolate look like to die for!!! I’m drooling now! thanks for the recipe!
Ashlee
they are so so SOOO good. Great, now I’m craving some myself!
Carol
Pain au chocolat is one of my favorites! I’ve always been intimidated by the dough but this looks doable! Pinning to try . Saw you over at Flamingo Toes!
Ashlee
the first time I had pain au chocolat I was actually in Tokyo! And I still remember how totally life changing it was. I could eat them every day for breakfast with hot chocolate!
Melinda
Did you use baking chocolate for these or just a regular ol’ Hershey bar?
Ashlee
for these reg chocolate bars! Dark chocolate for me!
Aimee @ Like mother like daughter
oh my goodness, these were so flaky and buttery and delicious! I cant wait to try making some of my own at home!
Ashlee
thank you! and they are seriously so easy! I like to roll cheese, meat or chocolate into them too, so delicious!
Kara
These were amazing! I brought two home to eat later, but the 16 year old devoured them as soon as I walked in the door. He raved about them, so I’ll be making them at his request. 🙂
Ashlee
ha! they are honestly super easy to make, let me know what you think! or better yet come over and we’ll make them together!
Dorit
Sounds wonderful, do you have a recipes non dairy? My son can not have any butter or milk.
any advice? Is there any way i can bake this without milk and butter?
Ashlee
I don’t specialize in gluten or dairy free, sorry. And I would have NO idea how to create layered laminated dough like this without butter between the layers. I bet SOMEONE knows how, I wish I knew of a specialist I could point you in the direction of. If I ever find one I’ll let you know.
Krystle
Is the dough suppose to be tough when you first make it. I’m following the recipe to the letter why does the dough feel so tough
Ashlee
it is a stiff dough, it needs to be strong to handle the many turns and folds and rolls. so not like rolls or breads, much tougher, but not like a brick, it should still roll.
Meredith L
First of all, I’ve never liked store bought croissants but this recipe is DELICIOUS. In my first attempt, my croissants looked like alien snot. SERIOUSLY. LOL. I rushed it and rolled the dough too thin on a couple of the folds. Doing that and not allowing it to cool long enough made the butter kind of melted away creating misshapen croissants. It’s time consuming but oh so worth the effort! I can’t wait to try again.
Ashlee
HA, my first batch looked like that too, just take your time and you’ll totally get it!
Minda
Thank you for sharing.
I’m try to do this soon