• Skip to primary navigation
  • Skip to main content
  • Skip to primary sidebar
  • Skip to footer

Ashlee Marie - real fun with real food

  • Recipes
    • Main Dish
    • Desserts
    • Breakfast
    • Sides
    • Bread
    • Soups & Salads
    • Drinks
    • Food Tutorials
  • Cakes
    • Cake Recipes
    • Cake Tutorials
    • Carved Cakes
    • Wedding Cakes
    • Smash Cakes
    • Party Cakes
    • How to Video Series
  • Parties
    • Complete Parties
    • Party Cakes
    • Party Food
    • Party Crafts & Decorations
    • Printables
    • Invitations
  • Holidays
    • Valentines
    • St. Patricks Day
    • Easter
    • Cinco De Mayo
    • Mothers Day
    • 4th of July
    • Halloween
    • Thanksgiving
    • Christmas
  • Travel
    • Culinary Travel – Cooking Schools
    • Family Travel
    • Disney
    • Universal Studios
    • Blogger Trips
  • Videos
    • Recipe Videos
    • Short Videos
    • Kitchen Tip Videos
    • Video equipment links
  • Crafts
    • How to & Craft Tutorials
    • Crochet & Knit Patterns
    • Decorations
    • Photoshop
    • Sewing Projects
  • Shop
    • Video equipment links
    • Baking and Kitchen equipment
Home » How to & Crafts » sewing

Flower Bow

Published: April 21, 2010 | Updated: November 12, 2019 | By Ashlee

  • Facebook
  • Twitter
  • Yummly

So last night my sister emailed me with a picture of this cute toddler flower bow she found. BUT she didn’t want to buy it if she could make it. So she asked if I, being the Origami QUEEN, could figure out how it was made. Now I have a to do list longer than my husbands monkey arms (his arms are longer then his height, unusual I think) for the party. BUT she piqued my interest. SO I started working on it… It was fun and I spent WAY to long on it, BUT I figured it out! What do you think?  I took a sheet of paper and kept folding it until I got all the folds the picture of the flower clip had.  Then I cut off the excess paper.  Then unfolded it to find a… square!  yup each petal is made from a square of fabric.  I used 4 inch squares for this clip, but think I’ll try a 3 inch square for one for Little S.

fabric flower hair clips denim bandana

Sorry for the bad picture quality, this is the bathroom mirror and there is NO natural light in that room.   But I thought a picture would help with the size.  I love having short hair, but don’t usually find anything I can wear in my hair.  These were perfect!  I’m LOVING them SOMEDAY I’ll get someone else to take a picture I like. But for now, here they are (and my new hairdo~!) I have a photographer girlfriend who I’m GOING to get together with someday and get new headshots!

fabric denim headband hair clip

The sewing was actually easy.  But showing you how to fold it is a bit harder.  I’ll TRY… Here it goes.

Okay start with a square of fabric.  I was trying different fabric options when I made this.  I took pictures of the Jersey, but it didn’t work out right.  I want something thicker than the cotton, but not as heavy as the jersey, any suggestions?  Okay, I used a 5 in square for these pictures, but 4 inches for the ones in my hair and will use 3 inch’s for the one for my toddler.

flower petal big hair clip fabric square

First step…  Fold it over with the right sides out, super easy!

flower petal big hair clip fabric square fold triangle

Then fold it in half again, pin the raw edges and sew up the line

flower petal big hair clip fabric square fold triangle again pin

Doesn’t that look nice?  Now were going to OPEN up the triangle.
This part is hard to explain, but the open side is going to open into a triangle and the folded side is going to meet up with the sewn edge. you want the invisible green lines to match up!

flower petal big hair clip fabric sewn

It should look like an elongated kite.  The raw edges underneath.  Next we’re going to take the top raw edge/point and fold it backwards pulling it down until it meets the bottom raw edge/point.

flower petal big hair clip fabric sewn fold

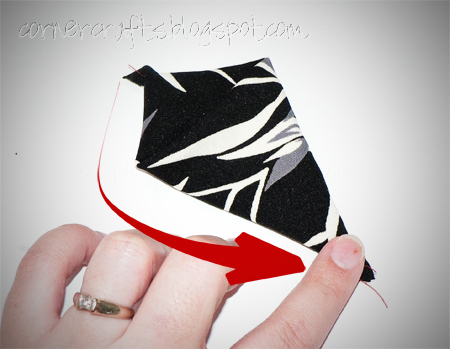
It should look like this with the raw edges touching in the middle of all the other layers.  Now we’re going to fold up the outer sides and this will create our petal look.

flower petal big hair clip fabric sewn folding

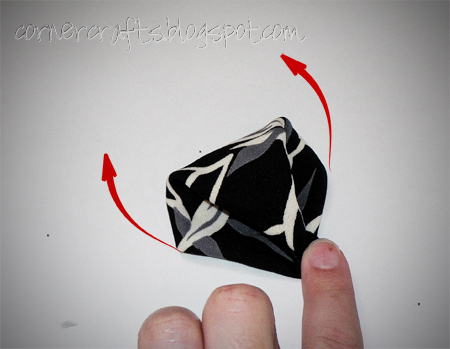
Voila!  Last fold the edges in as much as you can down at the point, sew it together and your done!   Make 7 of these putting them together to create  a flower.  Use a button on the top to cover the nasty point/edge and add to whatever you’d like,  barrette, clip, headband etc…!

flower petal big hair clip fabric sewn done

I used jersey, cotton, and denim. the jersey is OUT, the other two are okay. The thicker denim is nicer than the cotton hancerchief but I’m not completely sold on either.  The search in on for the right material for this project!  Let me know what you think, and if you make one (or make it BETTER) I’d love to see it!

red bandana hair clip fabric

Related Posts:

  • Pom Pom hair clips
    Pom Pom hair clips
  • Frozen Birthday Party
    Frozen Birthday Party
  • Lego Star Wars Birthday Party
    Lego Star Wars Birthday Party

JOIN MY NEWSLETTER!

Become an insider and receive this FREE Maple Icing Recipe (not seen on the blog!)

You have Successfully Subscribed!

Privacy Policy: We hate spam and promise to keep your email address safe. You'll receive email updates through AshleeMarie.com. You can unsubscribe at anytime.

  • Facebook
  • Twitter
  • Yummly
ashlee marie

About Ashlee

With the right tips and tricks, I believe YOU can make, bake, or create anything. This is what I love to do - make some awesome, teach you how, and give you that boost of culinary confidence you need to rock your own kitchen! Read more...

youtube facebook instagram twitter pinterest email rss

Reader Interactions

Comments

    Leave a Reply Cancel reply

    Your email address will not be published. Required fields are marked *

    Recipe Rating


  1. Caitlin L.

    July 10, 2010 at 4:15 am

    I am soooooo thankful for this tutorial! I have been searching everywhere for a tutorial for exactly these flowers, because I–just like your sister–do not want to buy them if I can make them myself! I've tried and tried to figure out how to make them and can never figure it out! Thank you so so so much!!! I can't wait to try this out!!! I'll let you know how it goes :o)

    Reply
    • Ashlee

      July 9, 2010 at 10:40 pm

      Can’t wait to see what you create! I hope you enjoy it.

  2. somedaycrafts

    July 26, 2010 at 6:42 pm

    Ashlee, I came back to feature this! I have to have it on my blog so I can make some in the future. Thanks!

    Reply
    • Ashlee

      July 30, 2010 at 11:54 pm

      Thanks Michelle! I’ve finally found a few innstructions on the “correct” way to make them. I’ll have to try the new way and do a post about it comparing the two.

  3. Maggie

    July 26, 2010 at 7:41 pm

    I’m getting ready to make some new pillows for my daughter’s room and these would be perfect appliques!!!

    Reply
    • Ashlee

      July 30, 2010 at 11:55 pm

      Great~! I can’t wait to see how they turn out~

  4. Aleisha

    July 26, 2010 at 8:14 pm

    I saw a tutorial for these over a year ago and never made them. Thanks for reminding me. I did a search on the web and here is a link with directions. Not sure if it is any easier than what you are already doing, but it doesn’t hurt to look. They are called Kanzashi flowers.

    http://www.mookychick.co.uk/how-to

    Reply
    • Ashlee

      July 30, 2010 at 11:58 pm

      this is similar to my way, but without sewing the edges. I wanted to make sure my fabric didn’t fray, so I sewed my edges. I finally found the “correct” way to do it, check it out here http://abigailscraftshowto.com/cgi-sys/suspendedpage.cgi I can’t wait to try it (once I find the right Japanese silk!

  5. Brenda

    September 15, 2010 at 10:28 pm

    I love these and can’t wait to try this. I love trying new crafts with my grandchildren. We’re making bows the next time they come. Wouldn’t regular quilting fabric work?

    Reply
    • Ashlee

      September 15, 2010 at 11:04 pm

      It would work fine, but the bigger the bow it might get a bit floppy. It’s good to have a slightly stiffer fabric, but that’s just my preference! Send me pictures after your done!

Primary Sidebar

about ashlee marie
youtube facebook instagram twitter pinterest email rss

You have Successfully Subscribed!

Privacy Policy: We hate spam and promise to keep your email address safe. You'll receive email updates through AshleeMarie.com. You can unsubscribe at anytime.

Popular Posts

Homemade deep-fried monte cristo sandwich
homemade choco taco
one pot loaded baked potato soup
tamatoa cake - moana - disney
I love these candied strawberries, like a candied apple, a glorious crunch with a ripe strawberry center!

Footer

SEEN ON

as seen on
  • TV and Media
  • Privacy Policy

COPYRIGHT © 2007–2023 Ashlee Marie - Real Fun with Real Food

ashlee marie lets make some awesome
  • Recipes
    • Main Dish
    • Desserts
    • Breakfast
    • Sides
    • Bread
    • Soups & Salads
    • Drinks
    • Food Tutorials
    • Back
  • Cakes
    • Cake Recipes
    • Cake Tutorials
    • Carved Cakes
    • Wedding Cakes
    • Smash Cakes
    • Party Cakes
    • How to Video Series
    • Back
  • Parties
    • Complete Parties
    • Party Cakes
    • Party Food
    • Party Crafts & Decorations
    • Printables
    • Invitations
    • Back
  • Holidays
    • Valentines
    • St. Patricks Day
    • Easter
    • Cinco De Mayo
    • Mothers Day
    • 4th of July
    • Halloween
    • Thanksgiving
    • Christmas
    • Back
  • Travel
    • Culinary Travel – Cooking Schools
    • Family Travel
    • Disney
    • Universal Studios
    • Blogger Trips
    • Back
  • Videos
    • Recipe Videos
    • Short Videos
    • Kitchen Tip Videos
    • Video equipment links
    • Back
  • Crafts
    • How to & Craft Tutorials
    • Crochet & Knit Patterns
    • Decorations
    • Photoshop
    • Sewing Projects
    • Back
  • Shop
    • Video equipment links
    • Baking and Kitchen equipment
    • Back