• Skip to primary navigation
  • Skip to main content
  • Skip to primary sidebar
  • Skip to footer

Ashlee Marie - real fun with real food

  • Recipes
    • Main Dish
    • Desserts
    • Breakfast
    • Sides
    • Bread
    • Soups & Salads
    • Drinks
    • Food Tutorials
  • Cakes
    • Cake Recipes
    • Cake Tutorials
    • Carved Cakes
    • Wedding Cakes
    • Smash Cakes
    • Party Cakes
    • How to Video Series
  • Parties
    • Complete Parties
    • Party Cakes
    • Party Food
    • Party Crafts & Decorations
    • Printables
    • Invitations
  • Holidays
    • Valentines
    • St. Patricks Day
    • Easter
    • Cinco De Mayo
    • Mothers Day
    • 4th of July
    • Halloween
    • Thanksgiving
    • Christmas
  • Travel
    • Culinary Travel – Cooking Schools
    • Family Travel
    • Disney
    • Universal Studios
    • Blogger Trips
  • Videos
    • Recipe Videos
    • Short Videos
    • Kitchen Tip Videos
    • Video equipment links
  • Crafts
    • How to & Craft Tutorials
    • Crochet & Knit Patterns
    • Decorations
    • Photoshop
    • Sewing Projects
  • Shop
    • Video equipment links
    • Baking and Kitchen equipment
Home » Parties » baby shower

Color Flow Airplane Cookies

Published: April 16, 2012 | Updated: November 12, 2019 | By Ashlee

  • Facebook
  • Twitter
  • Yummly
Jump to Recipe

This week I’m going to be sharing my airplane baby shower all week, today is the airplane cookies, Wednesday the cake, Thursday the invitations and Friday the rest of the party, including the labels! I hope you all enjoy it! It was such a fun party to throw for my sweet cousin.

airplane-cookies-color-flow-method-finished

Take your favorite sugar cookies, but for this method if you want the frosting to dry hard so you can stack them you need to use royal icing, so it’s mostly sugar, and looks AMAZING, but isn’t he most tasty frosting. You CAN use my classic Sugar cookie frosting, making it thick for the outline and thin for filling in, but while the frosting will crust over you won’t be able to stack them. But it does taste better in my opinion….

airplane-cookies-color-flow-method-outline

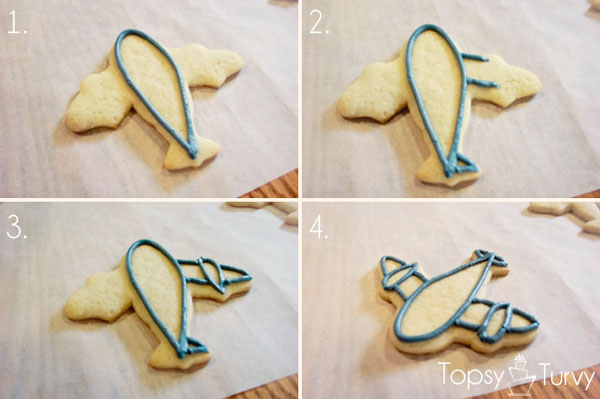
First we’re going to outline the shape you want.  I started with the MAIN space, then did one side of the details then the other.  You want to make sure your outline connects everywhere without spaces or holes.

airplane-cookies-color-flow-method-detail

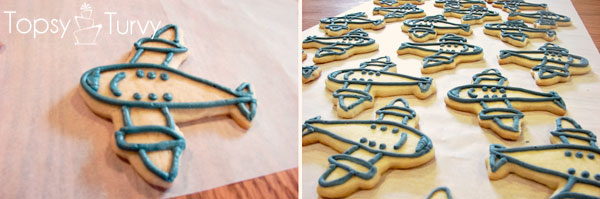
Then any detail work in the center, I was going off an image of a plane I tweaked and colored for our party…  do this to ALL the cookies and let the outlines dry completely.

Take the royal icing and THIN it out, after you’ve thinned it, plop a bit of the frosting back into the main bowl and count to 10, if the plop and/or lines created when you dropped it in have disappeared and you have a nice smooth surface again it’s thinned enough, if not add a bit more water, mix and try again.  Go slowly, like half a tsp at a time, you can always add more water, but if you go too far you can’t take it back out!

airplane-cookies-color-flow-method-piping

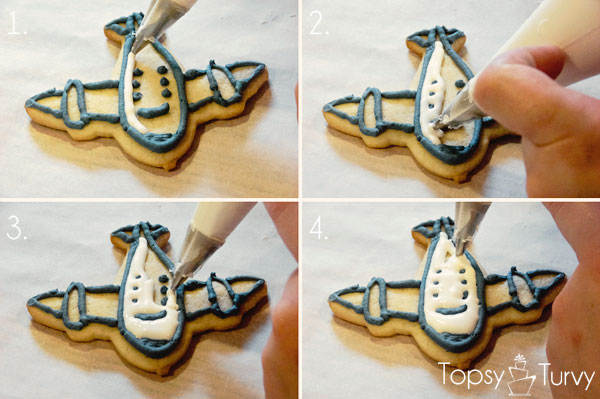
Now we’re going to fill in the design, doing one space at a time,works smoothly and quickly, starting with a side and moving your way over.  You want it to bubble up over the edge of your outline JUST a bit (but not overflow) creating a pillowy effect..

airplane-cookies-color-flow-method-main-color

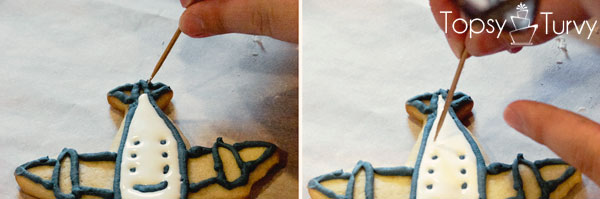
Use a straight pin or toothpick to help fill in any area and pop any bubbles

airplane-cookies-color-flow-method-shake

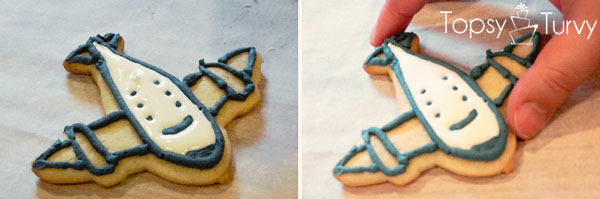
Jiggle it a bit to help it smooth itself out

airplane-cookies-color-flow-method-color

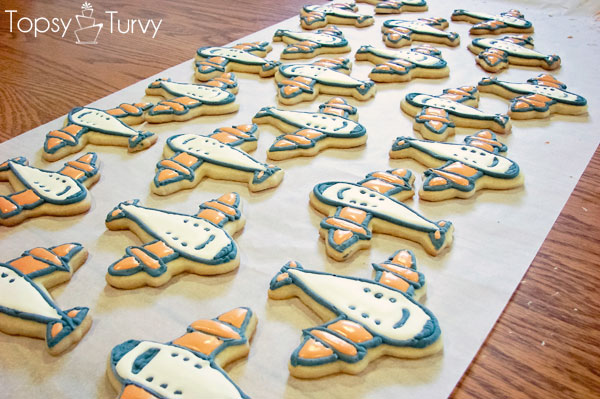
Let it dry completely between each color!  Fill in every space and your done!  Once they are completely dry you can stack them.

airplane-cookies-color-flow-method-finished

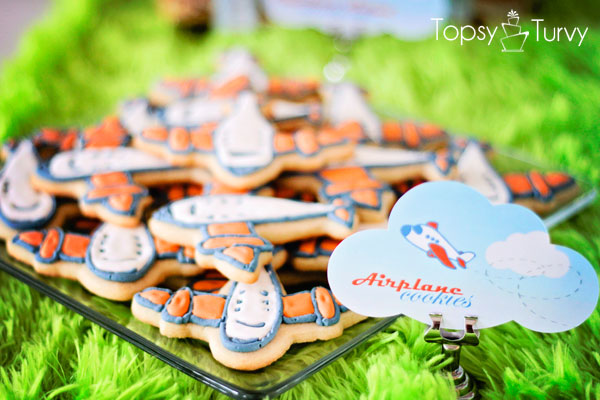
And here you can see the plane I tweaked for the labels and used as my cookie inspiration!  More on the party all week!  I can’t wait to share it with you guys.

Simple Sugar Cookie and Frosting Recipe

Sugar cookies are a traditional treat for good reason: under a practiced hand they look amazing, but good results can still be gotten by play. My favorite recipe tastes and looks amazing.
5 from 1 vote
Print Pin Rate
Prep Time: 15 minutes
Cook Time: 8 minutes
Chill time: 4 hours
Total Time: 15 minutes
Servings: 60
Calories: 151kcal
Author: Ashlee Marie
Prevent your screen from going dark

Ingredients

Cookies

  • 6 1/2 C all-purpose flour
  • 2 tsp. baking soda
  • 1 tsp. salt
  • 2 tsp. nutmeg
  • 2 tsp. baking powder
  • 1 C Butter
  • 2 C granulated sugar
  • 2 egg
  • 2 tsp. vanilla
  • 1 C full fat sour cream

Icing

  • 4 C powdered sugar
  • 1/4 C whole milk
  • 2 Tbsp butter
  • 2 Tbsp light corn syrup
  • 1 1/2 tsp vanilla
  • 1 tsp extract peppermint or almond
  • Food coloring optional
US Customary - Metric

Instructions

Cookies

  • Preheat oven to 350
  • Sift flour, soda, salt, nutmeg and powder in a bowl.
  • In separate bowl cream the butter and sugar (use cookie paddles or dough hook this will get thick)
  • Add the egg and beat again
  • then add the vanilla and sour cream and beat it smooth
  • Mix in dry ingredients and beat smooth - it will be thick.
  • wrap up in wax paper or parchment paper and chill in fridge for 3-4 hours
  • preheat oven to 350
  • roll out to 1/4 inch and cut airplane shapes
  • bake for 8-10 mins, until the edges get a slight golden color to them (don't over bake) let cool

Icing

  • Mix butter, powdered sugar, milk, vanilla and peppermint in your mixer.
  • it will be thick at first - great for spreading
  • thin with milk to get a "toothpaste" thickness good for piping - great for outlining cookies
  • thin more to create a icing you can fill in "color flow' style for a smooth finish. The perfect thinness is when stop stirring the icing and count to 10 it gets smooth.

Assembly

  • divide the frosting during the thicker stage - dye some blue, orange and leave some white - you can thin the white and orange
  • use the thick blue to pipe all the outlines and windows of the planes
  • fill in with the white and orange and let crust over and dry!

Nutrition

Calories: 151kcal | Carbohydrates: 26g | Protein: 2g | Fat: 5g | Saturated Fat: 3g | Cholesterol: 17mg | Sodium: 114mg | Potassium: 41mg | Fiber: 1g | Sugar: 15g | Vitamin A: 140IU | Vitamin C: 1mg | Calcium: 17mg | Iron: 1mg
Did you make this recipe?Mention @ashleemariecakes or tag #makesomeawesome and I'll share your image in my Instagram stories!
[riview showtitle=always id=64 name=parties tags=airplane size=150x150 lightbox=0]

Related Posts:

  • Airplane Baby Shower
    Airplane Baby Shower
  • Gender reveal party printable pack and 15 more baby showers in one
    Gender reveal party printable pack and 15 more baby showers…
  • Bumble Bee Sugar Cookies
    Bumble Bee Sugar Cookies

JOIN MY NEWSLETTER!

Become an insider and receive this FREE Maple Icing Recipe (not seen on the blog!)

You have Successfully Subscribed!

Privacy Policy: We hate spam and promise to keep your email address safe. You'll receive email updates through AshleeMarie.com. You can unsubscribe at anytime.

  • Facebook
  • Twitter
  • Yummly
ashlee marie

About Ashlee

With the right tips and tricks, I believe YOU can make, bake, or create anything. This is what I love to do - make some awesome, teach you how, and give you that boost of culinary confidence you need to rock your own kitchen! Read more...

youtube facebook instagram twitter pinterest email rss

Reader Interactions

Comments

    Leave a Reply Cancel reply

    Your email address will not be published. Required fields are marked *

    Recipe Rating


  1. chelsea

    April 16, 2012 at 9:36 am

    so cute!

    Reply
    • Ashlee

      April 23, 2012 at 4:03 am

      thanks, and thanks for taking pictures AGAIN for me!

  2. kayla

    April 16, 2012 at 2:57 pm

    Oh I love these so much!! My husband loves airplanes & these would be so great to have at my sons first birthday. Thank you so much for sharing this wonderful tutorial! I would love it if you would come share your wonderful talent over at Sunday Round Up http://www.kaylascreationsblog.com/2012/04/sunday-round-up-5.html Hope you have a wonderful week!
    -Kayla 🙂

    Reply
    • Ashlee

      April 23, 2012 at 4:37 am

      This version of frosting is really fun and pretty, but not quite as tasty. if you don’t have to stack them I’d use butter and milk in the frosting for taste!

Primary Sidebar

about ashlee marie
youtube facebook instagram twitter pinterest email rss

You have Successfully Subscribed!

Privacy Policy: We hate spam and promise to keep your email address safe. You'll receive email updates through AshleeMarie.com. You can unsubscribe at anytime.

Popular Posts

Homemade deep-fried monte cristo sandwich
homemade choco taco
one pot loaded baked potato soup
tamatoa cake - moana - disney
I love these candied strawberries, like a candied apple, a glorious crunch with a ripe strawberry center!

Footer

SEEN ON

as seen on
  • TV and Media
  • Privacy Policy

COPYRIGHT © 2007–2023 Ashlee Marie - Real Fun with Real Food

ashlee marie lets make some awesome
  • Recipes
    • Main Dish
    • Desserts
    • Breakfast
    • Sides
    • Bread
    • Soups & Salads
    • Drinks
    • Food Tutorials
    • Back
  • Cakes
    • Cake Recipes
    • Cake Tutorials
    • Carved Cakes
    • Wedding Cakes
    • Smash Cakes
    • Party Cakes
    • How to Video Series
    • Back
  • Parties
    • Complete Parties
    • Party Cakes
    • Party Food
    • Party Crafts & Decorations
    • Printables
    • Invitations
    • Back
  • Holidays
    • Valentines
    • St. Patricks Day
    • Easter
    • Cinco De Mayo
    • Mothers Day
    • 4th of July
    • Halloween
    • Thanksgiving
    • Christmas
    • Back
  • Travel
    • Culinary Travel – Cooking Schools
    • Family Travel
    • Disney
    • Universal Studios
    • Blogger Trips
    • Back
  • Videos
    • Recipe Videos
    • Short Videos
    • Kitchen Tip Videos
    • Video equipment links
    • Back
  • Crafts
    • How to & Craft Tutorials
    • Crochet & Knit Patterns
    • Decorations
    • Photoshop
    • Sewing Projects
    • Back
  • Shop
    • Video equipment links
    • Baking and Kitchen equipment
    • Back