• Skip to primary navigation
  • Skip to main content
  • Skip to primary sidebar
  • Skip to footer

Ashlee Marie - real fun with real food

  • Recipes
    • Main Dish
    • Desserts
    • Breakfast
    • Sides
    • Bread
    • Soups & Salads
    • Drinks
    • Food Tutorials
  • Cakes
    • Cake Recipes
    • Cake Tutorials
    • Carved Cakes
    • Wedding Cakes
    • Smash Cakes
    • Party Cakes
    • How to Video Series
  • Parties
    • Complete Parties
    • Party Cakes
    • Party Food
    • Party Crafts & Decorations
    • Printables
    • Invitations
  • Holidays
    • Valentines
    • St. Patricks Day
    • Easter
    • Cinco De Mayo
    • Mothers Day
    • 4th of July
    • Halloween
    • Thanksgiving
    • Christmas
  • Travel
    • Culinary Travel – Cooking Schools
    • Family Travel
    • Disney
    • Universal Studios
    • Blogger Trips
  • Videos
    • Recipe Videos
    • Short Videos
    • Kitchen Tip Videos
    • Video equipment links
  • Crafts
    • How to & Craft Tutorials
    • Crochet & Knit Patterns
    • Decorations
    • Photoshop
    • Sewing Projects
  • Shop
    • Video equipment links
    • Baking and Kitchen equipment
Home » How to & Crafts » How To & Craft Tutorial

How to change out your door knobs

Published: January 28, 2013 | Updated: November 12, 2019 | By Ashlee

  • Facebook
  • Twitter
  • Yummly

Don’t forget to come link up your door projects, bedroom door, front doors, door decor, closet door, cabinet door???

I had grand plans to PAINT my “front” door (since we’re in a basement our “front” door leads to the back yard…) but the weather has been so so SO cold here in UT (negative digits for weeks, then freak freezing rain) it just didn’t work out.

change-your-own-door-knob

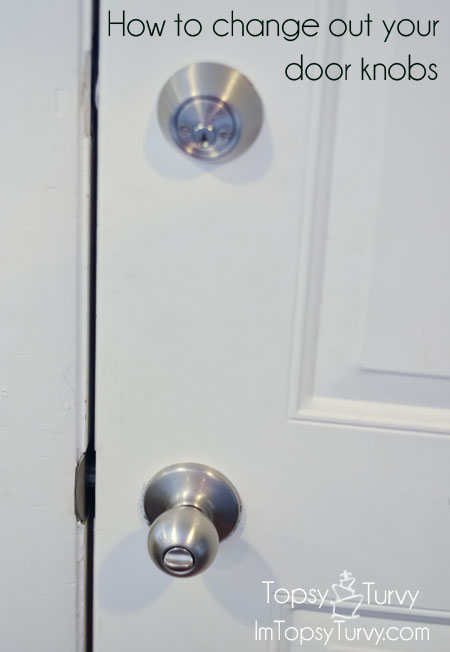
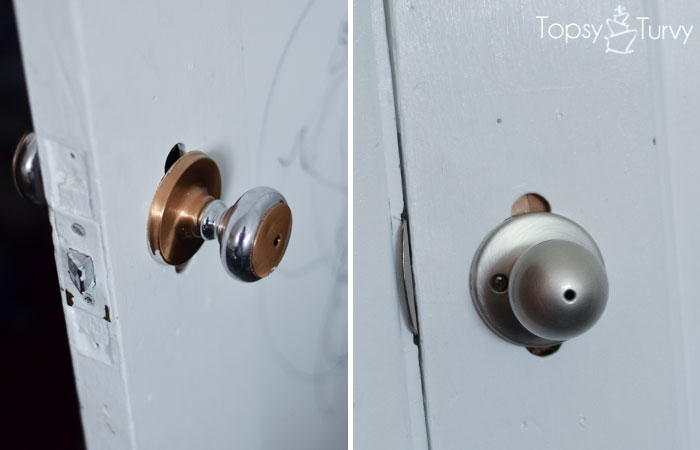
But the knob on our “front” door lost one screw and the other one was constantly loose and we often couldn’t even get it opened. That during the remodel we replaced most of the doors and most of the hardware to brushed steel. The brass had to go!

change-your-own-door-knobs-before-after

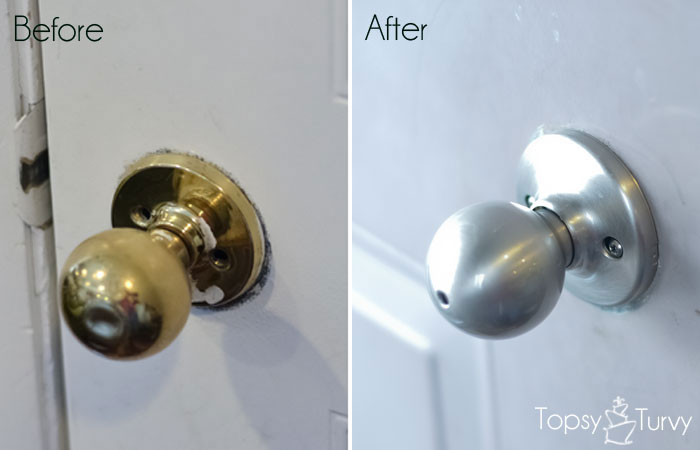
Now you can always PAINT your knobs, but these were dented, scratched and with the missing screws practically useless. So I decided to replace it! And I thought I’d show you how!

change-your-own-door-knob-old

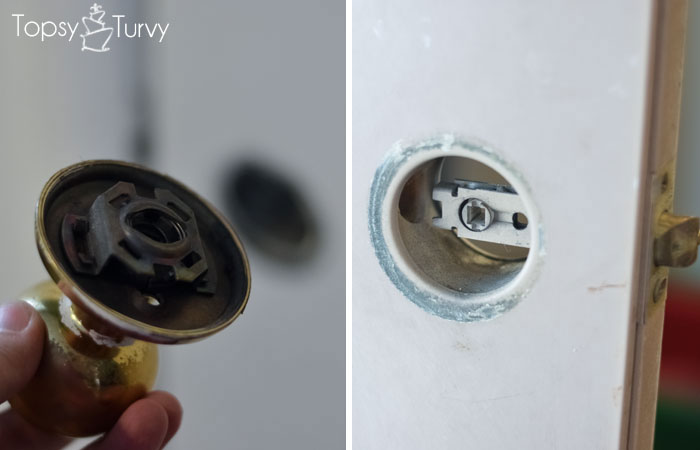
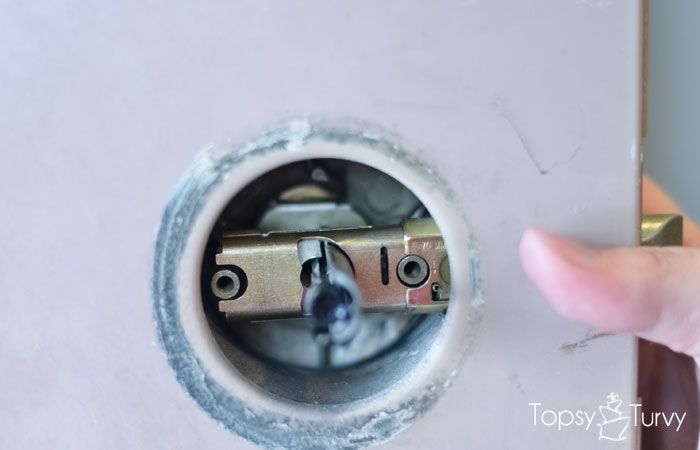
First unscrew and take off the first knob (make sure you open the door first so your not stuck inside) then take the knob off the other side!  You’ll see the inner workings of your deadlatch.

change-your-own-door-knob-screws

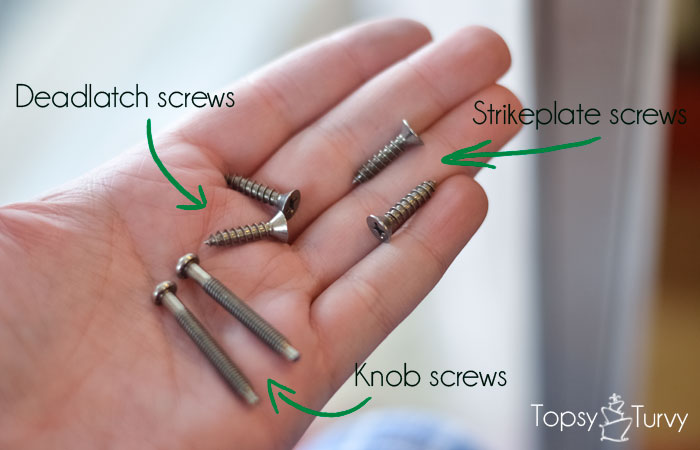
Make sure you keep track of the screws you get with your kit, there will be 6, 2 for each item, the strikeplate, deadlatch and knobs (the knobs are the long ones, pretty easy!

change-your-strike-plate

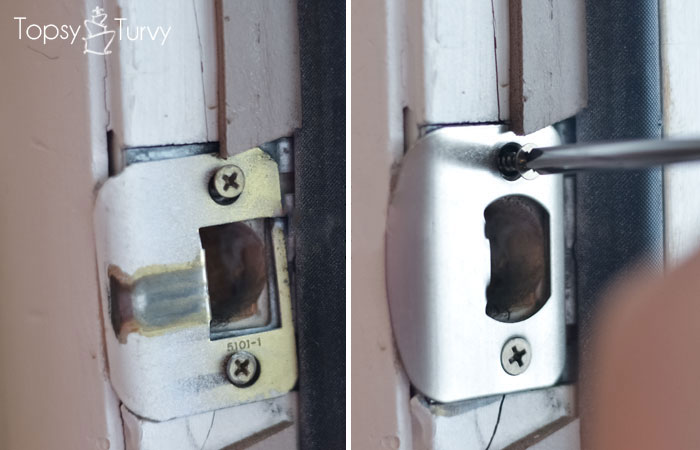
The strikeplate is called that because the deadlatch STRIKES the plate when it closes!  pretty smart huh?  You can leave on the old strikeplate if it’s in good shape.  My old one had paint on it, was super ugly so it had to go!

change-your-deadlatch-old

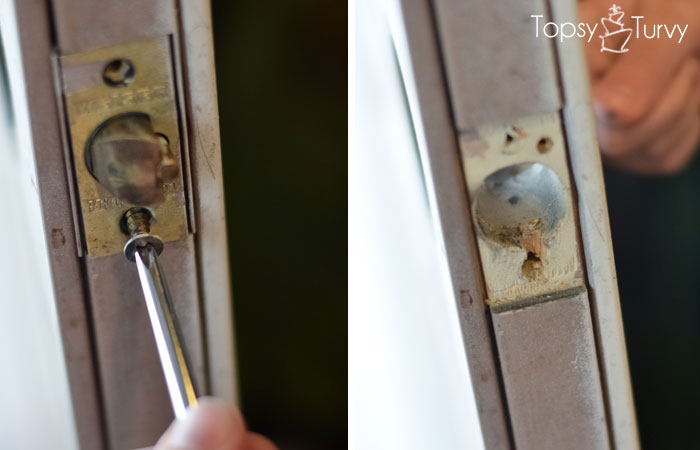
Now for the deadlatch.  This is the trickiest part of the whole assembly.  Unscrew and pull out!  Okay, THIS part wasn’t hard, but the deadlatch itself)

change-your-deadlatch-length

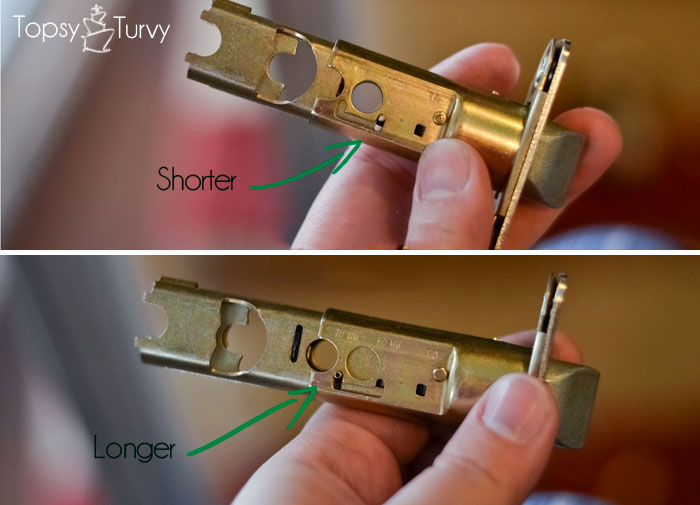
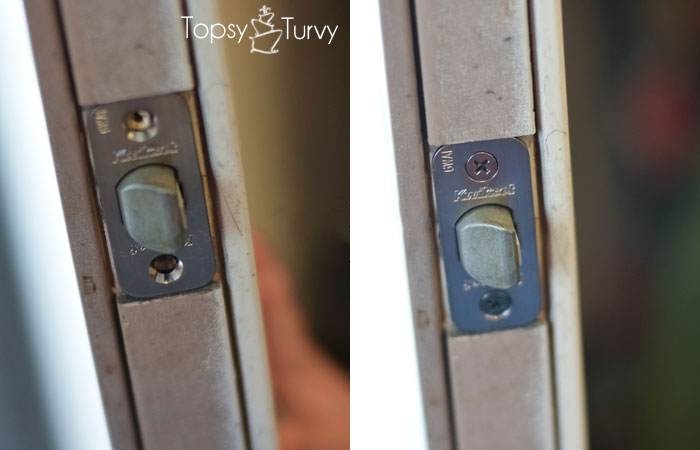
First, is your knob hole further from the door edge or closer.  It’s an easy switch from one to the other.  Pull down, slide over, let it pop into place!

change-your-deadlatch-round

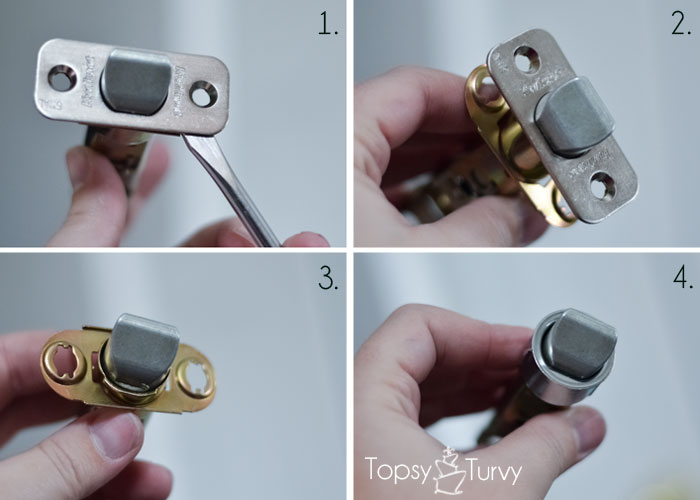
Depending on what your deadlatch was before you might have to switch out the plate.  It’s also an easy fix.  1. slide the flathead between the plates, twist and they’ll separate (you might have to do it on both sides.  2. see, they just pop apart! 3. slide both plates off and 4. slide the round piece into place.

change-your-own-deadlatch-direction

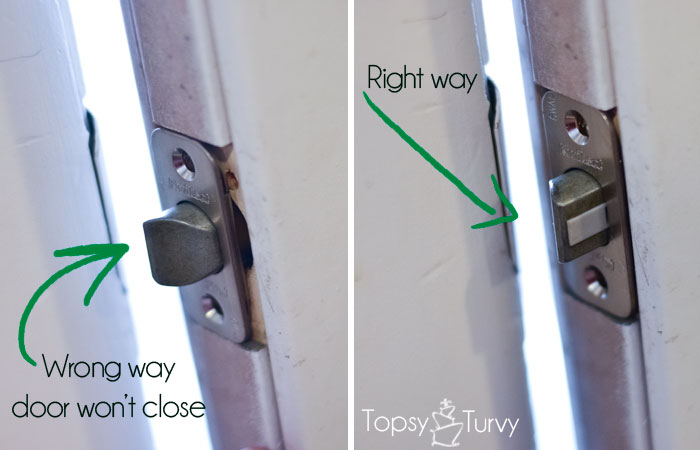
Slide it into place!  Make sure you face it the right way, or the door wont close, this seems obvious, but worth mentioning!

change-your-deadlatch-new

AND screw it into place, nice and tight!

change-your-own-door-knobs-locks

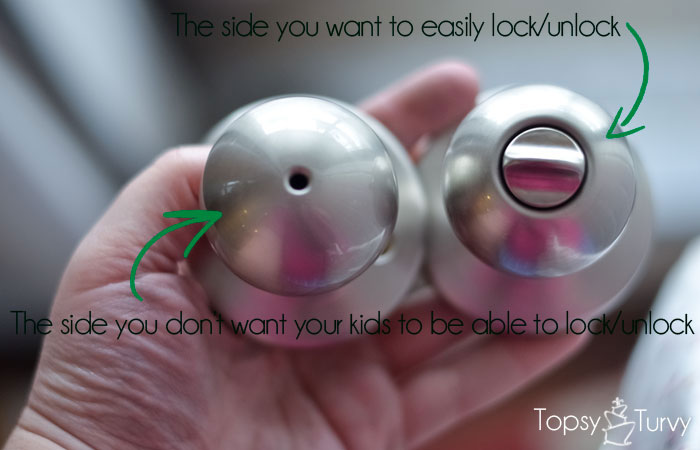
Depending on what door your doing you might have a lock, or not, or key hole, etc… this is where you make sure that each knob is on the side you want it on.  if you want to lock your kid out of your room, or into there’s (not suggested use of the locks btw, but sometimes…. tempting!)

change-your-own-door-knobs-inserting-spindle-opening

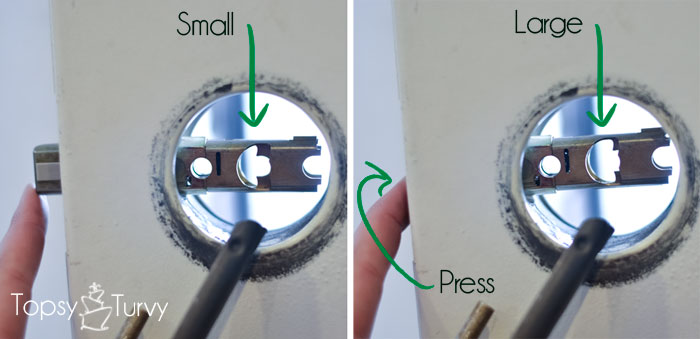
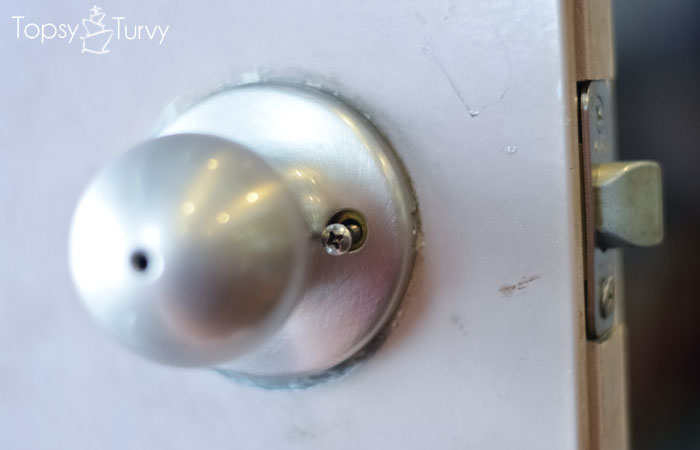
to get the spindle of the knob to easily fit through the hole you need to press on the latch and the hole will open wider and you can slide the spindle in.

change-your-own-door-knobs-spindle

This is what it looks like on the other side!

change-your-own-door-knobs-screw-on

Line up the holds and screw in just enough to make sure you caught them both.  you don’t want to screw one side in far and not be able to find the other hole blindly.

change-your-own-door-knob-finished

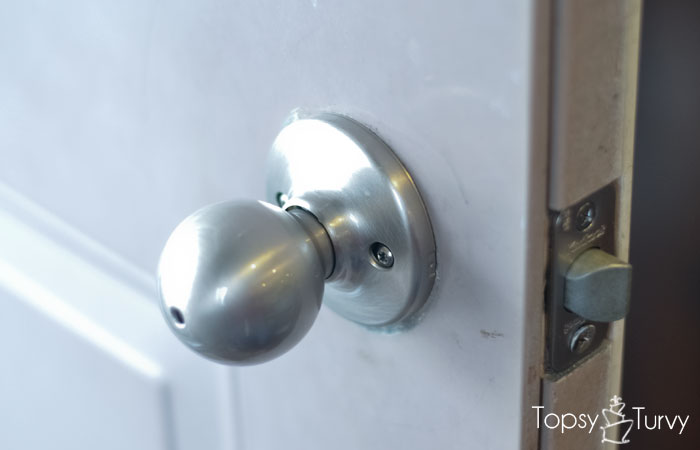
Once they are both caught tighten the screws and your finished!!!

change-your-own-door-knobs-french-closet

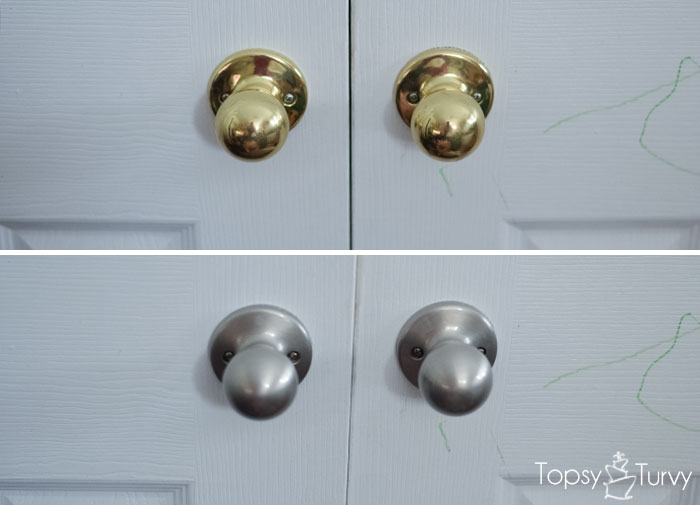
I also replaced my french closet door knobs…

change-your-own-door-knob-vintage

And the vintage door knob to our itty bitty bedroom!  This more vintage knob is actually really really fun, but it didn’t match the rest of the knobs or style at all.  I think I’m going to keep it, how awesome would it be to find more of them for my next house???

Related Posts:

  • Living room Board and Batten
    Living room Board and Batten
  • Antique window turned into a table!
    Antique window turned into a table!
  • Full Sized Candy Land Yard Game
    Full Sized Candy Land Yard Game

JOIN MY NEWSLETTER!

Become an insider and receive this FREE Maple Icing Recipe (not seen on the blog!)

You have Successfully Subscribed!

Privacy Policy: We hate spam and promise to keep your email address safe. You'll receive email updates through AshleeMarie.com. You can unsubscribe at anytime.

  • Facebook
  • Twitter
  • Yummly
ashlee marie

About Ashlee

With the right tips and tricks, I believe YOU can make, bake, or create anything. This is what I love to do - make some awesome, teach you how, and give you that boost of culinary confidence you need to rock your own kitchen! Read more...

youtube facebook instagram twitter pinterest email rss

Reader Interactions

Comments

    Leave a Reply Cancel reply

    Your email address will not be published. Required fields are marked *

    Recipe Rating


  1. Jonie @ Just Between Friends

    January 28, 2013 at 8:38 am

    Very clear tutorial. I like it! If I ever need to change out my doorknobs, I know right where to go.
    p.s. I love the emerald green arrows 🙂

    Reply
    • Ashlee

      February 18, 2013 at 8:46 pm

      thanks Jonie! I figured I’d stick with our color!

  2. chelsea

    January 28, 2013 at 10:08 am

    im glad you didn’t paint them. people were doing that a few years ago and now I see people everywhere showing how that didn’t end up working out the long run. not all things should be crafted.

    Reply
    • Ashlee

      February 18, 2013 at 8:47 pm

      agreed, I would rather do it right the first time, than create more work down the road for myself

  3. Amy

    January 28, 2013 at 1:18 pm

    Love the new knobs. I think we’re going to have to do this with our front door. 🙁 Silly builder grade hardware. Now I won’t have to wait for the hubby to do it. 🙂
    xoxo

    Reply
    • Ashlee

      February 18, 2013 at 8:48 pm

      I love doing things myself, my husband is pretty much useless though!

  4. Steph @ Crafting in the Rain

    January 28, 2013 at 2:29 pm

    Little things can make such a difference…great instructions!

    Reply
    • Ashlee

      February 18, 2013 at 8:48 pm

      I agree, I am so happy with my matching hardware!

  5. Whitney Ulrich @ A mommy's life with a touch of yellow

    January 28, 2013 at 3:08 pm

    I love this especially for when we buy our first home it will be nice to change things even as simple as a door knob to be able to love where you are living. Thank you I am pinning this for the future for sure.

    Reply
    • Ashlee

      February 18, 2013 at 8:50 pm

      esp if you can get a discount on bulk hardware!

  6. JT

    January 16, 2014 at 5:26 am

    Hi, please can you tell me the brand of door handle you have used? They are lovely!

    Reply
    • Ashlee

      February 6, 2014 at 1:14 am

      it was just the cheapest brushed steel/chrome at home depot. I didn’t keep any packaging or take any pictures of it… But they have a GREAT selection every time I go in!

Primary Sidebar

about ashlee marie
youtube facebook instagram twitter pinterest email rss

You have Successfully Subscribed!

Privacy Policy: We hate spam and promise to keep your email address safe. You'll receive email updates through AshleeMarie.com. You can unsubscribe at anytime.

Popular Posts

Homemade deep-fried monte cristo sandwich
homemade choco taco
one pot loaded baked potato soup
tamatoa cake - moana - disney
I love these candied strawberries, like a candied apple, a glorious crunch with a ripe strawberry center!

Footer

SEEN ON

as seen on
  • TV and Media
  • Privacy Policy

COPYRIGHT © 2007–2023 Ashlee Marie - Real Fun with Real Food

ashlee marie lets make some awesome
  • Recipes
    • Main Dish
    • Desserts
    • Breakfast
    • Sides
    • Bread
    • Soups & Salads
    • Drinks
    • Food Tutorials
    • Back
  • Cakes
    • Cake Recipes
    • Cake Tutorials
    • Carved Cakes
    • Wedding Cakes
    • Smash Cakes
    • Party Cakes
    • How to Video Series
    • Back
  • Parties
    • Complete Parties
    • Party Cakes
    • Party Food
    • Party Crafts & Decorations
    • Printables
    • Invitations
    • Back
  • Holidays
    • Valentines
    • St. Patricks Day
    • Easter
    • Cinco De Mayo
    • Mothers Day
    • 4th of July
    • Halloween
    • Thanksgiving
    • Christmas
    • Back
  • Travel
    • Culinary Travel – Cooking Schools
    • Family Travel
    • Disney
    • Universal Studios
    • Blogger Trips
    • Back
  • Videos
    • Recipe Videos
    • Short Videos
    • Kitchen Tip Videos
    • Video equipment links
    • Back
  • Crafts
    • How to & Craft Tutorials
    • Crochet & Knit Patterns
    • Decorations
    • Photoshop
    • Sewing Projects
    • Back
  • Shop
    • Video equipment links
    • Baking and Kitchen equipment
    • Back