I had this picture in my mind of Indiana Jones Satchels for the party. As part of the games, and also for favors. I didn’t have a pattern, So I made one up as I went. I did change the way I sewed the outer edges. Rather than show you all of them I’m going to show you my favorite. The one I think turned out the best, although not the easiest. SOOO Start with Canvas… I got a 4×15 canvas drop cloth.
I’m working with the 4 foot end of things. I folded it into fourths and cut off the ends, just to even things up, and get rid of the thick folded ends. THEN I cut a strip for the handle, 2 1/2 inches wide. So this strip is 2 1/2 inches by 4 feet.
Then I cut what will be the body of the purse. I cut 7 inches thick. So this piece is 7 inches by 4 feet. Well I didn’t need 4 feet so I cut it in half. The great thing is I can make two purses out of this. So each body piece is 7 inches by 2 feet.
Next I took both of the 7 inch ends and folded them up to sew them. So I’m going to sew across these tops. You can use any stitch you want, I used a denim twin needle because I love the way it looks. I used a canvas colored thread, but for this tutorial I’m using denim thread so you can see it.
The next thing I did was find the bottom of my bag. So I folded the body into how I wanted it to look, not quite thirds, but close to it. See that large bubble on the right side of the picture? That’s going to be the bottom.
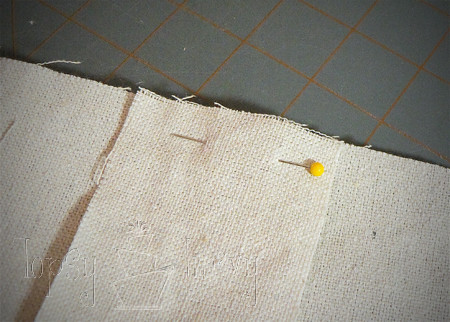
Pin the end of the handle to the bag. For this part you want the right sides touching. Pin it in place on both sides.
Here it is pined. Now you have two options, the more correct way or the faster way. The more correct way would be to sew a line where I pinned it, also if your not going to use a twin needle you’ll want to surge it if you can. Personally I just pinned it there.
Now weather you sew it, or just pin it fold it over. We’re going to sew this fold down now.
Like this! Do this on both sides. Now your bottom is done! You’ll be sewing 3 layers together so if you choose not to use a denim twin needle you’ll still need to use a nice thick, strong needle. Easy peasy, right?
The sides are a bit more tricky. We’re working with the side and the front now. Fold the RIGHT sides together again. Here you can choose to sew or just pin along the line I created.
Then fold it back over. We’re going to sew along the side/handle sewing the edges into it. You should be sewing 3 layers, if not you folded something wrong. Pin the other front side as well.
Now we’re going to sew! Start at one bottom, and we’re going to work our way around to the other bottom.
Here you can see what it looks like underneath. As the pin’s get close to the foot I pull them out. You can see the three layers here…
So start on the front
Work your way along the handle…
And work your way along the other side of the front.
Here you can see the entire front done.
Now there’s a trick to the other side. You don’t want to sew the entire back into the sides or you’ll loss the top/front flap! So first you want to mark where the back will become the top/flap. See, the pin is marking the top of the front, Then I pined the side and the back together and marked the back.
I folded in the sides from the pins to the end. then sewed them with my twin needles. Now the top/flap is finished! You can see where the top becomes the back and how the edges go back out? That get’s pinned then sewed into the side.
So just like we did with the font pin the RIGHT sides of the back and side together (or sew a line). Fold it back over to the front. Pin (sew) both sides. Now started at one of the bottoms work your way around, up the sides, over the handle, down the other side and to the other bottom.
Here you can see where the first side branches away from the back/top mark.
And here coming back from the handle and adding the back into the side. Voila! Finished bag!!! Now to make 12 of them for the party!
Other Lego Crafts
[riview showtitle=always id=46 name=diy-crafts tags=lego size=150x150 lightbox=0]


Faith
I am struggling
I bought the material and have been working on trying to make theses satchels for my sons party next weekend. I am ok at sewing but can’t quite follow your instructions like I thought I could. Can you please help me break it down a little more??i am struggling with what pieces you are sewing together and what your not
Please any help
Ashlee
it’s just 2 pieces, the thin one is the sides and handles, while the thick piece is the front, bottom, back and the flap. You can put them together in any way you want. I am in NO way a frequent sewer, I just throw things together and play with it until I’m happy with it. I’m so sorry I’m not more help, I made these 2 1/2 years ago and don’t really remember any more than the pictures show.