• Skip to primary navigation
  • Skip to main content
  • Skip to primary sidebar
  • Skip to footer

Ashlee Marie - real fun with real food

  • Recipes
    • Main Dish
    • Desserts
    • Breakfast
    • Sides
    • Bread
    • Soups & Salads
    • Drinks
    • Food Tutorials
  • Cakes
    • Cake Recipes
    • Cake Tutorials
    • Carved Cakes
    • Wedding Cakes
    • Smash Cakes
    • Party Cakes
    • How to Video Series
  • Parties
    • Complete Parties
    • Party Cakes
    • Party Food
    • Party Crafts & Decorations
    • Printables
    • Invitations
  • Holidays
    • Valentines
    • St. Patricks Day
    • Easter
    • Cinco De Mayo
    • Mothers Day
    • 4th of July
    • Halloween
    • Thanksgiving
    • Christmas
  • Travel
    • Culinary Travel – Cooking Schools
    • Family Travel
    • Disney
    • Universal Studios
    • Blogger Trips
  • Videos
    • Recipe Videos
    • Short Videos
    • Kitchen Tip Videos
    • Video equipment links
  • Crafts
    • How to & Craft Tutorials
    • Crochet & Knit Patterns
    • Decorations
    • Furniture
    • Photoshop
    • Remodel
    • Sewing Projects
  • Shop
    • Video equipment links
    • Baking and Kitchen equipment
  • Navigation Menu: Social Icons

Home » How to & Crafts » How To & Craft Tutorial » Braided & Beaded Bracelet

Braided & Beaded Bracelet

By Missy 2 Comments

  • Facebook
  • Twitter
  • Yummly

How’s that for some awesome alliteration?

Hey there!  I’m Missy from Missy Dear and I’m so excited to be the craft contributor here at I’m Topsy Turvy!  I’ve long admired Ashlee and I’ve had such fun getting to know the other ladies a little over the last week or so.

Braided & Beaded Bracelet

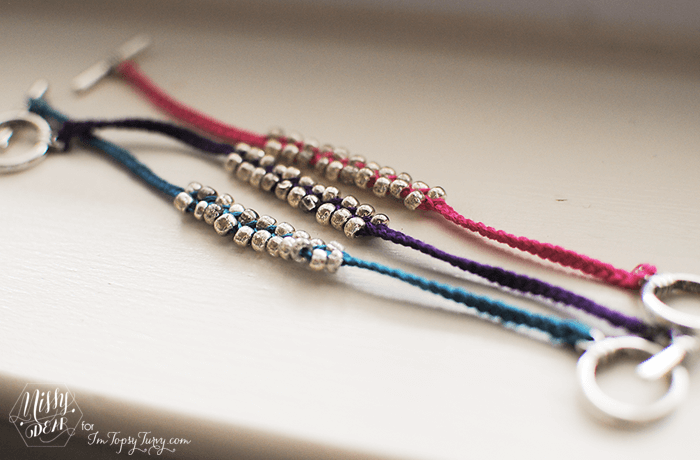
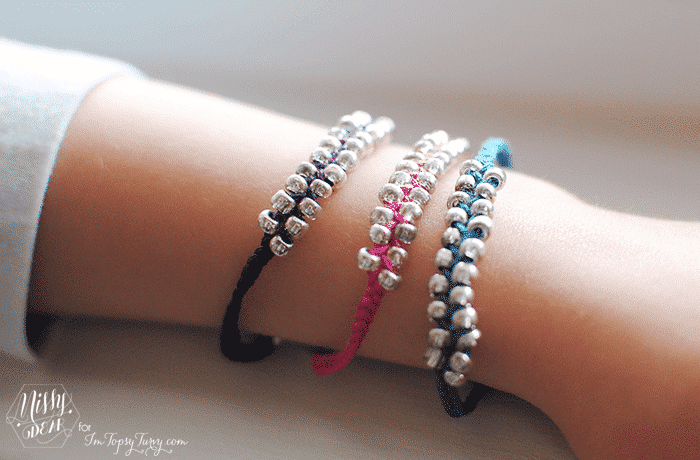
We’ve been having some crazy weather here in North Carolina the past few weeks.  It’s resulted in 8 snow days since January 1st which means there’s a lot of time that I need to fill with projects for my daughter and niece.  They love to dress up and get “all fancy” so I decided that maybe an easy jewelry project was in order.  And this simple Braided & Beaded Bracelet was just the thing.

This project was perfect for my 11 year old niece, but 5 year old Abi had a much better time watching.  It’s pretty simple as long as you can do a little basic braiding.

Bead & Braid

For supplies you will need:

Bracelet Findings – I used the circle and post kind.
Thread – I used embroidery floss since I had it on hand, but I would suggest something sturdier, like waxed thread. It would make the beading much easier.
Beads – I used some silver glass seed beads.

Now for the fun part.

First let me apologize for the pictures if they’re not very clear on what I’m doing.  One thing I realized while doing this project is that trying to take pictures of a project that really works best while using two hands can be a little tricky.  I’m not sure why I didn’t think to just take pictures of my niece doing it.  I blame in on my prego brain.

beaded-braided-bracelet

1 – Thread whatever you decided to use as the string onto the finding.  I found that instead of tying it on, threading it through and doubling it over was the better option.  That way you don’t have a bulky knot, and it makes the bracelet a little thicker.  And here’s a tip: taping it to the table top helps A TON! Braid about a third of the finished length of the bracelet.  In my case I was making a 6 inch bracelet for Abi.  So, this first braided section was 2 inches long.

bead-braid-bracelet

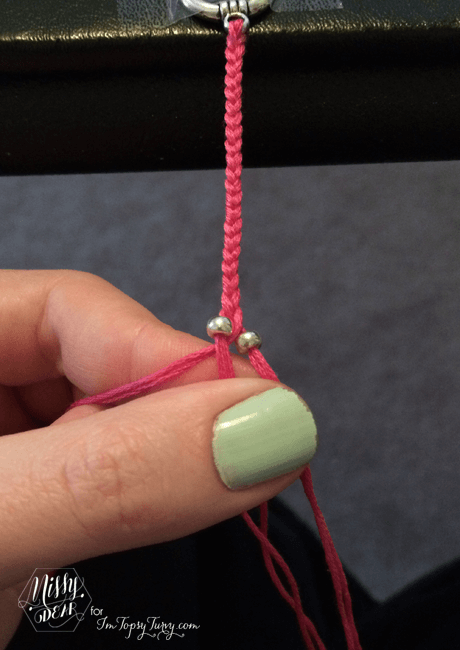
2 – Once you’ve reached the desired length add a bead to the outside thread that will next be going to the middle.  When you cross it over to the middle, make sure that the thread coming over to take it’s place stays under the bead to hold it up.  If it slips to the top of the bead then the braid will just get longer and the bead will get pushed down the bracelet. Does that make sense?

bracelet-bead-braids

3 – Just keep braiding like normal, only adding a bead to the outside threads after every cross over.  In this picture you can see a little more clearly what I mean by keeping the middle thread under the bead when you cross it over. Another tip: Try to keep your finger behind the beads at all times.  I moved them for the sake of the pictures but it will save you so much frustration if you always have the beads held.  If you don’t the bracelet starts to spin and the beads start kind of moving around.  No bueno.

braided-bead-bracelet

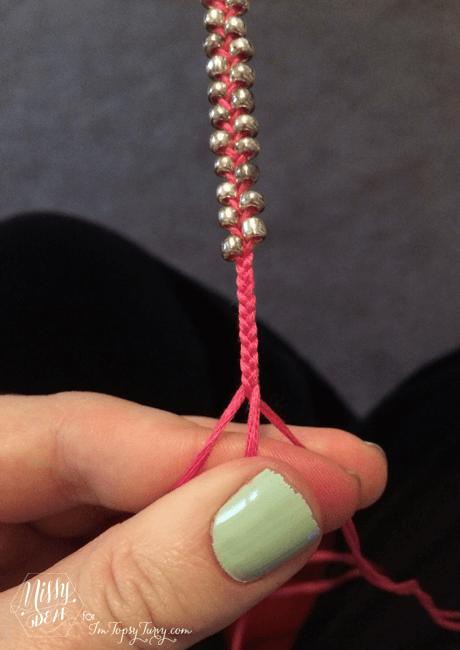
4 – Continue the beaded braid until you’ve done another third of the length (in my case, another 2 inches).  Once you reach that length just finish out the bracelet with a normal braid like in the beginning.

beaded-braid-bracelet

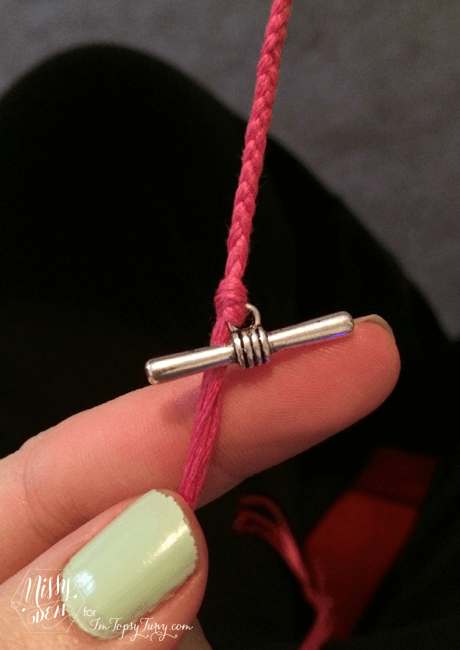
5 – Then just tie it onto the post.  To keep it a little more secure from coming undone I dabbed a little bit of hot glue around the knot.  I’ve never done that before but it sounded like a good idea so I thought I’d give it a try.  I’ll let you know how it works out.

Beaded Braid

And there you have it!  Have you ever tried your hand at a fun DIY jewelry project?  How did it turn out?

Follow along on my blog or social media and make sure you tag me if you make yourself one of these great bracelets!  I’d love to see it!!

 photo sot.png  photo sop.png photo soi.png  photo sof.png photo sot.png

  • Author
  • Recent Posts
Missy
Full Time Mom + Free Time Blogger + Handmade Maker.

Missy has been blogging since 2009; first as the creator and host of So You Think You're Crafty, the first "reality" blog, before leaving in 2013 to spend more time with her family and her new blogging adventure, Missy Dear.She also runs a handmade shop selling 100% wool felt hair accessories and loves it.Missy loves to do anything creative using almost any medium from food to paper to fabric to digital.
Latest posts by Missy (see all)
  • Paper Mache Jewelry Tray Tutorial - April 10, 2014
  • Braided & Beaded Bracelet - March 12, 2014

More From Ashlee Marie!

JOIN MY NEWSLETTER!

Become an insider and receive this FREE Maple Icing Recipe (not seen on the blog!)

You have Successfully Subscribed!

Privacy Policy: We hate spam and promise to keep your email address safe. You'll receive email updates through AshleeMarie.com. You can unsubscribe at anytime.

  • Facebook
  • Twitter
  • Yummly

Filed Under: How To & Craft Tutorial, How to & Crafts

Previous Post: « Comfort Weighted Blankets
Next Post: Chocolate Oatmeal Bars »

Reader Interactions

Comments

  1. Cher @ Designs by Studio C

    March 12, 2014 at 12:02 pm

    So cute and such an easy project! Thanks for sharing!!

    Reply
  2. Melissa

    March 12, 2014 at 1:58 pm

    Wow, these are so cute! And I love how you the possibilities are endless. Thanks for sharing!

    Reply

Leave a Reply Cancel reply

Your email address will not be published. Required fields are marked *

Recipe Rating


This site uses Akismet to reduce spam. Learn how your comment data is processed.

Primary Sidebar

about Ashlee Marie image
youtube facebook instagram twitter pinterest email rss

You have Successfully Subscribed!

Privacy Policy: We hate spam and promise to keep your email address safe. You'll receive email updates through AshleeMarie.com. You can unsubscribe at anytime.

Popular Posts

Homemade deep-fried monte cristo sandwich
homemade choco taco
one pot loaded baked potato soup
tamatoa cake - moana - disney
I love these candied strawberries, like a candied apple, a glorious crunch with a ripe strawberry center!

Footer

SEEN ON

as seen on
  • TV and Media
  • Privacy Policy

COPYRIGHT © 2007–2022 Ashlee Marie - Real Fun with Real Food

ashlee marie lets make some awesome
  • Recipes
    • Main Dish
    • Desserts
    • Breakfast
    • Sides
    • Bread
    • Soups & Salads
    • Drinks
    • Food Tutorials
    • Back
  • Cakes
    • Cake Recipes
    • Cake Tutorials
    • Carved Cakes
    • Wedding Cakes
    • Smash Cakes
    • Party Cakes
    • How to Video Series
    • Back
  • Parties
    • Complete Parties
    • Party Cakes
    • Party Food
    • Party Crafts & Decorations
    • Printables
    • Invitations
    • Back
  • Holidays
    • Valentines
    • St. Patricks Day
    • Easter
    • Cinco De Mayo
    • Mothers Day
    • 4th of July
    • Halloween
    • Thanksgiving
    • Christmas
    • Back
  • Travel
    • Culinary Travel – Cooking Schools
    • Family Travel
    • Disney
    • Universal Studios
    • Blogger Trips
    • Back
  • Videos
    • Recipe Videos
    • Short Videos
    • Kitchen Tip Videos
    • Video equipment links
    • Back
  • Crafts
    • How to & Craft Tutorials
    • Crochet & Knit Patterns
    • Decorations
    • Furniture
    • Photoshop
    • Remodel
    • Sewing Projects
    • Back
  • Shop
    • Video equipment links
    • Baking and Kitchen equipment
    • Back